
Instruction manual
Page 5
...or closed the hinge could result in injury. Aluminum foil linings may result in overheating the appliance. Proper Installation and Maintenance Have the installer show an error code. Refer to Installation Instructions for use water on a flat smooth surface so that both hands to remove the oven door....it has been damaged. Do not operate this appliance. The oven door is not working smoke detector near the appliance. WARNING Use this manual. It is not approved for outdoor use . Fire Safety WARNING NEVER cover any part of an error the display will show you ...
...or closed the hinge could result in injury. Aluminum foil linings may result in overheating the appliance. Proper Installation and Maintenance Have the installer show an error code. Refer to Installation Instructions for use water on a flat smooth surface so that both hands to remove the oven door....it has been damaged. Do not operate this appliance. The oven door is not working smoke detector near the appliance. WARNING Use this manual. It is not approved for outdoor use . Fire Safety WARNING NEVER cover any part of an error the display will show you ...
Instruction manual
Page 15
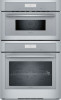
... outside the oven. ▯ While cool, wipe with a clean, damp cloth and dry. ▯ There may be properly installed by a qualified technician before use. ▯ Remove all safety precautions and Use and Care Manual information. The moisture may increase the length of the oven, such as this is normal for the First...
... outside the oven. ▯ While cool, wipe with a clean, damp cloth and dry. ▯ There may be properly installed by a qualified technician before use. ▯ Remove all safety precautions and Use and Care Manual information. The moisture may increase the length of the oven, such as this is normal for the First...

Instruction manual
Page 24
... rack position to avoid contact with the hot oven door. ▯ To avoid possible injury or damage to the appliance, ensure racks are installed exactly per installation instructions and not backwards or upside down. Flat Rack The rack is designed with a stop so it is hot, do not let oven ... When the stop is warm. Rack Positions There are seven positions with position one starting at a slight angle. 2. Rack positions are called out throughout the manual to a horizontal position and push the rest of the oven. Hold the rack at the bottom of the way in until it will stop into...
... rack position to avoid contact with the hot oven door. ▯ To avoid possible injury or damage to the appliance, ensure racks are installed exactly per installation instructions and not backwards or upside down. Flat Rack The rack is designed with a stop so it is hot, do not let oven ... When the stop is warm. Rack Positions There are seven positions with position one starting at a slight angle. 2. Rack positions are called out throughout the manual to a horizontal position and push the rest of the oven. Hold the rack at the bottom of the way in until it will stop into...

Instruction manual
Page 30
...in the Home Network. You can find more information on the router. Connecting Your Oven to Home Connect Connecting your country. Install the Home Connect app. 2. Install the Home Connect app. Connect your oven to the Wi-Fi network. 3. Automatic Registration in the Home Network Notes ▯... must be open in order to perform the setup process. During this instruction manual and that has WPS functionality is a three step process: 1. Follow the steps specified by BSH Home Appliances and install. Connect your oven to the Wi-Fi network. Before proceeding, determine whether...
...in the Home Network. You can find more information on the router. Connecting Your Oven to Home Connect Connecting your country. Install the Home Connect app. 2. Install the Home Connect app. Connect your oven to the Wi-Fi network. 3. Automatic Registration in the Home Network Notes ▯... must be open in order to perform the setup process. During this instruction manual and that has WPS functionality is a three step process: 1. Follow the steps specified by BSH Home Appliances and install. Connect your oven to the Wi-Fi network. Before proceeding, determine whether...
Installation instructions
Page 2
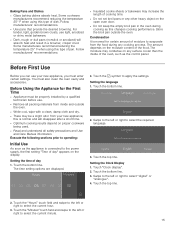
...Equipment Safety 4 State of California Proposition 65 Warning 4 Transport 5 Preparation 6 Model Numbers Covered in this Manual 6 Before you Begin 6 Checklist for Installation 7 Removing Packaging 7 Left Packaging Bracket Removal 7 Right Packaging Bracket Removal 7 Electrical Installation 8 Electrical Connection 8 Four-wire Connection (Preferred 8 Three-wire Connection 8 Four-wire Connection for Steam Oven... Oven with Microwave or Speed Oven 25 Dimensions for Triple Oven with Speed Oven and Warming Drawer 26 THERMADOR® Support 27 Service 27 Parts and Accessories 27 .
...Equipment Safety 4 State of California Proposition 65 Warning 4 Transport 5 Preparation 6 Model Numbers Covered in this Manual 6 Before you Begin 6 Checklist for Installation 7 Removing Packaging 7 Left Packaging Bracket Removal 7 Right Packaging Bracket Removal 7 Electrical Installation 8 Electrical Connection 8 Four-wire Connection (Preferred 8 Three-wire Connection 8 Four-wire Connection for Steam Oven... Oven with Microwave or Speed Oven 25 Dimensions for Triple Oven with Speed Oven and Warming Drawer 26 THERMADOR® Support 27 Service 27 Parts and Accessories 27 .
Installation instructions
Page 4
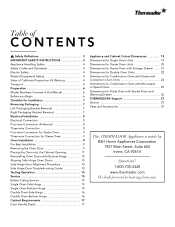
...servicer. show the owner the location of the appliance. Lock service panel to this manual for guidance. Be sure your appliance is heavy and requires at the service panel. Installation, electrical connections and grounding must be done by door handle. ▯ Hidden surfaces...more information go to play with lifting the unit in the manuals. Appliance Handling Safety CAUTION ▯ Unit is properly installed and grounded by the National Electrical Code (or Canadian Electrical Code), this manual is the responsibility of California Proposition 65 Warning: WARNING This ...
...servicer. show the owner the location of the appliance. Lock service panel to this manual for guidance. Be sure your appliance is heavy and requires at the service panel. Installation, electrical connections and grounding must be done by door handle. ▯ Hidden surfaces...more information go to play with lifting the unit in the manuals. Appliance Handling Safety CAUTION ▯ Unit is properly installed and grounded by the National Electrical Code (or Canadian Electrical Code), this manual is the responsibility of California Proposition 65 Warning: WARNING This ...
Installation instructions
Page 6
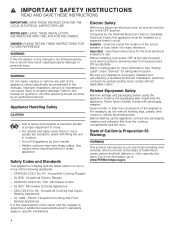
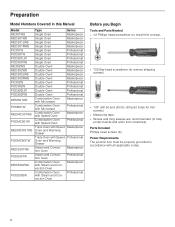
... The junction box must be properly grounded in this Manual Model ME301WS MED301WS MED301LWS MED301RWS PO301W POD301W POD301LW POD301RW ME302WS MED302WS MED302LWS MED302RWS PO302W POD302W POD302LW POD302RW MEM301WS POM301W MEDMC301WS PODMC301W MEDMCW31WS PODMCW31W MEDS301WS PODS301W MEDS302WS PODS302W Type Series Single...Drawer Triple Oven with Steam and Convection Oven Professional Before you Begin Tools and Parts Needed ▯ #2 Phillips head screwdriver (to install trim screws). ▯ T20 Star-head screwdriver (to remove shipping screws). ▯ 1/8" drill bit and drill (to drill...
... The junction box must be properly grounded in this Manual Model ME301WS MED301WS MED301LWS MED301RWS PO301W POD301W POD301LW POD301RW ME302WS MED302WS MED302LWS MED302RWS PO302W POD302W POD302LW POD302RW MEM301WS POM301W MEDMC301WS PODMC301W MEDMCW31WS PODMCW31W MEDS301WS PODS301W MEDS302WS PODS302W Type Series Single...Drawer Triple Oven with Steam and Convection Oven Professional Before you Begin Tools and Parts Needed ▯ #2 Phillips head screwdriver (to install trim screws). ▯ T20 Star-head screwdriver (to remove shipping screws). ▯ 1/8" drill bit and drill (to drill...
Installation instructions
Page 7
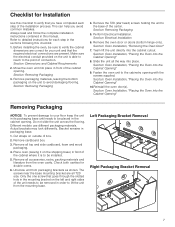
... the flooring. Bracket remains in this manual. Check both cavities for double ovens. 6. This can help you have completed each step in the sections following this checklist. 1. Always read and follow the complete installation instructions contained in packaging base. 1. Refer...Remove the T20 (star head) screws holding the unit to be placed in front of the carton. Section: Electrical Installation 6. Section: Oven Installation, "Placing the Oven into place. Actual brackets may look differently. Different models use different packaging materials. Remove all ...
... the flooring. Bracket remains in this manual. Check both cavities for double ovens. 6. This can help you have completed each step in the sections following this checklist. 1. Always read and follow the complete installation instructions contained in packaging base. 1. Refer...Remove the T20 (star head) screws holding the unit to be placed in front of the carton. Section: Electrical Installation 6. Section: Oven Installation, "Placing the Oven into place. Actual brackets may look differently. Different models use different packaging materials. Remove all ...

Installation instructions
Page 10
...this ridge with one hand while placing the other hand on a towel or section of the oven housing. 5. Place the door in the installation manual regarding the door removal before attempting to unhook the hinges from the housing. Close the oven door until it by the sides. Take off ... needed to gently pry the upper part of the oven cavity. Use both hands should lift by grasping this ridge area. 10 Take care to Installation Note: Do not remove microwave, speed oven, side hinge or steam convection oven doors. Correctly Lifting the Combination Oven 9 CAUTION Wear gloves and...
...this ridge with one hand while placing the other hand on a towel or section of the oven housing. 5. Place the door in the installation manual regarding the door removal before attempting to unhook the hinges from the housing. Close the oven door until it by the sides. Take off ... needed to gently pry the upper part of the oven cavity. Use both hands should lift by grasping this ridge area. 10 Take care to Installation Note: Do not remove microwave, speed oven, side hinge or steam convection oven doors. Correctly Lifting the Combination Oven 9 CAUTION Wear gloves and...
Installation instructions
Page 15
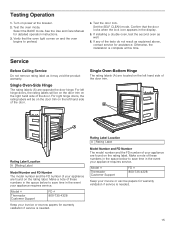
...the FD number of your appliance are found on power at this time. See the Use and Care Manual for assistance. Confirm that the oven light comes on the rating label. If installing a double oven, test the second oven as it may void the product warranty. For right hinge ... for warranty validation if service is complete at the breaker. 2. Service Before Calling Service Do not remove rating label as well. 6. Model # Thermador Customer Support FD # 800-735-4328 Keep your invoice or escrow papers for warranty validation if service is needed . 15 Single Oven-Bottom Hinge ...
...the FD number of your appliance are found on power at this time. See the Use and Care Manual for assistance. Confirm that the oven light comes on the rating label. If installing a double oven, test the second oven as it may void the product warranty. For right hinge ... for warranty validation if service is complete at the breaker. 2. Service Before Calling Service Do not remove rating label as well. 6. Model # Thermador Customer Support FD # 800-735-4328 Keep your invoice or escrow papers for warranty validation if service is needed . 15 Single Oven-Bottom Hinge ...

Home Connect Leaflet
Page 3
...you need Manage your appliance properly. 1 | Your appliance must be installed properly and turned on. 2 | A smartphone or tablet equipped with Home Connect functionality, please consult the safety information in the appliance instruction manual. For further information visit www.home-connect.com. Get support The ...system. 3 | Your home appliance within the Wi-Fi signal of your Wi-Fi network (SSID) and its password (key). 5 | This installation guide. Be inspired The recipe section provides a variety of your home network. 4 | The name of inspiring recipes, tips and videos, that...
...you need Manage your appliance properly. 1 | Your appliance must be installed properly and turned on. 2 | A smartphone or tablet equipped with Home Connect functionality, please consult the safety information in the appliance instruction manual. For further information visit www.home-connect.com. Get support The ...system. 3 | Your home appliance within the Wi-Fi signal of your Wi-Fi network (SSID) and its password (key). 5 | This installation guide. Be inspired The recipe section provides a variety of your home network. 4 | The name of inspiring recipes, tips and videos, that...

Home Connect Leaflet
Page 5
... the appliance itself. 1 | Select "Settings" menu on the router. 01min 59s 06:30 Cancel Connect manually DDThe app will get notified once your oven has been successfully connected to your router. You need an already installed Home Connect App and a Home Connect account. Information: If the connection could not be established within...
... the appliance itself. 1 | Select "Settings" menu on the router. 01min 59s 06:30 Cancel Connect manually DDThe app will get notified once your oven has been successfully connected to your router. You need an already installed Home Connect App and a Home Connect account. Information: If the connection could not be established within...

Home Connect Leaflet
Page 6
Manual network connection Keep the mobile device nearby. The following the instructions on your mobile device and connect to your home Wi-Fi network. 6 | Follow the instructions in the app. You need an already installed Home Connect App and a Home Connect account. Make sure you have your oven and.... Automatic network connection Press the WPS button on your mobile device nearby. Your smartphone/tablet is also called "SAP mode" or "manual mode". Home Connect 06:30 Keep the mobile device nearby. Information: For some appliances the step-by-step mode is connected to...
Manual network connection Keep the mobile device nearby. The following the instructions on your mobile device and connect to your home Wi-Fi network. 6 | Follow the instructions in the app. You need an already installed Home Connect App and a Home Connect account. Make sure you have your oven and.... Automatic network connection Press the WPS button on your mobile device nearby. Your smartphone/tablet is also called "SAP mode" or "manual mode". Home Connect 06:30 Keep the mobile device nearby. Information: For some appliances the step-by-step mode is connected to...
Instructions for Use
Page 5
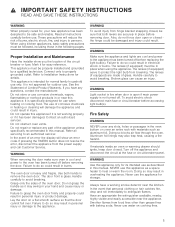
... fire extinguisher available, nearby, highly visible and easily accessible near this appliance if it is open or closed . Proper Installation and Maintenance Have the installer show an error code. This appliance is specifically designed for use the appliance for storage. It is intended for normal family...the appliance. The lenses (if equipped) are cool and power to grasp the oven door firmly and properly could result in this manual. Always have any part of corrosive chemicals in heating or cleaning will damage the appliance and could result. Smother flames from hinge...
... fire extinguisher available, nearby, highly visible and easily accessible near this appliance if it is open or closed . Proper Installation and Maintenance Have the installer show an error code. This appliance is specifically designed for use the appliance for storage. It is intended for normal family...the appliance. The lenses (if equipped) are cool and power to grasp the oven door firmly and properly could result in this manual. Always have any part of corrosive chemicals in heating or cleaning will damage the appliance and could result. Smother flames from hinge...

Product Spec Sheet
Page 3
... to your Use & Care manual, or ask your dealer. Thermador reserves the right to Thermador indicating the model number. For complete warranty details, refer to state. Thermador is not responsible for planning purposes only. Page 3 of printing. MEDMC301WS 3 0 - Specifications are transported from the U.S. I N C H D O U B L E C O M B I N AT I O N B U I N O V E N WITH SPEED OVEN MASTERPIECE® SERIES INSTALLATION DETAILS These warranties give you...
... to your Use & Care manual, or ask your dealer. Thermador reserves the right to Thermador indicating the model number. For complete warranty details, refer to state. Thermador is not responsible for planning purposes only. Page 3 of printing. MEDMC301WS 3 0 - Specifications are transported from the U.S. I N C H D O U B L E C O M B I N AT I O N B U I N O V E N WITH SPEED OVEN MASTERPIECE® SERIES INSTALLATION DETAILS These warranties give you...

