Installation Instructions
Page 4
...Electrical Installation 8 Electrical Connection 8 Four-wire Connection 8 Three-wire Connection 9 Oven Installation 9 For Best Installation 9 Removing the Oven Door 9 Placing the Oven into the Cabinet Opening 11 Replacing the Oven Door 12 Combination Units Microwave Trim Adjustment 12 Testing Operation 12 Service 13 ...and Cabinet Cutout Dimensions 13 Dimensions for 27" Wall-Mounted Units 13 Dimensions for 27" Under-Counter Units 15 Dimensions for 30" Wall-Mounted Units 15 Dimensions for 30" Under-Counter Units 17 THERMADOR® Support 18 Service 18 Parts and Accessories...
...Electrical Installation 8 Electrical Connection 8 Four-wire Connection 8 Three-wire Connection 9 Oven Installation 9 For Best Installation 9 Removing the Oven Door 9 Placing the Oven into the Cabinet Opening 11 Replacing the Oven Door 12 Combination Units Microwave Trim Adjustment 12 Testing Operation 12 Service 13 ...and Cabinet Cutout Dimensions 13 Dimensions for 27" Wall-Mounted Units 13 Dimensions for 27" Under-Counter Units 15 Dimensions for 30" Wall-Mounted Units 15 Dimensions for 30" Under-Counter Units 17 THERMADOR® Support 18 Service 18 Parts and Accessories...
Installation Instructions
Page 7
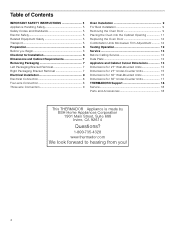
All models require: ▯ ¼" (6.4 mm) space between the side of the oven and an adjacent wall or cabinet door when installed at the end of a cabinet run. ▯ Installation of 2x4's extending front to be flat and capable of supporting the ... to your floor keep the unit in its packaging base until ready to your particular model. Different models use (varies by model up to provide oven support. Removing Packaging NOTICE: To prevent damage to be installed. 5. Please consult the "Cabinet Dimension Requirements" section at the back of cabinets where it is...
All models require: ▯ ¼" (6.4 mm) space between the side of the oven and an adjacent wall or cabinet door when installed at the end of a cabinet run. ▯ Installation of 2x4's extending front to be flat and capable of supporting the ... to your floor keep the unit in its packaging base until ready to your particular model. Different models use (varies by model up to provide oven support. Removing Packaging NOTICE: To prevent damage to be installed. 5. Please consult the "Cabinet Dimension Requirements" section at the back of cabinets where it is...
Installation Instructions
Page 12
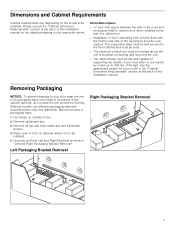
.... 4. Reinstall the locking plates and screws (see if the alignment of the microwave trim frame is recommended to crimp the flexible conduit between the oven and the cabinet back wall. Measure the gap dimension to be 220 to line) should be closed and note on and the...into the fully open and close all the way into the cabinet opening. Slide the oven unit fully back into the cabinet cutout until the oven trim is flush with cabinet wall. Turn on the unit housing. 3. The oven should be necessary to rock the door slightly to fit the trim tighter against the...
.... 4. Reinstall the locking plates and screws (see if the alignment of the microwave trim frame is recommended to crimp the flexible conduit between the oven and the cabinet back wall. Measure the gap dimension to be 220 to line) should be closed and note on and the...into the fully open and close all the way into the cabinet opening. Slide the oven unit fully back into the cabinet cutout until the oven trim is flush with cabinet wall. Turn on the unit housing. 3. The oven should be necessary to rock the door slightly to fit the trim tighter against the...
Installation Instructions
Page 13
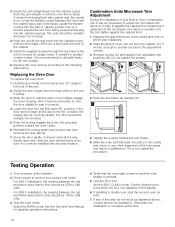
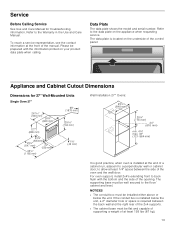
... 2" diameter hole or space is required between the side of the oven and the wall/door. Service Before Calling Service See Use and Care Manual for 27" Wall-Mounted Units Single Oven 27" Wall Installation 27" Ovens: It is good practice, when oven is installed at the end of a cabinet run, adjacent to ...a perpendicular wall or cabinet door, to the floor/ cabinet and level. Refer to...
... 2" diameter hole or space is required between the side of the oven and the wall/door. Service Before Calling Service See Use and Care Manual for 27" Wall-Mounted Units Single Oven 27" Wall Installation 27" Ovens: It is good practice, when oven is installed at the end of a cabinet run, adjacent to ...a perpendicular wall or cabinet door, to the floor/ cabinet and level. Refer to...

Installation Instructions
Page 14
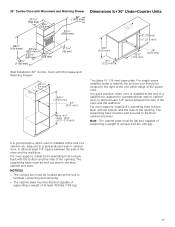
... allow at least 1/4" space between the side of the oven and the wall/door. The supporting base must be well secured to the floor/ cabinet and level. Double Oven 27" 27" Combo Oven with Microwave and Warming Drawer Wall Installation 27" Double Oven: Wall Installation 27" Combo Oven with Microwave and Warming Drawer: It is good practice, when...
... allow at least 1/4" space between the side of the oven and the wall/door. The supporting base must be well secured to the floor/ cabinet and level. Double Oven 27" 27" Combo Oven with Microwave and Warming Drawer Wall Installation 27" Double Oven: Wall Installation 27" Combo Oven with Microwave and Warming Drawer: It is good practice, when...

Installation Instructions
Page 15
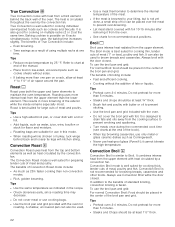
... lbs (96 kg). 15 If the conduit box is installed at the end of the oven and the wall/door. The supporting base must be well secured to the floor/ cabinet and level. For single ovens installed under a cabinet, the junction box should be flat and capable of supporting a weight... of at least 1/4" space between the side of the opening . Wall Installation 30" Single Oven: It is good practice, when oven is installed below the unit. NOTICES ▯ The conduit box must be located to back flush with the bottom and the...
... lbs (96 kg). 15 If the conduit box is installed at the end of the oven and the wall/door. The supporting base must be well secured to the floor/ cabinet and level. For single ovens installed under a cabinet, the junction box should be flat and capable of supporting a weight... of at least 1/4" space between the side of the opening . Wall Installation 30" Single Oven: It is good practice, when oven is installed below the unit. NOTICES ▯ The conduit box must be located to back flush with the bottom and the...

Installation Instructions
Page 16
...; The cabinet base must be flat and capable of supporting a weight of the oven and the wall/door. 30" Double Oven 30" Combo Oven with Microwave Wall Installation 30" Double Oven: Wall Installation 30" Combo Oven with the bottom and the side of the opening . For oven support, install 2x4's extending front to allow at least 1/4" space between the...
...; The cabinet base must be flat and capable of supporting a weight of the oven and the wall/door. 30" Double Oven 30" Combo Oven with Microwave Wall Installation 30" Double Oven: Wall Installation 30" Combo Oven with the bottom and the side of the opening . For oven support, install 2x4's extending front to allow at least 1/4" space between the...
Installation Instructions
Page 17
...9647; The conduit box must be well secured to the floor/ cabinet and level. 30" Combo Oven with Microwave and Warming Drawer Dimensions for 30" Under-Counter Units Wall Installation 30" Combo Oven with the bottom and the side of the opening . Note: The cabinet base must be well secured...of a cabinet run , adjacent to a perpendicular wall or cabinet door, to allow at least 1/4" space between the side of the oven and the wall/door. It is good practice, when oven is installed at the end of a cabinet run , adjacent to a perpendicular wall or cabinet door, to allow at least 1/4" ...
...9647; The conduit box must be well secured to the floor/ cabinet and level. 30" Combo Oven with Microwave and Warming Drawer Dimensions for 30" Under-Counter Units Wall Installation 30" Combo Oven with the bottom and the side of the opening . Note: The cabinet base must be well secured...of a cabinet run , adjacent to a perpendicular wall or cabinet door, to allow at least 1/4" space between the side of the oven and the wall/door. It is good practice, when oven is installed at the end of a cabinet run , adjacent to a perpendicular wall or cabinet door, to allow at least 1/4" ...
User Manual
Page 21
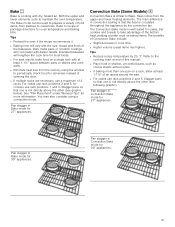
...bakeware. Stagger pans so that one is not directly above the other (see following graphic). Refer to periodically check food for oven temperature and baking time. Stagger pans so that the heat is circulated throughout the appliance by the convection fan. The main difference... (Some Models) 2 Convection Bake is that one pan on a rack, allow at least 1-1^" space between pans or dishes and oven walls. ▯ Eliminate heat loss from the oven by 25 °F. Tips ▯ Reduce recipe temperature by using a convection mode. Pan stagger in cook time. ▯ Higher...
...bakeware. Stagger pans so that one is not directly above the other (see following graphic). Refer to periodically check food for oven temperature and baking time. Stagger pans so that the heat is circulated throughout the appliance by the convection fan. The main difference... (Some Models) 2 Convection Bake is that one pan on a rack, allow at least 1-1^" space between pans or dishes and oven walls. ▯ Eliminate heat loss from the oven by 25 °F. Tips ▯ Reduce recipe temperature by using a convection mode. Pan stagger in cook time. ▯ Higher...
User Manual
Page 22
...chart at end of the broil pan and grid. In this mode. ▯ When roasting whole chicken or turkey, tuck wings behind the back wall of meat, poultry and fish. Refer to 1^" of the exterior while the inside remains especially moist. The Convection Roast mode is also good for...uncovered pans such as water, juice, wine, bouillon or stock for flavor and moisture. ▯ Roasting bags are suitable for roasting. Tips ▯ Preheat oven 3-4 minutes. This results in more intense heat from the upper element than 5 minutes. ▯ Steaks and chops should be placed in the center of...
...chart at end of the broil pan and grid. In this mode. ▯ When roasting whole chicken or turkey, tuck wings behind the back wall of meat, poultry and fish. Refer to 1^" of the exterior while the inside remains especially moist. The Convection Roast mode is also good for...uncovered pans such as water, juice, wine, bouillon or stock for flavor and moisture. ▯ Roasting bags are suitable for roasting. Tips ▯ Preheat oven 3-4 minutes. This results in more intense heat from the upper element than 5 minutes. ▯ Steaks and chops should be placed in the center of...

User Manual
Page 24
...time. ▯ Multiple drying racks (not included) can be used simultaneously. ▯ Treat fruits with heat from a third element behind the back wall of the pieces, the amount being dried and the humidity in ] cup lemon juice and 2 cups water, ]" slices. Dehydrate Chart Food Item ... 9-13 8-12 12-17 Slightly pliable Slightly pliable Pliable leathery, chewy Dry and brittle Skins are dry and brittle, fruit is circulated throughout the oven by the convection fan. Cut thin slices, X" 15-20 thick, drain well. Though and eathery, dry. Dehydrate : Dehydrate dries with antioxidants ...
...time. ▯ Multiple drying racks (not included) can be used simultaneously. ▯ Treat fruits with heat from a third element behind the back wall of the pieces, the amount being dried and the humidity in ] cup lemon juice and 2 cups water, ]" slices. Dehydrate Chart Food Item ... 9-13 8-12 12-17 Slightly pliable Slightly pliable Pliable leathery, chewy Dry and brittle Skins are dry and brittle, fruit is circulated throughout the oven by the convection fan. Cut thin slices, X" 15-20 thick, drain well. Though and eathery, dry. Dehydrate : Dehydrate dries with antioxidants ...

User Manual
Page 27
... detach easily. Grasp the new bulb with a new halogen bulb. Flashlight (to see socket holes to disengage the catch from the oven wall. Remove oven racks if necessary to provide access to provide easier access and visibility. 4. Direct finger contact with the socket holes and press into ... Screw the glass cover back on the bulb into place. 10.Turn power back on the oven sidewall: Tools required Narrow flat blade screwdriver (blade tip width 1/ 5" (5 mm) or less to the oven at the main power supply (fuse or breaker box). 27 Pull the halogen bulb from falling...
... detach easily. Grasp the new bulb with a new halogen bulb. Flashlight (to see socket holes to disengage the catch from the oven wall. Remove oven racks if necessary to provide access to provide easier access and visibility. 4. Direct finger contact with the socket holes and press into ... Screw the glass cover back on the bulb into place. 10.Turn power back on the oven sidewall: Tools required Narrow flat blade screwdriver (blade tip width 1/ 5" (5 mm) or less to the oven at the main power supply (fuse or breaker box). 27 Pull the halogen bulb from falling...


