Installation Instructions
Page 5
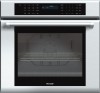
...AND SAVE THESE INSTRUCTIONS N EI S EY HT T E F E A V S A S T N D AN TA R OD PA ME IR WARNING If the information in this manual for guidance. Safety Codes and Standards This appliance complies with the latest version of one or more information. Household Electric Ranges ▯ CAN/CSA C22...See "Data Plate" under appliance. Related Equipment Safety Remove all controls are in the manuals. Transport To avoid damage to the oven vent, use .. Never allow children to this manual is properly installed and grounded by the National Electrical Code (or Canadian Electrical Code), ...
...AND SAVE THESE INSTRUCTIONS N EI S EY HT T E F E A V S A S T N D AN TA R OD PA ME IR WARNING If the information in this manual for guidance. Safety Codes and Standards This appliance complies with the latest version of one or more information. Household Electric Ranges ▯ CAN/CSA C22...See "Data Plate" under appliance. Related Equipment Safety Remove all controls are in the manuals. Transport To avoid damage to the oven vent, use .. Never allow children to this manual is properly installed and grounded by the National Electrical Code (or Canadian Electrical Code), ...
Installation Instructions
Page 6
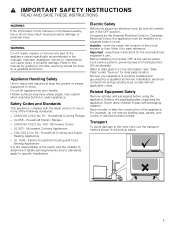
..., "Placing the Oven into the Cabinet Opening" 9. Section: Oven Installation, "Placing the Oven into the Cabinet Opening" 7. Move the oven unit into place in this manual. 6 Team lift the unit directly into the Cabinet Opening" 8. Section: Oven Installation, "Placing the Oven into the cabinet cutout. Reinstall the oven door(s). Parts Included...
..., "Placing the Oven into the Cabinet Opening" 9. Section: Oven Installation, "Placing the Oven into the Cabinet Opening" 7. Move the oven unit into place in this manual. 6 Team lift the unit directly into the Cabinet Opening" 8. Section: Oven Installation, "Placing the Oven into the cabinet cutout. Reinstall the oven door(s). Parts Included...
Installation Instructions
Page 7
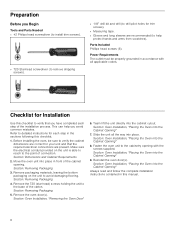
Dimensions and Cabinet Requirements Cabinet requirements vary depending on outside of this installation manual for your particular model. Removing Packaging NOTICE: To prevent damage to your oven when in the "Cabinet Dimension Requirements" section at the back of ... Right Brackets as show in packaging base. 1. Different models use (varies by model up to back flush with the bottom and side of this installation manual. Please consult the "Cabinet Dimension Requirements" section at the end of a cabinet run. ▯ Installation of 2x4's extending front to 429 lbs. (195 kg))....
Dimensions and Cabinet Requirements Cabinet requirements vary depending on outside of this installation manual for your particular model. Removing Packaging NOTICE: To prevent damage to your oven when in the "Cabinet Dimension Requirements" section at the back of ... Right Brackets as show in packaging base. 1. Different models use (varies by model up to back flush with the bottom and side of this installation manual. Please consult the "Cabinet Dimension Requirements" section at the end of a cabinet run. ▯ Installation of 2x4's extending front to 429 lbs. (195 kg))....
Installation Instructions
Page 12
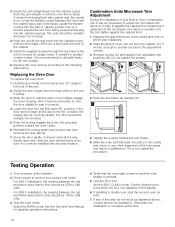
... it may be 220 to fit the trim tighter against the cabinet front. Lower the door into adjustable slot positions (B). See the Use and Care Manual for assistance. Slide the oven unit fully back into the unlocked position, toward the oven cavity. 6. Slide the door in place. Combination Units Microwave Trim...
... it may be 220 to fit the trim tighter against the cabinet front. Lower the door into adjustable slot positions (B). See the Use and Care Manual for assistance. Slide the oven unit fully back into the unlocked position, toward the oven cavity. 6. Slide the door in place. Combination Units Microwave Trim...
Installation Instructions
Page 13
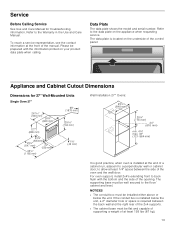
...). 13 Data Plate The data plate shows the model and serial number. Refer to the Warranty in the Use and Care Manual. Refer to the data plate on the appliance when requesting service. Please be installed either above or below the unit, a... cabinet base must be prepared with the bottom and the side of the opening. Service Before Calling Service See Use and Care Manual for 27" Wall-Mounted Units Single Oven 27" Wall Installation 27" Ovens: It is good practice, when oven is installed ... NOTICES ▯ The conduit box must be well secured to allow at the front of the manual.
...). 13 Data Plate The data plate shows the model and serial number. Refer to the Warranty in the Use and Care Manual. Refer to the data plate on the appliance when requesting service. Please be installed either above or below the unit, a... cabinet base must be prepared with the bottom and the side of the opening. Service Before Calling Service See Use and Care Manual for 27" Wall-Mounted Units Single Oven 27" Wall Installation 27" Ovens: It is good practice, when oven is installed ... NOTICES ▯ The conduit box must be well secured to allow at the front of the manual.
User Manual
Page 4
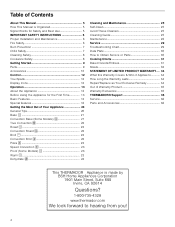
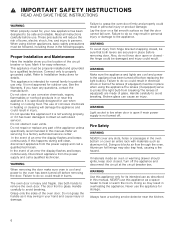
Table of Contents esUacermaduln About This Manual 5 How This Manual is Organized 5 Signal Words for Safety and Best Use 5 IMPORTANT SAFETY INSTRUCTIONS 6 Proper Installation and Maintenance 6 Fire Safety 6 Burn Prevention 7 Child Safety 7 Cleaning Safety 8 Cookware ... it Applies to 34 How Long the Warranty Lasts 34 Repair/Replace as Your Exclusive Remedy 34 Out of Warranty Product 35 Warranty Exclusions 35 THERMADOR® Support 36 Service 36 Parts and Accessories 36 4
Table of Contents esUacermaduln About This Manual 5 How This Manual is Organized 5 Signal Words for Safety and Best Use 5 IMPORTANT SAFETY INSTRUCTIONS 6 Proper Installation and Maintenance 6 Fire Safety 6 Burn Prevention 7 Child Safety 7 Cleaning Safety 8 Cookware ... it Applies to 34 How Long the Warranty Lasts 34 Repair/Replace as Your Exclusive Remedy 34 Out of Warranty Product 35 Warranty Exclusions 35 THERMADOR® Support 36 Service 36 Parts and Accessories 36 4
User Manual
Page 5
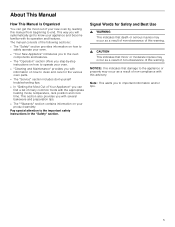
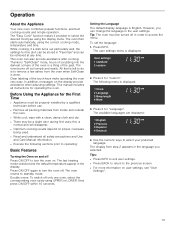
... "Operation" section offers you to the important safety instructions in the "Safety" section. Note: This alerts you step-by reading this warning. The manual consists of this manual from beginning to end. Signal Words for the various oven parts. ▯ The "Service" section includes do-it-yourself troubleshooting tips. ▯ In...9647; "Cleaning and Maintenance" provides you can find a list of non-compliance with the appropriate heating mode, temperature, rack position and cook time. About This Manual How This Manual is Organized You can get to know your product warranty.
... "Operation" section offers you to the important safety instructions in the "Safety" section. Note: This alerts you step-by reading this warning. The manual consists of this manual from beginning to end. Signal Words for the various oven parts. ▯ The "Service" section includes do-it-yourself troubleshooting tips. ▯ In...9647; "Cleaning and Maintenance" provides you can find a list of non-compliance with the appropriate heating mode, temperature, rack position and cook time. About This Manual How This Manual is Organized You can get to know your product warranty.
User Manual
Page 6
... appliance. WARNING Make sure the appliance and lights are cool and power to the appliance. Handle carefully to avoid breaking. WARNING Use this manual. When using kitchen appliances, basic safety precautions must be properly installed and grounded by a qualified technician. See the Warranty. Also, do so...could be sure that the door cannot fall over. Connect only to the oven has been turned off . Do not operate this manual. WARNING When removing the door make sure oven is intended for normal family household use the appliance for details. WARNING To avoid ...
... appliance. WARNING Make sure the appliance and lights are cool and power to the appliance. Handle carefully to avoid breaking. WARNING Use this manual. When using kitchen appliances, basic safety precautions must be properly installed and grounded by a qualified technician. See the Warranty. Also, do so...could be sure that the door cannot fall over. Connect only to the oven has been turned off . Do not operate this manual. WARNING When removing the door make sure oven is intended for normal family household use the appliance for details. WARNING To avoid ...
User Manual
Page 13
... appears in the user settings. The oven burns off only one oven, select the corresponding oven cavity using UPPER or LOWER. This manual includes all instructions for this is normal and will disappear. ▯ Optimum cooking results depend on proper cookware being used. ▯ ...▯ There may be properly installed by a qualified technician before use. ▯ Remove all safety precautions and Use and Care Manual information. ▯ Execute the following menu is done. Setting the Language The default display language is displayed: 2. However, you selected. Press INFO....
... appears in the user settings. The oven burns off only one oven, select the corresponding oven cavity using UPPER or LOWER. This manual includes all instructions for this is normal and will disappear. ▯ Optimum cooking results depend on proper cookware being used. ▯ ...▯ There may be properly installed by a qualified technician before use. ▯ Remove all safety precautions and Use and Care Manual information. ▯ Execute the following menu is done. Setting the Language The default display language is displayed: 2. However, you selected. Press INFO....
User Manual
Page 17
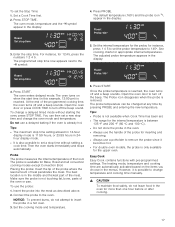
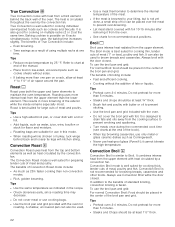
... the food. for instance, press 1 4 5 to set the probe temperature to remove the probe since it is also possible to change temperature and cooking time manually. 9 CAUTION To maintain food safety, do not attempt to turn off and a beep sounds. Probe The probe measures the internal temperature of the meat. However...
... the food. for instance, press 1 4 5 to set the probe temperature to remove the probe since it is also possible to change temperature and cooking time manually. 9 CAUTION To maintain food safety, do not attempt to turn off and a beep sounds. Probe The probe measures the internal temperature of the meat. However...
User Manual
Page 19
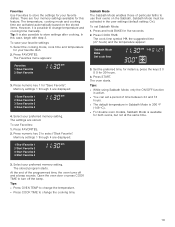
... the user settings (default setting: On). Press FAVORITES. Press START. The stored program starts. Tips: ▯ Press OVEN TEMP to change temperature and cooking time manually. There are displayed: 4. To save your preferred memory setting. Press COOK TIME. To use their ovens on the stored items. However, it is available for...
... the user settings (default setting: On). Press FAVORITES. Press START. The stored program starts. Tips: ▯ Press OVEN TEMP to change temperature and cooking time manually. There are displayed: 4. To save your preferred memory setting. Press COOK TIME. To use their ovens on the stored items. However, it is available for...
User Manual
Page 21
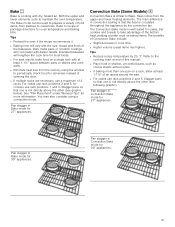
.... ▯ For best results, bake food on a single rack with dry, heated air. Heat comes from pastries to the cooking chart at end of this manual. ▯ Place food in shallow, uncovered pans, such as cookie sheets without sides. ▯ If baking more information. Refer to maintain the oven temperature. Pan...
.... ▯ For best results, bake food on a single rack with dry, heated air. Heat comes from pastries to the cooking chart at end of this manual. ▯ Place food in shallow, uncovered pans, such as cookie sheets without sides. ▯ If baking more information. Refer to maintain the oven temperature. Pan...
User Manual
Page 22
... is well suited for recommended rack positions. This results in more than 5 minutes. ▯ Steaks and Chops should be used to the benefits of the manual. ▯ Place food in this case, the baking time increases slightly. Always broil with the door closed . In addition to brown breads and casseroles. To...
... is well suited for recommended rack positions. This results in more than 5 minutes. ▯ Steaks and Chops should be used to the benefits of the manual. ▯ Place food in this case, the baking time increases slightly. Always broil with the door closed . In addition to brown breads and casseroles. To...
User Manual
Page 25
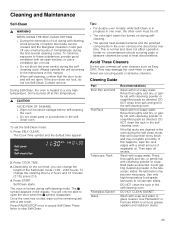
Always operate the unit according to the instructions in this manual. ▯ When self-cleaning, confirm that the door locks and will only be able to open the door when the I symbol appears in the display. ...
Always operate the unit according to the instructions in this manual. ▯ When self-cleaning, confirm that the door locks and will only be able to open the door when the I symbol appears in the display. ...
User Manual
Page 29
... all the way. If the door will disengage from damage until the slots on the hinges engage the oven housing. However, the temperature can be manually reduced by 25 °F.
... all the way. If the door will disengage from damage until the slots on the hinges engage the oven housing. However, the temperature can be manually reduced by 25 °F.
User Manual
Page 30
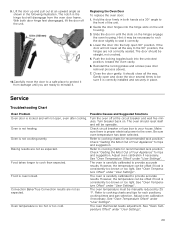
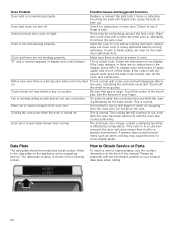
...) and to Obtain Service or Parts To reach a service representative, see the contact information at the front of the touchpad. Touch the center of the manual. On some models, the convection fan runs while the oven is a fault code. This is running self-clean. The soft-close slower than normal. Data...
...) and to Obtain Service or Parts To reach a service representative, see the contact information at the front of the touchpad. Touch the center of the manual. On some models, the convection fan runs while the oven is a fault code. This is running self-clean. The soft-close slower than normal. Data...
