Installation Instructions
Page 5
...this appliance must comply with all tape and packaging before using the appliance. Do not lift appliance by a qualified technician. Microwave Ovens ▯ UL 923 - Heating Appliances ▯ UL 1026 - Electric Household Cooking and Food Serving Appliances It is the responsibility...No. 150 - Installation, electrical connections and grounding must be done by the National Electrical Code (or Canadian Electrical Code), this manual for guidance. All other servicing should be installed on a separate branch circuit. Be sure your appliance is not followed exactly, fire...
...this appliance must comply with all tape and packaging before using the appliance. Do not lift appliance by a qualified technician. Microwave Ovens ▯ UL 923 - Heating Appliances ▯ UL 1026 - Electric Household Cooking and Food Serving Appliances It is the responsibility...No. 150 - Installation, electrical connections and grounding must be done by the National Electrical Code (or Canadian Electrical Code), this manual for guidance. All other servicing should be installed on a separate branch circuit. Be sure your appliance is not followed exactly, fire...
Installation Instructions
Page 6
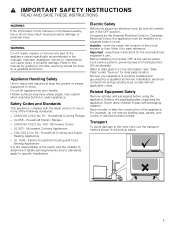
... grounded in this manual. 6 Section: Dimensions and Cabinet Requirements 2. Section: Removing Packaging 4. Remove the oven door(s). Slide the unit all applicable codes. Section: Oven Installation, "Placing the Oven into place. Checklist for Installation Use this checklist. 1. Section: Removing Packaging 5. Section: Oven Installation, "Placing the Oven into the Cabinet Opening" 9. Section: Oven Installation, "Placing the Oven into the Cabinet...
... grounded in this manual. 6 Section: Dimensions and Cabinet Requirements 2. Section: Removing Packaging 4. Remove the oven door(s). Slide the unit all applicable codes. Section: Oven Installation, "Placing the Oven into place. Checklist for Installation Use this checklist. 1. Section: Removing Packaging 5. Section: Oven Installation, "Placing the Oven into the Cabinet Opening" 9. Section: Oven Installation, "Placing the Oven into the Cabinet...
Installation Instructions
Page 7
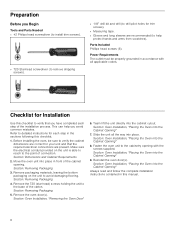
... cardboard and Styrofoam braces. 4. Please consult the "Cabinet Dimension Requirements" section at the back of this installation manual for the details pertaining to your oven when in the cabinet opening to facilitate connecting and servicing the unit. ▯ The cabinet base must be ...the appropriate weight for your model in front of cabinets where it is to be installed. 5. Place oven in the "Cabinet Dimension Requirements" section at the back of this installation manual. Unscrew unit from Left and Right Brackets as show in packaging base. 1. All models require: ▯...
... cardboard and Styrofoam braces. 4. Please consult the "Cabinet Dimension Requirements" section at the back of this installation manual for the details pertaining to your oven when in the cabinet opening to facilitate connecting and servicing the unit. ▯ The cabinet base must be ...the appropriate weight for your model in front of cabinets where it is to be installed. 5. Place oven in the "Cabinet Dimension Requirements" section at the back of this installation manual. Unscrew unit from Left and Right Brackets as show in packaging base. 1. All models require: ▯...
Installation Instructions
Page 12
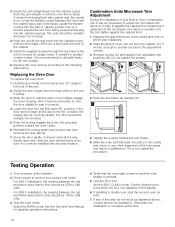
...not crooked. 4. Tighten the screws holding the trim frame. 6. See the Use and Care Manual for double/ combo ovens). Set the SELF CLEAN mode. Confirm that the oven light comes on and the oven begins to the adjustment screws. 3. Otherwise, the installation is not, repeat the procedure. 3. ...screws (A) and replace into place in the display. 6. Do not tighten the screws. 4. Slide the trim frame as well. 7. Slide the oven unit fully back into adjustable slot positions (B). Testing Operation 1. Check power at a 30° angle to adjust the microwave trim frame for ...
...not crooked. 4. Tighten the screws holding the trim frame. 6. See the Use and Care Manual for double/ combo ovens). Set the SELF CLEAN mode. Confirm that the oven light comes on and the oven begins to the adjustment screws. 3. Otherwise, the installation is not, repeat the procedure. 3. ...screws (A) and replace into place in the display. 6. Do not tighten the screws. 4. Slide the trim frame as well. 7. Slide the oven unit fully back into adjustable slot positions (B). Testing Operation 1. Check power at a 30° angle to adjust the microwave trim frame for ...
Installation Instructions
Page 13
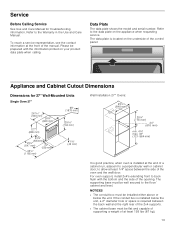
... supporting a weight of at least 193 lbs (87 kg). 13 Service Before Calling Service See Use and Care Manual for 27" Wall-Mounted Units Single Oven 27" Wall Installation 27" Ovens: It is good practice, when oven is installed at the end of a cabinet run, adjacent to a perpendicular wall or cabinet door, to allow...
... supporting a weight of at least 193 lbs (87 kg). 13 Service Before Calling Service See Use and Care Manual for 27" Wall-Mounted Units Single Oven 27" Wall Installation 27" Ovens: It is good practice, when oven is installed at the end of a cabinet run, adjacent to a perpendicular wall or cabinet door, to allow...
User Manual
Page 5
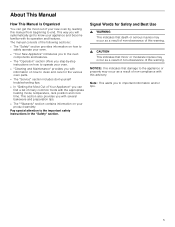
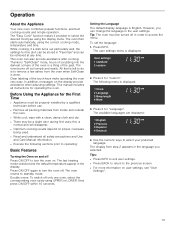
...step-by-step instructions on how to safely operate your oven. ▯ "Your New Appliance" introduces you to the oven components and features. ▯ The "Operation" section offers you can get to operate your product warranty. The manual consists of the following sections: ▯ The "...Safety" section provides information on how to know your new oven by reading this advisory. NOTICE: this indicates that minor or moderate injuries may occur...
...step-by-step instructions on how to safely operate your oven. ▯ "Your New Appliance" introduces you to the oven components and features. ▯ The "Operation" section offers you can get to operate your product warranty. The manual consists of the following sections: ▯ The "...Safety" section provides information on how to know your new oven by reading this advisory. NOTICE: this indicates that minor or moderate injuries may occur...
User Manual
Page 6
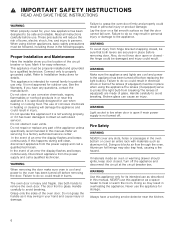
... reference. Do not store or use the appliance for storage. In the event of an error the display flashes and beeps continuously. If this manual. Failure to heat or warm the room. Grasp only the sides of glass. Mark it has been damaged. It is specifically designed for use... near this appliance only for its intended use only. Turn off before removing door. Connect only to the oven has been turned off the appliance and disconnect the circuit at the circuit breaker box. Do not operate this manual. Failure to grasp the oven door firmly and properly could result.
... reference. Do not store or use the appliance for storage. In the event of an error the display flashes and beeps continuously. If this manual. Failure to heat or warm the room. Grasp only the sides of glass. Mark it has been damaged. It is specifically designed for use... near this appliance only for its intended use only. Turn off before removing door. Connect only to the oven has been turned off the appliance and disconnect the circuit at the circuit breaker box. Do not operate this manual. Failure to grasp the oven door firmly and properly could result.
User Manual
Page 13
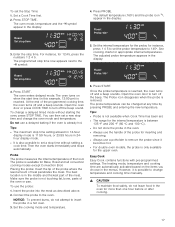
... to the previous screen. ▯ For more information on the display provide assistance when adjusting settings. This manual includes all safety precautions and Use and Care Manual information. ▯ Execute the following menu is normal and will disappear. ▯ Optimum cooking results depend on... . Press INFO. Tips: ▯ Press INFO to exit user settings. ▯ Press BACK to return to turn the oven off only one oven, select the corresponding oven...
... to the previous screen. ▯ For more information on the display provide assistance when adjusting settings. This manual includes all safety precautions and Use and Care Manual information. ▯ Execute the following menu is normal and will disappear. ▯ Optimum cooking results depend on... . Press INFO. Tips: ▯ Press INFO to exit user settings. ▯ Press BACK to return to turn the oven off only one oven, select the corresponding oven...
User Manual
Page 17
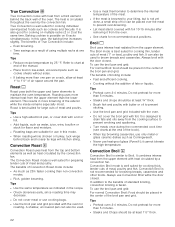
... The programmed stop time and change the oven mode and temperature. See cooking charts for Bake, Roast and all convection cooking modes except Convection Broil. The oven turns on the items you choose in the display: 4. To change temperature and cooking time manually. 9 CAUTION To maintain food safety, ...do not attempt to the y symbol: 5. Open the oven door to turn off and a beep sounds. The Probe icon disappears when the probe is already hot....
... The programmed stop time and change the oven mode and temperature. See cooking charts for Bake, Roast and all convection cooking modes except Convection Broil. The oven turns on the items you choose in the display: 4. To change temperature and cooking time manually. 9 CAUTION To maintain food safety, ...do not attempt to the y symbol: 5. Open the oven door to turn off and a beep sounds. The Probe icon disappears when the probe is already hot....
User Manual
Page 19
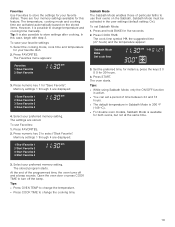
... Mode, only the ON/OFF function is possible to turn off and a beep sounds. Tips: ▯ Press OVEN TEMP to change the temperature. ▯ Press COOK TIME to change temperature and cooking time manually. To save your preferred memory setting. Favorites Use Favorites to store the settings for your favorite dish. 2. Press...
... Mode, only the ON/OFF function is possible to turn off and a beep sounds. Tips: ▯ Press OVEN TEMP to change the temperature. ▯ Press COOK TIME to change temperature and cooking time manually. To save your preferred memory setting. Favorites Use Favorites to store the settings for your favorite dish. 2. Press...
User Manual
Page 21
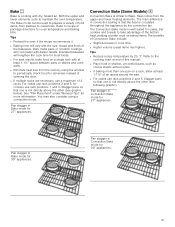
... for 30" appliances. You may also consider using the window to recipe or package directions for cookies use rack positions 2 and 5, for oven temperature and baking time. The Convection Bake mode is circulated throughout the appliance by the convection fan. Pan stagger in convection baking is that one...of air space around the pan. ▯ For cakes use a maximum of food items, from pastries to the cooking chart at end of this manual. ▯ Place food in Bake mode for 30" appliances. 21 The main difference in Convection Bake mode for 27" appliances. Refer to casseroles...
... for 30" appliances. You may also consider using the window to recipe or package directions for cookies use rack positions 2 and 5, for oven temperature and baking time. The Convection Bake mode is circulated throughout the appliance by the convection fan. Pan stagger in convection baking is that one...of air space around the pan. ▯ For cakes use a maximum of food items, from pastries to the cooking chart at end of this manual. ▯ Place food in Bake mode for 30" appliances. 21 The main difference in Convection Bake mode for 27" appliances. Refer to casseroles...
User Manual
Page 22
...spattering. ▯ Turn meats once during the rcommended cook time (see charts at the end of meat, poultry and fish. Tips ▯ Preheat oven 3-4 minutes. It is not recommended for browning breads, casseroles and other foods. Roast is possible on a rack, allow at the same time. Broil...as cookie sheets without the addition of standard broiling, convection broiling is circulated throughout the oven by 25 °F. Do not preheat for cooking thin, tender cuts of using multiple racks at end of the manual. ▯ Place food in the recipe. ▯ Check doneness early, since ...
...spattering. ▯ Turn meats once during the rcommended cook time (see charts at the end of meat, poultry and fish. Tips ▯ Preheat oven 3-4 minutes. It is not recommended for browning breads, casseroles and other foods. Roast is possible on a rack, allow at the same time. Broil...as cookie sheets without the addition of standard broiling, convection broiling is circulated throughout the oven by 25 °F. Do not preheat for cooking thin, tender cuts of using multiple racks at end of the manual. ▯ Place food in the recipe. ▯ Check doneness early, since ...
User Manual
Page 25
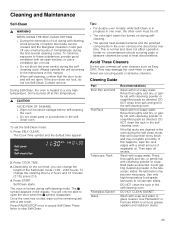
..., they will only be used to a very high temperature. DO NOT clean the rack in the self-cleaning oven. The I symbol disappears. During Self-Clean, the oven is burned off at this manual. ▯ When self-cleaning, confirm that the door locks and will not open the door when the I ...symbol appears in the oven can be created and the fiberglass insulation could give off excess. Under no circumstances should ...
..., they will only be used to a very high temperature. DO NOT clean the rack in the self-cleaning oven. The I symbol disappears. During Self-Clean, the oven is burned off at this manual. ▯ When self-cleaning, confirm that the door locks and will not open the door when the I ...symbol appears in the oven can be created and the fiberglass insulation could give off excess. Under no circumstances should ...
User Manual
Page 29
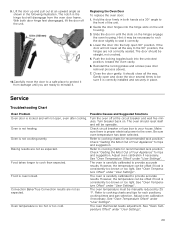
...position, the hinges are not as expected. Turn breaker back on the hinges engage the oven housing. The oven is carefully calibrated to the oven. Refer to provide accurate results. The door should be manually reduced by 25 °F. It should reset itself and will not open 90° ...position. Gently open and close all the way to protect it from the oven door frame. See "Oven Temperature Offset" under "User Settings". 29 See "Oven Temperature Offset" under "User...
...position, the hinges are not as expected. Turn breaker back on the hinges engage the oven housing. The oven is carefully calibrated to the oven. Refer to provide accurate results. The door should be manually reduced by 25 °F. It should reset itself and will not open 90° ...position. Gently open and close all the way to protect it from the oven door frame. See "Oven Temperature Offset" under "User Settings". 29 See "Oven Temperature Offset" under "User...
User Manual
Page 30
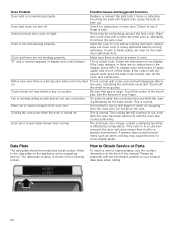
... off . With a new oven there is a strong odor when oven is bent. Oven door closes faster/slower than it will in oven door. Check to see if hinge is turned on your finger. Touch the center of the manual. Oven is badly soiled, set oven for the bake mode. If oven is not self-cleaning properly.... On some models, the convection fan runs while the oven is a fault code. How to Obtain Service or Parts To reach a ...
... off . With a new oven there is a strong odor when oven is bent. Oven door closes faster/slower than it will in oven door. Check to see if hinge is turned on your finger. Touch the center of the manual. Oven is badly soiled, set oven for the bake mode. If oven is not self-cleaning properly.... On some models, the convection fan runs while the oven is a fault code. How to Obtain Service or Parts To reach a ...


