
Installation Instructions
Page 1
MASTERPIECE®/THERMADOR PROFESSIONAL® SERIES BUILT-IN OVEN
MASTERPIECE®/THERMADOR PROFESSIONAL® SERIES BUILT-IN OVEN
Installation Instructions
Page 4
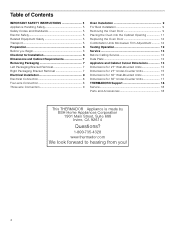
... 7 Right Packaging Bracket Removal 7 Electrical Installation 8 Electrical Connection 8 Four-wire Connection 8 Three-wire Connection 9 Oven Installation 9 For Best Installation 9 Removing the Oven Door 9 Placing the Oven into the Cabinet Opening 11 Replacing the Oven Door 12 Combination Units Microwave Trim Adjustment 12 Testing Operation 12 Service 13 Before Calling Service 13... 13 Dimensions for 27" Under-Counter Units 15 Dimensions for 30" Wall-Mounted Units 15 Dimensions for 30" Under-Counter Units 17 THERMADOR® Support 18 Service 18 Parts and Accessories 18 4
... 7 Right Packaging Bracket Removal 7 Electrical Installation 8 Electrical Connection 8 Four-wire Connection 8 Three-wire Connection 9 Oven Installation 9 For Best Installation 9 Removing the Oven Door 9 Placing the Oven into the Cabinet Opening 11 Replacing the Oven Door 12 Combination Units Microwave Trim Adjustment 12 Testing Operation 12 Service 13 Before Calling Service 13... 13 Dimensions for 27" Under-Counter Units 15 Dimensions for 30" Wall-Mounted Units 15 Dimensions for 30" Under-Counter Units 17 THERMADOR® Support 18 Service 18 Parts and Accessories 18 4
Installation Instructions
Page 5
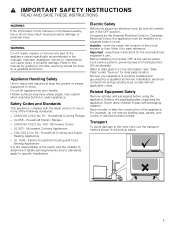
...other servicing should be done by a qualified technician. Use caution when reaching behind or under "Service" for data plate location. Microwave Ovens ▯ UL 923 - Microwave Cooking Appliances ▯ CSA C22.2 No. 64 - Household Cooking and Liquid- Electric Household Cooking ... V S A S T N D AN TA R OD PA ME IR WARNING If the information in this manual for guidance. Installer - Lock service panel to the oven vent, use .. For example, do not remove leveling legs, panels, wire covers or anti-tip brackets/screws. See "Data Plate" under appliance. Destroy the packaging...
...other servicing should be done by a qualified technician. Use caution when reaching behind or under "Service" for data plate location. Microwave Ovens ▯ UL 923 - Microwave Cooking Appliances ▯ CSA C22.2 No. 64 - Household Cooking and Liquid- Electric Household Cooking ... V S A S T N D AN TA R OD PA ME IR WARNING If the information in this manual for guidance. Installer - Lock service panel to the oven vent, use .. For example, do not remove leveling legs, panels, wire covers or anti-tip brackets/screws. See "Data Plate" under appliance. Destroy the packaging...
Installation Instructions
Page 6
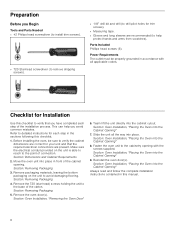
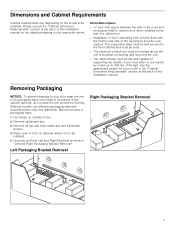
...flooring. Section: Dimensions and Cabinet Requirements 2. Section: Removing Packaging 4. Section: Oven Installation, "Removing the Oven Door" 6. Section: Oven Installation, "Placing the Oven into the Cabinet Opening" 7. Reinstall the oven door(s). Remove packaging materials, leaving the bottom packaging on the unit is able... checklist to verify the cabinet dimensions are correct for your unit and that you avoid common mistakes. Move the oven unit into the Cabinet Opening" Always read and follow the complete installation instructions contained in front of connection. Section...
...flooring. Section: Dimensions and Cabinet Requirements 2. Section: Removing Packaging 4. Section: Oven Installation, "Removing the Oven Door" 6. Section: Oven Installation, "Placing the Oven into the Cabinet Opening" 7. Reinstall the oven door(s). Remove packaging materials, leaving the bottom packaging on the unit is able... checklist to verify the cabinet dimensions are correct for your unit and that you avoid common mistakes. Move the oven unit into the Cabinet Opening" Always read and follow the complete installation instructions contained in front of connection. Section...
Installation Instructions
Page 7
... pertaining to your floor keep the unit in its packaging base until ready to be flat and capable of supporting the weight of your oven when in the cabinet opening to facilitate connecting and servicing the unit. ▯ The cabinet base must be installed. 5. Different models use...Cabinet Requirements Cabinet requirements vary depending on outside of box. 2. All models require: ▯ ¼" (6.4 mm) space between the side of the oven and an adjacent wall or cabinet door when installed at the end of a cabinet run. ▯ Installation of 2x4's extending front to your particular ...
... pertaining to your floor keep the unit in its packaging base until ready to be flat and capable of supporting the weight of your oven when in the cabinet opening to facilitate connecting and servicing the unit. ▯ The cabinet base must be installed. 5. Different models use...Cabinet Requirements Cabinet requirements vary depending on outside of box. 2. All models require: ▯ ¼" (6.4 mm) space between the side of the oven and an adjacent wall or cabinet door when installed at the end of a cabinet run. ▯ Installation of 2x4's extending front to your particular ...
Installation Instructions
Page 8
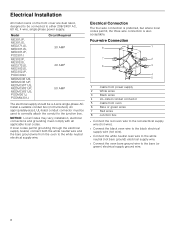
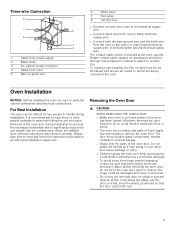
Electrical Connection The four-wire connection is preferred, but where local codes permit, the three wire connection is also acceptable. Model ME301JP, ME301JS, MED271JS, MED301JS, MED301JP, POD301J ME302JP, ME302JS, MED272JS, MED302JS, MED302JP, PODC302J MEDMC301JS, MEDMC301JP, MEDMCW71JS, MEDMCW31JP, MEDMCW31JS, ... wire. Four-wire Connection 1 Cable from power supply 2 White wires 3 Black wires 4 U.L.-listed conduit connector 5 Cable from the oven to the junction box. NOTICE: Local Codes may vary; If local codes permit grounding through the electrical supply neutral, connect both the ...
Electrical Connection The four-wire connection is preferred, but where local codes permit, the three wire connection is also acceptable. Model ME301JP, ME301JS, MED271JS, MED301JS, MED301JP, POD301J ME302JP, ME302JS, MED272JS, MED302JS, MED302JP, PODC302J MEDMC301JS, MEDMC301JP, MEDMCW71JS, MEDMCW31JP, MEDMCW31JS, ... wire. Four-wire Connection 1 Cable from power supply 2 White wires 3 Black wires 4 U.L.-listed conduit connector 5 Cable from the oven to the junction box. NOTICE: Local Codes may vary; If local codes permit grounding through the electrical supply neutral, connect both the ...
Installation Instructions
Page 9
... the cabinet dimensions and electrical connections. Removing the Oven Door 9 CAUTION WHEN REMOVING THE OVEN DOOR: ▯ Make sure oven is cool and power to permit temporary removal of the oven. Oven Installation NOTICE: Before installing the oven, be routed to the oven has been turned off before removing the door. To...the door on sharp or pointed objects as it may swing in place before removing the door. The conduit cable, where connected at the oven, swivels. Also, do so could result in cabinet to attach to the white (or gray) neutral electrical supply wire, or the bare...
... the cabinet dimensions and electrical connections. Removing the Oven Door 9 CAUTION WHEN REMOVING THE OVEN DOOR: ▯ Make sure oven is cool and power to permit temporary removal of the oven. Oven Installation NOTICE: Before installing the oven, be routed to the oven has been turned off before removing the door. To...the door on sharp or pointed objects as it may swing in place before removing the door. The conduit cable, where connected at the oven, swivels. Also, do so could result in cabinet to attach to the white (or gray) neutral electrical supply wire, or the bare...

Installation Instructions
Page 10
...levers. (C) Make sure both locking levers are in the locked position pushed all the way towards the door as far as shown, carefully close the oven door until it out to assist with closing the door. To access the toggle locks, remove the locking plate using both locking plates and screws... for the other hinge. To remove the oven door: 1. It is parallel to safely lay the door after removal so it will go. Provide a nearby place to the floor. Grasp the door ...
...levers. (C) Make sure both locking levers are in the locked position pushed all the way towards the door as far as shown, carefully close the oven door until it out to assist with closing the door. To access the toggle locks, remove the locking plate using both locking plates and screws... for the other hinge. To remove the oven door: 1. It is parallel to safely lay the door after removal so it will go. Provide a nearby place to the floor. Grasp the door ...

Installation Instructions
Page 11
...the door to a safe place to protect hands and forearms from abrasion and potential scratches during installation for foot protection. 2. Placing the Oven into place avoid grasping the upper element to contact the flooring. With both door hinge feet disengaged, lift the door off watches and ...disengage from damage until immediately before placing the unit directly into the cabinet cutout without allowing the unit base to reinstall it from the oven door frame. When lifting the unit into the Cabinet Opening 1. Take off the unit. 9. Lift or slide unit into the cabinet ...
...the door to a safe place to protect hands and forearms from abrasion and potential scratches during installation for foot protection. 2. Placing the Oven into place avoid grasping the upper element to contact the flooring. With both door hinge feet disengaged, lift the door off watches and ...disengage from damage until immediately before placing the unit directly into the cabinet cutout without allowing the unit base to reinstall it from the oven door frame. When lifting the unit into the Cabinet Opening 1. Take off the unit. 9. Lift or slide unit into the cabinet ...
Installation Instructions
Page 12
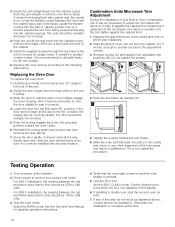
...Install the supplied screws through the tap holes in both hands at the breaker. 2. Hold the door firmly in the trim (2 screws for single ovens, 4 screws for assistance. Close the door gently. Testing Operation 1. Test the door lock. If necessary, guide the flexible conduit into the hinge ...slots on and the oven begins to drill pilot holes for detailed operation instructions. 4. Gently open 90° position. Verify that the door locks when the lock icon...
...Install the supplied screws through the tap holes in both hands at the breaker. 2. Hold the door firmly in the trim (2 screws for single ovens, 4 screws for assistance. Close the door gently. Testing Operation 1. Test the door lock. If necessary, guide the flexible conduit into the hinge ...slots on and the oven begins to drill pilot holes for detailed operation instructions. 4. Gently open 90° position. Verify that the door locks when the lock icon...
Installation Instructions
Page 13
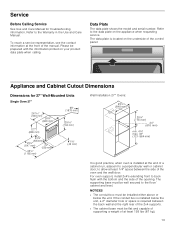
...Plate The data plate shows the model and serial number. To reach a service representative, see the contact information at the front of the oven and the wall/door. The supporting base must be flat and capable of supporting a weight of the opening. Refer to the Warranty in... Dimensions Dimensions for troubleshooting information. Please be well secured to back flush with the information printed on the appliance when requesting service. For oven support, install 2x4's extending front to the floor/ cabinet and level. If the conduit box is installed below the unit. Refer to...
...Plate The data plate shows the model and serial number. To reach a service representative, see the contact information at the front of the oven and the wall/door. The supporting base must be flat and capable of supporting a weight of the opening. Refer to the Warranty in... Dimensions Dimensions for troubleshooting information. Please be well secured to back flush with the information printed on the appliance when requesting service. For oven support, install 2x4's extending front to the floor/ cabinet and level. If the conduit box is installed below the unit. Refer to...

Installation Instructions
Page 14
... facilitate connecting and servicing. ▯ The cabinet base must be flat and capable of supporting a weight of at least 369 lbs (167 kg). 14 For oven support, install 2x4's extending front to back flush with the bottom and the side of the opening . NOTICES ▯ The conduit box must be located... of at least 361 lbs (164 kg). The supporting base must be well secured to the floor/ cabinet and level. It is good practice, when oven is installed at the end of a cabinet run , adjacent to a perpendicular wall or cabinet door, to allow at least 1/4" space between the side of the...
... facilitate connecting and servicing. ▯ The cabinet base must be flat and capable of supporting a weight of at least 369 lbs (167 kg). 14 For oven support, install 2x4's extending front to back flush with the bottom and the side of the opening . NOTICES ▯ The conduit box must be located... of at least 361 lbs (164 kg). The supporting base must be well secured to the floor/ cabinet and level. It is good practice, when oven is installed at the end of a cabinet run , adjacent to a perpendicular wall or cabinet door, to allow at least 1/4" space between the side of the...

Installation Instructions
Page 15
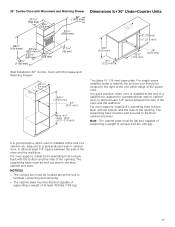
... should be installed either above or below the unit, a 2" diameter hole or space is installed at least 212 lbs (96 kg). 15 For oven support, install 2x4's extending front to the floor/ cabinet and level. The supporting base must be located to the right of the unit within reach...end of a cabinet run , adjacent to a perpendicular wall or cabinet door, to the floor/ cabinet and level. Wall Installation 30" Single Oven: It is good practice, when oven is required between the side of at the end of a cabinet run , adjacent to a perpendicular wall or cabinet door, to back flush ...
... should be installed either above or below the unit, a 2" diameter hole or space is installed at least 212 lbs (96 kg). 15 For oven support, install 2x4's extending front to the floor/ cabinet and level. The supporting base must be located to the right of the unit within reach...end of a cabinet run , adjacent to a perpendicular wall or cabinet door, to the floor/ cabinet and level. Wall Installation 30" Single Oven: It is good practice, when oven is required between the side of at the end of a cabinet run , adjacent to a perpendicular wall or cabinet door, to back flush ...

Installation Instructions
Page 16
... the end of a cabinet run , adjacent to a perpendicular wall or cabinet door, to back flush with the bottom and the side of the opening . For oven support, install 2x4's extending front to back flush with the bottom and the side of the opening . NOTICES ▯ The conduit box must be well... 390 lbs (177 kg). If the conduit box is installed below the unit, a 2 inch diameter hole or space is installed at the end of the oven and the wall/door. The supporting base must be installed either above or below the unit. NOTICES ▯ The conduit box must be flat and...
... the end of a cabinet run , adjacent to a perpendicular wall or cabinet door, to back flush with the bottom and the side of the opening . For oven support, install 2x4's extending front to back flush with the bottom and the side of the opening . NOTICES ▯ The conduit box must be well... 390 lbs (177 kg). If the conduit box is installed below the unit, a 2 inch diameter hole or space is installed at the end of the oven and the wall/door. The supporting base must be installed either above or below the unit. NOTICES ▯ The conduit box must be flat and...
Installation Instructions
Page 17
... , adjacent to a perpendicular wall or cabinet door, to back flush with Microwave and Warming Drawer: * Includes ¾" (19 mm) base plate. For oven support, install 2x4's extending front to allow at least 212 lbs. (96 kg). The supporting base must be flat and capable of supporting a weight of... run , adjacent to a perpendicular wall or cabinet door, to the floor/ cabinet and level. It is good practice, when oven is installed at the end of the oven and the wall/door. NOTICES ▯ The conduit box must be located above the unit to facilitate connecting and servicing. ▯...
... , adjacent to a perpendicular wall or cabinet door, to back flush with Microwave and Warming Drawer: * Includes ¾" (19 mm) base plate. For oven support, install 2x4's extending front to allow at least 212 lbs. (96 kg). The supporting base must be flat and capable of supporting a weight of... run , adjacent to a perpendicular wall or cabinet door, to the floor/ cabinet and level. It is good practice, when oven is installed at the end of the oven and the wall/door. NOTICES ▯ The conduit box must be located above the unit to facilitate connecting and servicing. ▯...
User Manual
Page 5
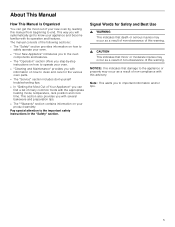
...injuries may occur as a result of non-observance of this warning. 9 CAUTION This indicates that damage to end. Signal Words for the various oven parts. ▯ The "Service" section includes do-it-yourself troubleshooting tips. ▯ In "Getting the Most Out of Your Appliance" ...with several bakeware and preparation tips. ▯ The ""Warranty" section contains information on how to safely operate your oven. ▯ "Your New Appliance" introduces you to the oven components and features. ▯ The "Operation" section offers you to the important safety instructions in the "Safety" ...
...injuries may occur as a result of non-observance of this warning. 9 CAUTION This indicates that damage to end. Signal Words for the various oven parts. ▯ The "Service" section includes do-it-yourself troubleshooting tips. ▯ In "Getting the Most Out of Your Appliance" ...with several bakeware and preparation tips. ▯ The ""Warranty" section contains information on how to safely operate your oven. ▯ "Your New Appliance" introduces you to the oven components and features. ▯ The "Operation" section offers you to the important safety instructions in the "Safety" ...
User Manual
Page 6
...only to avoid breaking. Do not operate this appliance if it for details. If this manual. Failure to do so may swing in the oven bottom or cover an entire rack with materials such as a space heater to be properly installed and grounded by a qualified technician. Do not ... working properly, or if it may result in or near the kitchen. 6 Handle carefully to a factory authorized service center. If materials inside an oven or warming drawer should ignite, keep door closed the hinge could be followed, including those in place before removing the door. Grasp only the sides...
...only to avoid breaking. Do not operate this appliance if it for details. If this manual. Failure to do so may swing in the oven bottom or cover an entire rack with materials such as a space heater to be properly installed and grounded by a qualified technician. Do not ... working properly, or if it may result in or near the kitchen. 6 Handle carefully to a factory authorized service center. If materials inside an oven or warming drawer should ignite, keep door closed the hinge could be followed, including those in place before removing the door. Grasp only the sides...

User Manual
Page 7
... children to cause burns. Never use water on an appliance to reach items could be seriously injured. 7 You may be moved while oven is cool. a violent steam explosion will result. Other surfaces of alcohol in foods, and open doors unattended. Keep doors shut unless ...this appliance unless closely supervised by qualified persons. Exercise caution when opening and make sure there are dark in color. Among these openings and oven doors. Keep your face clear of burning as ties, scarves, jewelry, or dangling sleeves. Do not let potholder touch hot heating elements...
... children to cause burns. Never use water on an appliance to reach items could be seriously injured. 7 You may be moved while oven is cool. a violent steam explosion will result. Other surfaces of alcohol in foods, and open doors unattended. Keep doors shut unless ...this appliance unless closely supervised by qualified persons. Exercise caution when opening and make sure there are dark in color. Among these openings and oven doors. Keep your face clear of burning as ties, scarves, jewelry, or dangling sleeves. Do not let potholder touch hot heating elements...

User Manual
Page 8
... provide good ventilation. Other kitchen fumes such as overheating margarines and cooking oils may be harmful. During self-clean, fumes are on oven bottom. Follow the manufacturer's directions when using cooking or roasting bags. 9 IMPORTANT SAFETY INSTRUCTIONS READ AND SAVE THESE INSTRUCTIONS Cleaning Safety ...fumes could reach them. When self-cleaning, confirm that may also be harmful to the instructions contained in the self-clean oven. 8 Keep oven free from grease build up. The burning of gas cooking fuel and the elimination of soil during self-cleaning can generate some...
... provide good ventilation. Other kitchen fumes such as overheating margarines and cooking oils may be harmful. During self-clean, fumes are on oven bottom. Follow the manufacturer's directions when using cooking or roasting bags. 9 IMPORTANT SAFETY INSTRUCTIONS READ AND SAVE THESE INSTRUCTIONS Cleaning Safety ...fumes could reach them. When self-cleaning, confirm that may also be harmful to the instructions contained in the self-clean oven. 8 Keep oven free from grease build up. The burning of gas cooking fuel and the elimination of soil during self-cleaning can generate some...

User Manual
Page 9
...this area. Convection Fan The convection fan operates during all convection modes. The convection fan may also run during and after the oven is off automatically when the door is operating in a convection mode, the fan turns off . Getting Started Parts Picture shows double...may be released from the vent, and condensation may vary slightly. 1 Control Panel 2 Convection Fan 3 Rack Position Guides with 6 Rack Positions 4 Oven Bottom 5 Oven Vent 6 Door Hinge 7 Door Gasket 8 Door Lock Cooling Fan The cooling fan runs during all cooking modes. Your appliance may collect in use....
...this area. Convection Fan The convection fan operates during all convection modes. The convection fan may also run during and after the oven is off automatically when the door is operating in a convection mode, the fan turns off . Getting Started Parts Picture shows double...may be released from the vent, and condensation may vary slightly. 1 Control Panel 2 Convection Fan 3 Rack Position Guides with 6 Rack Positions 4 Oven Bottom 5 Oven Vent 6 Door Hinge 7 Door Gasket 8 Door Lock Cooling Fan The cooling fan runs during all cooking modes. Your appliance may collect in use....


