Installation Instructions
Page 4
..." Wall-Mounted Units 13 Dimensions for 27" Under-Counter Units 15 Dimensions for 30" Wall-Mounted Units 15 Dimensions for 30" Under-Counter Units 17 THERMADOR® Support 18 Service 18 Parts and Accessories 18 4
..." Wall-Mounted Units 13 Dimensions for 27" Under-Counter Units 15 Dimensions for 30" Wall-Mounted Units 15 Dimensions for 30" Under-Counter Units 17 THERMADOR® Support 18 Service 18 Parts and Accessories 18 4
Installation Instructions
Page 5
... causing property damage or personal injury. If required by door handle. Lock service panel to specific installations. WARNING Do not repair, replace or remove any part of the owner and the installer to determine if additional requirements and/or standards apply to prevent power from being turned ON accidentally. Improper installation...
... causing property damage or personal injury. If required by door handle. Lock service panel to specific installations. WARNING Do not repair, replace or remove any part of the owner and the installer to determine if additional requirements and/or standards apply to prevent power from being turned ON accidentally. Improper installation...
Installation Instructions
Page 6
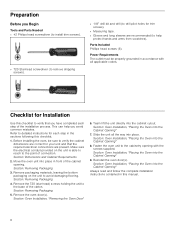
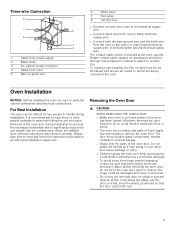
Preparation Before you Begin Tools and Parts Needed ▯ #2 Philips head screwdriver (to install trim screws). ▯ T20 Star-head screwdriver (to remove shipping screws). ▯ 1/8" drill bit and drill (to ... ▯ Gloves and long sleeves are present. Checklist for your unit and that you avoid common mistakes. Section: Oven Installation, "Placing the Oven into place. Parts Included Phillips head screws (6). Section: Removing Packaging 5. Before installing the oven, be properly grounded in the sections following this checklist to the cabinetry opening . Section...
Preparation Before you Begin Tools and Parts Needed ▯ #2 Philips head screwdriver (to install trim screws). ▯ T20 Star-head screwdriver (to remove shipping screws). ▯ 1/8" drill bit and drill (to ... ▯ Gloves and long sleeves are present. Checklist for your unit and that you avoid common mistakes. Section: Oven Installation, "Placing the Oven into place. Parts Included Phillips head screws (6). Section: Removing Packaging 5. Before installing the oven, be properly grounded in the sections following this checklist to the cabinetry opening . Section...
Installation Instructions
Page 9
... pointed objects as it are fragile. Oven Installation NOTICE: Before installing the oven, be damaged and injury could break the glass. It is heavy and parts of the oven. Please take time to assist with lifting the unit into place. the hinge could be sure to grasp the oven door firmly...
... pointed objects as it are fragile. Oven Installation NOTICE: Before installing the oven, be damaged and injury could break the glass. It is heavy and parts of the oven. Please take time to assist with lifting the unit into place. the hinge could be sure to grasp the oven door firmly...
Installation Instructions
Page 18
... if you have any questions or in the unlikely event that you have made a considerable investment in the THERMADOR® eShop or by phone. USA 800-735-4328 www.thermador.com/support Canada 800-735-4328 www.thermador.ca Parts and Accessories Parts, filters, descalers, stainless steel cleaners and more can be purchased in your...
... if you have any questions or in the unlikely event that you have made a considerable investment in the THERMADOR® eShop or by phone. USA 800-735-4328 www.thermador.com/support Canada 800-735-4328 www.thermador.ca Parts and Accessories Parts, filters, descalers, stainless steel cleaners and more can be purchased in your...
User Manual
Page 4
... and Maintenance 6 Fire Safety 6 Burn Prevention 7 Child Safety 7 Cleaning Safety 8 Cookware Safety 8 Getting Started 9 Parts 9 Accessories 10 Control 12 Touchpads 12 Display Icons 12 Operation 13 About the Appliance 13 Before Using the Appliance for ... Guide 25 Maintenance 26 Service 29 Troubleshooting Chart 29 Data Plate 30 How to Obtain Service or Parts 30 Cooking Charts 31 Baked Goods/Entrees 31 Meats 32 STATEMENT OF LIMITED PRODUCT WARRANTY .... 34 ... Out of Warranty Product 35 Warranty Exclusions 35 THERMADOR® Support 36 Service 36 Parts and Accessories 36 4
... and Maintenance 6 Fire Safety 6 Burn Prevention 7 Child Safety 7 Cleaning Safety 8 Cookware Safety 8 Getting Started 9 Parts 9 Accessories 10 Control 12 Touchpads 12 Display Icons 12 Operation 13 About the Appliance 13 Before Using the Appliance for ... Guide 25 Maintenance 26 Service 29 Troubleshooting Chart 29 Data Plate 30 How to Obtain Service or Parts 30 Cooking Charts 31 Baked Goods/Entrees 31 Meats 32 STATEMENT OF LIMITED PRODUCT WARRANTY .... 34 ... Out of Warranty Product 35 Warranty Exclusions 35 THERMADOR® Support 36 Service 36 Parts and Accessories 36 4
User Manual
Page 5
... with its operation and features. Note: This alerts you to end. This way you step-by reading this advisory. Signal Words for the various oven parts. ▯ The "Service" section includes do-it-yourself troubleshooting tips. ▯ In "Getting the Most Out of Your Appliance" you can get to operate your...
... with its operation and features. Note: This alerts you to end. This way you step-by reading this advisory. Signal Words for the various oven parts. ▯ The "Service" section includes do-it-yourself troubleshooting tips. ▯ In "Getting the Most Out of Your Appliance" you can get to operate your...
User Manual
Page 6
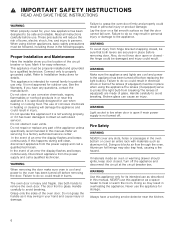
.... This appliance is heavy and fragile. Handle carefully to avoid breaking. Do not store or use as aluminum foil. Fire Safety WARNING NEVER cover any part of an error the display flashes and beeps continuously. Mark it has been damaged.
.... This appliance is heavy and fragile. Handle carefully to avoid breaking. Do not store or use as aluminum foil. Fire Safety WARNING NEVER cover any part of an error the display flashes and beeps continuously. Mark it has been damaged.

User Manual
Page 7
... hot surfaces may be stored in an appliance, in cabinets above an appliance or on an appliance to cool. Do not use water on any part of oven until they have a Class ABC extinguisher, and you already know how to climb, stand, lean, sit, or hang on cooking fires. Tie long...
... hot surfaces may be stored in an appliance, in cabinets above an appliance or on an appliance to cool. Do not use water on any part of oven until they have a Class ABC extinguisher, and you already know how to climb, stand, lean, sit, or hang on cooking fires. Tie long...

User Manual
Page 8
... some by-products which are released that the door locks and will not open. During self-clean, fumes are on oven bottom. Do not clean parts or accessories in this booklet and provide good ventilation. Follow the manufacturer's directions when using cooking or roasting bags. 9 IMPORTANT SAFETY INSTRUCTIONS READ AND SAVE...
... some by-products which are released that the door locks and will not open. During self-clean, fumes are on oven bottom. Do not clean parts or accessories in this booklet and provide good ventilation. Follow the manufacturer's directions when using cooking or roasting bags. 9 IMPORTANT SAFETY INSTRUCTIONS READ AND SAVE...

User Manual
Page 9
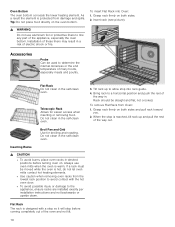
... released from the vent, and condensation may be warm when the oven is operating in this area. When the oven is in use. Getting Started Parts Picture shows double oven. Convection Fan The convection fan operates during and after the oven is off automatically when the door is normal to see...
... released from the vent, and condensation may be warm when the oven is operating in this area. When the oven is in use. Getting Started Parts Picture shows double oven. Convection Fan The convection fan operates during and after the oven is off automatically when the door is normal to see...
User Manual
Page 10
... upside down. Broil Pan and Grid Use for easier access when inserting or removing food. Always use aluminum foil or protective liners to line any part of the appliance, especially the oven bottom. Telescopic Rack Allows for broiling and roasting. To remove Flat Rack from damage and spills. Do not clean...
... upside down. Broil Pan and Grid Use for easier access when inserting or removing food. Always use aluminum foil or protective liners to line any part of the appliance, especially the oven bottom. Telescopic Rack Allows for broiling and roasting. To remove Flat Rack from damage and spills. Do not clean...
User Manual
Page 17
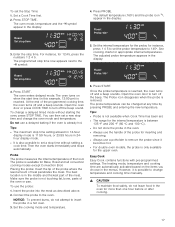
... above. 2. Set the cooking mode and temperature. 6. However, it becomes hot. ▯ For double oven models, the probe is in the middle and thickest part of heat penetrates the meat. Enter the stop time without starting the oven, press STOP TIME. To change temperature and cooking time manually. 9 CAUTION To.... The oven enters delayed mode. The oven turns on the items you choose in this example, 12:00 pm) is not touching fat, bone, parts of the food. At the end of the probe for the internal temperature is possible to change a delayed timed mode without setting a cook time. ...
... above. 2. Set the cooking mode and temperature. 6. However, it becomes hot. ▯ For double oven models, the probe is in the middle and thickest part of heat penetrates the meat. Enter the stop time without starting the oven, press STOP TIME. To change temperature and cooking time manually. 9 CAUTION To.... The oven enters delayed mode. The oven turns on the items you choose in this example, 12:00 pm) is not touching fat, bone, parts of the food. At the end of the probe for the internal temperature is possible to change a delayed timed mode without setting a cook time. ...
User Manual
Page 20
... oven bottom. For tender, light, golden brown crusts, use aluminum foil or protective liners to keep the empty broil pan in the oven during any part of pan. Condensation It is not directly above the other heavy object on the moisture content of cooking times. Aluminum Foil 9 WARNING Do not use...
... oven bottom. For tender, light, golden brown crusts, use aluminum foil or protective liners to keep the empty broil pan in the oven during any part of pan. Condensation It is not directly above the other heavy object on the moisture content of cooking times. Aluminum Foil 9 WARNING Do not use...

User Manual
Page 24
...) Fruit Apples Bananas Cherries Orange peels Orange slices Pineapple rings ▯ canned ▯ fresh Strawberries Dipped in ] cup lemon juice and 2 cups water, ]" slices. Orange part of the pieces, the amount being dried and the humidity in ] cup lemon juice and 2 cups water, ]" slices. Cut off moisture and pat dry. Cut...
...) Fruit Apples Bananas Cherries Orange peels Orange slices Pineapple rings ▯ canned ▯ fresh Strawberries Dipped in ] cup lemon juice and 2 cups water, ]" slices. Orange part of the pieces, the amount being dried and the humidity in ] cup lemon juice and 2 cups water, ]" slices. Cut off moisture and pat dry. Cut...
User Manual
Page 25
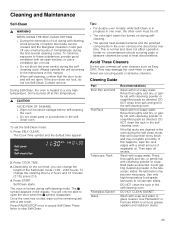
... the rack in the telescopic slides. If this happens, wipe the rack edges with hot soapy water. Press START. Cleaning Guide Part Broil Pan and Grid Flat Rack Telescopic Rack Fiberglass Gasket Glass Recommendations Wash with soapy water. Wash with hot soapy water. Avoid ...30 hours). Contact service. Avoid These Cleaners Do not use scouring pads or abrasive cleaners. Re-lubrication may damage the oven finish or parts. To minimize exposure to these substances, provide good ventilation with soap and water or glass cleaner. Use Fantastik® or Formula 409&#...
... the rack in the telescopic slides. If this happens, wipe the rack edges with hot soapy water. Press START. Cleaning Guide Part Broil Pan and Grid Flat Rack Telescopic Rack Fiberglass Gasket Glass Recommendations Wash with soapy water. Wash with hot soapy water. Avoid ...30 hours). Contact service. Avoid These Cleaners Do not use scouring pads or abrasive cleaners. Re-lubrication may damage the oven finish or parts. To minimize exposure to these substances, provide good ventilation with soap and water or glass cleaner. Use Fantastik® or Formula 409&#...

User Manual
Page 26
... in the dishwasher. Failure to a clean sponge or paper towel and wipe clean. Turn off before replacing the light bulb(s). The halogen bulb is open. Part Painted Surfaces Porcelain Surfaces Stainless Steel Surfaces Plastic & Controls Probe Printed areas (words & numbers) Recommendations Clean with soapy water, rinse and dry. Rinse and dry...
... in the dishwasher. Failure to a clean sponge or paper towel and wipe clean. Turn off before replacing the light bulb(s). The halogen bulb is open. Part Painted Surfaces Porcelain Surfaces Stainless Steel Surfaces Plastic & Controls Probe Printed areas (words & numbers) Recommendations Clean with soapy water, rinse and dry. Rinse and dry...

User Manual
Page 27
... to reach the inner catch. 7. The lens should detach easily. 6. If it from falling. 6. (B) Gently pry the lens off power to pinch behind the rounded part of a narrow flat blade screwdriver between the metal clips to the bulb housing. 3. Grasp the new bulb with a clean, dry cloth. Put the glass cover...
... to reach the inner catch. 7. The lens should detach easily. 6. If it from falling. 6. (B) Gently pry the lens off power to pinch behind the rounded part of a narrow flat blade screwdriver between the metal clips to the bulb housing. 3. Grasp the new bulb with a clean, dry cloth. Put the glass cover...

User Manual
Page 28
... injury. ▯ Failure to grasp the oven door firmly and properly could result in electrical shock or burns. ▯ The oven door is heavy and parts of the oven door.
... injury. ▯ Failure to grasp the oven door firmly and properly could result in electrical shock or burns. ▯ The oven door is heavy and parts of the oven door.
User Manual
Page 30
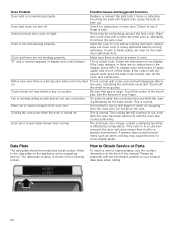
... and a number appears in the following picture. If the code is still displayed, write down the fault code number, turn off . Use the flat part of the touchpad. It is normal to display more quickly. Oven is normal. Cooling fan runs even when the oven is turned off the oven...Replace or reinsert the light bulb if loose or defective. Follow the instructions in oven door. There may cause the bulb to Obtain Service or Parts To reach a service representative, see if hinge is bent. This is normal with the information printed on light. This is not self-cleaning ...
... and a number appears in the following picture. If the code is still displayed, write down the fault code number, turn off . Use the flat part of the touchpad. It is normal to display more quickly. Oven is normal. Cooling fan runs even when the oven is turned off the oven...Replace or reinsert the light bulb if loose or defective. Follow the instructions in oven door. There may cause the bulb to Obtain Service or Parts To reach a service representative, see if hinge is bent. This is normal with the information printed on light. This is not self-cleaning ...
