Installation Instructions
Page 4
... Data Plate 13 Appliance and Cabinet Cutout Dimensions 13 Dimensions for 27" Wall-Mounted Units 13 Dimensions for 27" Under-Counter Units 15 Dimensions for 30" Wall-Mounted Units 15 Dimensions for 30" Under-Counter Units 17 THERMADOR® Support 18 Service 18 Parts and Accessories 18 4
... Data Plate 13 Appliance and Cabinet Cutout Dimensions 13 Dimensions for 27" Wall-Mounted Units 13 Dimensions for 27" Under-Counter Units 15 Dimensions for 30" Wall-Mounted Units 15 Dimensions for 30" Under-Counter Units 17 THERMADOR® Support 18 Service 18 Parts and Accessories 18 4
Installation Instructions
Page 8
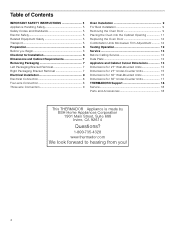
...the oven bare ground wire to either 208/240V AC, 60 Hz, 4 wire, single-phase power supply. Model ME301JP, ME301JS, MED271JS, MED301JS, MED301JP, POD301J ME302JP, ME302JS, MED272JS, MED302JS, MED302JP, PODC302J MEDMC301JS, MEDMC301JP, MEDMCW71JS, MEDMCW31JP, MEDMCW31JS, PODM301J, PODMW301J Circuit... Required 30 AMP 40 AMP 50 AMP The electrical supply should be connected to the bare (or green) electrical supply ground wire. 8...
...the oven bare ground wire to either 208/240V AC, 60 Hz, 4 wire, single-phase power supply. Model ME301JP, ME301JS, MED271JS, MED301JS, MED301JP, POD301J ME302JP, ME302JS, MED272JS, MED302JS, MED302JP, PODC302J MEDMC301JS, MEDMC301JP, MEDMCW71JS, MEDMCW31JP, MEDMCW31JS, PODM301J, PODMW301J Circuit... Required 30 AMP 40 AMP 50 AMP The electrical supply should be connected to the bare (or green) electrical supply ground wire. 8...

Installation Instructions
Page 10
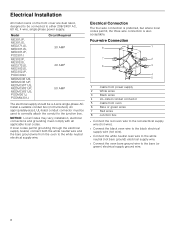
... Grasp the door firmly using a T20 star head driver. 6. To remove the oven door: 1. With the toggles in place as they will not fall over 30 pounds. 9 CAUTION To avoid damage do not allow the door to assist with closing the door.
... Grasp the door firmly using a T20 star head driver. 6. To remove the oven door: 1. With the toggles in place as they will not fall over 30 pounds. 9 CAUTION To avoid damage do not allow the door to assist with closing the door.
Installation Instructions
Page 12
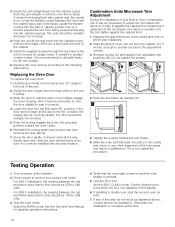
... for the trim screws. 6. If the door will not lower all the way back into the hinge slots on which side it is complete at a 30° angle to the front of the microwave trim frame is recommended to preheat. 5. Select the BAKE mode. Replace the oven door(s) according to 240...
... for the trim screws. 6. If the door will not lower all the way back into the hinge slots on which side it is complete at a 30° angle to the front of the microwave trim frame is recommended to preheat. 5. Select the BAKE mode. Replace the oven door(s) according to 240...

Installation Instructions
Page 15
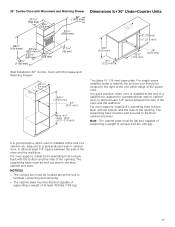
Wall Installation 30" Single Oven: It is good practice, when oven is installed at the end of a cabinet run , adjacent to a perpendicular wall or cabinet door, to back ... installed either above or below the unit, a 2" diameter hole or space is installed below the unit. Dimensions for 27" Under-Counter Units Dimensions for 30" Wall-Mounted Units 30" Single Oven * Includes ¾" (19 mm) base plate. NOTICES ▯ The conduit box must be flat and capable of supporting a weight of at...
Wall Installation 30" Single Oven: It is good practice, when oven is installed at the end of a cabinet run , adjacent to a perpendicular wall or cabinet door, to back ... installed either above or below the unit, a 2" diameter hole or space is installed below the unit. Dimensions for 27" Under-Counter Units Dimensions for 30" Wall-Mounted Units 30" Single Oven * Includes ¾" (19 mm) base plate. NOTICES ▯ The conduit box must be flat and capable of supporting a weight of at...

Installation Instructions
Page 16
... Oven with Microwave Wall Installation 30" Double Oven: Wall Installation 30" Combo Oven with Microwave: It is good practice, when oven is installed at the end of a cabinet run, adjacent to a perpendicular wall or cabinet door, ...
... Oven with Microwave Wall Installation 30" Double Oven: Wall Installation 30" Combo Oven with Microwave: It is good practice, when oven is installed at the end of a cabinet run, adjacent to a perpendicular wall or cabinet door, ...
Installation Instructions
Page 17
..., install 2x4's extending front to back flush with Microwave and Warming Drawer: * Includes ¾" (19 mm) base plate. 30" Combo Oven with Microwave and Warming Drawer Dimensions for 30" Under-Counter Units Wall Installation 30" Combo Oven with the bottom and the side of the power cord. For single ovens installed under a cabinet...
..., install 2x4's extending front to back flush with Microwave and Warming Drawer: * Includes ¾" (19 mm) base plate. 30" Combo Oven with Microwave and Warming Drawer Dimensions for 30" Under-Counter Units Wall Installation 30" Combo Oven with the bottom and the side of the power cord. For single ovens installed under a cabinet...
User Manual
Page 4
...Maintenance 25 Self-Clean 25 Avoid These Cleaners 25 Cleaning Guide 25 Maintenance 26 Service 29 Troubleshooting Chart 29 Data Plate 30 How to Obtain Service or Parts 30 Cooking Charts 31 Baked Goods/Entrees 31 Meats 32 STATEMENT OF LIMITED PRODUCT WARRANTY .... 34 What this Warranty Covers ...& Who it Applies to 34 How Long the Warranty Lasts 34 Repair/Replace as Your Exclusive Remedy 34 Out of Warranty Product 35 Warranty Exclusions 35 THERMADOR®...
...Maintenance 25 Self-Clean 25 Avoid These Cleaners 25 Cleaning Guide 25 Maintenance 26 Service 29 Troubleshooting Chart 29 Data Plate 30 How to Obtain Service or Parts 30 Cooking Charts 31 Baked Goods/Entrees 31 Meats 32 STATEMENT OF LIMITED PRODUCT WARRANTY .... 34 What this Warranty Covers ...& Who it Applies to 34 How Long the Warranty Lasts 34 Repair/Replace as Your Exclusive Remedy 34 Out of Warranty Product 35 Warranty Exclusions 35 THERMADOR®...
User Manual
Page 14
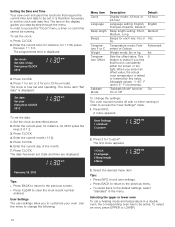
... 12-hour 24-hour Language setting: English, English Français, Español, Deutsch Beep length setting: Short, Medium Medium, Long Beeps for 11:30, press the keys 1 1 3 0. When you step-by this menu to change the settings: The oven must be running in a double oven, the corresponding oven has...
... 12-hour 24-hour Language setting: English, English Français, Español, Deutsch Beep length setting: Short, Medium Medium, Long Beeps for 11:30, press the keys 1 1 3 0. When you step-by this menu to change the settings: The oven must be running in a double oven, the corresponding oven has...

User Manual
Page 15
... for the following: ▯ COOK TIME: Turns off beep for the end of the timer. ▯ ON/OFF: Turns off beep for 10 minutes and 30 seconds.
... for the following: ▯ COOK TIME: Turns off beep for the end of the timer. ▯ ON/OFF: Turns off beep for 10 minutes and 30 seconds.
User Manual
Page 19
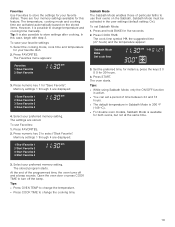
..., press the keys 3 0 0 0 for five seconds. 2. The stored program starts. Tip: It is available for this case, begin with step 2. Press and hold BAKE for 30 hours. 4. Memory settings 1 through 4 are displayed: 4. Press FAVORITES. 2. To set a period of particular faiths to use Favorites: 1. At the end of the programmed time, the...
..., press the keys 3 0 0 0 for five seconds. 2. The stored program starts. Tip: It is available for this case, begin with step 2. Press and hold BAKE for 30 hours. 4. Memory settings 1 through 4 are displayed: 4. Press FAVORITES. 2. To set a period of particular faiths to use Favorites: 1. At the end of the programmed time, the...
User Manual
Page 21
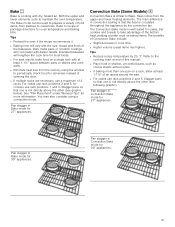
...advantage of the bottom heat, yielding a better crust on a rack, allow at least 1-1^" of 2 racks. Pan stagger in Bake mode for 30" appliances. 21 The main difference in convection baking is that one pan on baked items. The benefits of opening the door. ▯ If ... cookie sheets without sides. ▯ If baking more information. Heat comes from pastries to casseroles. Pan stagger in Convection Bake mode for 30" appliances. Pan stagger in Convection Bake mode for oven temperature and baking time. Refer to the cooking chart at least 1-1^" space between pans...
...advantage of the bottom heat, yielding a better crust on a rack, allow at least 1-1^" of 2 racks. Pan stagger in Bake mode for 30" appliances. 21 The main difference in convection baking is that one pan on baked items. The benefits of opening the door. ▯ If ... cookie sheets without sides. ▯ If baking more information. Heat comes from pastries to casseroles. Pan stagger in Convection Bake mode for 30" appliances. Pan stagger in Convection Bake mode for oven temperature and baking time. Refer to the cooking chart at least 1-1^" space between pans...
User Manual
Page 25
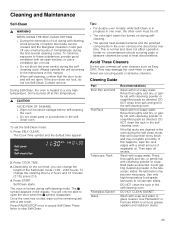
...-Clean. Use Fantastik® or Formula 409® to 2 hours and 15 minutes (2:15), press 215. 4. To change the length of the Self-Clean mode (1:30 - 2:30 hours). Self-Clean starts. The I symbol disappears. Tips: ▯ For double oven models: while Self-Clean is in progress in this manual. ▯ When self...
...-Clean. Use Fantastik® or Formula 409® to 2 hours and 15 minutes (2:15), press 215. 4. To change the length of the Self-Clean mode (1:30 - 2:30 hours). Self-Clean starts. The I symbol disappears. Tips: ▯ For double oven models: while Self-Clean is in progress in this manual. ▯ When self...

User Manual
Page 28
Lay the door on a flat, smooth surface, positioned so that the door cannot fall over 30 pounds. 9 CAUTION To avoid damage do not allow the door to safely lay the door after removal so it will go. Read the preceeding caution ...
Lay the door on a flat, smooth surface, positioned so that the door cannot fall over 30 pounds. 9 CAUTION To avoid damage do not allow the door to safely lay the door after removal so it will go. Read the preceeding caution ...
User Manual
Page 29
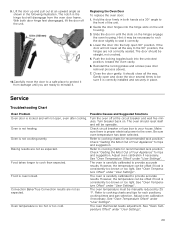
9. With both hands at a 30° angle to the 90° position, the hinges are not as expected. Replacing the Oven Door To replace the oven door: 1. Push the locking ...
9. With both hands at a 30° angle to the 90° position, the hinges are not as expected. Replacing the Oven Door To replace the oven door: 1. Push the locking ...
User Manual
Page 30
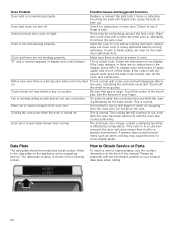
... prior to attemping to oven. This is electrical power to remove the lens cover. Use the flat part of your product data plate when calling. 30 On some models, the convection fan runs while the oven is shown in the display, press INFO to cool before running self-clean. Do not...
... prior to attemping to oven. This is electrical power to remove the lens cover. Use the flat part of your product data plate when calling. 30 On some models, the convection fan runs while the oven is shown in the display, press INFO to cool before running self-clean. Do not...

User Manual
Page 31
...-33 8-10 8-10 8-10 8" or 9" square cookie sheet cookie sheet cookie sheet 8" or 9" square cookie sheet cookie sheet cookie sheet Single 3 Single 2 Single 3 recipe time 30-40 45-55 casserole dish quiche dish soufflé dish Single Multiple Single Single Multiple Single Multiple 3 2 & 5 3 3 2 & 5 3 2 & 5 pkg time cookie sheet pkg time cookie sheet...
...-33 8-10 8-10 8-10 8" or 9" square cookie sheet cookie sheet cookie sheet 8" or 9" square cookie sheet cookie sheet cookie sheet Single 3 Single 2 Single 3 recipe time 30-40 45-55 casserole dish quiche dish soufflé dish Single Multiple Single Single Multiple Single Multiple 3 2 & 5 3 3 2 & 5 3 2 & 5 pkg time cookie sheet pkg time cookie sheet...

User Manual
Page 32
... 325° F 2 3-3.5 lbs. Stuffed turkey requires additional roasting time. Time of the meat. Bake 425° F Yes Self-rising, Frozen Convect. Roast Medium, 160° F 30-38 min./lb. perature ing Mode Preheat Oven Number Rack Posi- Bake 350° F Yes Convect. Bake on package Yes Quick Breads Biscuits True Convect...
... 325° F 2 3-3.5 lbs. Stuffed turkey requires additional roasting time. Time of the meat. Bake 425° F Yes Self-rising, Frozen Convect. Roast Medium, 160° F 30-38 min./lb. perature ing Mode Preheat Oven Number Rack Posi- Bake 350° F Yes Convect. Bake on package Yes Quick Breads Biscuits True Convect...

User Manual
Page 33
...F Rack Position 2 Internal Temperature Doneness Cooking Time Medium-rare, 18-33 min./lb. 145° F Food Stand Time Covered No 10-15 min. 2 Medium, 30-35 min/lb. Roast Loin Roast, 3-6 lbs. No Side 1: 8-10 No Side 2: 8-9 Side 1: 9-11 No Side 2: 8-10 Side 1: 3-5 No ...Steaks 1 1/2-inch thick Steaks 1 1/2-inch thick Tenderloin, 2-3 lbs. Roast Chops, 1-inch thick Broil High 4 Chops, 1-inch thick Broil High 4 Medium, 160° F 30-35 min./lb. No Medium-rare, Side 1: 4-6 No 145° F Side 2: 4-5 Medium, Side 1: 5-7 No 160° F Side 2: 5-6 10-15 min....
...F Rack Position 2 Internal Temperature Doneness Cooking Time Medium-rare, 18-33 min./lb. 145° F Food Stand Time Covered No 10-15 min. 2 Medium, 30-35 min/lb. Roast Loin Roast, 3-6 lbs. No Side 1: 8-10 No Side 2: 8-9 Side 1: 9-11 No Side 2: 8-10 Side 1: 3-5 No ...Steaks 1 1/2-inch thick Steaks 1 1/2-inch thick Tenderloin, 2-3 lbs. Roast Chops, 1-inch thick Broil High 4 Chops, 1-inch thick Broil High 4 Medium, 160° F 30-35 min./lb. No Medium-rare, Side 1: 4-6 No 145° F Side 2: 4-5 Medium, Side 1: 5-7 No 160° F Side 2: 5-6 10-15 min....