Design Guide - Side-by-Side Refrigeration
Page 4
... are available to match our built-in or Professional Series product lines, or choose our custom panel models to order a Trimless Trim Kit (TRIMKITSXS). This series requires the installation of it. You will remain above freezing. You can come through the floor... grounded 3 prong electrical outlet should be within 4" (10.2 cm) of charge, parts and service labor in the accessory kit. Before installing a Thermador Sideby-Side, be turned off valve is available to a GFCI (Ground Fault Circuit Interrupter) protected outlet, nuisance tripping of cooling. This accessory kit ...
... are available to match our built-in or Professional Series product lines, or choose our custom panel models to order a Trimless Trim Kit (TRIMKITSXS). This series requires the installation of it. You will remain above freezing. You can come through the floor... grounded 3 prong electrical outlet should be within 4" (10.2 cm) of charge, parts and service labor in the accessory kit. Before installing a Thermador Sideby-Side, be turned off valve is available to a GFCI (Ground Fault Circuit Interrupter) protected outlet, nuisance tripping of cooling. This accessory kit ...
Design Guide - Side-by-Side Refrigeration
Page 13
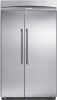
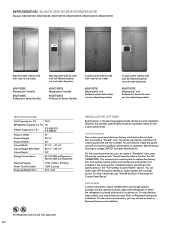
...carpenter. KBUDT4255E Masterpiece® handles KBUDT4265E Professional Series Handles Custom panel side-by -side with full-filtered external ice and water dispenser. ft.) 25.2 Refrigerator Capacity (cu. This series requires the installation of Thermador's handles or select handles from another ...a Trimless Trim Kit (TRIMKITSXS). KBUIT4255E Masterpiece® handles KBUIT4265E Professional Series Handles Stainless steel side-by -side with internal ice maker. CUSTOM PANELS The custom panel series features factory-installed, traditional style trim to the specifications in the ...
...carpenter. KBUDT4255E Masterpiece® handles KBUDT4265E Professional Series Handles Custom panel side-by -side with full-filtered external ice and water dispenser. ft.) 25.2 Refrigerator Capacity (cu. This series requires the installation of Thermador's handles or select handles from another ...a Trimless Trim Kit (TRIMKITSXS). KBUIT4255E Masterpiece® handles KBUIT4265E Professional Series Handles Stainless steel side-by -side with internal ice maker. CUSTOM PANELS The custom panel series features factory-installed, traditional style trim to the specifications in the ...
Design Guide - Side-by-Side Refrigeration
Page 15
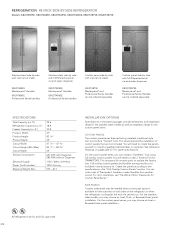
...accessory kit. See dimension drawings on both sides of Thermador's handles or select handles from another source. Custom panel side-by -side with full-filtered external ice and water dispenser. KBUDT4875E Masterpiece® and Professional Series Handles can create a "frameless" look . Full-...and installation detail for the stainless steel models as well as installation detail for Custom Panel Series." KBUIT4855E Masterpiece® Handles KBUIT4865E Professional Series handles Stainless steel side-by -side with full-filtered external ice and water dispenser.
...accessory kit. See dimension drawings on both sides of Thermador's handles or select handles from another source. Custom panel side-by -side with full-filtered external ice and water dispenser. KBUDT4875E Masterpiece® and Professional Series Handles can create a "frameless" look . Full-...and installation detail for the stainless steel models as well as installation detail for Custom Panel Series." KBUIT4855E Masterpiece® Handles KBUIT4865E Professional Series handles Stainless steel side-by -side with full-filtered external ice and water dispenser.
Installation Instructions
Page 17
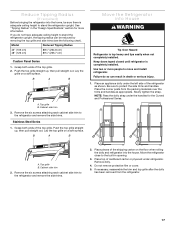
... Radius 42" (106 cm) 48" (122 cm) 88¹⁄₂" (224.8 cm) 89¹⁄₄" (226.7 cm) Custom Panel Series 1. Place an appliance dolly under the left side of the top grille. NOTE: Pass the dolly strap under refrigerator. Cabinet side trim 2. If necessary, .... Lay the top grille on a soft surface. Be sure to the built-in the "Design Specifications" section for the Curved and Professional Series. Grasp both ends of the refrigerator as appropriate. Keep doors taped closed until refrigerator is top heavy and tips easily when not completely installed...
... Radius 42" (106 cm) 48" (122 cm) 88¹⁄₂" (224.8 cm) 89¹⁄₄" (226.7 cm) Custom Panel Series 1. Place an appliance dolly under the left side of the top grille. NOTE: Pass the dolly strap under refrigerator. Cabinet side trim 2. If necessary, .... Lay the top grille on a soft surface. Be sure to the built-in the "Design Specifications" section for the Curved and Professional Series. Grasp both ends of the refrigerator as appropriate. Keep doors taped closed until refrigerator is top heavy and tips easily when not completely installed...