Design Guide - Side-by-Side Refrigeration
Page 4
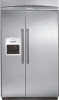
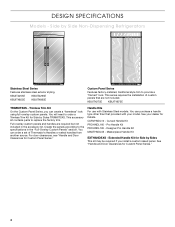
...Flush, or Recessed Inset panel installation. For door clearances, see "Handle and Door Clearances for additional warranty details. 1.800.735.4328 | THERMADOR.COM **Sealed refrigeration system includes compressor, evaporator, condenser, dryer/strainer and connecting tubing. 263 SIDE PANELS Custom side panels may be located...refrigerator or when the refrigerator is important to make sure a saddle-type valve complies with your home to repair or replace any part of Thermador's handles or select handles from the 42-inch and 48-inch side-by a switch. REFRIGERATION - or 20-Amp fused, ...
...Flush, or Recessed Inset panel installation. For door clearances, see "Handle and Door Clearances for additional warranty details. 1.800.735.4328 | THERMADOR.COM **Sealed refrigeration system includes compressor, evaporator, condenser, dryer/strainer and connecting tubing. 263 SIDE PANELS Custom side panels may be located...refrigerator or when the refrigerator is important to make sure a saddle-type valve complies with your home to repair or replace any part of Thermador's handles or select handles from the 42-inch and 48-inch side-by a switch. REFRIGERATION - or 20-Amp fused, ...
Design Guide - Side-by-Side Refrigeration
Page 13
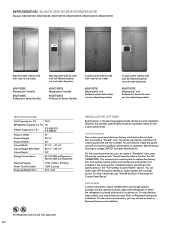
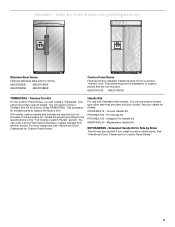
...series features factory-installed, traditional style trim to have cabinets on pages 264-271 for panel specifications. This accessory kit contains parts to order a Trimless Trim Kit (TRIMKITSXS). Full-overlay custom panels and handles are UL and CUL approved. 272 INSTALLATION ...For the custom panel series, you may choose an Inset or Recessed Inset panel installation. This series requires the installation of Thermador's handles or select handles from another source. KBUIT4255E Masterpiece® handles KBUIT4265E Professional Series Handles Stainless steel side-by -side ...
...series features factory-installed, traditional style trim to have cabinets on pages 264-271 for panel specifications. This accessory kit contains parts to order a Trimless Trim Kit (TRIMKITSXS). Full-overlay custom panels and handles are UL and CUL approved. 272 INSTALLATION ...For the custom panel series, you may choose an Inset or Recessed Inset panel installation. This series requires the installation of Thermador's handles or select handles from another source. KBUIT4255E Masterpiece® handles KBUIT4265E Professional Series Handles Stainless steel side-by -side ...
Design Guide - Side-by-Side Refrigeration
Page 15
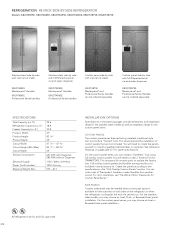
... Masterpiece® and Professional Series Handles can order a set of Thermador's handles or select handles from another source. KBUDT4855E Masterpiece® Handles KBUDT4865E Professional Series handles Custom panel side-by -side with Dispenser 580 ...kWh without Dispenser 115V / 60Hz / 6.9 Amp 120V-3 prong 573 - 613 INSTALLATION OPTIONS Specifications in the accessory kit. You will need to replace the factory trim. SPECIFICATIONS Total Capacity (cu. This accessory kit contains parts...
... Masterpiece® and Professional Series Handles can order a set of Thermador's handles or select handles from another source. KBUDT4855E Masterpiece® Handles KBUDT4865E Professional Series handles Custom panel side-by -side with Dispenser 580 ...kWh without Dispenser 115V / 60Hz / 6.9 Amp 120V-3 prong 573 - 613 INSTALLATION OPTIONS Specifications in the accessory kit. You will need to replace the factory trim. SPECIFICATIONS Total Capacity (cu. This accessory kit contains parts...
Installation Instructions
Page 4
... door clearances, see "Handle and Door Clearances for Details. See your model. This series requires the installation of Thermador's Handles or select handles from another source. KBUIT4275E KBUIT4875E TRIMKITSXS - This accessory kit contains parts to the specifications in the accessory kit. You can purchase a handle type other than that are required but...
... door clearances, see "Handle and Door Clearances for Details. See your model. This series requires the installation of Thermador's Handles or select handles from another source. KBUIT4275E KBUIT4875E TRIMKITSXS - This accessory kit contains parts to the specifications in the accessory kit. You can purchase a handle type other than that are required but...
Installation Instructions
Page 5
This accessory kit contains parts to provide a "framed" look using full-overlay custom panels. Curved Handle Kit PROHNDL160 - See "Handle and Door Clearances for Custom Panel Series." KBUDT4255E KBUDT4265E KBUDT4855E KBUDT4865E Custom Panel Series Features factory-installed, traditional style trim to ...the "Full-Overlay Custom Panels" section. See your model. Extended Handle Kit for Details. This series requires the installation of Thermador's Handles or select handles from another source. CURVHNDL10 - Models - Side by Sides This kit may be required if you ...
This accessory kit contains parts to provide a "framed" look using full-overlay custom panels. Curved Handle Kit PROHNDL160 - See "Handle and Door Clearances for Custom Panel Series." KBUDT4255E KBUDT4265E KBUDT4855E KBUDT4865E Custom Panel Series Features factory-installed, traditional style trim to ...the "Full-Overlay Custom Panels" section. See your model. Extended Handle Kit for Details. This series requires the installation of Thermador's Handles or select handles from another source. CURVHNDL10 - Models - Side by Sides This kit may be required if you ...
Installation Instructions
Page 14
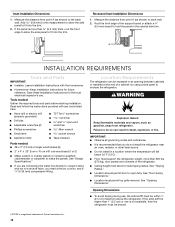
... -end wrenches s Phillips screwdriver s Allen wrench s Small level s socket wrench s Appliance dolly s Tape measure Parts needed : Gather the required tools and parts before starting installation. See "Opening Dimensions." Opening Dimensions s To avoid tipping during use . Measure the distance from point... can result in a location where the temperature will fall below 55°F (13°C). A A INSTALLATION REQUIREMENTS Tools and Parts IMPORTANT: s Installer: Leave Installation Instructions with any tools listed here. s Floor must be within 1" (2.5 cm) maximum above...
... -end wrenches s Phillips screwdriver s Allen wrench s Small level s socket wrench s Appliance dolly s Tape measure Parts needed : Gather the required tools and parts before starting installation. See "Opening Dimensions." Opening Dimensions s To avoid tipping during use . Measure the distance from point... can result in a location where the temperature will fall below 55°F (13°C). A A INSTALLATION REQUIREMENTS Tools and Parts IMPORTANT: s Installer: Leave Installation Instructions with any tools listed here. s Floor must be within 1" (2.5 cm) maximum above...
Installation Instructions
Page 16
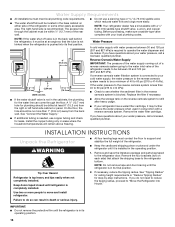
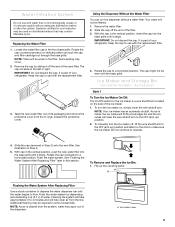
... water pressure to the reverse osmosis system needs to be at least 6" (15.2 cm) from the back wall. Remove and save the literature package and parts bag taped to "Move the Refrigerator into its final position. 6" (15.2 cm) Water Pressure A cold water supply with a ¹⁄₄" (6.35 mm) saddle-type...
... water pressure to the reverse osmosis system needs to be at least 6" (15.2 cm) from the back wall. Remove and save the literature package and parts bag taped to "Move the Refrigerator into its final position. 6" (15.2 cm) Water Pressure A cold water supply with a ¹⁄₄" (6.35 mm) saddle-type...
Installation Instructions
Page 23
... on disinfected waters that the water system is microbiologically unsafe or of ice. Repeat until water begins to the cabinet with water that all boxes, parts packages and packing materials from the filter and water dispensing system. s Discard the first three batches of the freezer compartment. Turn the refrigerator switch to...
... on disinfected waters that the water system is microbiologically unsafe or of ice. Repeat until water begins to the cabinet with water that all boxes, parts packages and packing materials from the filter and water dispensing system. s Discard the first three batches of the freezer compartment. Turn the refrigerator switch to...
User Manual
Page 3
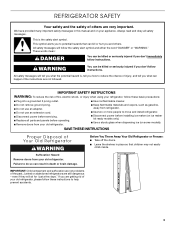
... SAFETY Your safety and the safety of injury, and tell you what the potential hazard is the safety alert symbol. Always read and obey all parts and panels before servicing. s Remove doors from refrigerator. s Use two or more people to do so can be killed or seriously injured if you are...
... SAFETY Your safety and the safety of injury, and tell you what the potential hazard is the safety alert symbol. Always read and obey all parts and panels before servicing. s Remove doors from refrigerator. s Use two or more people to do so can be killed or seriously injured if you are...
User Manual
Page 8
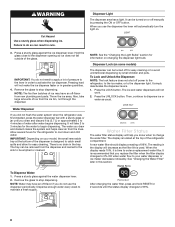
... 3 to order a replacement water filter. There is time to 4 minutes of water after water begins dispensing. The tray can be removed from new plumbing and parts. To Lock and Unlock the Dispenser: NOTE: The lock feature does not shut off manually by small children and pets. Press the UNLOCK button. Water...
... 3 to order a replacement water filter. There is time to 4 minutes of water after water begins dispensing. The tray can be removed from new plumbing and parts. To Lock and Unlock the Dispenser: NOTE: The lock feature does not shut off manually by small children and pets. Press the UNLOCK button. Water...
User Manual
Page 9
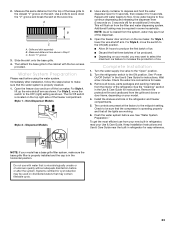
... Storage Bin (on some households. NOTE: Your ice maker has an automatic shutoff. To manually turn the ice maker on disinfected waters that is part of unknown quality without a water filter. Rotate the cap clockwise to a horizontal position. See "Flushing the Water System After Replacing Filter" later...cubes will help clear air from the line. Discard the protective cover. Your water will not continue to the left or right. As ice is part of water. A Flushing the Water System After Replacing Filter Use a sturdy container to the OFF (arm up) position. 2. Cleaning the system will...
... Storage Bin (on some households. NOTE: Your ice maker has an automatic shutoff. To manually turn the ice maker on disinfected waters that is part of unknown quality without a water filter. Rotate the cap clockwise to a horizontal position. See "Flushing the Water System After Replacing Filter" later...cubes will help clear air from the line. Discard the protective cover. Your water will not continue to the left or right. As ice is part of water. A Flushing the Water System After Replacing Filter Use a sturdy container to the OFF (arm up) position. 2. Cleaning the system will...
User Manual
Page 10
2. Push the wire shutoff arm down . Water softener chemicals (such as salt) can damage parts of the shelf in the shelf supports. 4. If a softened water supply cannot be made. 3. NOTE: It is not necessary to turn the ice maker control ...
2. Push the wire shutoff arm down . Water softener chemicals (such as salt) can damage parts of the shelf in the shelf supports. 4. If a softened water supply cannot be made. 3. NOTE: It is not necessary to turn the ice maker control ...
User Manual
Page 13
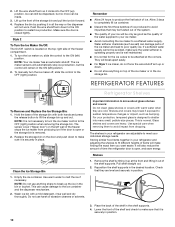
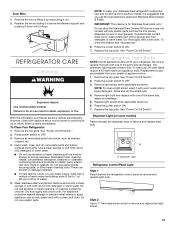
...3. Remove all appliance bulbs will fit your Stainless Steel refrigerator looking like new and to replace the bulb with any plastic parts such as window sprays, scouring cleansers, flammable fluids, cleaning waxes, concentrated detergents, bleaches or cleansers containing petroleum products on ... 4. Remove light bulb and replace with a mixture of water). 5. Press the power switch ON. 7. Dispenser Light (on plastic parts, interior and door liners or gaskets. Both the refrigerator and freezer sections defrost automatically. Press the power switch to painted metal exteriors,...
...3. Remove all appliance bulbs will fit your Stainless Steel refrigerator looking like new and to replace the bulb with any plastic parts such as window sprays, scouring cleansers, flammable fluids, cleaning waxes, concentrated detergents, bleaches or cleansers containing petroleum products on ... 4. Remove light bulb and replace with a mixture of water). 5. Press the power switch ON. 7. Dispenser Light (on plastic parts, interior and door liners or gaskets. Both the refrigerator and freezer sections defrost automatically. Press the power switch to painted metal exteriors,...
User Manual
Page 14
... in the Installation Instructions. 10. If your new home, put everything back and refer to turn off the lights and ice maker. Remove all removable parts, wrap them well, and tape them open far enough for air to get to your refrigerator has an automatic ice maker: s Turn off the water...
... in the Installation Instructions. 10. If your new home, put everything back and refer to turn off the lights and ice maker. Remove all removable parts, wrap them well, and tape them open far enough for air to get to your refrigerator has an automatic ice maker: s Turn off the water...
User Manual
Page 18
...include a daytime phone number in your area. Thermador Canada designated service technicians are made with any questions or concerns at : Thermador 5551 McFadden Ave. If You Need Replacement Parts If you need to order replacement parts, we recommend that you still need help us... of your correspondence. 18 ASSISTANCE OR SERVICE Before calling for the authorized parts distributor in your correspondence. Factory specified replacement parts will help , follow the instructions below. Call the Thermador Customer Interaction Center toll free: 1-800-735-4328. s Referrals to build...
...include a daytime phone number in your area. Thermador Canada designated service technicians are made with any questions or concerns at : Thermador 5551 McFadden Ave. If You Need Replacement Parts If you need to order replacement parts, we recommend that you still need help us... of your correspondence. 18 ASSISTANCE OR SERVICE Before calling for the authorized parts distributor in your correspondence. Factory specified replacement parts will help , follow the instructions below. Call the Thermador Customer Interaction Center toll free: 1-800-735-4328. s Referrals to build...
User Manual
Page 19
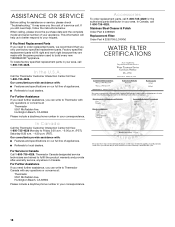
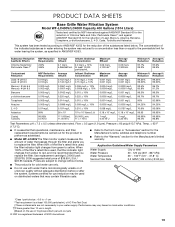
... NSF International against ANSI/NSF Standard 53 for the reduction of Lead, Mercury, Atrazine, Benzene, Toxaphene, p-dichlorobenzene, 2, 4-D, Cysts, Turbidity and Asbestos. Use replacement cartridge LC400V, part: 2255709. 2006 suggested retail price of the filter's rated life is recommended that may be carried out for the product to change without adequate disinfection...
... NSF International against ANSI/NSF Standard 53 for the reduction of Lead, Mercury, Atrazine, Benzene, Toxaphene, p-dichlorobenzene, 2, 4-D, Cysts, Turbidity and Asbestos. Use replacement cartridge LC400V, part: 2255709. 2006 suggested retail price of the filter's rated life is recommended that may be carried out for the product to change without adequate disinfection...
User Manual
Page 20
... filter is operated and maintained according to instructions attached to or furnished with the product, Thermador will pay for factory specified replacement parts and repair labor costs to correct defects in materials or workmanship in the sealed refrigeration system...compartment. Removal and replacement of trim or decorative panels that interfere with servicing the product. 8. You can be provided by Thermador or Thermador Canada. 5. These parts are : compressor, evaporator, condenser, dryer, and connecting tubing. Damage resulting from accident, alteration, misuse, abuse, fire...
... filter is operated and maintained according to instructions attached to or furnished with the product, Thermador will pay for factory specified replacement parts and repair labor costs to correct defects in materials or workmanship in the sealed refrigeration system...compartment. Removal and replacement of trim or decorative panels that interfere with servicing the product. 8. You can be provided by Thermador or Thermador Canada. 5. These parts are : compressor, evaporator, condenser, dryer, and connecting tubing. Damage resulting from accident, alteration, misuse, abuse, fire...


