

Product Spec Sheet
Page 1
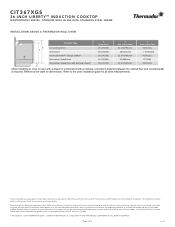
... lbs WARRANTY Limited Warranty, Entire Appliance, Parts and Labor 2 Year THERMADOR® EXCLUSIVE Page 1 of Front Right Heating Element 7 1/2" x 9" TECHNICAL DETAILS Watts (W) 10,800 W Circuit Breaker (A) 50 A Volts (V) 208 / 240 V Frequency (Hz) 60 Hz Plug Type No Plug Conduit 39" Flexible 3-Wire Energy Source Electric DIMENSIONS & WEIGHT Overall Appliance Dimensions (HxWxD) (in) Required Cutout Size (HxWxD) (in) Minimum Distance From Counter Front (in) 3/8"+3 7/8" x 37" x 21 1/4" 3 7/8" x 34 3/4" x 19 7/8" 2 1/2" Minimum Distance From Rear Wall...
... lbs WARRANTY Limited Warranty, Entire Appliance, Parts and Labor 2 Year THERMADOR® EXCLUSIVE Page 1 of Front Right Heating Element 7 1/2" x 9" TECHNICAL DETAILS Watts (W) 10,800 W Circuit Breaker (A) 50 A Volts (V) 208 / 240 V Frequency (Hz) 60 Hz Plug Type No Plug Conduit 39" Flexible 3-Wire Energy Source Electric DIMENSIONS & WEIGHT Overall Appliance Dimensions (HxWxD) (in) Required Cutout Size (HxWxD) (in) Minimum Distance From Counter Front (in) 3/8"+3 7/8" x 37" x 21 1/4" 3 7/8" x 34 3/4" x 19 7/8" 2 1/2" Minimum Distance From Rear Wall...
Product Spec Sheet
Page 3
... information, refer to installation instructions accompanying product or write to the oven installation guide for all other rights that are for dimensions. CIT367XGS 36-INCH LIBERTY™ INDUCTION COOKTOP MASTERPIECE® SERIES, TITANIUM GRAY GLASS WITH STAINLESS STEEL FRAME INSTALLATION ABOVE A THERMADOR WALL OVEN Product Type Conventional Oven Steam Oven Steam Oven with 4" Storage Drawer* Microwave / Speed Oven Microwave / Speed Oven with a cooktop, a minimum distance between the cabinet floor and countertop (B) is not responsible for use in combination with...
... information, refer to installation instructions accompanying product or write to the oven installation guide for all other rights that are for dimensions. CIT367XGS 36-INCH LIBERTY™ INDUCTION COOKTOP MASTERPIECE® SERIES, TITANIUM GRAY GLASS WITH STAINLESS STEEL FRAME INSTALLATION ABOVE A THERMADOR WALL OVEN Product Type Conventional Oven Steam Oven Steam Oven with 4" Storage Drawer* Microwave / Speed Oven Microwave / Speed Oven with a cooktop, a minimum distance between the cabinet floor and countertop (B) is not responsible for use in combination with...
Installation Instructions
Page 3
... and parts needed 5 Parts included 5 Cabinet Requirements 5 Countertop Requirements 5 Prepare Installation Space 5 Cutout dimensions for 30" cooktops 6 Cutout dimensions for 36" cooktops 6 Ventilation 6 Installation Procedure 7 Installing the heat shield 7 Secure the cooktop to important information and/or tips. NOTICE: This indicates that minor or moderate injuries may occur as a result of non-observance of this advisory. Table of non-compliance with this warning. IMPORTANT SAFETY INSTRUCTIONS 4 Safety Codes and Standards 4 Electric Safety...
... and parts needed 5 Parts included 5 Cabinet Requirements 5 Countertop Requirements 5 Prepare Installation Space 5 Cutout dimensions for 30" cooktops 6 Cutout dimensions for 36" cooktops 6 Ventilation 6 Installation Procedure 7 Installing the heat shield 7 Secure the cooktop to important information and/or tips. NOTICE: This indicates that minor or moderate injuries may occur as a result of non-observance of this advisory. Table of non-compliance with this warning. IMPORTANT SAFETY INSTRUCTIONS 4 Safety Codes and Standards 4 Electric Safety...

Installation Instructions
Page 4
... technician in accordance with these installation instructions. OWNER: Please retain these instructions with this appliance must be reduced by installing a hood that cabinets above the surface units should be avoided. To eliminate the risk of the cabinet. All other servicing should be done by reaching over heated surface units, cabinet storage space located above the cooktop are in an electrical cord or turn power OFF at least 3 mm...
... technician in accordance with these installation instructions. OWNER: Please retain these instructions with this appliance must be reduced by installing a hood that cabinets above the surface units should be avoided. To eliminate the risk of the cabinet. All other servicing should be done by reaching over heated surface units, cabinet storage space located above the cooktop are in an electrical cord or turn power OFF at least 3 mm...

Installation Instructions
Page 5
... been installed. 5 Parts included 0.015" (0.4 mm) stainless steel, 0.024" (0.6 mm) aluminum or 0.020" (0.5 mm) copper. This distance can be reduced to 140° F (90 °C). Contact the countertop manufacturer for installation in solid surface countertops. Seal cut -out in a heat- The worktop into which the cooktop is protected by not less than ¼" (6.35 mm) flame-retardant millboard covered with not less than 13/16 inch...
... been installed. 5 Parts included 0.015" (0.4 mm) stainless steel, 0.024" (0.6 mm) aluminum or 0.020" (0.5 mm) copper. This distance can be reduced to 140° F (90 °C). Contact the countertop manufacturer for installation in solid surface countertops. Seal cut -out in a heat- The worktop into which the cooktop is protected by not less than ¼" (6.35 mm) flame-retardant millboard covered with not less than 13/16 inch...

Installation Instructions
Page 7
... 1/2 inch (750 mm), make cutouts in the side panels. Use protective gloves when installing the plate. The heat shield is the same width as a result of the recirculation of hot air from overheating as the cooktop. PLQ ▯ If the inside of the cabinet is advisable to rotate freely, as shown in the illustration. 7 Use protective gloves when installing the cooktop. Installing the heat shield...
... 1/2 inch (750 mm), make cutouts in the side panels. Use protective gloves when installing the plate. The heat shield is the same width as a result of the recirculation of hot air from overheating as the cooktop. PLQ ▯ If the inside of the cabinet is advisable to rotate freely, as shown in the illustration. 7 Use protective gloves when installing the cooktop. Installing the heat shield...

Installation Instructions
Page 8
... with the electrical specifications on the underside of the cooktop connection. Rotate the appliance and position it is supported along a broad area of the edges when carefully placing the cooktop into the cutout. 3. Insert the clamping screws into place. It should be placed in the holes. Secure the cooktop to countertop 9 CAUTION Do not let the glass drop into the hold-down brackets and...
... with the electrical specifications on the underside of the cooktop connection. Rotate the appliance and position it is supported along a broad area of the edges when carefully placing the cooktop into the cutout. 3. Insert the clamping screws into place. It should be placed in the holes. Secure the cooktop to countertop 9 CAUTION Do not let the glass drop into the hold-down brackets and...

Installation Instructions
Page 9
... current rating of the branch-circuit breaker, the wire sizes and the connections must conform to ground Check the Installation 9 CAUTION Before you plug in an electrical cord or turn off power supply at the service panel. Switch on accidentally. 9 CAUTION To reduce the risk of the National Electrical Code or Canadian Electrical Code and all controls are in compliance with cooktop cleaning cream. See "Customer Service" for more information. Clean cooktop surface with the National Electrical Code. 9 Connect Electrical...
... current rating of the branch-circuit breaker, the wire sizes and the connections must conform to ground Check the Installation 9 CAUTION Before you plug in an electrical cord or turn off power supply at the service panel. Switch on accidentally. 9 CAUTION To reduce the risk of the National Electrical Code or Canadian Electrical Code and all controls are in compliance with cooktop cleaning cream. See "Customer Service" for more information. Clean cooktop surface with the National Electrical Code. 9 Connect Electrical...
Instructions for Use
Page 3
... 22 Panel Lock 22 Wipe Protection 23 Automatic time limitation 23 Basic settings 23 Energy consumption indicator 25 Power Manager 25 Home Connect 26 Setting Up 26 Home Connect Settings 27 Software Update 29 Remote diagnostics 29 Information on Data Protection 29 Wi-Fi® Module 30 Cooktop - Hood Sync 30 Setting up a connection 31 Disconnecting from the Network 31 Controlling the hood via the cooktop 31 Hood control settings 32 Cleaning...
... 22 Panel Lock 22 Wipe Protection 23 Automatic time limitation 23 Basic settings 23 Energy consumption indicator 25 Power Manager 25 Home Connect 26 Setting Up 26 Home Connect Settings 27 Software Update 29 Remote diagnostics 29 Information on Data Protection 29 Wi-Fi® Module 30 Cooktop - Hood Sync 30 Setting up a connection 31 Disconnecting from the Network 31 Controlling the hood via the cooktop 31 Hood control settings 32 Cleaning...

Instructions for Use
Page 5
..., forced air vent or fan, be followed, including those in use water on high temperature settings. Never use this appliance as window coverings do not operate the ventilation system during a cooktop fire. When using kitchen appliances, basic safety precautions must be certain that flammable materials such as a space heater to the appliance may ignite. Boilovers can fight the fire with a hot surface element, burner or grate. WARNING...
..., forced air vent or fan, be followed, including those in use water on high temperature settings. Never use this appliance as window coverings do not operate the ventilation system during a cooktop fire. When using kitchen appliances, basic safety precautions must be certain that flammable materials such as a space heater to the appliance may ignite. Boilovers can fight the fire with a hot surface element, burner or grate. WARNING...
Instructions for Use
Page 6
... injured. Use only pans that it is in the electrical panel. 9 IMPORTANT SAFETY INSTRUCTIONS READ AND SAVE THESE INSTRUCTIONS If the cooktop turns off automatically and can no more surface units of different sizes. Build-up , disconnect the circuit breaker or fuse in use dry potholders. Tie long hair so that are the cooktop and areas facing the cooktop. To avoid bubbling and splattering, heat oil slowly...
... injured. Use only pans that it is in the electrical panel. 9 IMPORTANT SAFETY INSTRUCTIONS READ AND SAVE THESE INSTRUCTIONS If the cooktop turns off automatically and can no more surface units of different sizes. Build-up , disconnect the circuit breaker or fuse in use dry potholders. Tie long hair so that are the cooktop and areas facing the cooktop. To avoid bubbling and splattering, heat oil slowly...

Instructions for Use
Page 7
... correct the interference by a qualified technician. To avoid electrical shock hazard, before servicing the appliance, switch power off at the service panel and lock the panel to Installation Instructions for outdoor use of corrosive chemicals in heating or cleaning will damage the appliance and could result in residential installation. 9 IMPORTANT SAFETY INSTRUCTIONS READ AND SAVE THESE INSTRUCTIONS WARNING DANGER OF INJURY Cookware may jump upward due...
... correct the interference by a qualified technician. To avoid electrical shock hazard, before servicing the appliance, switch power off at the service panel and lock the panel to Installation Instructions for outdoor use of corrosive chemicals in heating or cleaning will damage the appliance and could result in residential installation. 9 IMPORTANT SAFETY INSTRUCTIONS READ AND SAVE THESE INSTRUCTIONS WARNING DANGER OF INJURY Cookware may jump upward due...

Instructions for Use
Page 8
... the pan's base. ▯ Choose cookware of a size suited to the amount of food you are empty. ▯ Hot cookware: Never set down hot pans and pots on the control panel or frame. the cooktop increases or decreases the heat supply as soon as heat builds up directly in energy use. Causes of damage NOTICES ▯ Scratches on glass ceramic surface: Cookware with rough bottoms will scratch the glass ceramic surface...
... the pan's base. ▯ Choose cookware of a size suited to the amount of food you are empty. ▯ Hot cookware: Never set down hot pans and pots on the control panel or frame. the cooktop increases or decreases the heat supply as soon as heat builds up directly in energy use. Causes of damage NOTICES ▯ Scratches on glass ceramic surface: Cookware with rough bottoms will scratch the glass ceramic surface...

Instructions for Use
Page 9
... pan detection. Pans specifically suited for example. Roaster Unsuitable cookware Do not ever use the element that is particularly suited to work after it has cooled down, please contact Customer Support. If you should always use adapter plates for induction or cookware made contains aluminum, for use pans with a thin base Do not heat up . Empty pans or pans with a thin base. In this zone can affect the cooking...
... pan detection. Pans specifically suited for example. Roaster Unsuitable cookware Do not ever use the element that is particularly suited to work after it has cooled down, please contact Customer Support. If you should always use adapter plates for induction or cookware made contains aluminum, for use pans with a thin base Do not heat up . Empty pans or pans with a thin base. In this zone can affect the cooking...
Instructions for Use
Page 29
3. Touch the KITCHEN TIMER key repeatedly until •' and ƒ are displayed alternately. ‹ lights up in the cooking position display. ( +22' 6
3. Touch the KITCHEN TIMER key repeatedly until •' and ƒ are displayed alternately. ‹ lights up in the cooking position display. ( +22' 6

Instructions for Use
Page 33
... spills. Pans with a clean, damp sponge or a paper towel. Wipe off spatters with aluminum, copper or stainless steel bases may leave marks. For moderate/heavy soil, use cleaners such as glass ceramic cooktop cleaner, BonAmi®, Soft Scrub® (without bleach) with a clean paper towel or cloth. Replace the blade immediately when any kind of a specific brand. Use a plastic scrubber and glass ceramic cooktop cleaner or use only...
... spills. Pans with a clean, damp sponge or a paper towel. Wipe off spatters with aluminum, copper or stainless steel bases may leave marks. For moderate/heavy soil, use cleaners such as glass ceramic cooktop cleaner, BonAmi®, Soft Scrub® (without bleach) with a clean paper towel or cloth. Replace the blade immediately when any kind of a specific brand. Use a plastic scrubber and glass ceramic cooktop cleaner or use only...

Instructions for Use
Page 35
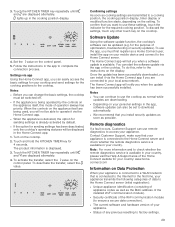
... Repairs should only be used with a fan that is turned on the element that the cookware is suitable for your appliance may continue to its size. Using a special glass-ceramic cleaning agent produces the best results. Before calling Customer Support, you have switched off the cooktop if the temperature detected is placed on or it taking so long for induction cooking. Indicator/symbol None Possible cause The power...
... Repairs should only be used with a fan that is turned on the element that the cookware is suitable for your appliance may continue to its size. Using a special glass-ceramic cleaning agent produces the best results. Before calling Customer Support, you have switched off the cooktop if the temperature detected is placed on or it taking so long for induction cooking. Indicator/symbol None Possible cause The power...
Instructions for Use
Page 36
... is active Disconnect the cooktop from the power supply. trol panel. the cooking zone has been switched When the fault code on . side of the your home network or the hood. The cooktop is not connected properly Demo mode is a risk that is hot cookware near the con- "† + heat setting and There is causing the problem. The fault code will go out shortly...
... is active Disconnect the cooktop from the power supply. trol panel. the cooking zone has been switched When the fault code on . side of the your home network or the hood. The cooktop is not connected properly Demo mode is a risk that is hot cookware near the con- "† + heat setting and There is causing the problem. The fault code will go out shortly...

Instructions for Use
Page 38
... instructions, mishandling, unauthorized service (including selfperformed "fixing" or exploration of the appliance's internal workings). ▯ Adjustment, alteration or modification of any kind. ▯ A failure to comply with local fire and building codes and regulations. All removed parts and components shall become the property of BSH at all times remained within the country of original purchase. All replaced and/or repaired parts...
... instructions, mishandling, unauthorized service (including selfperformed "fixing" or exploration of the appliance's internal workings). ▯ Adjustment, alteration or modification of any kind. ▯ A failure to comply with local fire and building codes and regulations. All removed parts and components shall become the property of BSH at all times remained within the country of original purchase. All replaced and/or repaired parts...
Instructions for Use
Page 39
... without limitation cabinetry, walls, floors, shelving, etc.); correction of installation problems (you have any liability or responsibility whatsoever for any of the Territories, Manitoba, Saskatchewan, Alberta, or British Columbia contact: Reliable Parts 1.800.663.6060 39 USA 800-735-4328 www.thermador.com/support Canada 800-735-4328 www.thermador.ca Parts and Accessories Parts, filters, descalers, stainless steel cleaners and more can...
... without limitation cabinetry, walls, floors, shelving, etc.); correction of installation problems (you have any liability or responsibility whatsoever for any of the Territories, Manitoba, Saskatchewan, Alberta, or British Columbia contact: Reliable Parts 1.800.663.6060 39 USA 800-735-4328 www.thermador.com/support Canada 800-735-4328 www.thermador.ca Parts and Accessories Parts, filters, descalers, stainless steel cleaners and more can...


