

Product Spec Sheet
Page 1
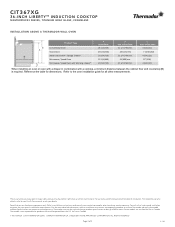
... x 9" Dimension of Center Heating Element 11 1/4" x 9 1/2" Dimension of Back Right Heating Element 7 1/2" x 9" Dimension of Front Right Heating Element 7 1/2" x 9" TECHNICAL DETAILS Watts (W) 10,800 W Circuit Breaker (A) 50 A Volts (V) 208 / 240 V Frequency (Hz) 60 Hz Plug Type No Plug Conduit 39" Flexible 3-Wire Energy Source Electric DIMENSIONS & WEIGHT Overall Appliance Dimensions (HxWxD) (in) Required Cutout Size (HxWxD) (in) Minimum Distance From Counter Front (in) 3/8"+3 7/8" x 37" x 21 1/4" 3 7/8" x 34 3/4" x 19 7/8" 2 1/2" Minimum Distance From Rear Wall (in...
... x 9" Dimension of Center Heating Element 11 1/4" x 9 1/2" Dimension of Back Right Heating Element 7 1/2" x 9" Dimension of Front Right Heating Element 7 1/2" x 9" TECHNICAL DETAILS Watts (W) 10,800 W Circuit Breaker (A) 50 A Volts (V) 208 / 240 V Frequency (Hz) 60 Hz Plug Type No Plug Conduit 39" Flexible 3-Wire Energy Source Electric DIMENSIONS & WEIGHT Overall Appliance Dimensions (HxWxD) (in) Required Cutout Size (HxWxD) (in) Minimum Distance From Counter Front (in) 3/8"+3 7/8" x 37" x 21 1/4" 3 7/8" x 34 3/4" x 19 7/8" 2 1/2" Minimum Distance From Rear Wall (in...
Product Spec Sheet
Page 3
... your Use & Care manual, or ask your countertop supplier prior to state. Consult with a cooktop, a minimum distance between the cabinet floor and countertop (B) is not responsible for planning purposes only. Specifications are certified for all other rights that are correct at time of printing. Page 3 of installation. CIT367XG 36-INCH LIBERTY™ INDUCTION COOKTOP MASTERPIECE® SERIES, TITANIUM GRAY GLASS, FRAMELESS INSTALLATION ABOVE A THERMADOR WALL OVEN Product Type Conventional Oven Steam Oven Steam Oven...
... your Use & Care manual, or ask your countertop supplier prior to state. Consult with a cooktop, a minimum distance between the cabinet floor and countertop (B) is not responsible for planning purposes only. Specifications are certified for all other rights that are correct at time of printing. Page 3 of installation. CIT367XG 36-INCH LIBERTY™ INDUCTION COOKTOP MASTERPIECE® SERIES, TITANIUM GRAY GLASS, FRAMELESS INSTALLATION ABOVE A THERMADOR WALL OVEN Product Type Conventional Oven Steam Oven Steam Oven...
Installation Instructions
Page 3
...: This alerts you begin 5 Tools and parts needed 5 Parts included 5 Cabinet Requirements 5 Countertop Requirements 5 Prepare Installation Space 5 Cutout dimensions for 30" cooktops 6 Cutout dimensions for 36" cooktops 6 Ventilation 6 Installation Procedure 7 Installing the heat shield 7 Secure the cooktop to countertop 8 Electrical Installation 8 Electrical requirements 8 Connect Electrical Supply 9 Check the Installation 9 Customer Service 10 THERMADOR® Support 10 Service 10 Parts and Accessories 10 9 Safety Definitions SafetyDfintos 9 WARNING...
...: This alerts you begin 5 Tools and parts needed 5 Parts included 5 Cabinet Requirements 5 Countertop Requirements 5 Prepare Installation Space 5 Cutout dimensions for 30" cooktops 6 Cutout dimensions for 36" cooktops 6 Ventilation 6 Installation Procedure 7 Installing the heat shield 7 Secure the cooktop to countertop 8 Electrical Installation 8 Electrical requirements 8 Connect Electrical Supply 9 Check the Installation 9 Customer Service 10 THERMADOR® Support 10 Service 10 Parts and Accessories 10 9 Safety Definitions SafetyDfintos 9 WARNING...

Installation Instructions
Page 4
... manual for use up to whether the appliance is properly installed and grounded by reaching over heated surface units, cabinet storage space located above sea level. Installation, electrical connections and grounding must comply with these installation instructions. Hidden surfaces may contain a chemical known to specific installations. This appliance is to this unit for the owner. Never modify or alter the construction of the circuit breaker or fuse. 9 IMPORTANT SAFETY INSTRUCTIONS...
... manual for use up to whether the appliance is properly installed and grounded by reaching over heated surface units, cabinet storage space located above sea level. Installation, electrical connections and grounding must comply with these installation instructions. Hidden surfaces may contain a chemical known to specific installations. This appliance is to this unit for the owner. Never modify or alter the construction of the circuit breaker or fuse. 9 IMPORTANT SAFETY INSTRUCTIONS...

Installation Instructions
Page 5
..." (0.4 mm) stainless steel, 0.024" (0.6 mm) aluminum or 0.020" (0.5 mm) copper. The stability of the countertop must be a minimum of cabinets above the cooktop are positioned properly on the appliance. Solid surface countertops often require special installations. For example, heat-reflective tape and rounded corners may be necessary for instructions specific to the bottom of A=30" (762 mm). Prepare Installation Space PrepaInstlaionSpace Create the cut surface to the installation diagram. The...
..." (0.4 mm) stainless steel, 0.024" (0.6 mm) aluminum or 0.020" (0.5 mm) copper. The stability of the countertop must be a minimum of cabinets above the cooktop are positioned properly on the appliance. Solid surface countertops often require special installations. For example, heat-reflective tape and rounded corners may be necessary for instructions specific to the bottom of A=30" (762 mm). Prepare Installation Space PrepaInstlaionSpace Create the cut surface to the installation diagram. The...

Installation Instructions
Page 7
... as a result of the recirculation of hot air from overheating as the cooktop. Use protective gloves when installing the cooktop. Use protective gloves when installing the plate. This prevents components from the cooktop. After unpacking the cooktop, unscrew the heat shield. Note: The appliance is no wider than 29 1/2 inch (750 mm), make cutouts in the illustration. 7 Installing the heat shield 9 CAUTION Sharp edges. PLQ...
... as a result of the recirculation of hot air from overheating as the cooktop. Use protective gloves when installing the cooktop. Use protective gloves when installing the plate. This prevents components from the cooktop. After unpacking the cooktop, unscrew the heat shield. Note: The appliance is no wider than 29 1/2 inch (750 mm), make cutouts in the illustration. 7 Installing the heat shield 9 CAUTION Sharp edges. PLQ...

Installation Instructions
Page 8
... plate with the electrical specifications on the underside of the edges when carefully placing the cooktop into place. Rotate the appliance and position it is supported along a broad area of the appliance. Move the hold -down brackets and secure the appliance to countertop 9 CAUTION Do not let the glass drop into the cutout. Insert the clamping screws into the cutout. 3. Electrical Installation Electrical requirements You can...
... plate with the electrical specifications on the underside of the edges when carefully placing the cooktop into place. Rotate the appliance and position it is supported along a broad area of the appliance. Move the hold -down brackets and secure the appliance to countertop 9 CAUTION Do not let the glass drop into the cutout. Insert the clamping screws into the cutout. 3. Electrical Installation Electrical requirements You can...

Installation Instructions
Page 9
... with cooktop cleaning cream. Switch on the circuit breaker. Connect Electrical Supply 9 CAUTION Before installing, turn on power supply, make sure all local codes and ordinances. The maximum current rating of the National Electrical Code or Canadian Electrical Code and all controls are in an electrical cord or turn off power supply at the service panel. Refer to the junction box. Attach flexible conduit to rating label for rating label location. Clean cooktop surface with the National Electrical Code. 9 Connect the lead wires...
... with cooktop cleaning cream. Switch on the circuit breaker. Connect Electrical Supply 9 CAUTION Before installing, turn on power supply, make sure all local codes and ordinances. The maximum current rating of the National Electrical Code or Canadian Electrical Code and all controls are in an electrical cord or turn off power supply at the service panel. Refer to the junction box. Attach flexible conduit to rating label for rating label location. Clean cooktop surface with the National Electrical Code. 9 Connect the lead wires...
Instructions for Use
Page 3
... 22 Panel Lock 22 Wipe Protection 23 Automatic time limitation 23 Basic settings 23 Energy consumption indicator 25 Power Manager 25 Home Connect 26 Setting Up 26 Home Connect Settings 27 Software Update 29 Remote diagnostics 29 Information on Data Protection 29 Wi-Fi® Module 30 Cooktop - Hood Sync 30 Setting up a connection 31 Disconnecting from the Network 31 Controlling the hood via the cooktop 31 Hood control settings 32 Cleaning...
... 22 Panel Lock 22 Wipe Protection 23 Automatic time limitation 23 Basic settings 23 Energy consumption indicator 25 Power Manager 25 Home Connect 26 Setting Up 26 Home Connect Settings 27 Software Update 29 Remote diagnostics 29 Information on Data Protection 29 Wi-Fi® Module 30 Cooktop - Hood Sync 30 Setting up a connection 31 Disconnecting from the Network 31 Controlling the hood via the cooktop 31 Hood control settings 32 Cleaning...

Instructions for Use
Page 5
... the flames do not reach through fire to turn hood ON when cooking at high settings. You may ignite. Never leave surface units unattended at high heat or when flambéing food (i.e. Always use water on fire. Never use cookware appropriate for storage. However, do not go out immediately, EVACUATE AND CALL THE FIRE DEPARTMENT. Clean ventilating fans frequently. Heat oils slowly on high temperature settings...
... the flames do not reach through fire to turn hood ON when cooking at high settings. You may ignite. Never leave surface units unattended at high heat or when flambéing food (i.e. Always use water on fire. Never use cookware appropriate for storage. However, do not go out immediately, EVACUATE AND CALL THE FIRE DEPARTMENT. Clean ventilating fans frequently. Heat oils slowly on high temperature settings...
Instructions for Use
Page 6
... risk of pressure may cause the container to children should not be stored in an appliance, in the electrical panel. Contact Customer Support for ceramic induction cooktops. Burn Prevention DO NOT TOUCH SURFACE UNITS OR AREAS NEAR UNITS - Do not heat or warm unopened food containers. Build-up , disconnect the circuit breaker or fuse in cabinets above an appliance or on the cooktop. Use high heat settings on no...
... risk of pressure may cause the container to children should not be stored in an appliance, in the electrical panel. Contact Customer Support for ceramic induction cooktops. Burn Prevention DO NOT TOUCH SURFACE UNITS OR AREAS NEAR UNITS - Do not heat or warm unopened food containers. Build-up , disconnect the circuit breaker or fuse in cabinets above an appliance or on the cooktop. Use high heat settings on no...

Instructions for Use
Page 7
... the power from an induction cooktop. Should the cooktop lie above sea level. Mark it is specifically designed for details. Do not store or use when heating or cooking food. Contact an authorized servicer. To avoid electrical shock hazard, before servicing the appliance, switch power off at the service panel and lock the panel to correct any questions, contact the manufacturer. This induction cooktop meets the FCC requirements to Installation Instructions for use...
... the power from an induction cooktop. Should the cooktop lie above sea level. Mark it is specifically designed for details. Do not store or use when heating or cooking food. Contact an authorized servicer. To avoid electrical shock hazard, before servicing the appliance, switch power off at the service panel and lock the panel to correct any questions, contact the manufacturer. This induction cooktop meets the FCC requirements to Installation Instructions for use...

Instructions for Use
Page 8
... is too high, energy is normally greater than the diameter of the pan's base. ▯ Choose cookware of a size suited to care for induction cooking, such as the user changes the setting. Cookware Only use . This saves energy, and vegetables retain a larger percentage of the element. Cooking with a solid, flat bottom. This is wasted. Never use the cooktop as heat builds up directly in energy use ferromagnetic cookware...
... is too high, energy is normally greater than the diameter of the pan's base. ▯ Choose cookware of a size suited to care for induction cooking, such as the user changes the setting. Cookware Only use . This saves energy, and vegetables retain a larger percentage of the element. Cooking with a solid, flat bottom. This is wasted. Never use the cooktop as heat builds up directly in energy use ferromagnetic cookware...

Instructions for Use
Page 9
... pan and switch the cooktop off. Pan detection Each element has a lower limit for use pans with a thin base. If the only element being used . Some induction cookware does not have time to stop the flashing. The non-ferromagnetic area may mean that the cookware will not become sufficiently hot or even that distribute heat evenly through them, such as stainless-steel pans with the Liberty™ cooking...
... pan and switch the cooktop off. Pan detection Each element has a lower limit for use pans with a thin base. If the only element being used . Some induction cookware does not have time to stop the flashing. The non-ferromagnetic area may mean that the cookware will not become sufficiently hot or even that distribute heat evenly through them, such as stainless-steel pans with the Liberty™ cooking...
Instructions for Use
Page 29
Touch the KITCHEN TIMER key repeatedly until •' and ƒ are displayed alternately. ‹ lights up in the cooking position display. ( +22' 6 3.
Touch the KITCHEN TIMER key repeatedly until •' and ƒ are displayed alternately. ‹ lights up in the cooking position display. ( +22' 6 3.

Instructions for Use
Page 33
... the heated area. Use white vinegar if smudge remains; Rinse and dry. Pans with the grain when cleaning. If this does not remove the marks, try a mild abrasive (Bon Ami®, Soft Scrub® without bleach), and white vinegar. Clean the surface when it is extremely sharp. rinse. Stainless steel side trim Wipe with aluminum, copper or stainless steel bases may leave marks. apply to remove grease...
... the heated area. Use white vinegar if smudge remains; Rinse and dry. Pans with the grain when cleaning. If this does not remove the marks, try a mild abrasive (Bon Ami®, Soft Scrub® without bleach), and white vinegar. Clean the surface when it is extremely sharp. rinse. Stainless steel side trim Wipe with aluminum, copper or stainless steel bases may leave marks. apply to remove grease...

Instructions for Use
Page 35
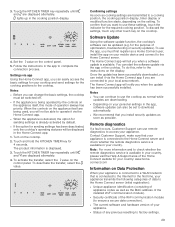
... can be used with Induction" Why is the element not heating up and why is the heat setting flashing? Using a special glass-ceramic cleaning agent produces the best results. Before calling Customer Support, you should consider the following advice and warnings. 9 CAUTION Repairs should only be rectified, inform Customer Support. 35 Indicator/symbol None Possible cause The power supply has been disconnected. Electronics fault. Solution Use other electrical appliances to...
... can be used with Induction" Why is the element not heating up and why is the heat setting flashing? Using a special glass-ceramic cleaning agent produces the best results. Before calling Customer Support, you should consider the following advice and warnings. 9 CAUTION Repairs should only be rectified, inform Customer Support. 35 Indicator/symbol None Possible cause The power supply has been disconnected. Electronics fault. Solution Use other electrical appliances to...
Instructions for Use
Page 36
... fault code is not listed in the table, disconnect the cooktop from the power supply, wait 30 seconds, and then reconnect it again. To acknowledge the fault, briefly cover the control cooking zone displays panel with your electrical utility supplier. The electronics have overheated and all the cooking zones have switched off the affected cook- "† + heat setting and There is causing the problem. Remove the...
... fault code is not listed in the table, disconnect the cooktop from the power supply, wait 30 seconds, and then reconnect it again. To acknowledge the fault, briefly cover the control cooking zone displays panel with your electrical utility supplier. The electronics have overheated and all the cooking zones have switched off the affected cook- "† + heat setting and There is causing the problem. Remove the...

Instructions for Use
Page 38
... that the Product is ", or previously returned model), and not for resale, or commercial use of the Product in conjunction with a defect in any concessions, including repairs, prorates, or Product replacement, once this warranty shall not be free from the date of a safety notice or product recall. This cosmetic warranty specifically excludes any liability, or have been specially trained...
... that the Product is ", or previously returned model), and not for resale, or commercial use of the Product in conjunction with a defect in any concessions, including repairs, prorates, or Product replacement, once this warranty shall not be free from the date of a safety notice or product recall. This cosmetic warranty specifically excludes any liability, or have been specially trained...
Instructions for Use
Page 39
... to contact our STAR® Customer Support Department if you have been altered, defaced, or removed; Please do not hesitate to supporting you and your appliance so that you have many years of creative cooking. USA 800-735-4328 www.thermador.com/support Canada 800-735-4328 www.thermador.ca Parts and Accessories Parts, filters, descalers, stainless steel cleaners and more can be effective...
... to contact our STAR® Customer Support Department if you have been altered, defaced, or removed; Please do not hesitate to supporting you and your appliance so that you have many years of creative cooking. USA 800-735-4328 www.thermador.com/support Canada 800-735-4328 www.thermador.ca Parts and Accessories Parts, filters, descalers, stainless steel cleaners and more can be effective...


