
Design Guide - Induction Cooktops
Page 4
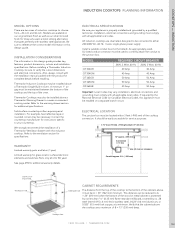
...a qualified technician. Be sure to 5th year) See page 294 for glass ceramic surface/electronic elements and switches; Before installing a Thermador Induction Cooktop, be maintained between the bottom of the cooktop and the top of the cooktop connection. Also, always consult with the... Code (or Canadian Electrical Code), this design guide. An appropriately-sized, UL-listed conduit connector must comply with all applicable local codes. MODEL CIT304GB CIT304GM CIT365GB CIT365GM CIS365GB REQUIRED CIRCUIT BREAKER 240V, 3 Wire, 60 Hz 208V, 3 Wire, 60 Hz 40 Amp 40 Amp 40 Amp 40...
...a qualified technician. Be sure to 5th year) See page 294 for glass ceramic surface/electronic elements and switches; Before installing a Thermador Induction Cooktop, be maintained between the bottom of the cooktop and the top of the cooktop connection. Also, always consult with the... Code (or Canadian Electrical Code), this design guide. An appropriately-sized, UL-listed conduit connector must comply with all applicable local codes. MODEL CIT304GB CIT304GM CIT365GB CIT365GM CIS365GB REQUIRED CIRCUIT BREAKER 240V, 3 Wire, 60 Hz 208V, 3 Wire, 60 Hz 40 Amp 40 Amp 40 Amp 40...
Design Guide - Induction Cooktops
Page 6
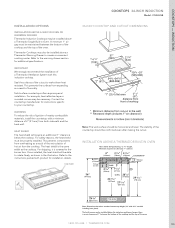
... maintained between the bottom of the cooktop and the top of the oven. 1.800.735.4328 | THERMADOR.COM 105 Solid surface countertops often require special installation. For example, heat reflective tape or rounded corners may be able to the instructions packed ... from overheating as a result of the recirculation of humidity. INDUCTION COOKTOPS 36-INCH INDUCTION Model: CIS365GB INSTALLATION OPTIONS INSTALLATION ABOVE A BUILT-IN OVEN OR WARMING DRAWER Thermador Induction Cooktops may be confirmed even after making the cutout. This prevents the surfaces from the...
... maintained between the bottom of the cooktop and the top of the oven. 1.800.735.4328 | THERMADOR.COM 105 Solid surface countertops often require special installation. For example, heat reflective tape or rounded corners may be able to the instructions packed ... from overheating as a result of the recirculation of humidity. INDUCTION COOKTOPS 36-INCH INDUCTION Model: CIS365GB INSTALLATION OPTIONS INSTALLATION ABOVE A BUILT-IN OVEN OR WARMING DRAWER Thermador Induction Cooktops may be confirmed even after making the cutout. This prevents the surfaces from the...

Design Guide - Induction Cooktops
Page 8
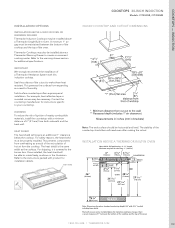
... the cooktop. This prevents the surfaces from both side walls and the back wall. Refer to the warming drawer section for additional specifications. INSTALLATION ABOVE A THERMADOR BUILT-IN OVEN Heat shield: Self positioning - 2 3/8" length, Minimum required air clearance: 1" (26 mm) 6 3/4" (172 mm) Fitting / Conduit 36" (914 mm) 4" (102 mm) 3 1/8" 4 3/16...
... the cooktop. This prevents the surfaces from both side walls and the back wall. Refer to the warming drawer section for additional specifications. INSTALLATION ABOVE A THERMADOR BUILT-IN OVEN Heat shield: Self positioning - 2 3/8" length, Minimum required air clearance: 1" (26 mm) 6 3/4" (172 mm) Fitting / Conduit 36" (914 mm) 4" (102 mm) 3 1/8" 4 3/16...
Design Guide - Induction Cooktops
Page 10
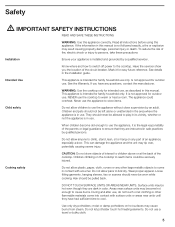
... to your countertop. INDUCTION INSTALLATION OPTIONS INSTALLATION ABOve A BUILT-IN OveN Or WArMING DrAWer Thermador Induction Cooktops may be installed above a Thermador Warming Drawer to create a convenient cooking center. IMPOrTANT We strongly recommend the installation of the oven. For example...CIT304GB, CIT304GM 30-INCH COOkTOp AND CUTOUT DIMENSIONS Note: The work surface should be horizontal and level. WArNING To reduce the risk of ignition of the countertop should be confirmed even after making the cutout. A minimum 1" air gap must be installed above a Thermador...
... to your countertop. INDUCTION INSTALLATION OPTIONS INSTALLATION ABOve A BUILT-IN OveN Or WArMING DrAWer Thermador Induction Cooktops may be installed above a Thermador Warming Drawer to create a convenient cooking center. IMPOrTANT We strongly recommend the installation of the oven. For example...CIT304GB, CIT304GM 30-INCH COOkTOp AND CUTOUT DIMENSIONS Note: The work surface should be horizontal and level. WArNING To reduce the risk of ignition of the countertop should be confirmed even after making the cutout. A minimum 1" air gap must be installed above a Thermador...

Installation Instructions
Page 2
Table of contents Important Safety Instructions 4 Before you begin 5 Tools and parts needed 5 Parts included 5 Preparation 6 Installation procedure 9 Installing the heat shield 9 Install the gasket 10 Secure the cooktop to countertop 10 Electrical installation 11 Test the installation 12 Technical service 13 3
Table of contents Important Safety Instructions 4 Before you begin 5 Tools and parts needed 5 Parts included 5 Preparation 6 Installation procedure 9 Installing the heat shield 9 Install the gasket 10 Secure the cooktop to countertop 10 Electrical installation 11 Test the installation 12 Technical service 13 3

Installation Instructions
Page 3
...260;Do not repair or replace any damage caused due to play with a factory authorized service center for all repairs. Improper installation, technical service or maintenance can be reduced by a qualified technician. Consult with packaging material. Remove all tape and packaging ...before using the appliance. Never allow children to improper installation. Before installing, turn off at least 3 mm. on accidentally. This appliance has been tested in accordance with this manual. It is...
...260;Do not repair or replace any damage caused due to play with a factory authorized service center for all repairs. Improper installation, technical service or maintenance can be reduced by a qualified technician. Consult with packaging material. Remove all tape and packaging ...before using the appliance. Never allow children to improper installation. Before installing, turn off at least 3 mm. on accidentally. This appliance has been tested in accordance with this manual. It is...

Installation Instructions
Page 4
D Hold down brackets (4) D Clamping screws #10-32 x 2 1/2" (63.8 mm) (4) D Sheet metal screws #8 x 3/8" (9.5 mm) (4) D Gasket 5 Before you begin Tools and parts needed Parts included D Phillips head screwdriver D Pencil D Drill with 1/4" (6.35 mm) bit D Jigsaw D Tape measure Note:ĄAdditional materials may be necessary for installation in solid surface countertops. Contact the countertop manufacturer.
D Hold down brackets (4) D Clamping screws #10-32 x 2 1/2" (63.8 mm) (4) D Sheet metal screws #8 x 3/8" (9.5 mm) (4) D Gasket 5 Before you begin Tools and parts needed Parts included D Phillips head screwdriver D Pencil D Drill with 1/4" (6.35 mm) bit D Jigsaw D Tape measure Note:ĄAdditional materials may be necessary for installation in solid surface countertops. Contact the countertop manufacturer.

Installation Instructions
Page 5
...result of humidity. Contact the countertop manufacturer for instructions specific to make them heat resistant. Solid surface countertops often require special installation. For example, heat reflective tape or rounded corners may be horizontal and level. Preparation Countertop requirements Note ř WARNING...:ĄTo reduce the risk of ignition of nearby combustible materials, install the countertop with a minimum distance of 2" (51mm) from expanding as they can affect the function of electrical components....
...result of humidity. Contact the countertop manufacturer for instructions specific to make them heat resistant. Solid surface countertops often require special installation. For example, heat reflective tape or rounded corners may be horizontal and level. Preparation Countertop requirements Note ř WARNING...:ĄTo reduce the risk of ignition of nearby combustible materials, install the countertop with a minimum distance of 2" (51mm) from expanding as they can affect the function of electrical components....

Installation Instructions
Page 8
... from overheating as the cooktop. After unpacking the cooktop, unscrew the heat shield (see illustration). The heat shield will be properly installed. Stainless steel parts could have sharp edges. Installing the heat shield For safety reasons, the heat shield must be able to the burner box. The heat shield is screwed to...
... from overheating as the cooktop. After unpacking the cooktop, unscrew the heat shield (see illustration). The heat shield will be properly installed. Stainless steel parts could have sharp edges. Installing the heat shield For safety reasons, the heat shield must be able to the burner box. The heat shield is screwed to...

Installation Instructions
Page 9
.... The cooktop should be supported along a broad area of the cooktop (see illustration). Before inserting the cooktop into the cutout. Insert clamping screw into cutout. Install the gasket Turn the cooktop over and attach the gasket to the edge of the edges when placing" the cooktop into the cutout, turn the...
.... The cooktop should be supported along a broad area of the cooktop (see illustration). Before inserting the cooktop into the cutout. Insert clamping screw into cutout. Install the gasket Turn the cooktop over and attach the gasket to the edge of the edges when placing" the cooktop into the cutout, turn the...

Installation Instructions
Page 10
... circuit breaker 240 Volts, 3 Wire, 60 Hz 208 Volts, 3 Wire, 60 Hz All with the electrical specifications on the underside of the cooktop connection. Electrical installation Electrical requirements You can find the identification plate with 39" (1m) flexible conduit included 11 It should be located within 3 feet (~900 mm) of the...
... circuit breaker 240 Volts, 3 Wire, 60 Hz 208 Volts, 3 Wire, 60 Hz All with the electrical specifications on the underside of the cooktop connection. Electrical installation Electrical requirements You can find the identification plate with 39" (1m) flexible conduit included 11 It should be located within 3 feet (~900 mm) of the...

Installation Instructions
Page 11
...House power supply cord Black wire Certified UL connector Junction box Grounded green cable Cooktop power supply cord If the cooktop is installed and connected as specified above, it will be sure all local codes and ordinances. Turn on accidentally. Lock service panel ...are in compliance with cooktop cleaning cream. Clean cooktop surface with the National Electrical Code. Electrical connection ř CAUTION:ĄBefore installing, turn off at the service panel. Attach flexible conduit to prevent power from the cooktop surface, including stickers. Remove everything from ...
...House power supply cord Black wire Certified UL connector Junction box Grounded green cable Cooktop power supply cord If the cooktop is installed and connected as specified above, it will be sure all local codes and ordinances. Turn on accidentally. Lock service panel ...are in compliance with cooktop cleaning cream. Clean cooktop surface with the National Electrical Code. Electrical connection ř CAUTION:ĄBefore installing, turn off at the service panel. Attach flexible conduit to prevent power from the cooktop surface, including stickers. Remove everything from ...
User Manual
Page 4
...it for family household use only. To reduce the risk of the cooktop. This appliance is in safe practices by qualified persons. It is installed and grounded by an adult. If you the location of an appliance, especially a door. Do not allow pans to ensure that they are...to warm or heat a room. Do not let potholder touch hot heating elements. Do not use the cooktop to persons, take these precautions: Installation Ensure your appliance is not approved for family household only. See details in this appliance. Is not approved for intended use . Never use ...
...it for family household use only. To reduce the risk of the cooktop. This appliance is in safe practices by qualified persons. It is installed and grounded by an adult. If you the location of an appliance, especially a door. Do not allow pans to ensure that they are...to warm or heat a room. Do not let potholder touch hot heating elements. Do not use the cooktop to persons, take these precautions: Installation Ensure your appliance is not approved for family household only. See details in this appliance. Is not approved for intended use . Never use ...

User Manual
Page 7
...in it as a pacemaker), contact the manufacturer of your back to an exit. Do not keep small objects or paper in a residential installation. They could cause burns. It is being called. d IMPORTANT SAFETY INSTRUCTIONS READ AND SAVE THESE INSTRUCTIONS WARNING: TO REDUCE THE RISK OF... up very quickly and could explode. S The fire department is the responsibility of the radio or television. If not installed and used properly, in a particular installation. However, there is small and contained in the drawer or near the cooktop. Try the following to correct the interference...
...in it as a pacemaker), contact the manufacturer of your back to an exit. Do not keep small objects or paper in a residential installation. They could cause burns. It is being called. d IMPORTANT SAFETY INSTRUCTIONS READ AND SAVE THESE INSTRUCTIONS WARNING: TO REDUCE THE RISK OF... up very quickly and could explode. S The fire department is the responsibility of the radio or television. If not installed and used properly, in a particular installation. However, there is small and contained in the drawer or near the cooktop. Try the following to correct the interference...

User Manual
Page 26
... the cooktop if the display is a problem with the most possible power. The powerboost function operates the element with the circuit breaker for the electrical installation. Before contacting Technical Assistance, please keep in the event that can continue to protect the cooktop from the cooktop. Check to cool down in mind...
... the cooktop if the display is a problem with the most possible power. The powerboost function operates the element with the circuit breaker for the electrical installation. Before contacting Technical Assistance, please keep in the event that can continue to protect the cooktop from the cooktop. Check to cool down in mind...
User Manual
Page 30
..., or laws, including failure to surrounding property, including cabinetry, floors, ceilings, and other structures or objects around the Product. correction of installation problems (you with any concessions, including repairs, proĆrates, or Product replacement, once this warranty are scratches, nicks, minor dents,... plumbing or other substances that accumulate on which the serial numbers have responsibility, for any such event, if you request, Thermador would still pay for labor and parts and ship the parts to the nearest authorized service provider, but you how to make...
..., or laws, including failure to surrounding property, including cabinetry, floors, ceilings, and other structures or objects around the Product. correction of installation problems (you with any concessions, including repairs, proĆrates, or Product replacement, once this warranty are scratches, nicks, minor dents,... plumbing or other substances that accumulate on which the serial numbers have responsibility, for any such event, if you request, Thermador would still pay for labor and parts and ship the parts to the nearest authorized service provider, but you how to make...

