Design Guide - Savor Built-In Coffee
Page 2
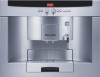
... addition to your exquisite taste. Now you can think of, as well as tea, all from the comfort of your own home. 1.800.735.4328 | THERMADOR.COM 289 BUILT-IN COFFEE MACHINE THE SAVOR® BUILT-IN COFFEE MACHINE PROFESSIONAL & MASTERPIECE® SERIES It's the ultimate culinary indulgence. An expression of your...
... addition to your exquisite taste. Now you can think of, as well as tea, all from the comfort of your own home. 1.800.735.4328 | THERMADOR.COM 289 BUILT-IN COFFEE MACHINE THE SAVOR® BUILT-IN COFFEE MACHINE PROFESSIONAL & MASTERPIECE® SERIES It's the ultimate culinary indulgence. An expression of your...
Design Guide - Savor Built-In Coffee
Page 3
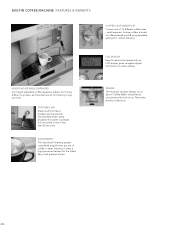
... and greatest aroma DESIGN The fluid and versatile design of our Savor® Coffee Maker will perfectly coordinate with the attached steam wand. HEIGHT-ADJUSTABLE DISPENSER Our height-adjustable coffee dispenser adjusts to large coffee, 6 levels of our Thermador product collections. 290 LCD DISPLAY Easy-to prepare hot chocolate or tea in water...
... and greatest aroma DESIGN The fluid and versatile design of our Savor® Coffee Maker will perfectly coordinate with the attached steam wand. HEIGHT-ADJUSTABLE DISPENSER Our height-adjustable coffee dispenser adjusts to large coffee, 6 levels of our Thermador product collections. 290 LCD DISPLAY Easy-to prepare hot chocolate or tea in water...
Design Guide - Savor Built-In Coffee
Page 4
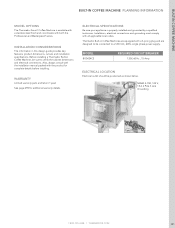
...with the installation manual packed with a 3-prong plug and are designed to verify the cabinet dimensions and electrical connections. MODEL BICM24CS REQUIRED CIRCUIT BREAkER 120V, 60 Hz , 15 Amp ELECTRICAL LOCATION Electrical outlet should be connected to a 120V AC, 60Hz,... parts and labor (1 year) See page 294 for complete details before installing. BUILT-IN COFFEE MACHINE BUILT-IN COFFEE MACHINE PLANNING INFORMATION MODEL OPTIONS The Thermador Savor® Coffee Machine is properly installed and grounded by a qualified technician. ELECTRICAL SPECIFICATIONS Be sure...
...with the installation manual packed with a 3-prong plug and are designed to verify the cabinet dimensions and electrical connections. MODEL BICM24CS REQUIRED CIRCUIT BREAkER 120V, 60 Hz , 15 Amp ELECTRICAL LOCATION Electrical outlet should be connected to a 120V AC, 60Hz,... parts and labor (1 year) See page 294 for complete details before installing. BUILT-IN COFFEE MACHINE BUILT-IN COFFEE MACHINE PLANNING INFORMATION MODEL OPTIONS The Thermador Savor® Coffee Machine is properly installed and grounded by a qualified technician. ELECTRICAL SPECIFICATIONS Be sure...
Design Guide - Savor Built-In Coffee
Page 5
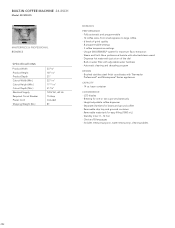
... Dispense hot water with Thermador Professional® and Masterpiece® Series appliances CAPACITY - 14 oz bean container CONVENIENCE - Brushed stainless steel finish coordinates with just a turn of the dial - Height adjustable coffee dispenser - Removable drip tray and grounds container - BUILT-IN COFFEE MACHINE 24-INCH Model: BICM24CS MASTERPIECE & PROFESSIONAL BICM24CS SPECIFICATIONS Product Width Product...
... Dispense hot water with Thermador Professional® and Masterpiece® Series appliances CAPACITY - 14 oz bean container CONVENIENCE - Brushed stainless steel finish coordinates with just a turn of the dial - Height adjustable coffee dispenser - Removable drip tray and grounds container - BUILT-IN COFFEE MACHINE 24-INCH Model: BICM24CS MASTERPIECE & PROFESSIONAL BICM24CS SPECIFICATIONS Product Width Product...

Design Guide - Savor Built-In Coffee
Page 6
... the wall and base of the unit or the rear panel of the appliance, is 37 1/4" (950 mm) BUILT-IN COFFEE MACHINE 24-INCH Model: BICM24CS COFFEE MACHINE & CUTOUT DIMENSIONS 1.800.735.4328 | THERMADOR.COM 293 The ideal installation height for the appliance situated above . The ventilation slots and intake openings must not have...
... the wall and base of the unit or the rear panel of the appliance, is 37 1/4" (950 mm) BUILT-IN COFFEE MACHINE 24-INCH Model: BICM24CS COFFEE MACHINE & CUTOUT DIMENSIONS 1.800.735.4328 | THERMADOR.COM 293 The ideal installation height for the appliance situated above . The ventilation slots and intake openings must not have...
User Manual
Page 3
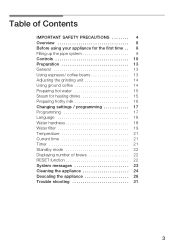
... appliance for the firstĂtime . . 8 Filling up the pipe system 9 Controls 10 Preparation 13 General 13 Using espresso/ coffeeĂbeans 13 Adjusting the grindingĂunit 14 Using ground coffee 14 Preparing hot water 15 Steam for heating drinks 15 Preparing frothy milk 16 Changing settings / programming 17 Programming 17...
... appliance for the firstĂtime . . 8 Filling up the pipe system 9 Controls 10 Preparation 13 General 13 Using espresso/ coffeeĂbeans 13 Adjusting the grindingĂunit 14 Using ground coffee 14 Preparing hot water 15 Steam for heating drinks 15 Preparing frothy milk 16 Changing settings / programming 17 Programming 17...
User Manual
Page 6
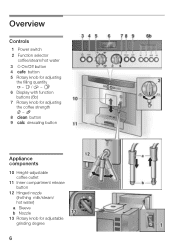
Overview Controls 1 Power switch 2 Function selector coffee/steam/hot water 3 d On/Off button 4 2 button 5 Rotary knob for adjusting the filling quantity x - )/ 8 - 9 6 Display with function buttons (6b) 7 Rotary knob for adjusting the coffee strength / - 7 8 + button 9 4 descaling button Appliance components 10 HeightĆadjustable coffee outlet 11 Inner compartment release button 12 Hinged nozzle (frothing milk/steam/ hot water) a Sleeve b Nozzle 13 Rotary knob for adjustable grinding degree 14 6
Overview Controls 1 Power switch 2 Function selector coffee/steam/hot water 3 d On/Off button 4 2 button 5 Rotary knob for adjusting the filling quantity x - )/ 8 - 9 6 Display with function buttons (6b) 7 Rotary knob for adjusting the coffee strength / - 7 8 + button 9 4 descaling button Appliance components 10 HeightĆadjustable coffee outlet 11 Inner compartment release button 12 Hinged nozzle (frothing milk/steam/ hot water) a Sleeve b Nozzle 13 Rotary knob for adjustable grinding degree 14 6
User Manual
Page 7
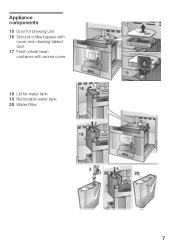
Appliance components 15 Door for brewing unit 16 Ground coffee bypass with cover and cleaning tabled duct 17 Fresh whole bean container with aroma cover 18 Lid for water tank 19 Removable water tank 20 Water Filter 7
Appliance components 15 Door for brewing unit 16 Ground coffee bypass with cover and cleaning tabled duct 17 Fresh whole bean container with aroma cover 18 Lid for water tank 19 Removable water tank 20 Water Filter 7

User Manual
Page 8
If a hardness value other additives containing sugar. Ascertain the water hardness with pure water and coffee beans only. Appliance components 21 Coffee dreg tray (dishwasherĆsafe) 22 Splash guard 23 Tray (for residual water) 24 Grille 25 Sensor Contacts Before using your appliance for the firstĂtime General Fill the respective containers with the enclosed test strip. Do not use coffee beans which have been glazed, caramelized or treated with other than 3 is indicated, switch on the appliance and program accordingly (see page 18). 8
If a hardness value other additives containing sugar. Ascertain the water hardness with pure water and coffee beans only. Appliance components 21 Coffee dreg tray (dishwasherĆsafe) 22 Splash guard 23 Tray (for residual water) 24 Grille 25 Sensor Contacts Before using your appliance for the firstĂtime General Fill the respective containers with the enclosed test strip. Do not use coffee beans which have been glazed, caramelized or treated with other than 3 is indicated, switch on the appliance and program accordingly (see page 18). 8

User Manual
Page 9
...q Press button % to the chassis. q Press the 6 button. 9 q Press button d 3. q Press button % until the display flashes. q Fill water tank 19 with coffee beans. Do not fill above max." Note: If the appliance is ready for at least 3 seconds. When switched on for a prolonged period, the first cup... of the appliance. q Select the desired language with < or >. Switching on the appliance COFFEE Filling up the pipe system FILL UP PIPE-SYS PRESS CAFE PIPE-SYS FILLS UP q Press button 11 forwards and release the inner compartment of...
...q Press button % to the chassis. q Press the 6 button. 9 q Press button d 3. q Press button % until the display flashes. q Fill water tank 19 with coffee beans. Do not fill above max." Note: If the appliance is ready for at least 3 seconds. When switched on for a prolonged period, the first cup... of the appliance. q Select the desired language with < or >. Switching on the appliance COFFEE Filling up the pipe system FILL UP PIPE-SYS PRESS CAFE PIPE-SYS FILLS UP q Press button 11 forwards and release the inner compartment of...
User Manual
Page 10
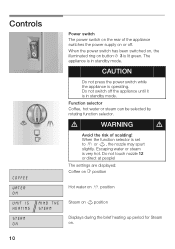
... ON UNIT IS HEATING STEAM ON MIND THE STEAM Power switch The power switch on the rear of scalding! The settings are displayed: Coffee on X position Hot water on 0 position Steam on =position Displays during the brief heating up period for Steam on button d 3 is in standby mode. d ...supply on or off the appliance until it is lit green. Do not switch off . When the function selector is Ăoperating. Function selector Coffee, hot water or steam can be selected by rotating function selector. CAUTION Do not press the power switch while the appliance is set to 0 or...
... ON UNIT IS HEATING STEAM ON MIND THE STEAM Power switch The power switch on the rear of scalding! The settings are displayed: Coffee on X position Hot water on 0 position Steam on =position Displays during the brief heating up period for Steam on button d 3 is in standby mode. d ...supply on or off the appliance until it is lit green. Do not switch off . When the function selector is Ăoperating. Function selector Coffee, hot water or steam can be selected by rotating function selector. CAUTION Do not press the power switch while the appliance is set to 0 or...
User Manual
Page 11
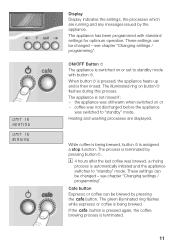
...can be brewed by pressing the 2button. When button d is pressed, the appliance heats up and is terminated by the appliance. coffee was not discharged before the appliance was still warm when switched on or - Heating and washing processes are running and any messages ... is automatically initiated and the appliance switches to standby" mode. the appliance was switched to standby" mode. i 4 hours after the last coffee was brewed, a rinsing process is switched on button d flashes during this process. UNIT IS HEATING UNIT IS RINSING Display Display indicates the settings,...
...can be brewed by pressing the 2button. When button d is pressed, the appliance heats up and is terminated by the appliance. coffee was not discharged before the appliance was still warm when switched on or - Heating and washing processes are running and any messages ... is automatically initiated and the appliance switches to standby" mode. the appliance was switched to standby" mode. i 4 hours after the last coffee was brewed, a rinsing process is switched on button d flashes during this process. UNIT IS HEATING UNIT IS RINSING Display Display indicates the settings,...
User Manual
Page 12
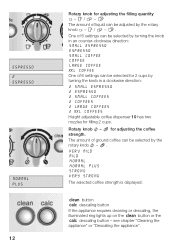
...of 6 settings can be selected by turning the knob in a clockwise direction: 2 SMALL ESPRESSO 2 ESPRESSO 2 SMALL COFFEES 2 COFFEES 2 LARGE COFFEES 2 XXL COFFEES Height adjustable coffee dispenser 10 has two nozzles for 2 cups by turning the knob in an counterĆclockwise direction: SMALL ESPRESSO ...ESPRESSO SMALL COFFEE COFFEE LARGE COFFEE XXL COFFEE One of 6 settings can be adjusted by the rotary knob / - 7. u / 8 - 9 The amount of ground coffee can be selected for filling 2 cups. ESPRESSO 2 ESPRESSO NORMAL PLUS...
...of 6 settings can be selected by turning the knob in a clockwise direction: 2 SMALL ESPRESSO 2 ESPRESSO 2 SMALL COFFEES 2 COFFEES 2 LARGE COFFEES 2 XXL COFFEES Height adjustable coffee dispenser 10 has two nozzles for 2 cups by turning the knob in an counterĆclockwise direction: SMALL ESPRESSO ...ESPRESSO SMALL COFFEE COFFEE LARGE COFFEE XXL COFFEE One of 6 settings can be adjusted by the rotary knob / - 7. u / 8 - 9 The amount of ground coffee can be selected for filling 2 cups. ESPRESSO 2 ESPRESSO NORMAL PLUS...
User Manual
Page 13
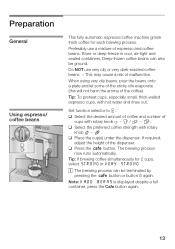
...Note: If ADD BEANS is displayed despite a full container, press the Cafe button again. 13 Preferably use very oily or very darkĆroasted coffee beans - When using very oily beans, pour the beans onto a plate and let some of the sticky oils evaporate (this will not harm the... with hot water and rinse out. q Place the cup(s) under the dispenser. Preparation General Using espresso/ coffeeĂbeans This fully automatic espresso/coffee machine grinds fresh coffee for 2 cups, selectĂSTRONG or VERY STRONG. StoreĂor deepĆfreeze in cool, airĆtight and sealed ...
...Note: If ADD BEANS is displayed despite a full container, press the Cafe button again. 13 Preferably use very oily or very darkĆroasted coffee beans - When using very oily beans, pour the beans onto a plate and let some of the sticky oils evaporate (this will not harm the... with hot water and rinse out. q Place the cup(s) under the dispenser. Preparation General Using espresso/ coffeeĂbeans This fully automatic espresso/coffee machine grinds fresh coffee for 2 cups, selectĂSTRONG or VERY STRONG. StoreĂor deepĆfreeze in cool, airĆtight and sealed ...

User Manual
Page 14
... the rotary knob ( - i The new setting will not become apparent until the second or third cup of coffee. q Return inner compartment into original position. u / 8 - 9. Note: If coffee is not brewed within 90 seconds, the brewing chamber is rinsed. q Depress button 11 and release the inner... compartment of the dispenser. Adjusting the grindingĂunit Using ground coffee 14 q The desired degree of ground coffee can be damaged. CAUTION Adjust the degree of grinding only while the grinding unit is running ! If required, ...
... the rotary knob ( - i The new setting will not become apparent until the second or third cup of coffee. q Return inner compartment into original position. u / 8 - 9. Note: If coffee is not brewed within 90 seconds, the brewing chamber is rinsed. q Depress button 11 and release the inner... compartment of the dispenser. Adjusting the grindingĂunit Using ground coffee 14 q The desired degree of ground coffee can be damaged. CAUTION Adjust the degree of grinding only while the grinding unit is running ! If required, ...

User Manual
Page 17
Changing settings / programming The appliance has been set so that coffee can be changed with the function buttons under the display. < Selection button % 6 > Access to programming mode / Save settings Terminate programming Selection button CAUTION Programming LANGUAGE ...
Changing settings / programming The appliance has been set so that coffee can be changed with the function buttons under the display. < Selection button % 6 > Access to programming mode / Save settings Terminate programming Selection button CAUTION Programming LANGUAGE ...
User Manual
Page 20
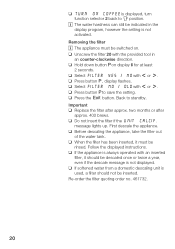
... s. q When the filter has been inserted, it should not be indicated in an counterĆclockwise direction. q Press button qto save the setting. q TURN ON COFFEE is not activated. i The water hardness can still be inserted. message lights up. ReĆorder the filter quoting order no. 461732. 20 two months...
... s. q When the filter has been inserted, it should not be indicated in an counterĆclockwise direction. q Press button qto save the setting. q TURN ON COFFEE is not activated. i The water hardness can still be inserted. message lights up. ReĆorder the filter quoting order no. 461732. 20 two months...

User Manual
Page 21
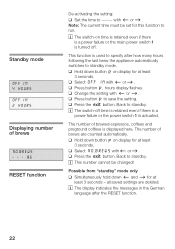
... %- The current time must be deleted - q Press button % until the display flashes. high ÄÄTMÄÄEAMXÄÄIPM.UÄÄM The coffee temperature can be set the time at least 3 seconds. q Hold down button % on display for at which the appliance automatically switches on display for at...
... %- The current time must be deleted - q Press button % until the display flashes. high ÄÄTMÄÄEAMXÄÄIPM.UÄÄM The coffee temperature can be set the time at least 3 seconds. q Hold down button % on display for at which the appliance automatically switches on display for at...
User Manual
Page 22
... - - - 86 The number of brews are deleted. Note: The current time must be changed! q Select OFF IN with < or >. The number of brewed espressos, coffees and preground coffees is actuated. RESET function Possible from standby" mode only q Simultaneously hold down < and > for at least 3 seconds. i The switchĆon time is retained...
... - - - 86 The number of brews are deleted. Note: The current time must be changed! q Select OFF IN with < or >. The number of brewed espressos, coffees and preground coffees is actuated. RESET function Possible from standby" mode only q Simultaneously hold down < and > for at least 3 seconds. i The switchĆon time is retained...
User Manual
Page 23
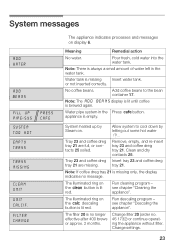
... conĆ tacts 25 soiled. The illuminated ring on . Change filter 20 (order no message. No coffee beans. Remove, empty, and reĆinsert tray 23 and coffee dreg tray 21. Note: If coffee dreg tray 21 is always a small amount of water left in the Press 2button. Note: The ADD ...BEANS display is lit until coffee is lit red. Allow system to the bean container 17. Add coffee beans to cool down by Steam on the 4 descaling button is brewed again. appliance is no longer effective after...
... conĆ tacts 25 soiled. The illuminated ring on . Change filter 20 (order no message. No coffee beans. Remove, empty, and reĆinsert tray 23 and coffee dreg tray 21. Note: If coffee dreg tray 21 is always a small amount of water left in the Press 2button. Note: The ADD ...BEANS display is lit until coffee is lit red. Allow system to the bean container 17. Add coffee beans to cool down by Steam on the 4 descaling button is brewed again. appliance is no longer effective after...


