Design Guide - Savor Built-In Coffee
Page 3
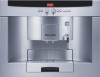
BUILT-IN COFFEE MACHINE FEATURES & BENEFITS COFFEE CUSTOMIZATION Choose one of coffee strengths and 8 programmable settings for custom brewing. HEIGHT-ADJUSTABLE DISPENSER Our height-adjustable coffee dispenser adjusts to large coffee, 6 levels of 12 different coffee sizes - FROTHING AID Steam and froth like a professional barista with an lCD display gives complete digital information on every setting. small espresso to fit many different cup sizes, and has dual spouts for the fullest...
BUILT-IN COFFEE MACHINE FEATURES & BENEFITS COFFEE CUSTOMIZATION Choose one of coffee strengths and 8 programmable settings for custom brewing. HEIGHT-ADJUSTABLE DISPENSER Our height-adjustable coffee dispenser adjusts to large coffee, 6 levels of 12 different coffee sizes - FROTHING AID Steam and froth like a professional barista with an lCD display gives complete digital information on every setting. small espresso to fit many different cup sizes, and has dual spouts for the fullest...
Design Guide - Savor Built-In Coffee
Page 4
..., single phase power supply. Installation, electrical connections and grounding must comply with the product for additional warranty details. Before installing a Thermador Built-in this design guide provides key features, product dimensions, cutouts and installation specifications. Also, always consult with the installation manual packed with all applicable local codes. INSTALLATION CONSIDERATIONS The information in Coffee Machine, be positioned as shown below. BUILT-IN COFFEE MACHINE BUILT-IN COFFEE MACHINE PLANNING INFORMATION MODEL OPTIONS...
..., single phase power supply. Installation, electrical connections and grounding must comply with the product for additional warranty details. Before installing a Thermador Built-in this design guide provides key features, product dimensions, cutouts and installation specifications. Also, always consult with the installation manual packed with all applicable local codes. INSTALLATION CONSIDERATIONS The information in Coffee Machine, be positioned as shown below. BUILT-IN COFFEE MACHINE BUILT-IN COFFEE MACHINE PLANNING INFORMATION MODEL OPTIONS...
Design Guide - Savor Built-In Coffee
Page 5
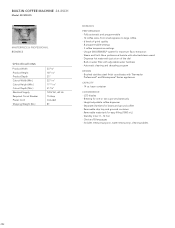
... Thermador Professional® and Masterpiece® Series appliances CAPACITY - 14 oz bean container CONVENIENCE - LCD display - Standby timer (1 - 12 hrs) - Choice of grind quality - 8 programmable settings - 3 coffee temperature settings - Includes measuring spoon, water testing strip, cleaning tablets 292 BUILT-IN COFFEE MACHINE 24-INCH Model: BICM24CS MASTERPIECE & PROFESSIONAL BICM24CS SPECIFICATIONS Product Width Product Height Product Depth Cutout Width (Min.) Cutout Height (Min.) Cutout Depth (Min.) Electrical Supply Required Circuit Breaker Power...
... Thermador Professional® and Masterpiece® Series appliances CAPACITY - 14 oz bean container CONVENIENCE - LCD display - Standby timer (1 - 12 hrs) - Choice of grind quality - 8 programmable settings - 3 coffee temperature settings - Includes measuring spoon, water testing strip, cleaning tablets 292 BUILT-IN COFFEE MACHINE 24-INCH Model: BICM24CS MASTERPIECE & PROFESSIONAL BICM24CS SPECIFICATIONS Product Width Product Height Product Depth Cutout Width (Min.) Cutout Height (Min.) Cutout Depth (Min.) Electrical Supply Required Circuit Breaker Power...
User Manual
Page 3
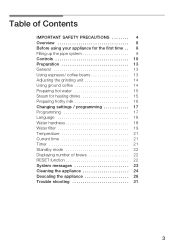
... 13 General 13 Using espresso/ coffeeĂbeans 13 Adjusting the grindingĂunit 14 Using ground coffee 14 Preparing hot water 15 Steam for heating drinks 15 Preparing frothy milk 16 Changing settings / programming 17 Programming 17 Language 18 Water hardness 18 Water filter 19 Temperature 21 Current time 21 Timer 21 Standby mode 22 Displaying number ofĂbrews 22 RESET function 22 System messages 23 Cleaning the appliance 24 Descaling the appliance 28 Trouble shooting 31 3
... 13 General 13 Using espresso/ coffeeĂbeans 13 Adjusting the grindingĂunit 14 Using ground coffee 14 Preparing hot water 15 Steam for heating drinks 15 Preparing frothy milk 16 Changing settings / programming 17 Programming 17 Language 18 Water hardness 18 Water filter 19 Temperature 21 Current time 21 Timer 21 Standby mode 22 Displaying number ofĂbrews 22 RESET function 22 System messages 23 Cleaning the appliance 24 Descaling the appliance 28 Trouble shooting 31 3
User Manual
Page 4
..., repair or adjustment. 7. Close supervision is used by or near a hot gas or electric burner, or in a heated oven. 11.To disconnect, turn any control to off parts, and before cleaning. Unplug from wall outlet. 12.Do not use outdoors. 9. Use handles or knobs. 3. d IMPORTANT SAFETY PRECAUTIONS WARNING: to avoid risk of fire and electric shock that they are instructed...
..., repair or adjustment. 7. Close supervision is used by or near a hot gas or electric burner, or in a heated oven. 11.To disconnect, turn any control to off parts, and before cleaning. Unplug from wall outlet. 12.Do not use outdoors. 9. Use handles or knobs. 3. d IMPORTANT SAFETY PRECAUTIONS WARNING: to avoid risk of fire and electric shock that they are instructed...

User Manual
Page 5
.... q Carefully read the operating instructions and save these instructions. This appliance has a polarized plug (one way. q Do not use the inner compartment for industrial use. q Keep your voltage. If an extension cord is wider than the other than cleaning and user maintenance should be used , 1. the marked electrical rating of a table top where it still does not fit, contact a qualified electrician. Use cold water...
.... q Carefully read the operating instructions and save these instructions. This appliance has a polarized plug (one way. q Do not use the inner compartment for industrial use. q Keep your voltage. If an extension cord is wider than the other than cleaning and user maintenance should be used , 1. the marked electrical rating of a table top where it still does not fit, contact a qualified electrician. Use cold water...
User Manual
Page 7
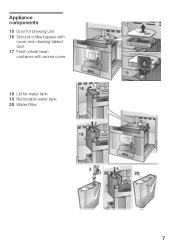
Appliance components 15 Door for brewing unit 16 Ground coffee bypass with cover and cleaning tabled duct 17 Fresh whole bean container with aroma cover 18 Lid for water tank 19 Removable water tank 20 Water Filter 7
Appliance components 15 Door for brewing unit 16 Ground coffee bypass with cover and cleaning tabled duct 17 Fresh whole bean container with aroma cover 18 Lid for water tank 19 Removable water tank 20 Water Filter 7

User Manual
Page 9
... not fill above max." q Set function selector 2 to the desired language: q Hold down button % on for a prolonged period, the first cup of the appliance. Selecting the language LANGUAGE ENGLISH To change the display to X. q Press button % to I. i The appliance is being used for the first time or has not been operated for the first time, the water pipe system in the...
... not fill above max." q Set function selector 2 to the desired language: q Hold down button % on for a prolonged period, the first cup of the appliance. Selecting the language LANGUAGE ENGLISH To change the display to X. q Press button % to I. i The appliance is being used for the first time or has not been operated for the first time, the water pipe system in the...
User Manual
Page 12
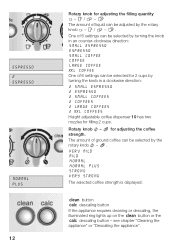
... 2 cups by turning the knob in an counterĆclockwise direction: SMALL ESPRESSO ESPRESSO SMALL COFFEE COFFEE LARGE COFFEE XXL COFFEE One of liquid can be selected by the rotary knob ( - ESPRESSO 2 ESPRESSO NORMAL PLUS 12 Rotary knob for adjusting the coffee strength. VERY MILD MILD NORMAL NORMAL PLUS STRONG VERY STRONG The selected coffee strength is displayed: + button 4 descaling button If the appliance requires cleaning or descaling, the illuminated ring lights...
... 2 cups by turning the knob in an counterĆclockwise direction: SMALL ESPRESSO ESPRESSO SMALL COFFEE COFFEE LARGE COFFEE XXL COFFEE One of liquid can be selected by the rotary knob ( - ESPRESSO 2 ESPRESSO NORMAL PLUS 12 Rotary knob for adjusting the coffee strength. VERY MILD MILD NORMAL NORMAL PLUS STRONG VERY STRONG The selected coffee strength is displayed: + button 4 descaling button If the appliance requires cleaning or descaling, the illuminated ring lights...
User Manual
Page 13
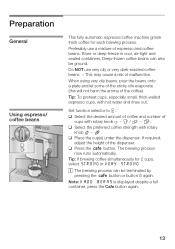
... a risk of espresso and coffee beans. Preparation General Using espresso/ coffeeĂbeans This fully automatic espresso/coffee machine grinds fresh coffee for 2 cups, selectĂSTRONG or VERY STRONG. StoreĂor deepĆfreeze in cool, airĆtight and sealed containers. Tip: To preheat cups, especially small, thickĆwalled espresso cups, with hot water and rinse out. q Place the cup(s) under the dispenser. q Press the 2 button.
... a risk of espresso and coffee beans. Preparation General Using espresso/ coffeeĂbeans This fully automatic espresso/coffee machine grinds fresh coffee for 2 cups, selectĂSTRONG or VERY STRONG. StoreĂor deepĆfreeze in cool, airĆtight and sealed containers. Tip: To preheat cups, especially small, thickĆwalled espresso cups, with hot water and rinse out. q Place the cup(s) under the dispenser. q Press the 2 button.
User Manual
Page 19
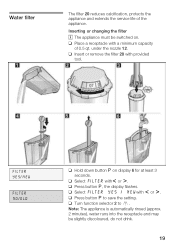
q Select FILTER withr or s. q Press button q, the display flashes. Water filter The filter 20 reduces calcification, protects the appliance and extends the service life of 0.5 qt. q Turn function selector 2 to save the setting. q Press button q to 0. q Place a receptacle with provided tool. ÄÄÄFYÄÄÄIELSTÄÄÄ/ENREÄÄÄW FILTER NO/OLD q Hold down button q on . under...
q Select FILTER withr or s. q Press button q, the display flashes. Water filter The filter 20 reduces calcification, protects the appliance and extends the service life of 0.5 qt. q Turn function selector 2 to save the setting. q Press button q to 0. q Place a receptacle with provided tool. ÄÄÄFYÄÄÄIELSTÄÄÄ/ENREÄÄÄW FILTER NO/OLD q Hold down button q on . under...
User Manual
Page 20
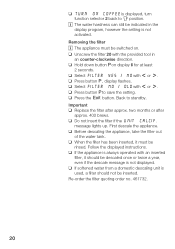
..., even if the descale message is not displayed. q Press button q, display flashes. q If softened water from a domestic descaling unit is used, a filter should be indicated in an counterĆclockwise direction. q Hold down button qon display 6 for at least 2 seconds. q Do not insert the filter if the UNIT CALCIF. message lights up. q If the appliance is always operated with the provided tool in the display program, however the setting is not activated...
..., even if the descale message is not displayed. q Press button q, display flashes. q If softened water from a domestic descaling unit is used, a filter should be indicated in an counterĆclockwise direction. q Hold down button qon display 6 for at least 2 seconds. q Do not insert the filter if the UNIT CALCIF. message lights up. q If the appliance is always operated with the provided tool in the display program, however the setting is not activated...
User Manual
Page 23
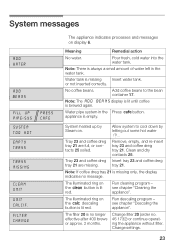
... ring on the 4 descaling button is lit red. The illuminated ring on the + button is lit red. System messages ADD WATER ADD BEANS FILL UP PIPE-SYS SYSTEM TOO HOT EMPTY TRAYS PRESS CAFE TRAYS MISSING CLEAN UNIT UNIT CALCIF. No coffee beans. appliance is brewed again. Remove, empty, and reĆinsert tray 23 and coffee dreg tray 21. The filter 20 is missing only...
... ring on the 4 descaling button is lit red. The illuminated ring on the + button is lit red. System messages ADD WATER ADD BEANS FILL UP PIPE-SYS SYSTEM TOO HOT EMPTY TRAYS PRESS CAFE TRAYS MISSING CLEAN UNIT UNIT CALCIF. No coffee beans. appliance is brewed again. Remove, empty, and reĆinsert tray 23 and coffee dreg tray 21. The filter 20 is missing only...
User Manual
Page 24
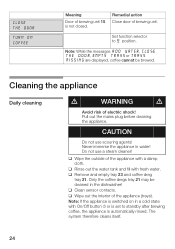
... electric shock! Set function selector to standby after brewing coffee, the appliance is not closed. Do not use scouring agents! q Clean sensor contacts. q Remove and empty tray 23 and coffee dreg tray 21. CLOSE THE DOOR TURN ON COFFEE Meaning Door of brewing unit. CAUTION Do not use a steam cleaner! Remedial action Close door of brewing unit 15 is automatically rinsed. Note: While the messages ADD WATER, CLOSE...
... electric shock! Set function selector to standby after brewing coffee, the appliance is not closed. Do not use scouring agents! q Clean sensor contacts. q Remove and empty tray 23 and coffee dreg tray 21. CLOSE THE DOOR TURN ON COFFEE Meaning Door of brewing unit. CAUTION Do not use a steam cleaner! Remedial action Close door of brewing unit 15 is automatically rinsed. Note: While the messages ADD WATER, CLOSE...

User Manual
Page 25
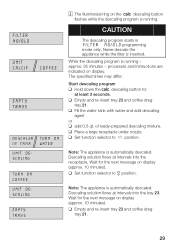
... do so. Never use descaling tablets or other descaling agents. Do not drop in mouth. d WARNING d Use care when handling and using cleaning tablet! Avoid contact with the enclosed cleaning tablet. CAUTION Never interrupt the cleaning program! Cleaning program CLEAN UNIT CLEAN UNIT COFFEE If the illuminated ring on the + button is lit red and theĂmessage CLEAN UNIT is indicated on display when the appliance is switched on the + button flashes. These tablets...
... do so. Never use descaling tablets or other descaling agents. Do not drop in mouth. d WARNING d Use care when handling and using cleaning tablet! Avoid contact with the enclosed cleaning tablet. CAUTION Never interrupt the cleaning program! Cleaning program CLEAN UNIT CLEAN UNIT COFFEE If the illuminated ring on the + button is lit red and theĂmessage CLEAN UNIT is indicated on display when the appliance is switched on the + button flashes. These tablets...

User Manual
Page 28
... or vinegarĆbased agents! CAUTION Never descale the appliance with skin and eyes. Follow the instructions Change settings/ programming - i Specially developed and suitable agents are available from customer service. is displayed, the filter is swallowed, seek medical advice immediately and produce packaging or label. Do not use a filter 20 and the message UNIT CALCIF. If a descaling agent comes into contact with eyes, immediately...
... or vinegarĆbased agents! CAUTION Never descale the appliance with skin and eyes. Follow the instructions Change settings/ programming - i Specially developed and suitable agents are available from customer service. is displayed, the filter is swallowed, seek medical advice immediately and produce packaging or label. Do not use a filter 20 and the message UNIT CALCIF. If a descaling agent comes into contact with eyes, immediately...
User Manual
Page 29
... IN TANK WATER UNIT DESCALING TURN ON COFFEE UNIT DESCALING EMPTY TRAYS i The illuminated ring on display (approx. 10 minutes). processes and instructions are indicated on display (approx. 10 minutes). Start descaling program q Hold down the4 descaling button for the next message on the 4 descaling button flashes while the descaling program is running approx. 35 minutes - Note: The appliance is inserted. Wait for the next message on display. Never descale the appliance while the filter is automatically descaled...
... IN TANK WATER UNIT DESCALING TURN ON COFFEE UNIT DESCALING EMPTY TRAYS i The illuminated ring on display (approx. 10 minutes). processes and instructions are indicated on display (approx. 10 minutes). Start descaling program q Hold down the4 descaling button for the next message on the 4 descaling button flashes while the descaling program is running approx. 35 minutes - Note: The appliance is inserted. Wait for the next message on display. Never descale the appliance while the filter is automatically descaled...
User Manual
Page 30
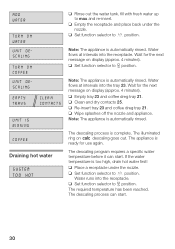
... under the nozzle. q Clean and dry contacts 25. ADD WATER TURN ON WATER UNIT DESCALING TURN ON COFFEE UNIT DESCALING EMPTY TRAYS CLEAN CONTACTS UNIT IS RINSING COFFEE Draining hot water SYSTEM TOO HOT q Rinse out the water tank, fill with fresh water up to 0 position. q Set function selector to max and reĆinsert. The illuminated ring on display (approx. 4 minutes). The descaling program requires a specific water temperature before it can start . Water flows at Ă...
... under the nozzle. q Clean and dry contacts 25. ADD WATER TURN ON WATER UNIT DESCALING TURN ON COFFEE UNIT DESCALING EMPTY TRAYS CLEAN CONTACTS UNIT IS RINSING COFFEE Draining hot water SYSTEM TOO HOT q Rinse out the water tank, fill with fresh water up to 0 position. q Set function selector to max and reĆinsert. The illuminated ring on display (approx. 4 minutes). The descaling program requires a specific water temperature before it can start . Water flows at Ă...

User Manual
Page 31
... falling into the grinding unit. System too hot. Change the type of grinding not appropriate for coffee beans. Set programming to : FILTER YES/NEW or CHANGE FILTER display. Grinding unit is running a drop at aĂtime. Nozzle is displayed despite a full bean container. Degree of coffee. Gently tap the bean container. Preground coffee too fine. Current programming set to FILTER NO/OLD ć Before descaling the appliance, always remove the filter. Thoroughly clean nozzle. Push down...
... falling into the grinding unit. System too hot. Change the type of grinding not appropriate for coffee beans. Set programming to : FILTER YES/NEW or CHANGE FILTER display. Grinding unit is running a drop at aĂtime. Nozzle is displayed despite a full bean container. Degree of coffee. Gently tap the bean container. Preground coffee too fine. Current programming set to FILTER NO/OLD ć Before descaling the appliance, always remove the filter. Thoroughly clean nozzle. Push down...
User Manual
Page 32
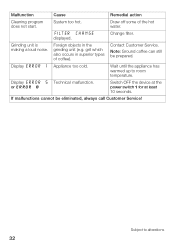
... Remedial action Cleaning program does not start. Note: Ground coffee can still be eliminated, always call Customer Service! Draw off some of coffee). Grinding unit is making a loud noise. If malfunctions cannot be prepared. System too hot. FILTER CHANGE displayed. Foreign objects in superior types of the hot water. Contact Customer Service. Display ERROR 1 Appliance too cold. Wait until the appliance has warmed up to alterations 32 Display ERROR 5 Technical malfunction. or ERROR 8 Switch...
... Remedial action Cleaning program does not start. Note: Ground coffee can still be eliminated, always call Customer Service! Draw off some of coffee). Grinding unit is making a loud noise. If malfunctions cannot be prepared. System too hot. FILTER CHANGE displayed. Foreign objects in superior types of the hot water. Contact Customer Service. Display ERROR 1 Appliance too cold. Wait until the appliance has warmed up to alterations 32 Display ERROR 5 Technical malfunction. or ERROR 8 Switch...


