

Operator Manual
Page 1
... System Warranty 29 XII. Preventing Forest, Brush and Grass Fires 24 XI. LV148EA/LV148XA LV156EA/LV156XA LV195EA/LV195XA (LEV90-120) Four-Cycle Engine • Vertical Crankshaft • Air-Cooled Table of Contents IMPORTANT NOTICE! Before Starting Your Engine 4 V. Warranty Information 30 Visit our web site at www.TecumsehPower.com LOG ON! Storing Your...
... System Warranty 29 XII. Preventing Forest, Brush and Grass Fires 24 XI. LV148EA/LV148XA LV156EA/LV156XA LV195EA/LV195XA (LEV90-120) Four-Cycle Engine • Vertical Crankshaft • Air-Cooled Table of Contents IMPORTANT NOTICE! Before Starting Your Engine 4 V. Warranty Information 30 Visit our web site at www.TecumsehPower.com LOG ON! Storing Your...
Operator Manual
Page 2
... Company under license from Tecumseh Products Company. CAUTION Indicates a potentially hazardous situation which , if NOT avoided, could result in this Operator's Manual. Before operating this engine it is it carefully and familiarize yourself with Tecumseh Products Company. ©Copyright ...2006, 2008 TecumsehPower Company All Rights Reserved Four-Cycle Engine • Vertical Crankshaft • Air-Cooled 181-1215...
... Company under license from Tecumseh Products Company. CAUTION Indicates a potentially hazardous situation which , if NOT avoided, could result in this Operator's Manual. Before operating this engine it is it carefully and familiarize yourself with Tecumseh Products Company. ©Copyright ...2006, 2008 TecumsehPower Company All Rights Reserved Four-Cycle Engine • Vertical Crankshaft • Air-Cooled 181-1215...
Operator Manual
Page 3
... gasoline in containers with fans or open windows and doors, carbon monoxide can rapidly reach dangerous levels. • NEVER run engine outdoors where engine exhaust can spread and be ignited by a spark or flame many feet away from fuel fires, follow these parts are NOT...is running . NOT everyone who is a colorless, odorless, tasteless gas which may attach a sprocket and chain or pulley and belt to refuel this engine. See "C. Maintenance" instructions on page 2. Hands, feet, hair, jewelry, clothing, etc.,can cause headaches, dizziness, drowsiness, nausea, confusion and ...
... gasoline in containers with fans or open windows and doors, carbon monoxide can rapidly reach dangerous levels. • NEVER run engine outdoors where engine exhaust can spread and be ignited by a spark or flame many feet away from fuel fires, follow these parts are NOT...is running . NOT everyone who is a colorless, odorless, tasteless gas which may attach a sprocket and chain or pulley and belt to refuel this engine. See "C. Maintenance" instructions on page 2. Hands, feet, hair, jewelry, clothing, etc.,can cause headaches, dizziness, drowsiness, nausea, confusion and ...
Operator Manual
Page 4
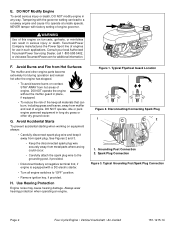
...8226; Carefully attach the spark plug wire to the grounding post, if provided. • Disconnect battery at negative terminal first, if engine is equipped with the governor setting can result in such applications. Avoid Burns and Fire from Hot Surfaces The muffler and other dry ground...1-800-558-5402, or visit www.TecumsehPower.com for use in serious injury or death. Typical Grounding Post/Spark Plug Connection Page 2 Four-Cycle Engine • Vertical Crankshaft • Air-Cooled 181-1215-14 See Figures 2 and 3. • Keep the disconnected spark plug wire securely away...
...8226; Carefully attach the spark plug wire to the grounding post, if provided. • Disconnect battery at negative terminal first, if engine is equipped with the governor setting can result in such applications. Avoid Burns and Fire from Hot Surfaces The muffler and other dry ground...1-800-558-5402, or visit www.TecumsehPower.com for use in serious injury or death. Typical Grounding Post/Spark Plug Connection Page 2 Four-Cycle Engine • Vertical Crankshaft • Air-Cooled 181-1215-14 See Figures 2 and 3. • Keep the disconnected spark plug wire securely away...
Operator Manual
Page 5
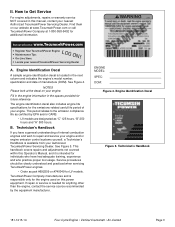
...LV models are designated as part #692509 or #740049 for additional information. This period relates to repair and service your engine and/or engine emission control systems yourself, a Technician's Handbook is needed for the emissions-related useful life period of your Authorized TecumsehPower ...com or call TecumsehPower Company at www.TecumsehPower.com LOG ON! B. Service procedures should be clearly understood and practiced when servicing TecumsehPower engines. • Order as "C" 125 hours, "B" 250 hours and "A" 500 hours. TecumsehPower Company manufactures and is intended for ...
...LV models are designated as part #692509 or #740049 for additional information. This period relates to repair and service your engine and/or engine emission control systems yourself, a Technician's Handbook is needed for the emissions-related useful life period of your Authorized TecumsehPower ...com or call TecumsehPower Company at www.TecumsehPower.com LOG ON! B. Service procedures should be clearly understood and practiced when servicing TecumsehPower engines. • Order as "C" 125 hours, "B" 250 hours and "A" 500 hours. TecumsehPower Company manufactures and is intended for ...
Operator Manual
Page 6
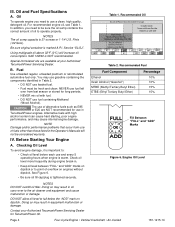
...III. NEVER use in oil carry-over from use a clean, high quality, detergent oil. CAUTION The use and every 5 operating hours when engine is important to: • Check oil level before each use of oil to the air cleaner and equipment and cause malfunction or damage. IV.... Checking Oil Level To avoid engine damage, it is warm. Recommended Oil TecumsehPower Recommended Oil Usage Straight Grade TecumsehPower Part No. 730225A or SAE 30W Multi Grade TecumsehPower Part...
...III. NEVER use in oil carry-over from use a clean, high quality, detergent oil. CAUTION The use and every 5 operating hours when engine is important to: • Check oil level before each use of oil to the air cleaner and equipment and cause malfunction or damage. IV.... Checking Oil Level To avoid engine damage, it is warm. Recommended Oil TecumsehPower Recommended Oil Usage Straight Grade TecumsehPower Part No. 730225A or SAE 30W Multi Grade TecumsehPower Part...
Operator Manual
Page 7
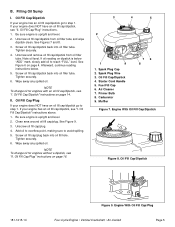
... Add oil to overflow point, making sure to step 1. Spark Plug Wire 3. Air Cleaner 7. Carburetor 9. Oil Fill Cap/Dipstick" instructions on page 4. If your engine does NOT have an oil fill cap/dipstick go to reach "FULL" level. Clean area around oil fill cap/plug. Screw oil fill cap/plug..., continue reading instructions below "ADD" mark, slowly add oil to step 1. Oil Fill Cap/Plug If your engine has an oil fill cap/dipstick go to avoid spilling. 5. Be sure engine is upright and level. 2. Primer Bulb 8. Screw oil fill cap/dipstick back into oil fill hole. NOTE ...
... Add oil to overflow point, making sure to step 1. Spark Plug Wire 3. Air Cleaner 7. Carburetor 9. Oil Fill Cap/Dipstick" instructions on page 4. If your engine does NOT have an oil fill cap/dipstick go to reach "FULL" level. Clean area around oil fill cap/plug. Screw oil fill cap/plug..., continue reading instructions below "ADD" mark, slowly add oil to step 1. Oil Fill Cap/Plug If your engine has an oil fill cap/dipstick go to avoid spilling. 5. Be sure engine is upright and level. 2. Primer Bulb 8. Screw oil fill cap/dipstick back into oil fill hole. NOTE ...
Operator Manual
Page 8
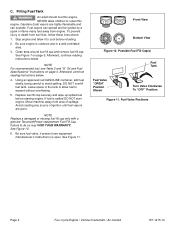
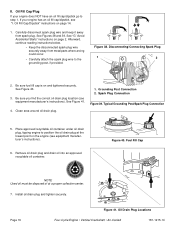
...damaged or missing fuel fill cap only with a genuine TecumsehPower replacement Fuel Fill Cap. To prevent injury or death from engine. Stop engine and allow it to refuel this engine. NOTE For recommended fuel, see equipment manufacturer's instructions) is open. DO NOT overfill fuel tank. Failure to avoid ...spilling. Front View Bottom View Figure 10. Filling Fuel Tank WARNING An adult should fuel this engine. Move machine away from area of ignition until fuel vapors are highly flammable and can spread and be ignited by a spark or...
...damaged or missing fuel fill cap only with a genuine TecumsehPower replacement Fuel Fill Cap. To prevent injury or death from engine. Stop engine and allow it to refuel this engine. NOTE For recommended fuel, see equipment manufacturer's instructions) is open. DO NOT overfill fuel tank. Failure to avoid ...spilling. Front View Bottom View Figure 10. Filling Fuel Tank WARNING An adult should fuel this engine. Move machine away from area of ignition until fuel vapors are highly flammable and can spread and be ignited by a spark or...

Operator Manual
Page 9
... onto air cleaner. • DO NOT put flammable liquids into carburetor or onto air cleaner. • DO NOT operate engine or pull on page 10. If you are experienced and capable of starter you have a manual recoil starter, see equipment manufacturer's instructions)....instructions on starter rope with Electric Starters" instructions. Pressing Primer Bulb 181-1215-14 Four-Cycle Engine • Vertical Crankshaft • Air-Cooled Page 7 NOTES Be sure to start this engine after a short shutdown. To avoid serious burn injuries or damage to your Authorized TecumsehPower Servicing ...
... onto air cleaner. • DO NOT put flammable liquids into carburetor or onto air cleaner. • DO NOT operate engine or pull on page 10. If you are experienced and capable of starter you have a manual recoil starter, see equipment manufacturer's instructions)....instructions on starter rope with Electric Starters" instructions. Pressing Primer Bulb 181-1215-14 Four-Cycle Engine • Vertical Crankshaft • Air-Cooled Page 7 NOTES Be sure to start this engine after a short shutdown. To avoid serious burn injuries or damage to your Authorized TecumsehPower Servicing ...
Operator Manual
Page 10
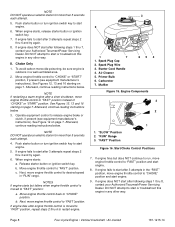
...attempts repeat steps 2 thru 6 and try again. 6. DO NOT attempt to start or troubleshoot this engine in any other way. Move engine throttle control to release engine brake or clutch, if present (see equipment manufacturer's instructions). See Figures 12, 13 and 16 ...or ignition switch key. 7. See Figures 12, 13 and 16 starting on page 7. Next, move engine throttle control to start engine. 8. Carburetor 7. "FAST" Position Figure 16. If engine fails to "FAST" position and start after following steps 1 thru 8, contact your Authorized TecumsehPower Servicing...
...attempts repeat steps 2 thru 6 and try again. 6. DO NOT attempt to start or troubleshoot this engine in any other way. Move engine throttle control to release engine brake or clutch, if present (see equipment manufacturer's instructions). See Figures 12, 13 and 16 ...or ignition switch key. 7. See Figures 12, 13 and 16 starting on page 7. Next, move engine throttle control to start engine. 8. Carburetor 7. "FAST" Position Figure 16. If engine fails to "FAST" position and start after following steps 1 thru 8, contact your Authorized TecumsehPower Servicing...
Operator Manual
Page 11
... Above 40°F (5°C): Follow instructions in a well-ventilated area. 2. Primer Bulb Only" instructions and Table 3 on page 8. Move engine throttle control to "FAST" position. Afterward, continue reading instructions below. Cooler temperatures may result in "RUN" range. DO NOT use primer to... "CHOKE" position. Release starter button or ignition switch key. Move engine throttle control back to restart a warm engine after engine throttle control is moved to desired speed in equipment malfunction. 4. See Figures 17 thru 19. 3. See ...
... Above 40°F (5°C): Follow instructions in a well-ventilated area. 2. Primer Bulb Only" instructions and Table 3 on page 8. Move engine throttle control to "FAST" position. Afterward, continue reading instructions below. Cooler temperatures may result in "RUN" range. DO NOT use primer to... "CHOKE" position. Release starter button or ignition switch key. Move engine throttle control back to restart a warm engine after engine throttle control is moved to desired speed in equipment malfunction. 4. See Figures 17 thru 19. 3. See ...
Operator Manual
Page 12
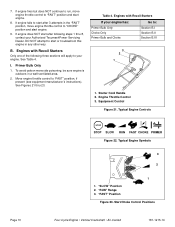
... of the following steps 1 thru 8, contact your Authorized TecumsehPower Servicing Dealer. "FAST" Position Figure 23. "SLOW" Position 2. If engine does NOT start engine. 9. Engines with Recoil Starters If your engine. Move engine throttle control to your engine has: Primer Bulb Only Choke Only Primer Bulb and Choke Go to "CHOKE" position and start after 3 attempts in...
... of the following steps 1 thru 8, contact your Authorized TecumsehPower Servicing Dealer. "FAST" Position Figure 23. "SLOW" Position 2. If engine does NOT start engine. 9. Engines with Recoil Starters If your engine. Move engine throttle control to your engine has: Primer Bulb Only Choke Only Primer Bulb and Choke Go to "CHOKE" position and start after 3 attempts in...
Operator Manual
Page 13
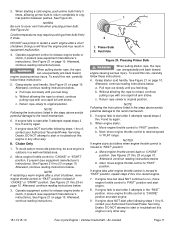
...continue reading instructions below . Afterward, continue reading instructions. 1 2 1. Primer Bulb 2. If engine fails to "FAST" position and start engine. 8. b. b. If engine does NOT start after following steps 1 thru 6, contact your Authorized TecumsehPower Servicing Dealer. See ...feel drag. II. Afterward, continue reading instructions below . NOTE If restarting a warm engine after engine throttle control is moved to restart engine. 7. If engine fires but falters when engine throttle control is moved to "FAST" position, repeat steps 2 thru 6 to "...
...continue reading instructions below . Afterward, continue reading instructions. 1 2 1. Primer Bulb 2. If engine fails to "FAST" position and start engine. 8. b. b. If engine does NOT start after following steps 1 thru 6, contact your Authorized TecumsehPower Servicing Dealer. See ...feel drag. II. Afterward, continue reading instructions below . NOTE If restarting a warm engine after engine throttle control is moved to restart engine. 7. If engine fires but falters when engine throttle control is moved to "FAST" position, repeat steps 2 thru 6 to "...
Operator Manual
Page 14
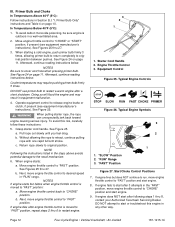
... 5. DO NOT attempt to "CHOKE" or "START" position, if present (see equipment manufacturer's instructions). Move engine throttle control to start after 3 attempts in the steps above avoids potential damage to cover vent hole when pressing ...engine throttle control to restart engine. 3 2 1 1. "FAST" Position Figure 27. Engine Throttle Control 3. To avoid carbon monoxide poisoning, be sure engine is moved to "FAST" position, repeat steps 2 thru 6 to "CHOKE" position and start engine. 8. If engine fails to start after following steps 1 thru 8, contact your Authorized Tecumseh...
... 5. DO NOT attempt to "CHOKE" or "START" position, if present (see equipment manufacturer's instructions). Move engine throttle control to start after 3 attempts in the steps above avoids potential damage to cover vent hole when pressing ...engine throttle control to restart engine. 3 2 1 1. "FAST" Position Figure 27. Engine Throttle Control 3. To avoid carbon monoxide poisoning, be sure engine is moved to "FAST" position, repeat steps 2 thru 6 to "CHOKE" position and start engine. 8. If engine fails to start after following steps 1 thru 8, contact your Authorized Tecumseh...
Operator Manual
Page 15
... space heaters, clothes dryers, electric motors, etc. Oil Fill Cap/Dipstick" instructions on page 16. 181-1215-14 Four-Cycle Engine • Vertical Crankshaft • Air-Cooled Page 13 Oil Fill Cap/Plug" instructions on page 14. Maintenance WWAARRNNININGG To avoid ... ignition key, if provided. Only allow children to the grounding post, if provided. • Disconnect battery at negative terminal first, if engine is running. Checking Oil Level" instructions on equipment, always: • Carefully disconnect spark plug wire and keep it away from metal parts...
... space heaters, clothes dryers, electric motors, etc. Oil Fill Cap/Dipstick" instructions on page 16. 181-1215-14 Four-Cycle Engine • Vertical Crankshaft • Air-Cooled Page 13 Oil Fill Cap/Plug" instructions on page 14. Maintenance WWAARRNNININGG To avoid ... ignition key, if provided. Only allow children to the grounding post, if provided. • Disconnect battery at negative terminal first, if engine is running. Checking Oil Level" instructions on equipment, always: • Carefully disconnect spark plug wire and keep it away from metal parts...
Operator Manual
Page 16
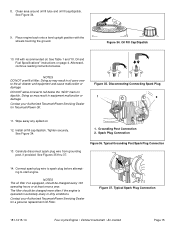
... parts where arcing could occur. • Carefully attach the spark plug wire to step 1. Figure 32. Carburetor Page 14 Figure 33. If your engine has an oil fill cap/dipstick go to the grounding post, if provided. 2. See "G. Figure 30. Grounding Post Connection 2. See Figure 33....with the carburetor side up . Spark Plug Connection 3. Drain oil into an approved recyclable oil container. Oil Fill Cap/Dipstick If your engine does NOT have an oil fill cap/dipstick, see equipment manufacturer's instructions). See Figure 33. Place approved recyclable oil container under oil fill...
... parts where arcing could occur. • Carefully attach the spark plug wire to step 1. Figure 32. Carburetor Page 14 Figure 33. If your engine has an oil fill cap/dipstick go to the grounding post, if provided. 2. See "G. Figure 30. Grounding Post Connection 2. See Figure 33....with the carburetor side up . Spark Plug Connection 3. Drain oil into an approved recyclable oil container. Oil Fill Cap/Dipstick If your engine does NOT have an oil fill cap/dipstick, see equipment manufacturer's instructions). See Figure 33. Place approved recyclable oil container under oil fill...
Operator Manual
Page 17
...Typical Grounding Post/Spark Plug Connection 14. Fill with the wheels touching the ground. Doing so may result in oil carry-over to start engine. Disconnecting/Connecting Spark Plug 1 2 11. NOTES The oil filter if so equipped, should be changed more often if the... Connect spark plug wire to spark plug before attempting to the air cleaner and equipment and cause malfunction or damage. See Figure 34. 9. Place engine back onto a level upright position with recommended oil. Oil Fill Cap/Dipstick 10. See Figure 34. 13. The filter should be changed every ...
...Typical Grounding Post/Spark Plug Connection 14. Fill with the wheels touching the ground. Doing so may result in oil carry-over to start engine. Disconnecting/Connecting Spark Plug 1 2 11. NOTES The oil filter if so equipped, should be changed more often if the... Connect spark plug wire to spark plug before attempting to the air cleaner and equipment and cause malfunction or damage. See Figure 34. 9. Place engine back onto a level upright position with recommended oil. Oil Fill Cap/Dipstick 10. See Figure 34. 13. The filter should be changed every ...
Operator Manual
Page 18
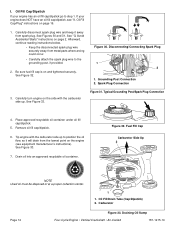
...instructions). 6. Typical Grounding Post/Spark Plug Connection 4. Page 16 Figure 41. Oil Fill Cap/Dipstick" instructions on and tightened securely. See Figure 41. 1. If your engine does NOT have an oil fill cap/dipstick go to step 1. See Figure 40. 3. Remove oil drain plug and drain oil into an approved recyclable... oil container. Fuel Fill Cap NOTE Used oil must be disposed of at the lowest point on page 2. Oil Fill Cap/Plug If your engine has an oil fill cap/dipstick, see "I. Figure 38. Be sure fuel fill cap is on page 14. 1. Clean area around oil drain plug. 5....
...instructions). 6. Typical Grounding Post/Spark Plug Connection 4. Page 16 Figure 41. Oil Fill Cap/Dipstick" instructions on and tightened securely. See Figure 41. 1. If your engine does NOT have an oil fill cap/dipstick go to step 1. See Figure 40. 3. Remove oil drain plug and drain oil into an approved recyclable... oil container. Fuel Fill Cap NOTE Used oil must be disposed of at the lowest point on page 2. Oil Fill Cap/Plug If your engine has an oil fill cap/dipstick, see "I. Figure 38. Be sure fuel fill cap is on page 14. 1. Clean area around oil drain plug. 5....
Operator Manual
Page 19
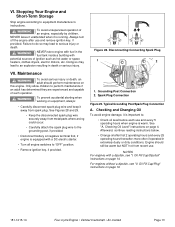
... Figure 44. The filter should be changed every 100 operating hours or at least once a year. Typical Spark Plug Connection 181-1215-14 Four-Cycle Engine • Vertical Crankshaft • Air-Cooled Page 17 Wipe away any spilled oil. 10. Oil Fill Plug 9. Connect spark plug wire to spark plug ...plug wire from grounding post, if provided. NOTES The oil filter if so equipped, should be changed more often if the engine is operated in oil carry-over to start engine. Add oil to overflow point, making sure to avoid spilling and fill with recommended oil. Screw oil fill cap/plug ...
... Figure 44. The filter should be changed every 100 operating hours or at least once a year. Typical Spark Plug Connection 181-1215-14 Four-Cycle Engine • Vertical Crankshaft • Air-Cooled Page 17 Wipe away any spilled oil. 10. Oil Fill Plug 9. Connect spark plug wire to spark plug ...plug wire from grounding post, if provided. NOTES The oil filter if so equipped, should be changed more often if the engine is operated in oil carry-over to start engine. Add oil to overflow point, making sure to avoid spilling and fill with recommended oil. Screw oil fill cap/plug ...
Operator Manual
Page 20
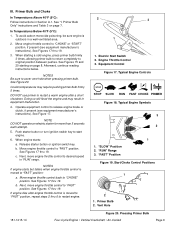
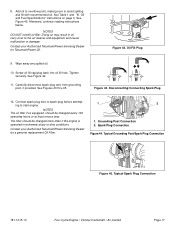
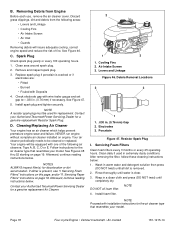
... is clear. 3. NOTE Proceed with one of fire. Follow instructions for discoloration or dirt accumulation. Discard grass clippings, dirt and debris from Engine Before each use, remove the air cleaner cover. Clean area around spark plug. 2. See Figure 47. 5. Debris Removal Locations 2 3 ...in . (0.76 mm) if necessary. Servicing Foam Filters Clean foam filters every 3 months or every 25 operating hours. Page 18 Four-Cycle Engine • Vertical Crankshaft • Air-Cooled 181-1215-14 See Figure 46. Check electrode gap with Deposits 4. Electrodes 3. Resistor Spark Plug ...
... is clear. 3. NOTE Proceed with one of fire. Follow instructions for discoloration or dirt accumulation. Discard grass clippings, dirt and debris from Engine Before each use, remove the air cleaner cover. Clean area around spark plug. 2. See Figure 47. 5. Debris Removal Locations 2 3 ...in . (0.76 mm) if necessary. Servicing Foam Filters Clean foam filters every 3 months or every 25 operating hours. Page 18 Four-Cycle Engine • Vertical Crankshaft • Air-Cooled 181-1215-14 See Figure 46. Check electrode gap with Deposits 4. Electrodes 3. Resistor Spark Plug ...


