
Datasheet
Page 2
TV-IP322WI WiFi or PoE The ability to connect the camera to an existing WiFi (2.4 GHz) or PoE network offers installation flexibility. Outdoor Ready Built for extreme environments with an IP66 weather rating and an operating temperature range of -30 - 60 °C (-22 - 140 °F). Day/Night HD Surveillance 960p video (1.3 Megapixel) at 30 fps in H.264 compression and 30 meter rated night vision provide 24 hour surveillance. Networking Solution
TV-IP322WI WiFi or PoE The ability to connect the camera to an existing WiFi (2.4 GHz) or PoE network offers installation flexibility. Outdoor Ready Built for extreme environments with an IP66 weather rating and an operating temperature range of -30 - 60 °C (-22 - 140 °F). Day/Night HD Surveillance 960p video (1.3 Megapixel) at 30 fps in H.264 compression and 30 meter rated night vision provide 24 hour surveillance. Networking Solution

Datasheet
Page 3
... vision up to 30 meters (100 ft.) in complete darkness Adjustable Bracket Adjustable integrated mounting bracket provides installation flexibility WiFi N Network the camera to an existing Wireless N (2.4 GHz) network PoE Supports ...installation Outdoor Ready Outdoor IP66 weather rated and an operating temperature range of -30 - 60 °C (-22 - 140 °F) Storage Store video to a MicroSD (SDHC, SDXC) card up to 64 GB (sold separately) or set up SMB or FTP Server storage Smart IR Dynamic IR adjustment optimizes night visibility TV-IP322WI... software to manage up to 32 TRENDnet cameras
... vision up to 30 meters (100 ft.) in complete darkness Adjustable Bracket Adjustable integrated mounting bracket provides installation flexibility WiFi N Network the camera to an existing Wireless N (2.4 GHz) network PoE Supports ...installation Outdoor Ready Outdoor IP66 weather rated and an operating temperature range of -30 - 60 °C (-22 - 140 °F) Storage Store video to a MicroSD (SDHC, SDXC) card up to 64 GB (sold separately) or set up SMB or FTP Server storage Smart IR Dynamic IR adjustment optimizes night visibility TV-IP322WI... software to manage up to 32 TRENDnet cameras

Datasheet
Page 4
... • TV-IP322WI • CD-ROM (Utility, Software & User's Guide) • Quick Installation Guide • Camera mounting hardware • Power adapter (12V 1A) • Network Cable (2 m / 6.5 ft.) 20675 Manhattan Place • Torrance • CA 90501 • USA • T: 1-888-326-6061 • F: 1-310-961-5511 • sales@trendnet.com • www.TRENDnet.com TRENDnet is subject...
... • TV-IP322WI • CD-ROM (Utility, Software & User's Guide) • Quick Installation Guide • Camera mounting hardware • Power adapter (12V 1A) • Network Cable (2 m / 6.5 ft.) 20675 Manhattan Place • Torrance • CA 90501 • USA • T: 1-888-326-6061 • F: 1-310-961-5511 • sales@trendnet.com • www.TRENDnet.com TRENDnet is subject...
Quick Installation Guide
Page 2
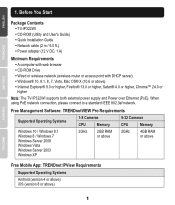
... App: TRENDnet IPView Requirements Supported Operating Systems Android (version 4 or above) iOS (version 8 or above ) Ÿ Internet Explorer® 9.0 or higher, Firefox® 13.0 or higher, Safari® 4.0 or higher, Chrome™ 24.0 or higher Note: The TV-IP322WI supports both...PoE). When using PoE network connection, please connect to a standard IEEE 802.3af network. Before You Start Package Contents Ÿ TV-IP322WI Ÿ CD-ROM (Utility and User's Guide) Ÿ Quick Installation Guide Ÿ Network cable (2 m / 6.5 ft.) Ÿ Power adapter (12 V DC, 1 A) Minimum Requirements &#...
... App: TRENDnet IPView Requirements Supported Operating Systems Android (version 4 or above) iOS (version 8 or above ) Ÿ Internet Explorer® 9.0 or higher, Firefox® 13.0 or higher, Safari® 4.0 or higher, Chrome™ 24.0 or higher Note: The TV-IP322WI supports both...PoE). When using PoE network connection, please connect to a standard IEEE 802.3af network. Before You Start Package Contents Ÿ TV-IP322WI Ÿ CD-ROM (Utility and User's Guide) Ÿ Quick Installation Guide Ÿ Network cable (2 m / 6.5 ft.) Ÿ Power adapter (12 V DC, 1 A) Minimum Requirements &#...

Quick Installation Guide
Page 3
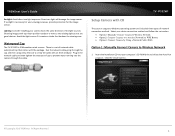
Click Install Camera. 6. Write down menu. 5. 2. Select the desired language from the drop down the MAC address. 2 WiFi Installation 1. Insert the CD into your computer. 3. Do not install or mount the IP camera before you complete the installation steps below. Temporarily place the IP camera next to your network. 2. Connect your computer to your CD-ROM drive and launch the setup utility. 4.
Click Install Camera. 6. Write down menu. 5. 2. Select the desired language from the drop down the MAC address. 2 WiFi Installation 1. Insert the CD into your computer. 3. Do not install or mount the IP camera before you complete the installation steps below. Temporarily place the IP camera next to your network. 2. Connect your computer to your CD-ROM drive and launch the setup utility. 4.

Quick Installation Guide
Page 4
The IR LEDs will turn on a dim red light. Allow 60 seconds for the camera to User's Guide.) 8. Select "Connect camera to your wireless network manually". (For a WPS WiFi installation refer to boot up, and then click Next. 9. Connect the power adapter to your camera, then click Next. 3 Select your router. 7. Connect a network cable to the camera's network port and then to the camera.
The IR LEDs will turn on a dim red light. Allow 60 seconds for the camera to User's Guide.) 8. Select "Connect camera to your wireless network manually". (For a WPS WiFi installation refer to boot up, and then click Next. 9. Connect the power adapter to your camera, then click Next. 3 Select your router. 7. Connect a network cable to the camera's network port and then to the camera.

Quick Installation Guide
Page 6
13. Disconnect the network cable from the camera. The initial setup is now connected to the management page. You will open a web browser. Please refer to the next session Install Web Browser Plug-in to download and install a plug-in for Camera Management Interface. To resume installation, minimize the web browser and then click Next. 5 Then click Next. 14. Enter username "admin" and the password that you have just changed. 15. Click the hyperlink to confirm access to your network. Your camera is now completed. This will need to view video.
13. Disconnect the network cable from the camera. The initial setup is now connected to the management page. You will open a web browser. Please refer to the next session Install Web Browser Plug-in to download and install a plug-in for Camera Management Interface. To resume installation, minimize the web browser and then click Next. 5 Then click Next. 14. Enter username "admin" and the password that you have just changed. 15. Click the hyperlink to confirm access to your network. Your camera is now completed. This will need to view video.

Quick Installation Guide
Page 7
... CD for TRENDnetVIEW Pro software. Ÿ When viewing live video from your mobile device. PoE Installation Ÿ See User's Guide. 6 one for the camera and one for more advanced features, please install the TRENDnetView Pro software. 16. Your camera is now ready to be prompted to view your ...router and IP camera user's guide for full functionally. Ÿ It is recommended that you will be physically installed in order to install plug-in for instructions. 3. Scan the QR code to download a free mobile app to view the camera from a web browser, you ...
... CD for TRENDnetVIEW Pro software. Ÿ When viewing live video from your mobile device. PoE Installation Ÿ See User's Guide. 6 one for the camera and one for more advanced features, please install the TRENDnetView Pro software. 16. Your camera is now ready to be prompted to view your ...router and IP camera user's guide for full functionally. Ÿ It is recommended that you will be physically installed in order to install plug-in for instructions. 3. Scan the QR code to download a free mobile app to view the camera from a web browser, you ...

Quick Installation Guide
Page 8
4. Then press OK. 3. Please click here to continue the installation. Click on the link to download the plug-in and follow the instructions to download and install the plug-in . 4. Access the camera management interface. 2. Click Finish. 7 Enter your username and password. Close the browser when installing the plug-in . Install Web Browser Plug-In for Camera Management Interface Windows 1.
4. Then press OK. 3. Please click here to continue the installation. Click on the link to download the plug-in and follow the instructions to download and install the plug-in . 4. Access the camera management interface. 2. Click Finish. 7 Enter your username and password. Close the browser when installing the plug-in . Install Web Browser Plug-In for Camera Management Interface Windows 1.

Quick Installation Guide
Page 9
Under / Mac directory.) Please click here to download and install the plug-in . 8 Restart the browser to download the plug-in. (If you don't have the Internet access at the time you are setting up, please find the plug-in on the link to live view. Close the browser when installing the plug-in . 5. Access the camera management interface. 2. Enter your username and password. Then press Log In. ........| 3. Mac OS X 1. Click on the CD.
Under / Mac directory.) Please click here to download and install the plug-in . 8 Restart the browser to download the plug-in. (If you don't have the Internet access at the time you are setting up, please find the plug-in on the link to live view. Close the browser when installing the plug-in . 5. Access the camera management interface. 2. Enter your username and password. Then press Log In. ........| 3. Mac OS X 1. Click on the CD.

Quick Installation Guide
Page 10
Double click on the WebComponents.pkg file and follow the instructions to live view. 9 Click Close. 6. 4. Restart the browser to proceed the installation. 5.
Double click on the WebComponents.pkg file and follow the instructions to live view. 9 Click Close. 6. 4. Restart the browser to proceed the installation. 5.

Quick Installation Guide
Page 11
... holes for the cables. 6. Please configure the camera first before mounting it through the hole. 7. 5. Place the provided template label on the template. For a WiFi Installation, confirm your cable from back of the provided screw anchors. 5. You can run your mobile device has at each marked position on the wall or...
... holes for the cables. 6. Please configure the camera first before mounting it through the hole. 7. 5. Place the provided template label on the template. For a WiFi Installation, confirm your cable from back of the provided screw anchors. 5. You can run your mobile device has at each marked position on the wall or...

Quick Installation Guide
Page 17
... without routing to this kit. TV-IP322WI TRENDnet 3 1 TRENDnet.com. Operation is not responsible for recycling advice. Such modifications could void the user's authority to TRENDnet's website at www.trendnet.com/support Product Warranty Registration Please take a moment to register your Local Authority or Retailer for any questions regarding the product installation, please contact our Technical Support...
... without routing to this kit. TV-IP322WI TRENDnet 3 1 TRENDnet.com. Operation is not responsible for recycling advice. Such modifications could void the user's authority to TRENDnet's website at www.trendnet.com/support Product Warranty Registration Please take a moment to register your Local Authority or Retailer for any questions regarding the product installation, please contact our Technical Support...

Users Guide
Page 2
...44 Event 45 Motion Detection...45 Exception ...49 Snapshot ...49 Email ...50 i TRENDnet User's Guide Contents Contents i Product Overview 3 Package Contents ...3 Features ...3 Product Hardware Features 4 Warnings: ...5 Cautions:...5 Plan for Installation 5 Setup Camera with CD 6 Option 1: Manually Connect Camera to Wireless Network ...Connect Camera to a Wireless Network by WPS Button 10 Option 3: Connect Camera by Using a Network Cable (PoE 14 Install Web Browser Plug-In for Camera Management Interface ......... 17 WiFi Camera Mounting 19 Access Camera through the Web Browser 20 ...
...44 Event 45 Motion Detection...45 Exception ...49 Snapshot ...49 Email ...50 i TRENDnet User's Guide Contents Contents i Product Overview 3 Package Contents ...3 Features ...3 Product Hardware Features 4 Warnings: ...5 Cautions:...5 Plan for Installation 5 Setup Camera with CD 6 Option 1: Manually Connect Camera to Wireless Network ...Connect Camera to a Wireless Network by WPS Button 10 Option 3: Connect Camera by Using a Network Cable (PoE 14 Install Web Browser Plug-In for Camera Management Interface ......... 17 WiFi Camera Mounting 19 Access Camera through the Web Browser 20 ...

Users Guide
Page 4
...'s Guide Product Overview TV-IP322WI Package Contents TV-IP322Wi Quick Installation Guide CD-ROM (Utility, Software & User's guide) Camera Mounting hardware (Drill template, mounting screws, network cable waterproof cap) Network cable (6 ft / 2M) Power Adapter (12V 1A) TV-IP322WI Features TRENDnet's Outdoor 1.3 MP HD WiFi IR Network Camera, model TV-IP322WI, provides powerful 1.3 megapixel...
...'s Guide Product Overview TV-IP322WI Package Contents TV-IP322Wi Quick Installation Guide CD-ROM (Utility, Software & User's guide) Camera Mounting hardware (Drill template, mounting screws, network cable waterproof cap) Network cable (6 ft / 2M) Power Adapter (12V 1A) TV-IP322WI Features TRENDnet's Outdoor 1.3 MP HD WiFi IR Network Camera, model TV-IP322WI, provides powerful 1.3 megapixel...

Users Guide
Page 6
...The camera is an outdoor dome camera, which will work properly, please contact your camera installation smooth and easy. TV-IP322WI There are a number of factors involved in extremely hot, cold temperatures (the operating temperature should also be...installations indoor and outdoor. Follow the suggested installation steps and go through the check lists. Plan for installation location Setup Camera with CD Hardware Installation Plan for Installation Viewing angle The TV-IP322WI is correct before using this camera outside of the specified temperature range. © Copyright 2015 TRENDnet...
...The camera is an outdoor dome camera, which will work properly, please contact your camera installation smooth and easy. TV-IP322WI There are a number of factors involved in extremely hot, cold temperatures (the operating temperature should also be...installations indoor and outdoor. Follow the suggested installation steps and go through the check lists. Plan for installation location Setup Camera with CD Hardware Installation Plan for Installation Viewing angle The TV-IP322WI is correct before using this camera outside of the specified temperature range. © Copyright 2015 TRENDnet...
Users Guide
Page 7
... the viewing area. Plug in the network cable and then tighten the waterproof cap to Wireless Network 1. Click the Install Camera. © Copyright 2015 TRENDnet. If sunlight is IP66 weather rated camera. TV-IP322WI Setup Camera with top-down position outdoor or next to the existing light source are good choices. Select your computer...
... the viewing area. Plug in the network cable and then tighten the waterproof cap to Wireless Network 1. Click the Install Camera. © Copyright 2015 TRENDnet. If sunlight is IP66 weather rated camera. TV-IP322WI Setup Camera with top-down position outdoor or next to the existing light source are good choices. Select your computer...

Users Guide
Page 9
...All Rights Reserved. 8 Click Next. Click Next. 7. Click Next. 9. Enter Password. TRENDnet User's Guide 6. The camera already selected by default if you have more than one camera installed. Select "DHCP" option to set IP address manually. The default password is "admin". ...You must within the same network. If you select "Fixed IP", fill out the IP address, subnet mask, default gateway, DNS server. Enter the default password: admin and enter the new password. TV-IP322WI...
...All Rights Reserved. 8 Click Next. Click Next. 7. Click Next. 9. Enter Password. TRENDnet User's Guide 6. The camera already selected by default if you have more than one camera installed. Select "DHCP" option to set IP address manually. The default password is "admin". ...You must within the same network. If you select "Fixed IP", fill out the IP address, subnet mask, default gateway, DNS server. Enter the default password: admin and enter the new password. TV-IP322WI...

Users Guide
Page 11
Click Finish to exit the program or click Home to return to install the App. Using your computer's CD-ROM drive to a Wireless Network by WPS Button 1. Insert the Installation CD into your mobile device to scan the QR code to the main screen. Click Next. © Copyright 2015 TRENDnet. TRENDnet User's Guide 14. TV-IP322WI Option 2: Connect Camera to initiate the Auto-Run program. Write down the MAC ID of the camera. All Rights Reserved. 10 Click the Install Camera. 2. This device also supports the Mobile App.
Click Finish to exit the program or click Home to return to install the App. Using your computer's CD-ROM drive to a Wireless Network by WPS Button 1. Insert the Installation CD into your mobile device to scan the QR code to the main screen. Click Next. © Copyright 2015 TRENDnet. TRENDnet User's Guide 14. TV-IP322WI Option 2: Connect Camera to initiate the Auto-Run program. Write down the MAC ID of the camera. All Rights Reserved. 10 Click the Install Camera. 2. This device also supports the Mobile App.

Users Guide
Page 13
... Network, you have only one camera installed. Enter the default password: admin and enter the new password. Enter "admin" on the screen. All Rights Reserved. 12 Click Next. 10. Enter Password. Wait while searching the cameras. TV-IP322WI 9. The password must change the default password of the camera. TRENDnet User's Guide 7. You must be...
... Network, you have only one camera installed. Enter the default password: admin and enter the new password. Enter "admin" on the screen. All Rights Reserved. 12 Click Next. 10. Enter Password. Wait while searching the cameras. TV-IP322WI 9. The password must change the default password of the camera. TRENDnet User's Guide 7. You must be...