
Datasheet
Page 1
... Android™ mobile app and complimentary pro-grade software to manage up to 32 TRENDnet cameras. It comes with an IP66 weather rated housing, embedded WiFi N, and a MicroSD card slot. TV-IP322WI Outdoor 1.3 MP HD WiFi IR Network Camera TV-IP322WI (v1.0R) • 1.3 Megapixel HD resolution (960p) • Connect to... slot (up to 64 GB) • Digital Wide Dynamic Range image balancing • ONVIF and IPv6 support TRENDnet's Outdoor 1.3 MP HD WiFi IR Network Camera, model TV-IP322WI, provides powerful 1.3 megapixel night vision in complete darkness for up to 30 meters (100 ft.).
... Android™ mobile app and complimentary pro-grade software to manage up to 32 TRENDnet cameras. It comes with an IP66 weather rated housing, embedded WiFi N, and a MicroSD card slot. TV-IP322WI Outdoor 1.3 MP HD WiFi IR Network Camera TV-IP322WI (v1.0R) • 1.3 Megapixel HD resolution (960p) • Connect to... slot (up to 64 GB) • Digital Wide Dynamic Range image balancing • ONVIF and IPv6 support TRENDnet's Outdoor 1.3 MP HD WiFi IR Network Camera, model TV-IP322WI, provides powerful 1.3 megapixel night vision in complete darkness for up to 30 meters (100 ft.).

Datasheet
Page 2
TV-IP322WI WiFi or PoE The ability to connect the camera to an existing WiFi (2.4 GHz) or PoE network offers installation flexibility. Networking Solution Outdoor Ready Built for extreme environments with an IP66 weather rating and an operating temperature range of -30 - 60 °C (-22 - 140 °F). Day/Night HD Surveillance 960p video (1.3 Megapixel) at 30 fps in H.264 compression and 30 meter rated night vision provide 24 hour surveillance.
TV-IP322WI WiFi or PoE The ability to connect the camera to an existing WiFi (2.4 GHz) or PoE network offers installation flexibility. Networking Solution Outdoor Ready Built for extreme environments with an IP66 weather rating and an operating temperature range of -30 - 60 °C (-22 - 140 °F). Day/Night HD Surveillance 960p video (1.3 Megapixel) at 30 fps in H.264 compression and 30 meter rated night vision provide 24 hour surveillance.

Datasheet
Page 3
...100 ft.) in complete darkness Adjustable Bracket Adjustable integrated mounting bracket provides installation flexibility WiFi N Network the camera to an existing Wireless N (2.4 GHz) network PoE Supports a Power over Ethernet (IEEE 802.3af) network...Smart IR Dynamic IR adjustment optimizes night visibility TV-IP322WI D-WDR Digital Wide Dynamic Range improves video quality in high contrast lighting environments Advanced Playback Advanced in-camera archived video review functionality Motion Detection Create motion ... Complimentary pro-grade software to manage up to 32 TRENDnet cameras
...100 ft.) in complete darkness Adjustable Bracket Adjustable integrated mounting bracket provides installation flexibility WiFi N Network the camera to an existing Wireless N (2.4 GHz) network PoE Supports a Power over Ethernet (IEEE 802.3af) network...Smart IR Dynamic IR adjustment optimizes night visibility TV-IP322WI D-WDR Digital Wide Dynamic Range improves video quality in high contrast lighting environments Advanced Playback Advanced in-camera archived video review functionality Motion Detection Create motion ... Complimentary pro-grade software to manage up to 32 TRENDnet cameras

Datasheet
Page 4
... video quality in 3dBi Security: • 64/128-bit, WPA/WPA2-PSK Data Rate • 802.11b: up to 11 Mbps TV-IP322WI • 802.11g: up to 54 Mbps • 802.11n: up to change at 150 Mbps Channel • 1-11 (FCC...TV-IP322WI • CD-ROM (Utility, Software & User's Guide) • Quick Installation Guide • Camera mounting hardware • Power adapter (12V 1A) • Network Cable (2 m / 6.5 ft.) 20675 Manhattan Place • Torrance • CA 90501 • USA • T: 1-888-326-6061 • F: 1-310-961-5511 • sales@trendnet.com • www.TRENDnet.com TRENDnet...
... video quality in 3dBi Security: • 64/128-bit, WPA/WPA2-PSK Data Rate • 802.11b: up to 11 Mbps TV-IP322WI • 802.11g: up to 54 Mbps • 802.11n: up to change at 150 Mbps Channel • 1-11 (FCC...TV-IP322WI • CD-ROM (Utility, Software & User's Guide) • Quick Installation Guide • Camera mounting hardware • Power adapter (12V 1A) • Network Cable (2 m / 6.5 ft.) 20675 Manhattan Place • Torrance • CA 90501 • USA • T: 1-888-326-6061 • F: 1-310-961-5511 • sales@trendnet.com • www.TRENDnet.com TRENDnet...
Quick Installation Guide
Page 2
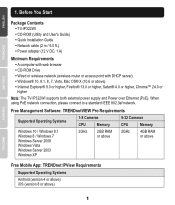
... Supported Operating Systems 1-8 Cameras CPU Memory 9-32 Cameras CPU Memory Windows 10 / Windows 8.1 Windows 8 / Windows 7 Windows Server 2008 Windows Vista Windows Server 2003 Windows XP 2GHz 2GB RAM or above 2GHz 4GB RAM or above Free Mobile App: TRENDnet IPView Requirements Supported Operating ...Systems Android (version 4 or above) iOS (version 8 or above ) Ÿ Internet Explorer® 9.0 or higher, Firefox® 13.0 or higher, Safari® 4.0 or higher, Chrome™ 24.0 or higher Note: The TV-IP322WI supports both...
... Supported Operating Systems 1-8 Cameras CPU Memory 9-32 Cameras CPU Memory Windows 10 / Windows 8.1 Windows 8 / Windows 7 Windows Server 2008 Windows Vista Windows Server 2003 Windows XP 2GHz 2GB RAM or above 2GHz 4GB RAM or above Free Mobile App: TRENDnet IPView Requirements Supported Operating ...Systems Android (version 4 or above) iOS (version 8 or above ) Ÿ Internet Explorer® 9.0 or higher, Firefox® 13.0 or higher, Safari® 4.0 or higher, Chrome™ 24.0 or higher Note: The TV-IP322WI supports both...

Quick Installation Guide
Page 3
Do not install or mount the IP camera before you complete the installation steps below. Temporarily place the IP camera next to your network. 2. Insert the CD into your computer. 3. Select the desired language from the drop down the MAC address. 2 Connect your computer to your CD-ROM drive and launch the setup utility. 4. Click Install Camera. 6. Write down menu. 5. WiFi Installation 1. 2.
Do not install or mount the IP camera before you complete the installation steps below. Temporarily place the IP camera next to your network. 2. Insert the CD into your computer. 3. Select the desired language from the drop down the MAC address. 2 Connect your computer to your CD-ROM drive and launch the setup utility. 4. Click Install Camera. 6. Write down menu. 5. WiFi Installation 1. 2.

Quick Installation Guide
Page 4
The IR LEDs will turn on a dim red light. Connect a network cable to the camera's network port and then to User's Guide.) 8. Select your router. Connect the power adapter to boot up, and then click Next. 9. Allow 60 seconds for the camera to the camera. Select "Connect camera to your wireless network manually". (For a WPS WiFi installation refer to your camera, then click Next. 3 7.
The IR LEDs will turn on a dim red light. Connect a network cable to the camera's network port and then to User's Guide.) 8. Select your router. Connect the power adapter to boot up, and then click Next. 9. Allow 60 seconds for the camera to the camera. Select "Connect camera to your wireless network manually". (For a WPS WiFi installation refer to your camera, then click Next. 3 7.

Quick Installation Guide
Page 5
If you don't see your wireless station on the list, click Rescan. Enter a new password, confirm new password, and click Next. 12. Select your Wireless Network Password. Select the Change Password box to change the camera's management interface access password. 10. Select DHCP and then click Next. 11. If you have encryption enabled, enter your wireless network from the Available Wireless Network dropdown menu. Then click Next. 4
If you don't see your wireless station on the list, click Rescan. Enter a new password, confirm new password, and click Next. 12. Select your Wireless Network Password. Select the Change Password box to change the camera's management interface access password. 10. Select DHCP and then click Next. 11. If you have encryption enabled, enter your wireless network from the Available Wireless Network dropdown menu. Then click Next. 4

Quick Installation Guide
Page 6
The initial setup is now connected to the next session Install Web Browser Plug-in to the management page. Click the hyperlink to confirm access to view video. To resume installation, minimize the web browser and then click Next. 5 This will need to download and install a plug-in for Camera Management Interface. You will open a web browser. Please refer to your network. Your camera is now completed. Enter username "admin" and the password that you have just changed. 15. Disconnect the network cable from the camera. 13. Then click Next. 14.
The initial setup is now connected to the next session Install Web Browser Plug-in to the management page. Click the hyperlink to confirm access to view video. To resume installation, minimize the web browser and then click Next. 5 This will need to download and install a plug-in for Camera Management Interface. You will open a web browser. Please refer to your network. Your camera is now completed. Enter username "admin" and the password that you have just changed. 15. Disconnect the network cable from the camera. 13. Then click Next. 14.

Quick Installation Guide
Page 7
... Ÿ See User's Guide for instructions. 3. Scan the QR code to download a free mobile app to start installation. one for the camera and one for more advanced features, please install the TRENDnetView Pro software. PoE Installation Ÿ See User's Guide. 6 Refer to view your... router and IP camera user's guide for information concerning advanced management functions. Ÿ Two User's Guides are included - Congratulations! Click Finish to be prompted to...
... Ÿ See User's Guide for instructions. 3. Scan the QR code to download a free mobile app to start installation. one for the camera and one for more advanced features, please install the TRENDnetView Pro software. PoE Installation Ÿ See User's Guide. 6 Refer to view your... router and IP camera user's guide for information concerning advanced management functions. Ÿ Two User's Guides are included - Congratulations! Click Finish to be prompted to...

Quick Installation Guide
Page 8
4. Access the camera management interface. 2. Please click here to download and install the plug-in and follow the instructions to download the plug-in . Then press OK. 3. Click on the link to continue the installation. Install Web Browser Plug-In for Camera Management Interface Windows 1. Click Finish. 7 Enter your username and password. Close the browser when installing the plug-in. 4.
4. Access the camera management interface. 2. Please click here to download and install the plug-in and follow the instructions to download the plug-in . Then press OK. 3. Click on the link to continue the installation. Install Web Browser Plug-In for Camera Management Interface Windows 1. Click Finish. 7 Enter your username and password. Close the browser when installing the plug-in. 4.

Quick Installation Guide
Page 9
Enter your username and password. Click on the CD. Restart the browser to download the plug-in. (If you don't have the Internet access at the time you are setting up, please find the plug-in on the link to live view. Mac OS X 1. Under / Mac directory.) Please click here to download and install the plug-in . 8 Close the browser when installing the plug-in . 5. Then press Log In. ........| 3. Access the camera management interface. 2.
Enter your username and password. Click on the CD. Restart the browser to download the plug-in. (If you don't have the Internet access at the time you are setting up, please find the plug-in on the link to live view. Mac OS X 1. Under / Mac directory.) Please click here to download and install the plug-in . 8 Close the browser when installing the plug-in . 5. Then press Log In. ........| 3. Access the camera management interface. 2.

Quick Installation Guide
Page 11
...connection to User's Guide. Place the provided template label on capturing appropriate camera viewing angle, please refer to the WiFi network. 2. Skip to the camera's power port. 10 Loosen the adjustable nut and manually position the camera as desired. 3. You can run your mobile device has at each ...marked position on the template. Connect the power adapter to step 6 if you are doing so. 5. Please configure the camera first before mounting it through the hole. 7. Make sure the drill bit matches the size of the base. Drill holes for the cables. 6....
...connection to User's Guide. Place the provided template label on capturing appropriate camera viewing angle, please refer to the WiFi network. 2. Skip to the camera's power port. 10 Loosen the adjustable nut and manually position the camera as desired. 3. You can run your mobile device has at each ...marked position on the template. Connect the power adapter to step 6 if you are doing so. 5. Please configure the camera first before mounting it through the hole. 7. Make sure the drill bit matches the size of the base. Drill holes for the cables. 6....

Quick Installation Guide
Page 12
Seal edge of camera base with the screw anchors, and then use the provided screws to secure the camera to hold the position after adjustment. 11 Loosen the lock ring to adjust the angle and tighten it to the mounting surface. 10. Align the mounting bracket with exterior grade caulking. 11. 8. Insert the provided screw anchors into the holes. 9.
Seal edge of camera base with the screw anchors, and then use the provided screws to secure the camera to hold the position after adjustment. 11 Loosen the lock ring to adjust the angle and tighten it to the mounting surface. 10. Align the mounting bracket with exterior grade caulking. 11. 8. Insert the provided screw anchors into the holes. 9.

Users Guide
Page 2
... Web Browser 20 System Management and Default Settings 20 Logging-in to the Camera 20 Basic Settings 22 Live View...22 Playback...23 Log ...26 System ...27 Advanced Settings 27 System 27 Device Settings ...27 © Copyright 2015 TRENDnet. All Rights Reserved. Table of Contents User Accounts ...28 Time Settings ...29 Daylight...
... Web Browser 20 System Management and Default Settings 20 Logging-in to the Camera 20 Basic Settings 22 Live View...22 Playback...23 Log ...26 System ...27 Advanced Settings 27 System 27 Device Settings ...27 © Copyright 2015 TRENDnet. All Rights Reserved. Table of Contents User Accounts ...28 Time Settings ...29 Daylight...

Users Guide
Page 4
... to 30 meters (100 ft.). All Rights Reserved. 3 TRENDnet User's Guide Product Overview TV-IP322WI Package Contents TV-IP322Wi Quick Installation Guide CD-ROM (Utility, Software & User's guide) Camera Mounting hardware (Drill template, mounting screws, network cable waterproof cap...) Network cable (6 ft / 2M) Power Adapter (12V 1A) TV-IP322WI Features TRENDnet's Outdoor 1.3 MP HD WiFi IR Network Camera, model TV-IP322WI, provides powerful 1.3 megapixel night vision (higher than 720p) at 30 fps in H.264 compression Night...
... to 30 meters (100 ft.). All Rights Reserved. 3 TRENDnet User's Guide Product Overview TV-IP322WI Package Contents TV-IP322Wi Quick Installation Guide CD-ROM (Utility, Software & User's guide) Camera Mounting hardware (Drill template, mounting screws, network cable waterproof cap...) Network cable (6 ft / 2M) Power Adapter (12V 1A) TV-IP322WI Features TRENDnet's Outdoor 1.3 MP HD WiFi IR Network Camera, model TV-IP322WI, provides powerful 1.3 megapixel night vision (higher than 720p) at 30 fps in H.264 compression Night...

Users Guide
Page 5
... is designed to work on when the sensor detect low light source. Sun Visor: Sun visor to prevent direct sun to 32 TRENDnet cameras Product Hardware Features Camera Overview TV-IP322WI Power Ethernet/PoE Mounting IP66 Connector Port Lock Ring Housing IR Sensor IR Sun Visor LEDs Power Connector: This model is rated...
... is designed to work on when the sensor detect low light source. Sun Visor: Sun visor to prevent direct sun to 32 TRENDnet cameras Product Hardware Features Camera Overview TV-IP322WI Power Ethernet/PoE Mounting IP66 Connector Port Lock Ring Housing IR Sensor IR Sun Visor LEDs Power Connector: This model is rated...

Users Guide
Page 6
... The TV-IP322WI is a bullet camera with fingers. Plan for installation location Setup Camera with a heater and blower if you expect to see. The camera is an IP66 grade water proof camera, and it gently. If the camera will help extend the camera's life and preserve the quality of the specified temperature range. © Copyright 2015 TRENDnet. Using the camera...
... The TV-IP322WI is a bullet camera with fingers. Plan for installation location Setup Camera with a heater and blower if you expect to see. The camera is an IP66 grade water proof camera, and it gently. If the camera will help extend the camera's life and preserve the quality of the specified temperature range. © Copyright 2015 TRENDnet. Using the camera...
Users Guide
Page 7
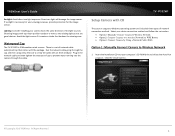
... network cable and then tighten the waterproof cap to Wireless Network 1. TV-IP322WI Setup Camera with top-down position outdoor or next to the existing light source are good choices. Click the Install Camera. © Copyright 2015 TRENDnet. If sunlight is IP66 weather rated camera. Select your desire connection method and follow the instruction. Option1...
... network cable and then tighten the waterproof cap to Wireless Network 1. TV-IP322WI Setup Camera with top-down position outdoor or next to the existing light source are good choices. Click the Install Camera. © Copyright 2015 TRENDnet. If sunlight is IP66 weather rated camera. Select your desire connection method and follow the instruction. Option1...

Users Guide
Page 8
Connect a network cable to the camera's network port and then to your wireless network manually". 5. Write down the MAC ID of the camera. The IR LEDs will turn on dime red light. Select "Connect camera to the router. Allow 60 seconds for the camera to the camera. Wait while searching the cameras. © Copyright 2015 TRENDnet. All Rights Reserved. 7 Connect the power adapter to boot up. TRENDnet User's Guide 2. Click Next. Click Next. 3. TV-IP322WI 4.
Connect a network cable to the camera's network port and then to your wireless network manually". 5. Write down the MAC ID of the camera. The IR LEDs will turn on dime red light. Select "Connect camera to the router. Allow 60 seconds for the camera to the camera. Wait while searching the cameras. © Copyright 2015 TRENDnet. All Rights Reserved. 7 Connect the power adapter to boot up. TRENDnet User's Guide 2. Click Next. Click Next. 3. TV-IP322WI 4.


