Data Sheet
Page 1
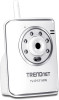
...installation • Complimentary SecurView Pro software: manage up of up to 32 cameras ** • 3-year limited warranty *Support SSL with the included complimentary camera management software. A wall/ceiling mounting kit is included and the off-white IP camera housing blends into most environments. SecurView Wireless N Day/Night Internet Camera TV-IP121WN..., SMTP Email*, HTTP and other Internet protocols • Record streaming video to 32 TRENDnet cameras with complimentary software **Monitoring multiple cameras may require a high performance CPU TV-IP121WN rev: 02.02.2011
...installation • Complimentary SecurView Pro software: manage up of up to 32 cameras ** • 3-year limited warranty *Support SSL with the included complimentary camera management software. A wall/ceiling mounting kit is included and the off-white IP camera housing blends into most environments. SecurView Wireless N Day/Night Internet Camera TV-IP121WN..., SMTP Email*, HTTP and other Internet protocols • Record streaming video to 32 TRENDnet cameras with complimentary software **Monitoring multiple cameras may require a high performance CPU TV-IP121WN rev: 02.02.2011
Data Sheet
Page 3
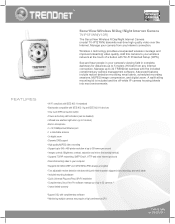
... recent product information please visit http://www.trendnet.com Copyright ©TRENDnet.All Rights Reserved. Other Brands and product names are trademarks of their respective holders. SecurView Wireless N Day/Night Internet Camera TV-IP121WN(V1.0R) SPECIFICATIONS Settings Dynamic DNS Time... SMTP System log • Yes • Synchronize with NTP server or set time/date manually • SMTP mail supported up to 2 accounts • 100 items NETWORKING SOLUTIONS PACKAGE CONTENTS TV-IP110WN Multi-Language Quick Installation...
... recent product information please visit http://www.trendnet.com Copyright ©TRENDnet.All Rights Reserved. Other Brands and product names are trademarks of their respective holders. SecurView Wireless N Day/Night Internet Camera TV-IP121WN(V1.0R) SPECIFICATIONS Settings Dynamic DNS Time... SMTP System log • Yes • Synchronize with NTP server or set time/date manually • SMTP mail supported up to 2 accounts • 100 items NETWORKING SOLUTIONS PACKAGE CONTENTS TV-IP110WN Multi-Language Quick Installation...
User's Guide
Page 2
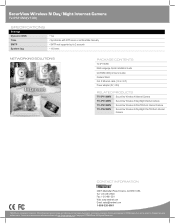
... Pro software. The camera can be installed as a standalone system within your DDNS. Chapter 5 Using SecurView™ Pro shows you with the instructions and illustrations on how to use this guide are for purchasing the TV-IP121WN, a powerful and high-quality image ...SecurView Wireless Day/Night Internet Camera. Chapter 2 Hardware Installation helps you through the configuration of the camera. - 1 - Chapter 4 Configuring the Camera...
... Pro software. The camera can be installed as a standalone system within your DDNS. Chapter 5 Using SecurView™ Pro shows you with the instructions and illustrations on how to use this guide are for purchasing the TV-IP121WN, a powerful and high-quality image ...SecurView Wireless Day/Night Internet Camera. Chapter 2 Hardware Installation helps you through the configuration of the camera. - 1 - Chapter 4 Configuring the Camera...
User's Guide
Page 3
CONTENTS PREFACE 1 CHAPTER 1 4 INTRODUCTION TO YOUR CAMERA 4 1.1 CHECKING THE PACKAGE CONTENTS 4 1.2 GETTING TO KNOW YOUR CAMERA 5 1.3 FEATURES AND BENEFITS 7 1.4 SYSTEM REQUIREMENT 8 CHAPTER 2 9 HARDWARE INSTALLATION 9 2.1 INSTALLING THE CAMERA STAND 9 2.2 CONNECTING THE CAMERA TO LAN/WLAN 10 2.3 APPLICATIONS OF THE CAMERA 11 CHAPTER 3 12 ACCESSING THE CAMERA 12 3.1 USING IPSETUP 12 3.2 ACCESSING ...
CONTENTS PREFACE 1 CHAPTER 1 4 INTRODUCTION TO YOUR CAMERA 4 1.1 CHECKING THE PACKAGE CONTENTS 4 1.2 GETTING TO KNOW YOUR CAMERA 5 1.3 FEATURES AND BENEFITS 7 1.4 SYSTEM REQUIREMENT 8 CHAPTER 2 9 HARDWARE INSTALLATION 9 2.1 INSTALLING THE CAMERA STAND 9 2.2 CONNECTING THE CAMERA TO LAN/WLAN 10 2.3 APPLICATIONS OF THE CAMERA 11 CHAPTER 3 12 ACCESSING THE CAMERA 12 3.1 USING IPSETUP 12 3.2 ACCESSING ...
User's Guide
Page 4
SECURVIEW™ PRO SOFT WARE 55 5.1 INSTALLATION 56 5.2 USING SECURVIEW™ PRO 59 CHAPTER 6 90 HOW TO ACCESS THE CAMERA BEHIND A ROUTER.......... 90 CHAPTER 7 96 APPENDIX 96 A.1 SPECIFICATION 96 A.2 GLOSSARY OF TERMS 98 LIMITED WARRANTY 107 - 3 -
SECURVIEW™ PRO SOFT WARE 55 5.1 INSTALLATION 56 5.2 USING SECURVIEW™ PRO 59 CHAPTER 6 90 HOW TO ACCESS THE CAMERA BEHIND A ROUTER.......... 90 CHAPTER 7 96 APPENDIX 96 A.1 SPECIFICATION 96 A.2 GLOSSARY OF TERMS 98 LIMITED WARRANTY 107 - 3 -

User's Guide
Page 5
CHAPTER 1 INTRODUCTION TO YOUR CAMERA 1.1 Checking the Package Contents Check the items contained in the package carefully. NOTE: If there is any packaging content missing, please contact with your local authorized dealer for replacement. - 4 - You should have the following: TV-IP121WN 1 x CD-ROM (Utility & User's Guide) 1 x Multi-Language Quick Installation Guide 1 x External antenna 1 x 5V 2.5A power adapter 1 x Network cable 1 x Camera stand.
CHAPTER 1 INTRODUCTION TO YOUR CAMERA 1.1 Checking the Package Contents Check the items contained in the package carefully. NOTE: If there is any packaging content missing, please contact with your local authorized dealer for replacement. - 4 - You should have the following: TV-IP121WN 1 x CD-ROM (Utility & User's Guide) 1 x Multi-Language Quick Installation Guide 1 x External antenna 1 x 5V 2.5A power adapter 1 x Network cable 1 x Camera stand.
User's Guide
Page 10
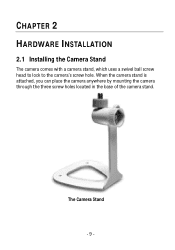
The Camera Stand - 9 - When the camera stand is attached, you can place the camera anywhere by mounting the camera through the three screw holes located in the base of the camera stand. CHAPTER 2 HARDWARE INSTALLATION 2.1 Installing the Camera Stand The camera comes with a camera stand, which uses a swivel ball screw head to lock to the camera's screw hole.
The Camera Stand - 9 - When the camera stand is attached, you can place the camera anywhere by mounting the camera through the three screw holes located in the base of the camera stand. CHAPTER 2 HARDWARE INSTALLATION 2.1 Installing the Camera Stand The camera comes with a camera stand, which uses a swivel ball screw head to lock to the camera's screw hole.
User's Guide
Page 11
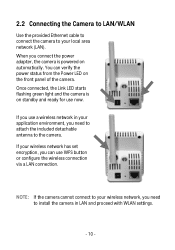
... can use WPS button or configure the wireless connection via a LAN connection. NOTE: If the camera cannot connect to your wireless network, you need to install the camera in your application environment, you need to attach the included detachable antenna to your wireless network has set encryption, you connect the power...
... can use WPS button or configure the wireless connection via a LAN connection. NOTE: If the camera cannot connect to your wireless network, you need to install the camera in your application environment, you need to attach the included detachable antenna to your wireless network has set encryption, you connect the power...
User's Guide
Page 12
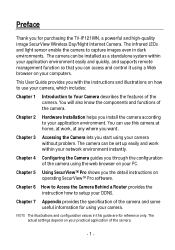
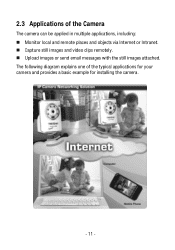
2.3 Applications of the typical applications for your camera and provides a basic example for installing the camera. - 11 - The following diagram explains one of the Camera The camera can be applied in multiple applications, including: Monitor local and remote places and objects via Internet or Intranet. Capture still images and video clips remotely. Upload images or send email messages with the still images attached.
2.3 Applications of the typical applications for your camera and provides a basic example for installing the camera. - 11 - The following diagram explains one of the Camera The camera can be applied in multiple applications, including: Monitor local and remote places and objects via Internet or Intranet. Capture still images and video clips remotely. Upload images or send email messages with the still images attached.
User's Guide
Page 13
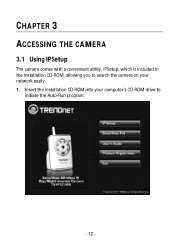
CHAPTER 3 ACCESSING THE CAMERA 3.1 Using IPSetup The camera comes with a convenient utility, IPSetup, which is included in the Installation CD-ROM, allowing you to initiate the Auto-Run program. - 12 - Insert the Installation CD-ROM into your computer's CD-ROM drive to search the camera on your network easily. 1.
CHAPTER 3 ACCESSING THE CAMERA 3.1 Using IPSetup The camera comes with a convenient utility, IPSetup, which is included in the Installation CD-ROM, allowing you to initiate the Auto-Run program. - 12 - Insert the Installation CD-ROM into your computer's CD-ROM drive to search the camera on your network easily. 1.

User's Guide
Page 15
4. Click Next to confirm the IPSetup software to be installed to the computer. 5. When the Installation Complete window appears, click Close. - 14 -
4. Click Next to confirm the IPSetup software to be installed to the computer. 5. When the Installation Complete window appears, click Close. - 14 -
User's Guide
Page 16
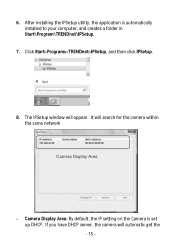
After installing the IPSetup utility, the application is set up DHCP. If you have DHCP server, the camera will appear. Camera Display Area: By default, the IP setting on the Camera is automatically installed to your computer, and creates a folder in Start\Program\TRENDnet\IPSetup. 7. The IPSetup window will automatic get the - 15 - Click Start>Programs>TRENDnet>IPSetup, and then click IPSetup. 8. It will search for the camera within the same network Camera Display Area - 6.
After installing the IPSetup utility, the application is set up DHCP. If you have DHCP server, the camera will appear. Camera Display Area: By default, the IP setting on the Camera is automatically installed to your computer, and creates a folder in Start\Program\TRENDnet\IPSetup. 7. The IPSetup window will automatic get the - 15 - Click Start>Programs>TRENDnet>IPSetup, and then click IPSetup. 8. It will search for the camera within the same network Camera Display Area - 6.
User's Guide
Page 18
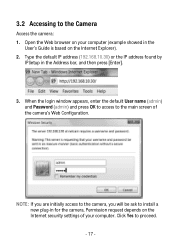
... in the User's Guide is based on the Internet security settings of the camera's Web Configuration. Permission request depends on the Internet Explorer). 2. 3.2 Accessing to install a new plug-in for the camera. Open the Web browser on your computer (example showed in the Address bar, and then press [Enter]. 3.
... in the User's Guide is based on the Internet security settings of the camera's Web Configuration. Permission request depends on the Internet Explorer). 2. 3.2 Accessing to install a new plug-in for the camera. Open the Web browser on your computer (example showed in the Address bar, and then press [Enter]. 3.
User's Guide
Page 57
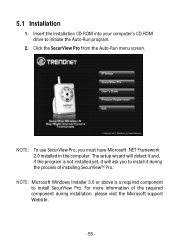
... to initiate the Auto-Run program. 2. The setup wizard will ask you must have Microsoft .NET Framework 2.0 installed in the computer. NOTE: Microsoft Windows Installer 3.0 or above is not installed yet, it will detect it during installation, please visit the Microsoft support Website. - 56 - For more information of the required component during the process...
... to initiate the Auto-Run program. 2. The setup wizard will ask you must have Microsoft .NET Framework 2.0 installed in the computer. NOTE: Microsoft Windows Installer 3.0 or above is not installed yet, it will detect it during installation, please visit the Microsoft support Website. - 56 - For more information of the required component during the process...
User's Guide
Page 58
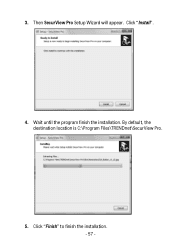
Then SecurView Pro Setup Wizard will appear. By default, the destination location is C:\Program Files\TRENDnet\SecurView Pro. 5. Click "Install". 4. Wait until the program finish the installation. Click "Finish" to finish the installation. - 57 - 3.
Then SecurView Pro Setup Wizard will appear. By default, the destination location is C:\Program Files\TRENDnet\SecurView Pro. 5. Click "Install". 4. Wait until the program finish the installation. Click "Finish" to finish the installation. - 57 - 3.
User's Guide
Page 59
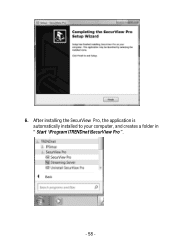
After installing the SecurView Pro, the application is automatically installed to your computer, and creates a folder in " Start \Program\TRENDnet\SecurView Pro ". - 58 - 6.
After installing the SecurView Pro, the application is automatically installed to your computer, and creates a folder in " Start \Program\TRENDnet\SecurView Pro ". - 58 - 6.

User's Guide
Page 72
If the image cannot be displayed in the Live View/Preview window normally, click the following path to the main windows. The cameras will display here. 8. Once you added all the cameras, click the close button "x" on the Device Setting windows to return to download and install the required component: http://download.divx.com/divx/DivXInstaller.exe - 71 - NOTE Divx/Xvid codec is required for viewing the image of camera.
If the image cannot be displayed in the Live View/Preview window normally, click the following path to the main windows. The cameras will display here. 8. Once you added all the cameras, click the close button "x" on the Device Setting windows to return to download and install the required component: http://download.divx.com/divx/DivXInstaller.exe - 71 - NOTE Divx/Xvid codec is required for viewing the image of camera.
User's Guide
Page 109
...STATUTORY OR OTHERWISE, INCLUDING WARRANTIES OF MERCHANTABILITY AND FITNESS FOR A PARTICULAR PURPOSE. LIMITATION OF LIABILITY: TO THE FULL EXTENT ALLOWED BY LAW TRENDNET ALSO EXCLUDES FOR ITSELF AND ITS SUPPLIERS ANY LIABILITY, WHETHER BASED IN CONTRACT OR TORT (INCLUDING NEGLIGENCE), FOR INCIDENTAL, CONSEQUENTIAL, INDIRECT, ...THAT THE ALLEGED DEFECT IN THE PRODUCT DOES NOT EXIST OR WAS CAUSED BY CUSTOMER'S OR ANY THIRD PERSON'S MISUSE, NEGLECT, IMPROPER INSTALLATION OR TESTING, UNAUTHORIZED ATTEMPTS TO REPAIR OR MODIFY, OR ANY OTHER CAUSE BEYOND THE RANGE OF THE INTENDED USE, OR BY ACCIDENT,...
...STATUTORY OR OTHERWISE, INCLUDING WARRANTIES OF MERCHANTABILITY AND FITNESS FOR A PARTICULAR PURPOSE. LIMITATION OF LIABILITY: TO THE FULL EXTENT ALLOWED BY LAW TRENDNET ALSO EXCLUDES FOR ITSELF AND ITS SUPPLIERS ANY LIABILITY, WHETHER BASED IN CONTRACT OR TORT (INCLUDING NEGLIGENCE), FOR INCIDENTAL, CONSEQUENTIAL, INDIRECT, ...THAT THE ALLEGED DEFECT IN THE PRODUCT DOES NOT EXIST OR WAS CAUSED BY CUSTOMER'S OR ANY THIRD PERSON'S MISUSE, NEGLECT, IMPROPER INSTALLATION OR TESTING, UNAUTHORIZED ATTEMPTS TO REPAIR OR MODIFY, OR ANY OTHER CAUSE BEYOND THE RANGE OF THE INTENDED USE, OR BY ACCIDENT,...
User's Guide
Page 110
...Go to http://www.trendnet.com/gpl or http://www.trendnet.com Download section and look for the desired TRENDnet product to access to the GNU General Public License ("GPL") or GNU Lesser General Public License ("LGPL"). OF OR IN CONNECTION WITH THE SALE, INSTALLATION, MAINTENANCE, USE, PERFORMANCE..., FAILURE, OR INTERRUPTION OF THE POSSIBILITY OF SUCH DAMAGES, AND LIMITS ITS LIABILITY TO REPAIR, REPLACEMENT, OR REFUND OF THE PURCHASE PRICE PAID, AT TRENDNET'S OPTION.
...Go to http://www.trendnet.com/gpl or http://www.trendnet.com Download section and look for the desired TRENDnet product to access to the GNU General Public License ("GPL") or GNU Lesser General Public License ("LGPL"). OF OR IN CONNECTION WITH THE SALE, INSTALLATION, MAINTENANCE, USE, PERFORMANCE..., FAILURE, OR INTERRUPTION OF THE POSSIBILITY OF SUCH DAMAGES, AND LIMITS ITS LIABILITY TO REPAIR, REPLACEMENT, OR REFUND OF THE PURCHASE PRICE PAID, AT TRENDNET'S OPTION.
Quick Installation Guide
Page 2
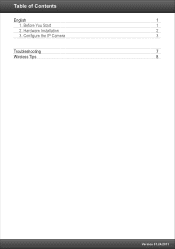
Configure the IP Camera 3 Troubleshooting 7 Wireless Tips 8 Version 01.24.2011 Hardware Installation 2 3. Before You Start 1 2. Table of Contents English 1 1.
Configure the IP Camera 3 Troubleshooting 7 Wireless Tips 8 Version 01.24.2011 Hardware Installation 2 3. Before You Start 1 2. Table of Contents English 1 1.
