
Datasheet
Page 1
... older Parallel port printers and newer USB port printers with everyone on your network. print servers Wireless 2-Port USB/Parallel Print Server TEW-P11G (v1.0R) The Wireless 2-Port USB/Parallel Print Server turns most USB and Parallel printers • Line Printer Remote (LPR) printing for Windows networking environments • Easy to use Windows based utility program and Web...
... older Parallel port printers and newer USB port printers with everyone on your network. print servers Wireless 2-Port USB/Parallel Print Server TEW-P11G (v1.0R) The Wireless 2-Port USB/Parallel Print Server turns most USB and Parallel printers • Line Printer Remote (LPR) printing for Windows networking environments • Easy to use Windows based utility program and Web...
Datasheet
Page 2
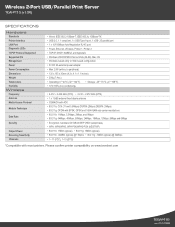
Please confirm printer compatibility on www.trendnet.com TEW-P11G rev: 03.11.2009 Wireless 2-Port USB/Parallel Print Server TEW-P11G (v1.0R) SPECIFICATIONS Hardware Standards Printer Interface LAN Port Diagnostic LEDs TCP/IP Protocol Supported Supported OS Management Power Power...-Negotiation RJ-45 port • Power, Ethernet, Wireless, Printer 1, Printer 2 • TCP/IP, DHCP, NetBEUI, and Appletalk • Windows 2000/XP/2003 Server/Vista (32-Bit), Mac OS • Windows based utility or Web based configuration • 5V DC 2A external power adapter • Max 2.5W (without a ...
Please confirm printer compatibility on www.trendnet.com TEW-P11G rev: 03.11.2009 Wireless 2-Port USB/Parallel Print Server TEW-P11G (v1.0R) SPECIFICATIONS Hardware Standards Printer Interface LAN Port Diagnostic LEDs TCP/IP Protocol Supported Supported OS Management Power Power...-Negotiation RJ-45 port • Power, Ethernet, Wireless, Printer 1, Printer 2 • TCP/IP, DHCP, NetBEUI, and Appletalk • Windows 2000/XP/2003 Server/Vista (32-Bit), Mac OS • Windows based utility or Web based configuration • 5V DC 2A external power adapter • Max 2.5W (without a ...
Datasheet
Page 3
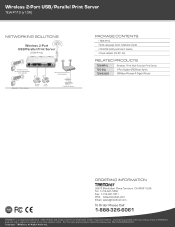
... are trademarks of their respective holders. Copyright © TRENDnet. Wireless 2-Port USB/Parallel Print Server TEW-P11G (v1.0R) NETWORKING SOLUTIONS Wireless 2-Port USB/Parallel Print Server (TEW-P11G) Workstations with Wireless N USB Adapter (TEW-644UB) Wireless g 54Mbps Parallel Printer USB Printer Wireless N Home Router (TEW-652BRP) Internet Cable/DSL Modem PACKAGE CONTENTS • TEW-P11G • Multi-Language Quick Installation Guide •...
... are trademarks of their respective holders. Copyright © TRENDnet. Wireless 2-Port USB/Parallel Print Server TEW-P11G (v1.0R) NETWORKING SOLUTIONS Wireless 2-Port USB/Parallel Print Server (TEW-P11G) Workstations with Wireless N USB Adapter (TEW-644UB) Wireless g 54Mbps Parallel Printer USB Printer Wireless N Home Router (TEW-652BRP) Internet Cable/DSL Modem PACKAGE CONTENTS • TEW-P11G • Multi-Language Quick Installation Guide •...

User's Guide
Page 2
... Contents ...2 Physical Details ...2 LED Indicators ...5 Reset Button ...6 Chapter 2 LAN Installation 7 Procedure ...7 Chapter 3 Print Server Configuration 9 Overview ...9 Using the Windows Setup Wizard 9 Chapter 4 Client PC Configuration 20 Overview ...20 Windows Peer-to-peer Printing 22 Windows SMB Printing 30 Windows with Server-based Print Queues 31 Macintosh (AppleTalk 33 Macintosh OS X ...34 Chapter 5 BiAdmin Management Utility 35...
... Contents ...2 Physical Details ...2 LED Indicators ...5 Reset Button ...6 Chapter 2 LAN Installation 7 Procedure ...7 Chapter 3 Print Server Configuration 9 Overview ...9 Using the Windows Setup Wizard 9 Chapter 4 Client PC Configuration 20 Overview ...20 Windows Peer-to-peer Printing 22 Windows SMB Printing 30 Windows with Server-based Print Queues 31 Macintosh (AppleTalk 33 Macintosh OS X ...34 Chapter 5 BiAdmin Management Utility 35...

User's Guide
Page 3
AppleTalk (Macintosh 76 Windows Printing Problems 78 Unix Troubleshooting 83 Appendix A Specifications 84 General Specifications 84 Protocol Support ...85 Feature Support...85 Regulatory Approvals 86 Appendix B Windows Server Configuration 87 Windows NT4.0 Server 87 Windows 2000/2003 Server 88 Appendix C Unix Systems 89 Overview ...89 Print Server IP Address Configuration 89 Other Print Server Configuration 89 LPD Configuration ...90 Appendix D NetWare 95 Overview ...95 Creating an NDPS Manager Object 95 Creating an NDPS Printer Agent 96 Page ii
AppleTalk (Macintosh 76 Windows Printing Problems 78 Unix Troubleshooting 83 Appendix A Specifications 84 General Specifications 84 Protocol Support ...85 Feature Support...85 Regulatory Approvals 86 Appendix B Windows Server Configuration 87 Windows NT4.0 Server 87 Windows 2000/2003 Server 88 Appendix C Unix Systems 89 Overview ...89 Print Server IP Address Configuration 89 Other Print Server Configuration 89 LPD Configuration ...90 Appendix D NetWare 95 Overview ...95 Creating an NDPS Manager Object 95 Creating an NDPS Printer Agent 96 Page ii
User's Guide
Page 4
... printers or plotters to your printer from anywhere on the purchase of your client platform. ¾ Compact Size. The Print Server can act as a SNMP agent, with features, including: ¾ Wireless LAN Support. (TEW-P11G only) Wireless stations supporting the IEEE 802.11b or IEEE 802.11g standard can be used even where space...
... printers or plotters to your printer from anywhere on the purchase of your client platform. ¾ Compact Size. The Print Server can act as a SNMP agent, with features, including: ¾ Wireless LAN Support. (TEW-P11G only) Wireless stations supporting the IEEE 802.11b or IEEE 802.11g standard can be used even where space...

User's Guide
Page 5
... cleaners. 2. If using an extension cord, makes sure the total ampere rating of the products using this product near water. The Print Server should be used with the power supply type specified on an unstable surface. If any items are not sure of type of the ...contact your dealer immediately. • TE100-P11 or TEW-P11G • CD-ROM (Utility & User's Guide) • Multi-Language Quick Installation Guide • Power Adapter (5VDC, 2A) Physical Details This section has details of your local power supply, consult your Print Server. If exposed to foot traffic, ensures that the...
... cleaners. 2. If using an extension cord, makes sure the total ampere rating of the products using this product near water. The Print Server should be used with the power supply type specified on an unstable surface. If any items are not sure of type of the ...contact your dealer immediately. • TE100-P11 or TEW-P11G • CD-ROM (Utility & User's Guide) • Multi-Language Quick Installation Guide • Power Adapter (5VDC, 2A) Physical Details This section has details of your local power supply, consult your Print Server. If exposed to foot traffic, ensures that the...

User's Guide
Page 9
... page containing all current settings. While pressing the button, plug in the power back to print this page. If you continue pressing the button for 2 seconds. 3. Unplug the Power from Print Server. 2. Press and hold it . Page 6 Note: PostScript printers are ON. 2. If you have ...current settings will not be used to port 1 are unable to Print Server. 3. a pin or paper clip can be printed. To restore the factory default settings: 1. To generate a Diagnostic print out 1. Ensure that both the Print Server and the printer attached to press it for 10 seconds, a ...
... page containing all current settings. While pressing the button, plug in the power back to print this page. If you continue pressing the button for 2 seconds. 3. Unplug the Power from Print Server. 2. Press and hold it . Page 6 Note: PostScript printers are ON. 2. If you have ...current settings will not be used to port 1 are unable to Print Server. 3. a pin or paper clip can be printed. To restore the factory default settings: 1. To generate a Diagnostic print out 1. Ensure that both the Print Server and the printer attached to press it for 10 seconds, a ...

User's Guide
Page 10
...Print Server. Chapter 2 2 LAN Installation This chapter describes how to install the Print Server in your Access Point is compatible with the Print Server's default settings: SSID Null (blank) The Print Server will disable the Wireless interface. it may be inserted BEFORE powering ON. Page 7 Wireless Network Interface (TEW-P11G...the LAN cable needs to "Adhoc". • Because the default Wireless mode is "Infrastructure", you cannot configure the Print Server via the Wireless interface unless you have an Access Point. Preparation • Ensure the power is TNXXXXX. The ...
...Print Server. Chapter 2 2 LAN Installation This chapter describes how to install the Print Server in your Access Point is compatible with the Print Server's default settings: SSID Null (blank) The Print Server will disable the Wireless interface. it may be inserted BEFORE powering ON. Page 7 Wireless Network Interface (TEW-P11G...the LAN cable needs to "Adhoc". • Because the default Wireless mode is "Infrastructure", you cannot configure the Print Server via the Wireless interface unless you have an Access Point. Preparation • Ensure the power is TNXXXXX. The ...
User's Guide
Page 12
...procedure. Procedure 1. see Chapter 6 for advanced configuration and management. This is chosen. The default IP address is required to configure the Print Server and printer. Page 9 A Windows-based setup Wizard is also provided on the CD-ROM to use a Network Serverbased queue; Advanced ...168.10.40. If the setup program does not start automatically, run Autorun.exe in Appendix B Windows Server Configuration. Overview The Print Server is designed to use a queue-based printing system using this task. • It is set as detailed in the root folder. see below for...
...procedure. Procedure 1. see Chapter 6 for advanced configuration and management. This is chosen. The default IP address is required to configure the Print Server and printer. Page 9 A Windows-based setup Wizard is also provided on the CD-ROM to use a Network Serverbased queue; Advanced ...168.10.40. If the setup program does not start automatically, run Autorun.exe in Appendix B Windows Server Configuration. Overview The Print Server is designed to use a queue-based printing system using this task. • It is set as detailed in the root folder. see below for...

User's Guide
Page 13
2. On the first screen, shown below, click Install Utility and in the sub-menu click on your LAN. Page 10 Click Next on the main screen of the Wizard, to Print Server. If the Router does not have DHCP enable, it will take around 20 seconds to store the backup IP (192.168.10.40) to view a list of Print Servers on Setup Wizard. 3.
2. On the first screen, shown below, click Install Utility and in the sub-menu click on your LAN. Page 10 Click Next on the main screen of the Wizard, to Print Server. If the Router does not have DHCP enable, it will take around 20 seconds to store the backup IP (192.168.10.40) to view a list of Print Servers on Setup Wizard. 3.

User's Guide
Page 14
4. Enter the required data on your LAN. Click Next to configure the TCP/IP Screen: • Select Obtain IP Address automatically if your Print Server, and then click Next to continue. 5. The default Fixed IP is optional information. 6. Use the same Network Mask and Gateway as your desire name.... • Domain Name: Select or enter the Workgroup name for this Print Server. • Comment: This is set as 192.168.10.40. • For Fixed IP Address, enter an unused address from the range used ...
4. Enter the required data on your LAN. Click Next to configure the TCP/IP Screen: • Select Obtain IP Address automatically if your Print Server, and then click Next to continue. 5. The default Fixed IP is optional information. 6. Use the same Network Mask and Gateway as your desire name.... • Domain Name: Select or enter the Workgroup name for this Print Server. • Comment: This is set as 192.168.10.40. • For Fixed IP Address, enter an unused address from the range used ...

User's Guide
Page 16
9. Make sure your PC. 10. Select the Port number, then click Next to Start > Programs > TRENDnet > Print Server Utility, Click Printer Port Setup. 11. Page 13 You can also configure later by go to add the printer port. Then Click Next. 12. Select Configure Print Driver Now, then click Finish. Select the option to help you setup the network printer into your print server and printer are both power on and connected properly.
9. Make sure your PC. 10. Select the Port number, then click Next to Start > Programs > TRENDnet > Print Server Utility, Click Printer Port Setup. 11. Page 13 You can also configure later by go to add the printer port. Then Click Next. 12. Select Configure Print Driver Now, then click Finish. Select the option to help you setup the network printer into your print server and printer are both power on and connected properly.

User's Guide
Page 17
13. This example shows you how to Add New Printer. 15. Then click Next. Page 14 You can choose the printers either from list or click Have Disk. Install printer driver from the Existing Printers or select Add New Printer. When blew print server port added successfully message display, click OK. 14.
13. This example shows you how to Add New Printer. 15. Then click Next. Page 14 You can choose the printers either from list or click Have Disk. Install printer driver from the Existing Printers or select Add New Printer. When blew print server port added successfully message display, click OK. 14.

User's Guide
Page 19
18. Click OK if the page printed correctly. It is recommend to print the test page. 20. Page 16 A test page message will display. Click Finish. 21. Click Next to add Print Server's name in front of your printer name, then click Next. 19.
18. Click OK if the page printed correctly. It is recommend to print the test page. 20. Page 16 A test page message will display. Click Finish. 21. Click Next to add Print Server's name in front of your printer name, then click Next. 19.

User's Guide
Page 21
...12. • Use the Start menu to run this program in Chapter 4 for details. See in future. Click close to the Print Server. • Check the Print Server's LEDs: • The Power LED should be On in Green. • If using the LAN interface, the Ethernet LED should ... you only have 1 segment.) • Check that your Installation. Note: If the desired Print Server is not listed: • Check all cables to finish your PC has either the TCP/IP or NetBEUI network protocols installed. Your installation is Start > Programs >TRENDnet > Print Server Utility > Printer Port Setup. 24.
...12. • Use the Start menu to run this program in Chapter 4 for details. See in future. Click close to the Print Server. • Check the Print Server's LEDs: • The Power LED should be On in Green. • If using the LAN interface, the Ethernet LED should ... you only have 1 segment.) • Check that your Installation. Note: If the desired Print Server is not listed: • Check all cables to finish your PC has either the TCP/IP or NetBEUI network protocols installed. Your installation is Start > Programs >TRENDnet > Print Server Utility > Printer Port Setup. 24.

User's Guide
Page 22
... station is used . Must match the Access Point. Page 19 no Ad Hoc group available on the environment, the Print Server will disable the Wireless interface. Wireless stations automatically locate the correct channel. all Wireless stations connect to use both other Wireless... SSID Channel Security Settings If Ad Hoc mode is a Wireless station, NOT an access point. Wireless Configuration (TEW-P11G only) Wireless Mode The Print Server is configured, the Print Server will join any group with the same Channel number. To use the same Channel. • Infrastructure (Default)...
... station is used . Must match the Access Point. Page 19 no Ad Hoc group available on the environment, the Print Server will disable the Wireless interface. Wireless stations automatically locate the correct channel. all Wireless stations connect to use both other Wireless... SSID Channel Security Settings If Ad Hoc mode is a Wireless station, NOT an access point. Wireless Configuration (TEW-P11G only) Wireless Mode The Print Server is configured, the Print Server will join any group with the same Channel number. To use the same Channel. • Infrastructure (Default)...
User's Guide
Page 23
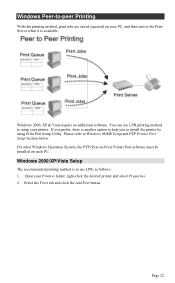
... section of this as well as described in Chapter 3. Both the Print Server and the attached printer must be installed on a Network server, if desired. • Unix users - Printing Methods The Print Server supports a number of client configuration. However, because the Print Server cannot store files, large print jobs may cause problems. • AppleTalk is also supported, and normally...
... section of this as well as described in Chapter 3. Both the Print Server and the attached printer must be installed on a Network server, if desired. • Unix users - Printing Methods The Print Server supports a number of client configuration. However, because the Print Server cannot store files, large print jobs may cause problems. • AppleTalk is also supported, and normally...
User's Guide
Page 25
Windows 2000, XP & Vista require no additional software. Please refer to install the printer by using Print Port Setup Utility. Windows Peer-to-peer Printing With this printing method, print jobs are stored (queued) on each PC. You can use LPR, as follows: 1. Select the Ports tab and click the ...Port Setup Section below. Windows 2000/XP/Vista Setup The recommended printing method is available. For other Windows Operation System, the PTP (Peer-to use LPR printing method to setup your PC, and then sent to the Print Server when it is to -Peer) Printer Port software must be ...
Windows 2000, XP & Vista require no additional software. Please refer to install the printer by using Print Port Setup Utility. Windows Peer-to-peer Printing With this printing method, print jobs are stored (queued) on each PC. You can use LPR, as follows: 1. Select the Ports tab and click the ...Port Setup Section below. Windows 2000/XP/Vista Setup The recommended printing method is available. For other Windows Operation System, the PTP (Peer-to use LPR printing method to setup your PC, and then sent to the Print Server when it is to -Peer) Printer Port software must be ...

User's Guide
Page 26
On the Add Standard TCP/IP Printer Port screen above, enter the IP Address of the Print Server in the Printer Name or IP Address field, and then click Next. Page 23 Choose Standard TCP/IP Port, then click New Port. 4. 3.
On the Add Standard TCP/IP Printer Port screen above, enter the IP Address of the Print Server in the Printer Name or IP Address field, and then click Next. Page 23 Choose Standard TCP/IP Port, then click New Port. 4. 3.
