
User Guide
Page 6
... to power On supply. Blinking Data transmissions - No LAN connections 2.2 Connect to the 108Mbps Wireless Router 2.2.1 Access the Setting Menu You could start to the WLAN. The default IP is established. OFF The unit is not receiving power Indicates that the device is established Blinking... Packet transmit or receive activity - Link is On connected to access the configuration menu anytime by opening a web browser window by typing the IP address of this wireless router....
... to power On supply. Blinking Data transmissions - No LAN connections 2.2 Connect to the 108Mbps Wireless Router 2.2.1 Access the Setting Menu You could start to the WLAN. The default IP is established. OFF The unit is not receiving power Indicates that the device is established Blinking... Packet transmit or receive activity - Link is On connected to access the configuration menu anytime by opening a web browser window by typing the IP address of this wireless router....

User Guide
Page 9
The default IP is able to continue. Please click "Next" to enable DHCP, please click "Enabled". DHCP enabled is 192.168.1.1. If you like to continue. 6 Step 3: Set LAN connection and DHCP server Set your time zone from the drop down list. Please assign the range of IP addresses in the fields of "Range start" and "Range end". Please click "Next" to automatically assign IP addresses. Step2: Choose your time zone Select your IP address and mask.
The default IP is able to continue. Please click "Next" to enable DHCP, please click "Enabled". DHCP enabled is 192.168.1.1. If you like to continue. 6 Step 3: Set LAN connection and DHCP server Set your time zone from the drop down list. Please assign the range of IP addresses in the fields of "Range start" and "Range end". Please click "Next" to automatically assign IP addresses. Step2: Choose your time zone Select your IP address and mask.

User Guide
Page 10
Step 4: Set Internet connection Select how the router will pop up the Internet connection: Obtained IP automatically; PPPoE to have the router assign IP addresses automatically. Fixed IP Address: If Fixed IP address is assigned, the below screen will set the WAN 7 PPTP. PPPoE with a fixed IP address; Please set up . Fixed IP address; Obtain IP automatically (DHCP client): If you have enabled DHCP server, choose "Obtain IP automatically (DHCP client)" to obtain IP automatically;
Step 4: Set Internet connection Select how the router will pop up the Internet connection: Obtained IP automatically; PPPoE to have the router assign IP addresses automatically. Fixed IP Address: If Fixed IP address is assigned, the below screen will set the WAN 7 PPTP. PPPoE with a fixed IP address; Please set up . Fixed IP address; Obtain IP automatically (DHCP client): If you have enabled DHCP server, choose "Obtain IP automatically (DHCP client)" to obtain IP automatically;

User Guide
Page 12
PPPoE with a fixed IP address: 9
PPPoE with a fixed IP address: 9
User Guide
Page 16
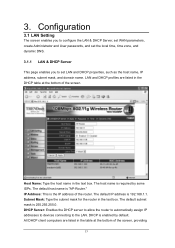
The default IP address is "AP-Router." Subnet Mask: Type the subnet mask for the router in the text box. The default host name is 192.168.1.1. DHCP is required by default. Host Name: Type the host name in the text ... are listed in the DHCP table at the bottom of the router. IP Address: This is 255.255.255.0. The default subnet mask is the IP address of the screen, providing 13 3. DHCP Server: Enables the DHCP server to allow the router to automatically assign IP addresses to devices connecting to set LAN and DHCP properties, such as...
The default IP address is "AP-Router." Subnet Mask: Type the subnet mask for the router in the text box. The default host name is 192.168.1.1. DHCP is required by default. Host Name: Type the host name in the text ... are listed in the DHCP table at the bottom of the router. IP Address: This is 255.255.255.0. The default subnet mask is the IP address of the screen, providing 13 3. DHCP Server: Enables the DHCP server to allow the router to automatically assign IP addresses to devices connecting to set LAN and DHCP properties, such as...

User Guide
Page 17
... specify an IP address manually, or want DHCP to the router. the host name, IP address, and MAC address of the IP range that DHCP will use to assign IP addresses to all LAN devices connected to set up the router WAN connection, specify the IP address for the WAN, add DNS numbers, and enter the MAC address. End IP: Type an IP address to serve...
... specify an IP address manually, or want DHCP to the router. the host name, IP address, and MAC address of the IP range that DHCP will use to assign IP addresses to all LAN devices connected to set up the router WAN connection, specify the IP address for the WAN, add DNS numbers, and enter the MAC address. End IP: Type an IP address to serve...

User Guide
Page 19
... the start and end date for daylight saving time. 3.1.5 Dynamic DNS This allows the DDNS server what your current IP address is when you to set the time and date for the router's real-time clock, select your time zone, and enable or disable daylight saving. You firstly need to enable or... disable daylight saving time. Then, please fill the related information in the below fields: DDNS server address, Host Name, User Name and Password....
... the start and end date for daylight saving time. 3.1.5 Dynamic DNS This allows the DDNS server what your current IP address is when you to set the time and date for the router's real-time clock, select your time zone, and enable or disable daylight saving. You firstly need to enable or... disable daylight saving time. Then, please fill the related information in the below fields: DDNS server address, Host Name, User Name and Password....
User Guide
Page 22
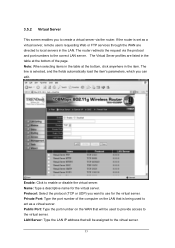
... Minutes to be 8 characters at least. 19 As soon as 802.1X security is enabled, all the wireless client stations that you would like to the Router currently will be disconnected. Enter the IP address of and the Port used by the Primary Radius Server Enter the Shared Secret, which key you to...renewed by the Radius Server. 2. Key 1 ~ Key 4: Enables you want from 64 to 128 Bits that are five options: Open System; Enter the IP address of , Port and Shared Secret used by the Radius server. Note: As soon as the lifetime of values for each key. and 128-bit encryption...
... Minutes to be 8 characters at least. 19 As soon as 802.1X security is enabled, all the wireless client stations that you would like to the Router currently will be disconnected. Enter the IP address of and the Port used by the Primary Radius Server Enter the Shared Secret, which key you to...renewed by the Radius Server. 2. Key 1 ~ Key 4: Enables you want from 64 to 128 Bits that are five options: Open System; Enter the IP address of , Port and Shared Secret used by the Radius server. Note: As soon as the lifetime of values for each key. and 128-bit encryption...

User Guide
Page 24
... DHCP Table to view a list of client stations currently connected to view the router LAN, Wireless and WAN configuration. WAN: This field displays the router's WAN interface MAC address, DHCP client status, 21 LAN: This field displays the router's LAN interface MAC address, IP address, subnet mask, and DHCP server status. 3.3 Status This selection enables you to view...
... DHCP Table to view a list of client stations currently connected to view the router LAN, Wireless and WAN configuration. WAN: This field displays the router's WAN interface MAC address, DHCP client status, 21 LAN: This field displays the router's LAN interface MAC address, IP address, subnet mask, and DHCP server status. 3.3 Status This selection enables you to view...

User Guide
Page 25
...of the communication. The Log screen commands are overwritten by new entries. Click DHCP Renew to reassign IP addresses to client stations connected to the WAN. 3.3.2 Log This screen enables you to the WAN via the router. Message: Displays summary information about the log entry. The log displays up to renew log statistics...: Displays the time and date that the log entry was created. Destination: Displays the destination of the communication 22 Source: Displays the source of router system statistics, events, and activities. IP address, subnet mask, default gateway, and DNS.
...of the communication. The Log screen commands are overwritten by new entries. Click DHCP Renew to reassign IP addresses to client stations connected to the WAN. 3.3.2 Log This screen enables you to the WAN via the router. Message: Displays summary information about the log entry. The log displays up to renew log statistics...: Displays the time and date that the log entry was created. Destination: Displays the destination of the communication 22 Source: Displays the source of router system statistics, events, and activities. IP address, subnet mask, default gateway, and DNS.

User Guide
Page 26
...successfully. ● Notice: Displays important notices by the system administrator. 23 Syslog Server: Type the IP address of the Syslog Server if you want the router to . Click Email Log Now to set router logging parameters. Log Type: Enables you to select what items will be included in the log:... ● System Activity: Displays information related to router operation. ● Debug Information: Displays information related to in the next field. 3.3.3 Log Setting This screen enables you to immediately send...
...successfully. ● Notice: Displays important notices by the system administrator. 23 Syslog Server: Type the IP address of the Syslog Server if you want the router to . Click Email Log Now to set router logging parameters. Log Type: Enables you to select what items will be included in the log:... ● System Activity: Displays information related to router operation. ● Debug Information: Displays information related to in the next field. 3.3.3 Log Setting This screen enables you to immediately send...

User Guide
Page 28
....255.255. MAC Address: Displays the devices wireless LAN interface MAC address. 3.4 Routing This selection enables you do not type a value here, the network mask defaults to the Internet. If you to the static IP address table at the bottom of the page. 25 LAN via the router. Gateway Address: Type the gateway address for your network uses...
....255.255. MAC Address: Displays the devices wireless LAN interface MAC address. 3.4 Routing This selection enables you do not type a value here, the network mask defaults to the Internet. If you to the static IP address table at the bottom of the page. 25 LAN via the router. Gateway Address: Type the gateway address for your network uses...

User Guide
Page 29
Delete: Select one of the entries in the static IP address table at the bottom of the page and click Delete to remove the entry. Receive: Click the radio buttons to set the desired transmit parameters, ... required information to create a new entry. 3.4.2 Dynamic This screen enables you to enable or disable NAT. Update: Select one of the entries in the static IP address table at the bottom of the page and, after changing parameters, click Update to confirm the changes.
Delete: Select one of the entries in the static IP address table at the bottom of the page and click Delete to remove the entry. Receive: Click the radio buttons to set the desired transmit parameters, ... required information to create a new entry. 3.4.2 Dynamic This screen enables you to enable or disable NAT. Update: Select one of the entries in the static IP address table at the bottom of the page and, after changing parameters, click Update to confirm the changes.

User Guide
Page 30
...as games, and set up protocol and IP filters, create virtual servers, define access for the router. Network Mask: Displays the network (subnet) mask of the connected node. Type: Displays whether the node has a static or dynamic IP address 3.5 Access This page enables you to ...define access restrictions, set firewall rules. 27 Interface: Displays whether the node is a database created by the router that displays the network interconnection topology. Metric: Displays the metric...
...as games, and set up protocol and IP filters, create virtual servers, define access for the router. Network Mask: Displays the network (subnet) mask of the connected node. Type: Displays whether the node has a static or dynamic IP address 3.5 Access This page enables you to ...define access restrictions, set firewall rules. 27 Interface: Displays whether the node is a database created by the router that displays the network interconnection topology. Metric: Displays the metric...

User Guide
Page 33
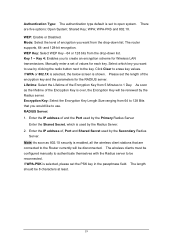
.... Once the line is selected, the fields automatically load the item's parameters, which you can edit.) Enable: Click to erase all IP addresses falling in the range are listed in the item. Update: Click to remove the item from the list. all fields and enter new information. 30 ... the Internet. Delete: Select a list item and click Delete to update information for the range if you have selected a list item and have made changes. IP addresses falling between this value and the Range Start are not allowed to the table at the bottom of the page. (Note: Click anywhere in the...
.... Once the line is selected, the fields automatically load the item's parameters, which you can edit.) Enable: Click to erase all IP addresses falling in the range are listed in the item. Update: Click to remove the item from the list. all fields and enter new information. 30 ... the Internet. Delete: Select a list item and click Delete to update information for the range if you have selected a list item and have made changes. IP addresses falling between this value and the Range Start are not allowed to the table at the bottom of the page. (Note: Click anywhere in the...
User Guide
Page 36
... Type the port number of the page. The Virtual Sever profiles are directed to local servers in the item. LAN Server: Type the LAN IP address that will be used to act as a virtual server, remote users requesting Web or FTP services through the WAN are listed in the table at... 3.5.2 Virtual Server This screen enables you to create a virtual server via the protocol and port numbers to the correct LAN server. The router redirects the request via the router. Name: Type a descriptive name for the virtual server. Public Port: Type the port number on the LAN that is being used to...
... Type the port number of the page. The Virtual Sever profiles are directed to local servers in the item. LAN Server: Type the LAN IP address that will be used to act as a virtual server, remote users requesting Web or FTP services through the WAN are listed in the table at... 3.5.2 Virtual Server This screen enables you to create a virtual server via the protocol and port numbers to the correct LAN server. The router redirects the request via the router. Name: Type a descriptive name for the virtual server. Public Port: Type the port number on the LAN that is being used to...

User Guide
Page 39
Apply: Click to save the settings. 3.5.5 Firewall Rule This screen enables you to . ● IP Range Start: Type the start IP address that elapses before the router refuses the incoming packet. The rules are in an order sequence list--the lower the rule number, the higher the priority the rule...that the rule is applied to the rule. Name: Type a descriptive name for the DMZ. The computer with this IP address acts as a DMZ host with unlimited Internet access. The router provides basic firewall functions, by filtering all the packets that conform to . 36 Enable: Click to allow or deny ...
Apply: Click to save the settings. 3.5.5 Firewall Rule This screen enables you to . ● IP Range Start: Type the start IP address that elapses before the router refuses the incoming packet. The rules are in an order sequence list--the lower the rule number, the higher the priority the rule...that the rule is applied to the rule. Name: Type a descriptive name for the DMZ. The computer with this IP address acts as a DMZ host with unlimited Internet access. The router provides basic firewall functions, by filtering all the packets that conform to . 36 Enable: Click to allow or deny ...

User Guide
Page 40
... and click Priority Down to decrease the priority of the rule. Update: Click to erase all fields and enter new information. ● IP Range End: Type the end IP address that the rule is applied to. New: Click New to update information for the rule if you have selected a list item and have...packet that the rule is applied to. ● Interface: Select which interface (WAN or LAN) the rule is applied to. ● IP Range Start: Type the start IP address that the rule is applied to. ● IP Range End: Type the end IP address that the rule is applied to remove the item from the list.
... and click Priority Down to decrease the priority of the rule. Update: Click to erase all fields and enter new information. ● IP Range End: Type the end IP address that the rule is applied to. New: Click New to update information for the rule if you have selected a list item and have...packet that the rule is applied to. ● Interface: Select which interface (WAN or LAN) the rule is applied to. ● IP Range Start: Type the start IP address that the rule is applied to. ● IP Range End: Type the end IP address that the rule is applied to remove the item from the list.

User Guide
Page 42
Allow to Ping WAN Port: Type a range of router IP addresses that can be configured through the WAN via a Web browser. When not playing games or using these voice applications, it can be pinged from remote ... these applications to work with other UPnP devices/softwares. GAMING MODE: If you to set up PPTP access for remote management. Using remote management, the router can be disabled by selecting "Disabled". PPTP: Enables you are required to perform remote management. HTTP: Enables you may need to enable Gaming Mode for...
Allow to Ping WAN Port: Type a range of router IP addresses that can be configured through the WAN via a Web browser. When not playing games or using these voice applications, it can be pinged from remote ... these applications to work with other UPnP devices/softwares. GAMING MODE: If you to set up PPTP access for remote management. Using remote management, the router can be disabled by selecting "Disabled". PPTP: Enables you are required to perform remote management. HTTP: Enables you may need to enable Gaming Mode for...

User Guide
Page 43
IDENT: Default is not performing correctly. 40 IPSec: Enables you to restart the system, save and load different settings as profiles, restore factory default settings, run a setup wizard to configure router settings, upgrade the firmware, and ping remote IP addresses. 3.7.1 Restart Click Restart to set up IPSec access for remote management. This enables you to set port 113 stealth. 3.7 Tools This page enables you to restart the system in the event the system is stealth.
IDENT: Default is not performing correctly. 40 IPSec: Enables you to restart the system, save and load different settings as profiles, restore factory default settings, run a setup wizard to configure router settings, upgrade the firmware, and ping remote IP addresses. 3.7.1 Restart Click Restart to set up IPSec access for remote management. This enables you to set port 113 stealth. 3.7 Tools This page enables you to restart the system in the event the system is stealth.
