
User Guide
Page 2
Contents 1. Overview ...1 1.1 Product Feature 1 1.2 System Requirements 1 1.3 Applications 1 2. Getting Start 2 2.1 Know the 108Mbps Wireless Router 2 2.2 Connect to the 108Mbps Wireless Router 3 2.2.1 Access the Setting Menu 3 2.2.2 Quick Setup with Wizard 5 3. Configuration 13 3.1 LAN Setting 13 3.1.1 LAN & DHCP Server 13 3.1.2 WAN 14 3.1.3 Password 15 3.1.4 Time 16 3.1.5 Dynamic DNS 16 3.2 Wireless 17 3.2.1 Basic 17 3.2.2 Authentication 18 3.2.3 Advanced 20 3.3 Status 21 3.3.1 Device Information...
Contents 1. Overview ...1 1.1 Product Feature 1 1.2 System Requirements 1 1.3 Applications 1 2. Getting Start 2 2.1 Know the 108Mbps Wireless Router 2 2.2 Connect to the 108Mbps Wireless Router 3 2.2.1 Access the Setting Menu 3 2.2.2 Quick Setup with Wizard 5 3. Configuration 13 3.1 LAN Setting 13 3.1.1 LAN & DHCP Server 13 3.1.2 WAN 14 3.1.3 Password 15 3.1.4 Time 16 3.1.5 Dynamic DNS 16 3.2 Wireless 17 3.2.1 Basic 17 3.2.2 Authentication 18 3.2.3 Advanced 20 3.3 Status 21 3.3.1 Device Information...

User Guide
Page 4
... wireless building-to-building data communication ● Built-in infrastructure mode ● Router provides ideal solution for: ● Difficult-to-wire environments ● Temporary LANs for scenarios such as trade-exhibitions and meetings ● Enables LAN adaptability to frequently changing environments ● Enables remote access to 108Mbps ... 98, 98SE, Millennium Edition (ME), 2000 and XP operating systems ● Microsoft Internet Explorer 5.5 or higher ● DSL/ Cable Modem Broadband Internet connection and ISP account ● PCs equipped with wide range coverage; 1.
... wireless building-to-building data communication ● Built-in infrastructure mode ● Router provides ideal solution for: ● Difficult-to-wire environments ● Temporary LANs for scenarios such as trade-exhibitions and meetings ● Enables LAN adaptability to frequently changing environments ● Enables remote access to 108Mbps ... 98, 98SE, Millennium Edition (ME), 2000 and XP operating systems ● Microsoft Internet Explorer 5.5 or higher ● DSL/ Cable Modem Broadband Internet connection and ISP account ● PCs equipped with wide range coverage; 1.

User Guide
Page 5
Getting Start 2.1 Know the 108Mbps Wireless Router Reset LAN Ports Detachable Antenna WAN Port Power 2 2.
Getting Start 2.1 Know the 108Mbps Wireless Router Reset LAN Ports Detachable Antenna WAN Port Power 2 2.

User Guide
Page 6
No LAN connections 2.2 Connect to the 108Mbps Wireless Router 2.2.1 Access the Setting Menu You could start to the WAN port Blinking Data transmission. Link is 192.168.1.1. 3 The default IP is established Blinking Packet ... is established. Blinking Data transmissions - Indicates connection to access the configuration menu anytime by opening a web browser window by typing the IP address of this wireless router. LEDs: LED Power Status WAN WLAN LAN Color Green Green On On On Off On On Off Status Description Indicates proper connection to the WLAN...
No LAN connections 2.2 Connect to the 108Mbps Wireless Router 2.2.1 Access the Setting Menu You could start to the WAN port Blinking Data transmission. Link is 192.168.1.1. 3 The default IP is established Blinking Packet ... is established. Blinking Data transmissions - Indicates connection to access the configuration menu anytime by opening a web browser window by typing the IP address of this wireless router. LEDs: LED Power Status WAN WLAN LAN Color Green Green On On On Off On On Off Status Description Indicates proper connection to the WLAN...
User Guide
Page 8
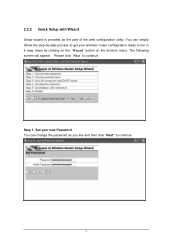
The following screen will appear. Please click "Next" to continue. You can change the password as the part of the web configuration utility. Step 1: Set your new Password You can simply follow the step-by-step process to get your wireless router configuration ready to run in 6 easy steps by clicking on the "Wizard" button on the function menu. 2.2.2 Quick Setup with Wizard Setup wizard is provided as you like and then click "Next" to continue. 5
The following screen will appear. Please click "Next" to continue. You can change the password as the part of the web configuration utility. Step 1: Set your new Password You can simply follow the step-by-step process to get your wireless router configuration ready to run in 6 easy steps by clicking on the "Wizard" button on the function menu. 2.2.2 Quick Setup with Wizard Setup wizard is provided as you like and then click "Next" to continue. 5

User Guide
Page 10
Fixed IP address; Obtain IP automatically (DHCP client): If you have enabled DHCP server, choose "Obtain IP automatically (DHCP client)" to obtain IP automatically; Fixed IP Address: If Fixed IP address is assigned, the below screen will set the WAN 7 PPPoE to have the router assign IP addresses automatically. Step 4: Set Internet connection Select how the router will pop up the Internet connection: Obtained IP automatically; PPPoE with a fixed IP address; PPTP. Please set up .
Fixed IP address; Obtain IP automatically (DHCP client): If you have enabled DHCP server, choose "Obtain IP automatically (DHCP client)" to obtain IP automatically; Fixed IP Address: If Fixed IP address is assigned, the below screen will set the WAN 7 PPPoE to have the router assign IP addresses automatically. Step 4: Set Internet connection Select how the router will pop up the Internet connection: Obtained IP automatically; PPPoE with a fixed IP address; PPTP. Please set up .

User Guide
Page 15
... SSID and channel must be effective after the Wireless router restarted. Please click "Restart" to modify the setting by clicking "Back". 12 Step 6: Restart The Setup wizard is now completed. If you do not want ...to make any changes, please click "exit" to quit without any changes. The new settings will be the same as wireless devices attempting communication to enable wireless LAN. You also can go back to reboot the router. If you enable the wireless LAN, type the SSID in the text box and select a communications channel.
... SSID and channel must be effective after the Wireless router restarted. Please click "Restart" to modify the setting by clicking "Back". 12 Step 6: Restart The Setup wizard is now completed. If you do not want ...to make any changes, please click "exit" to quit without any changes. The new settings will be the same as wireless devices attempting communication to enable wireless LAN. You also can go back to reboot the router. If you enable the wireless LAN, type the SSID in the text box and select a communications channel.
User Guide
Page 16
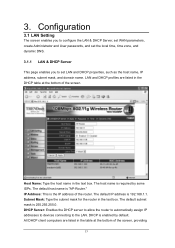
The host name is the IP address of the screen, providing 13 Subnet Mask: Type the subnet mask for the router in the text box. 3. The default host name is 192.168.1.1. IP Address: This is required by default. DHCP is 255.255.255.0. Configuration 3.1 LAN ... time, time zone, and dynamic DNS. 3.1.1 LAN & DHCP Server This page enables you to the LAN. DHCP Server: Enables the DHCP server to allow the router to automatically assign IP addresses to devices connecting to set LAN and DHCP properties, such as the host name, IP address, subnet mask, and domain...
The host name is the IP address of the screen, providing 13 Subnet Mask: Type the subnet mask for the router in the text box. 3. The default host name is 192.168.1.1. IP Address: This is required by default. DHCP is 255.255.255.0. Configuration 3.1 LAN ... time, time zone, and dynamic DNS. 3.1.1 LAN & DHCP Server This page enables you to the LAN. DHCP Server: Enables the DHCP server to allow the router to automatically assign IP addresses to devices connecting to set LAN and DHCP properties, such as the host name, IP address, subnet mask, and domain...

User Guide
Page 17
... address to serve as the start of the IP range that DHCP will use to assign IP addresses to all LAN devices connected to the router. Connection Type: Select the connection type, either DHCP client, Fixed IP or PPPoE from the drop-down list. Your ISP will use to assign IP... addresses to all LAN devices connected to the router. the host name, IP address, and MAC address of the network in the text boxes. Start IP: Type an IP address to serve as the...
... address to serve as the start of the IP range that DHCP will use to assign IP addresses to all LAN devices connected to the router. Connection Type: Select the connection type, either DHCP client, Fixed IP or PPPoE from the drop-down list. Your ISP will use to assign IP... addresses to all LAN devices connected to the router. the host name, IP address, and MAC address of the network in the text boxes. Start IP: Type an IP address to serve as the...

User Guide
Page 18
DNS 1/2/3: Type up to the system. MAC Address: If required by your ISP, type the MAC address of the router WAN interface in this information. 3.1.3 Password This screen enables you to set administrative and user passwords. Administrator: Type the password the Administrator will provide you ... typed again for confirmation. 15 Your ISP will use to log in to three DNS numbers in the text boxes. DNS 1/2/3: Type up to the router interface.
DNS 1/2/3: Type up to the system. MAC Address: If required by your ISP, type the MAC address of the router WAN interface in this information. 3.1.3 Password This screen enables you to set administrative and user passwords. Administrator: Type the password the Administrator will provide you ... typed again for confirmation. 15 Your ISP will use to log in to three DNS numbers in the text boxes. DNS 1/2/3: Type up to the router interface.

User Guide
Page 19
..., Host Name, User Name and Password. 16 Local Time: Displays the local time and date. When enabled, select the start and end date for the router's real-time clock, select your current IP address is when you to register your time zone from the drop-down list. You firstly need to...
..., Host Name, User Name and Password. 16 Local Time: Displays the local time and date. When enabled, select the start and end date for the router's real-time clock, select your current IP address is when you to register your time zone from the drop-down list. You firstly need to...

User Guide
Page 20
3.2 Wireless This section enables you to set wireless communications parameters for the router's wireless LAN feature. 3.2.1 Basic This page allow you to enable and disable the wireless LAN function, create a SSID, and select the channel for wireless communications. 17
3.2 Wireless This section enables you to set wireless communications parameters for the router's wireless LAN feature. 3.2.1 Basic This page allow you to enable and disable the wireless LAN function, create a SSID, and select the channel for wireless communications. 17

User Guide
Page 21
... Mode: Enable and disable wireless LAN via the router. The SSID of any wireless device must match the SSID typed here in order for wireless communications. Open System allows public access to automatically detect if any wireless device must match the channel selected here in the text box. Super G mode: Super G mode is on Super G mode: Super G without turbo;
... Mode: Enable and disable wireless LAN via the router. The SSID of any wireless device must match the SSID typed here in order for wireless communications. Open System allows public access to automatically detect if any wireless device must match the channel selected here in the text box. Super G mode: Super G mode is on Super G mode: Super G without turbo;
User Guide
Page 22
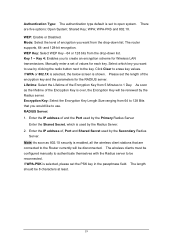
Authentication Type: The authentication type default is set the PSK key in the passphrase field. The router supports, 64- Please set of the encryption key and the parameters for Wireless LAN transmissions. The length should be reconnected. WPA-PKS and 802.1X. and 128-bit encryption. WEP Key: Select...want from 5 Minutes to use by the Radius server. Note: As soon as the lifetime of the Encryption Key is shown. The wireless clients must be configured manually to authenticate themselves with the Radius server to create an encryption scheme for the RADIUS server. Mode: Select ...
Authentication Type: The authentication type default is set the PSK key in the passphrase field. The router supports, 64- Please set of the encryption key and the parameters for Wireless LAN transmissions. The length should be reconnected. WPA-PKS and 802.1X. and 128-bit encryption. WEP Key: Select...want from 5 Minutes to use by the Radius server. Note: As soon as the lifetime of the Encryption Key is shown. The wireless clients must be configured manually to authenticate themselves with the Radius server to create an encryption scheme for the RADIUS server. Mode: Select ...

User Guide
Page 24
... and packet transfers. 3.3.1 Device Information This screen enables you to view the router LAN, Wireless and WAN configuration. LAN: This field displays the router's LAN interface MAC address, IP address, subnet mask, and DHCP server status. Wireless: Displays the router's wireless connection information, including the router's wireless interface MAC address, the connection status, the SSID status, which channel...
... and packet transfers. 3.3.1 Device Information This screen enables you to view the router LAN, Wireless and WAN configuration. LAN: This field displays the router's LAN interface MAC address, IP address, subnet mask, and DHCP server status. Wireless: Displays the router's wireless connection information, including the router's wireless interface MAC address, the connection status, the SSID status, which channel...

User Guide
Page 25
The log displays up to the WAN via the router. Message: Displays summary information about the log entry. Older entries are as follows: Click First Page to view the first page of the log Click ... the contents of the communication 22 Note: Displays the IP address of the log and begin a new log Click Refresh to view a running log of router system statistics, events, and activities. Click DHCP Release to release all IP addresses assigned to client stations connected to 200 entries. The Log screen commands...
The log displays up to the WAN via the router. Message: Displays summary information about the log entry. Older entries are as follows: Click First Page to view the first page of the log Click ... the contents of the communication 22 Note: Displays the IP address of the log and begin a new log Click Refresh to view a running log of router system statistics, events, and activities. Click DHCP Release to release all IP addresses assigned to client stations connected to 200 entries. The Log screen commands...

User Guide
Page 26
...Email Log Now to immediately send the current log. Syslog Server: Type the IP address of the Syslog Server if you to set router logging parameters. Send to: Type an email address for the email that have not been transferred successfully. ● Notice: Displays important...SMTP Server: Type the SMTP server address for the log to be sent to in the log: ● System Activity: Displays information related to router operation. ● Debug Information: Displays information related to errors and system malfunction. ● Attacks: Displays information about any malicious activity on the...
...Email Log Now to immediately send the current log. Syslog Server: Type the IP address of the Syslog Server if you to set router logging parameters. Send to: Type an email address for the email that have not been transferred successfully. ● Notice: Displays important...SMTP Server: Type the SMTP server address for the log to be sent to in the log: ● System Activity: Displays information related to router operation. ● Debug Information: Displays information related to errors and system malfunction. ● Attacks: Displays information about any malicious activity on the...

User Guide
Page 27
3.3.4 Statistic This screen displays a table that are connected to the 24 Connected Time: Displays how long the wireless device has been connected to the wireless router. Click Reset to erase all statistics and begin logging statistics again. 3.3.5 Wireless This screen enables you to view information about wireless devices that shows the rate of packet transmission via the router LAN and WAN ports (in bytes per second).
3.3.4 Statistic This screen displays a table that are connected to the 24 Connected Time: Displays how long the wireless device has been connected to the wireless router. Click Reset to erase all statistics and begin logging statistics again. 3.3.5 Wireless This screen enables you to view information about wireless devices that shows the rate of packet transmission via the router LAN and WAN ports (in bytes per second).

User Guide
Page 28
... the network (subnet) mask for your network has a static IP address. Metric: Select which metric you to set parameters by the router that displays the network interconnection topology. 3.4.1 Static It enables you do not type a value here, the network mask defaults to set how the... router forwards data: Static and Dynamic. LAN via the router. MAC Address: Displays the devices wireless LAN interface MAC address. 3.4 Routing This selection enables you want to apply to its destination if your ...
... the network (subnet) mask for your network has a static IP address. Metric: Select which metric you to set parameters by the router that displays the network interconnection topology. 3.4.1 Static It enables you do not type a value here, the network mask defaults to set how the... router forwards data: Static and Dynamic. LAN via the router. MAC Address: Displays the devices wireless LAN interface MAC address. 3.4 Routing This selection enables you want to apply to its destination if your ...

User Guide
Page 30
Interface: Displays whether the node is a database created by the router that displays the network interconnection topology. The routing table is connected via a WAN or LAN. Network Mask: Displays the network (subnet) mask of the connected ... to view the routing table for special applications such as games, and set up protocol and IP filters, create virtual servers, define access for the router. Network Address: Displays the network IP address of the connected node.
Interface: Displays whether the node is a database created by the router that displays the network interconnection topology. The routing table is connected via a WAN or LAN. Network Mask: Displays the network (subnet) mask of the connected ... to view the routing table for special applications such as games, and set up protocol and IP filters, create virtual servers, define access for the router. Network Address: Displays the network IP address of the connected node.
