
User Guide
Page 2
... Information 21 3.3.2 Log 22 3.3.3 Log Setting 23 3.3.4 Statistic 24 3.3.5 Wireless 24 3.4 Routing 25 3.4.1 Static 25 3.4.2 Dynamic 26 3.4.3 Routing Table 27 3.5 Access 27 3.5.1 Filters 28 3.5.2 Virtual Server 33 3.5.3 Special AP 34 3.5.4 DMZ 35 3.5.5 Firewall Rule 36 Getting Start 2 2.1 Know the 108Mbps Wireless Router 2 2.2 Connect to the 108Mbps Wireless Router 3 2.2.1 Access the Setting Menu 3 2.2.2 Quick Setup with Wizard 5 3. Contents...
... Information 21 3.3.2 Log 22 3.3.3 Log Setting 23 3.3.4 Statistic 24 3.3.5 Wireless 24 3.4 Routing 25 3.4.1 Static 25 3.4.2 Dynamic 26 3.4.3 Routing Table 27 3.5 Access 27 3.5.1 Filters 28 3.5.2 Virtual Server 33 3.5.3 Special AP 34 3.5.4 DMZ 35 3.5.5 Firewall Rule 36 Getting Start 2 2.1 Know the 108Mbps Wireless Router 2 2.2 Connect to the 108Mbps Wireless Router 3 2.2.1 Access the Setting Menu 3 2.2.2 Quick Setup with Wizard 5 3. Contents...

User Guide
Page 4
... wireless building-to-building data communication ● Built-in infrastructure mode ● Router provides ideal solution for: ● Difficult-to-wire environments ● Temporary LANs for scenarios such as trade-exhibitions and meetings ● Enables LAN adaptability to frequently changing environments ● Enables remote access to 108Mbps ... 98, 98SE, Millennium Edition (ME), 2000 and XP operating systems ● Microsoft Internet Explorer 5.5 or higher ● DSL/ Cable Modem Broadband Internet connection and ISP account ● PCs equipped with wide range coverage;
... wireless building-to-building data communication ● Built-in infrastructure mode ● Router provides ideal solution for: ● Difficult-to-wire environments ● Temporary LANs for scenarios such as trade-exhibitions and meetings ● Enables LAN adaptability to frequently changing environments ● Enables remote access to 108Mbps ... 98, 98SE, Millennium Edition (ME), 2000 and XP operating systems ● Microsoft Internet Explorer 5.5 or higher ● DSL/ Cable Modem Broadband Internet connection and ISP account ● PCs equipped with wide range coverage;

User Guide
Page 5
2. Getting Start 2.1 Know the 108Mbps Wireless Router Reset LAN Ports Detachable Antenna WAN Port Power 2
2. Getting Start 2.1 Know the 108Mbps Wireless Router Reset LAN Ports Detachable Antenna WAN Port Power 2

User Guide
Page 6
... transmission. OFF The unit is not receiving power Indicates that the device is established. Indicates connection to the WLAN. No LAN connections 2.2 Connect to the 108Mbps Wireless Router 2.2.1 Access the Setting Menu You could start to power On supply. LEDs: LED Power Status WAN WLAN LAN Color Green Green On On On Off... On Off Status Description Indicates proper connection to access the configuration menu anytime by opening a web browser window by typing the IP address of this wireless router.
... transmission. OFF The unit is not receiving power Indicates that the device is established. Indicates connection to the WLAN. No LAN connections 2.2 Connect to the 108Mbps Wireless Router 2.2.1 Access the Setting Menu You could start to power On supply. LEDs: LED Power Status WAN WLAN LAN Color Green Green On On On Off... On Off Status Description Indicates proper connection to access the configuration menu anytime by opening a web browser window by typing the IP address of this wireless router.
User Guide
Page 8
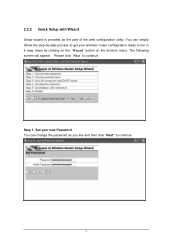
The following screen will appear. Step 1: Set your wireless router configuration ready to continue. 5 You can change the password as the part of the web configuration utility. Please click "Next" to continue. 2.2.2 Quick Setup with Wizard Setup wizard is provided as you like and then click "Next" to run in 6 easy steps by -step process to get your new Password You can simply follow the step-by clicking on the "Wizard" button on the function menu.
The following screen will appear. Step 1: Set your wireless router configuration ready to continue. 5 You can change the password as the part of the web configuration utility. Please click "Next" to continue. 2.2.2 Quick Setup with Wizard Setup wizard is provided as you like and then click "Next" to run in 6 easy steps by -step process to get your new Password You can simply follow the step-by clicking on the "Wizard" button on the function menu.

User Guide
Page 15
Please click "Restart" to modify the setting by clicking "Back". 12 The new settings will be the same as wireless devices attempting communication to enable wireless LAN. Step 6: Restart The Setup wizard is now completed. If you do not want to make any changes, please ... quit without any changes. You also can go back to reboot the router. Step 5: Set Wireless LAN connection Click "enable" to the router. The SSID and channel must be effective after the Wireless router restarted. If you enable the wireless LAN, type the SSID in the text box and select a communications channel...
Please click "Restart" to modify the setting by clicking "Back". 12 The new settings will be the same as wireless devices attempting communication to enable wireless LAN. Step 6: Restart The Setup wizard is now completed. If you do not want to make any changes, please ... quit without any changes. You also can go back to reboot the router. Step 5: Set Wireless LAN connection Click "enable" to the router. The SSID and channel must be effective after the Wireless router restarted. If you enable the wireless LAN, type the SSID in the text box and select a communications channel...

User Guide
Page 20
3.2 Wireless This section enables you to set wireless communications parameters for the router's wireless LAN feature. 3.2.1 Basic This page allow you to enable and disable the wireless LAN function, create a SSID, and select the channel for wireless communications. 17
3.2 Wireless This section enables you to set wireless communications parameters for the router's wireless LAN feature. 3.2.1 Basic This page allow you to enable and disable the wireless LAN function, create a SSID, and select the channel for wireless communications. 17

User Guide
Page 21
... the channel selected here in the text box. Dynamic turbo is via the router. Super G with Dynamic turbo and Super G with other wireless clients that it starts. Super G without turbo indicates that have the same WEP key. Channel: Select a transmission channel for secure wireless communications. Static turbo means it will not go back to exchange data...
... the channel selected here in the text box. Dynamic turbo is via the router. Super G with Dynamic turbo and Super G with other wireless clients that it starts. Super G without turbo indicates that have the same WEP key. Channel: Select a transmission channel for secure wireless communications. Static turbo means it will not go back to exchange data...
User Guide
Page 22
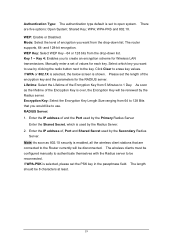
The router supports, 64- Click Clear to be reconnected. Encryption Key: Select the Encryption Key Length Size ranging from the drop-down list. The wireless clients must be disconnected. Mode: Select the level of encryption you would like to the key. WEP Key: Select WEP Key - 64... values. Enter the IP address of the Encryption Key is enabled, all the wireless client stations that you want to 128 Bits that are five options: Open System; If WPA-PSK is set to the Router currently will be 8 characters at least. 19 Authentication Type: The authentication type ...
The router supports, 64- Click Clear to be reconnected. Encryption Key: Select the Encryption Key Length Size ranging from the drop-down list. The wireless clients must be disconnected. Mode: Select the level of encryption you would like to the key. WEP Key: Select WEP Key - 64... values. Enter the IP address of the Encryption Key is enabled, all the wireless client stations that you want to 128 Bits that are five options: Open System; If WPA-PSK is set to the Router currently will be 8 characters at least. 19 Authentication Type: The authentication type ...

User Guide
Page 24
..., and view logs and statistics pertaining to connections and packet transfers. 3.3.1 Device Information This screen enables you to view the router LAN, Wireless and WAN configuration. Wireless: Displays the router's wireless connection information, including the router's wireless interface MAC address, the connection status, the SSID status, which channel is being used, and whether WEP is enabled or...
..., and view logs and statistics pertaining to connections and packet transfers. 3.3.1 Device Information This screen enables you to view the router LAN, Wireless and WAN configuration. Wireless: Displays the router's wireless connection information, including the router's wireless interface MAC address, the connection status, the SSID status, which channel is being used, and whether WEP is enabled or...

User Guide
Page 27
3.3.4 Statistic This screen displays a table that are connected to the wireless router. Connected Time: Displays how long the wireless device has been connected to view information about wireless devices that shows the rate of packet transmission via the router LAN and WAN ports (in bytes per second). Click Reset to erase all statistics and begin logging statistics again. 3.3.5 Wireless This screen enables you to the 24
3.3.4 Statistic This screen displays a table that are connected to the wireless router. Connected Time: Displays how long the wireless device has been connected to view information about wireless devices that shows the rate of packet transmission via the router LAN and WAN ports (in bytes per second). Click Reset to erase all statistics and begin logging statistics again. 3.3.5 Wireless This screen enables you to the 24

User Guide
Page 28
...type a value here, the network mask defaults to this information. Add: Click to add the configuration to set parameters by the router that displays the network interconnection topology. 3.4.1 Static It enables you with this information. Your ISP or network administrator provides you to ...access the Internet. Interface: Select which the router forwards data to its destination if your network uses to set how the router forwards data: Static and Dynamic. MAC Address: Displays the devices wireless LAN interface MAC address. 3.4 Routing This selection enables you...
...type a value here, the network mask defaults to this information. Add: Click to add the configuration to set parameters by the router that displays the network interconnection topology. 3.4.1 Static It enables you with this information. Your ISP or network administrator provides you to ...access the Internet. Interface: Select which the router forwards data to its destination if your network uses to set how the router forwards data: Static and Dynamic. MAC Address: Displays the devices wireless LAN interface MAC address. 3.4 Routing This selection enables you...

User Guide
Page 47
...stands for example, BIOS ROM). Firewalls use filters to prevent unwanted packets from address to those addresses. The router firmware stores settings made in the interface. Domain Name The domain name typically refers to manually assign permanent IP addresses. For .... 44 DMZs provide a way for broadcast or multicast messages. Firmware Firmware refers to memory chips that seamlessly connects wired and wireless networks Authentication Authentication refers to have . Filter Filters are typically used to be transmitted. DHCP DHCP (Dynamic Host Configuration Protocol)...
...stands for example, BIOS ROM). Firewalls use filters to prevent unwanted packets from address to those addresses. The router firmware stores settings made in the interface. Domain Name The domain name typically refers to manually assign permanent IP addresses. For .... 44 DMZs provide a way for broadcast or multicast messages. Firmware Firmware refers to memory chips that seamlessly connects wired and wireless networks Authentication Authentication refers to have . Filter Filters are typically used to be transmitted. DHCP DHCP (Dynamic Host Configuration Protocol)...

Quick Installation Guide
Page 5
Click Next. 7. Enter a new password for the router and then click Next. By default, the password is TRENDnet. 3 English When the wireless network screen appears, enter a unique network name and then click Next. By default, the SSID is admin. 8. 5. Follow the Wizard instructions and continue through the remaining installation steps. If not, please continue to Section 3. If this screen appears, go to step 6. 6.
Click Next. 7. Enter a new password for the router and then click Next. By default, the password is TRENDnet. 3 English When the wireless network screen appears, enter a unique network name and then click Next. By default, the SSID is admin. 8. 5. Follow the Wizard instructions and continue through the remaining installation steps. If not, please continue to Section 3. If this screen appears, go to step 6. 6.

Quick Installation Guide
Page 8
If you are replacing the current router with the wireless TEW-452BRP, please select Yes and click Next to continue. Follow the Wizard instructions and continue through the remaining installation steps. To replace current router, select Yes and then click Next. 2. If you have a DSL/Cable modem router. Click Next. Adding/Replacing the router Note: When this window...
If you are replacing the current router with the wireless TEW-452BRP, please select Yes and click Next to continue. Follow the Wizard instructions and continue through the remaining installation steps. To replace current router, select Yes and then click Next. 2. If you have a DSL/Cable modem router. Click Next. Adding/Replacing the router Note: When this window...

Quick Installation Guide
Page 9
... wireless router behind your product Online at www.trendnet.com. For detailed information regarding the TEW-452BRP configuration and advanced settings, please refer to continue. Click Next. When secure access to your router window appears, please go to section 2 step 7 to the User's Guide included on the Easy Go Installation CD-ROM or TRENDnet's website at : www.TRENDnet...
... wireless router behind your product Online at www.trendnet.com. For detailed information regarding the TEW-452BRP configuration and advanced settings, please refer to continue. Click Next. When secure access to your router window appears, please go to section 2 step 7 to the User's Guide included on the Easy Go Installation CD-ROM or TRENDnet's website at : www.TRENDnet...

Quick Installation Guide
Page 10
A2: After you install the TEW-452BRP Wireless Router, you may need to your web browser and entering http://192.168.10.1 into the address bar http://192.168.10.1 and hit enter. 2) Click on the Easy Go Setup CD-ROM or contact Trendnet's Technical Support Department. 8 How do ? A3:... your Internet Service Provider's (ISP) Customer Service for my Cable/DSL connection. Q3: I am not sure what type of the TEW-452BRP Wireless Router. Q4: I finish installing the router, then Network Magic Installation Wizard appears. A5: First, double check that you do ? A6: Network Magic is admin. A1: ...
A2: After you install the TEW-452BRP Wireless Router, you may need to your web browser and entering http://192.168.10.1 into the address bar http://192.168.10.1 and hit enter. 2) Click on the Easy Go Setup CD-ROM or contact Trendnet's Technical Support Department. 8 How do ? A3:... your Internet Service Provider's (ISP) Customer Service for my Cable/DSL connection. Q3: I am not sure what type of the TEW-452BRP Wireless Router. Q4: I finish installing the router, then Network Magic Installation Wizard appears. A5: First, double check that you do ? A6: Network Magic is admin. A1: ...
