
User Guide
Page 2
Getting Start 2 2.1 Know the 108Mbps Wireless Router 2 2.2 Connect to the 108Mbps Wireless Router 3 2.2.1 Access the Setting Menu 3 2.2.2 Quick Setup with Wizard 5 3. Configuration 13 3.1 LAN Setting 13 3.1.1 LAN & DHCP Server 13 3.1.2 WAN 14 3.1.3 Password 15 3.1.4 Time 16 3.1.5 Dynamic DNS 16 3.2 Wireless 17 3.2.1 Basic 17 3.2.2 Authentication 18 3.2.3 Advanced 20 3.3 Status 21 3.3.1 Device Information 21 3.3.2 Log 22 3.3.3 Log Setting 23 3.3.4 Statistic 24...
Getting Start 2 2.1 Know the 108Mbps Wireless Router 2 2.2 Connect to the 108Mbps Wireless Router 3 2.2.1 Access the Setting Menu 3 2.2.2 Quick Setup with Wizard 5 3. Configuration 13 3.1 LAN Setting 13 3.1.1 LAN & DHCP Server 13 3.1.2 WAN 14 3.1.3 Password 15 3.1.4 Time 16 3.1.5 Dynamic DNS 16 3.2 Wireless 17 3.2.1 Basic 17 3.2.2 Authentication 18 3.2.3 Advanced 20 3.3 Status 21 3.3.1 Device Information 21 3.3.2 Log 22 3.3.3 Log Setting 23 3.3.4 Statistic 24...

User Guide
Page 7
The below window will popup. Please enter the user name and password. Now, the main menu screen is "admin". Both of the default is popup. 4
The below window will popup. Please enter the user name and password. Now, the main menu screen is "admin". Both of the default is popup. 4
User Guide
Page 8
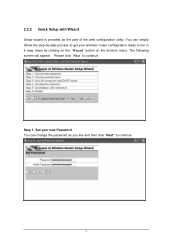
Please click "Next" to run in 6 easy steps by clicking on the "Wizard" button on the function menu. Step 1: Set your new Password You can simply follow the step-by-step process to get your wireless router configuration ready to continue. 2.2.2 Quick Setup with Wizard Setup wizard is provided as you like and then click "Next" to continue. 5 The following screen will appear. You can change the password as the part of the web configuration utility.
Please click "Next" to run in 6 easy steps by clicking on the "Wizard" button on the function menu. Step 1: Set your new Password You can simply follow the step-by-step process to get your wireless router configuration ready to continue. 2.2.2 Quick Setup with Wizard Setup wizard is provided as you like and then click "Next" to continue. 5 The following screen will appear. You can change the password as the part of the web configuration utility.
User Guide
Page 16
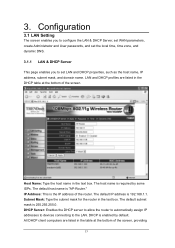
... the table at the bottom of the screen. 3. IP Address: This is enabled by some ISPs. DHCP Server: Enables the DHCP server to allow the router to automatically assign IP addresses to devices connecting to set LAN and DHCP properties, such as the host name, IP address, subnet mask, and domain... name is 255.255.255.0. Configuration 3.1 LAN Setting The screen enables you to configure the LAN & DHCP Server, set WAN parameters, create Administrator and User passwords, and set the local time, time zone, and dynamic DNS. 3.1.1 LAN & DHCP Server This page enables you to the LAN.
... the table at the bottom of the screen. 3. IP Address: This is enabled by some ISPs. DHCP Server: Enables the DHCP server to allow the router to automatically assign IP addresses to devices connecting to set LAN and DHCP properties, such as the host name, IP address, subnet mask, and domain... name is 255.255.255.0. Configuration 3.1 LAN Setting The screen enables you to configure the LAN & DHCP Server, set WAN parameters, create Administrator and User passwords, and set the local time, time zone, and dynamic DNS. 3.1.1 LAN & DHCP Server This page enables you to the LAN.

User Guide
Page 18
...Administrator will use to log in this field. MAC Address: If required by your ISP, type the MAC address of the router WAN interface in to the system. The password must be typed again for confirmation. 15 DNS 1/2/3: Type up to three DNS numbers in the text boxes. Your ISP ...will provide you with this information. 3.1.3 Password This screen enables you with this information. These passwords are used to gain access to three DNS numbers in the text boxes. Your ISP will provide you to set administrative...
...Administrator will use to log in this field. MAC Address: If required by your ISP, type the MAC address of the router WAN interface in to the system. The password must be typed again for confirmation. 15 DNS 1/2/3: Type up to three DNS numbers in the text boxes. Your ISP ...will provide you with this information. 3.1.3 Password This screen enables you with this information. These passwords are used to gain access to three DNS numbers in the text boxes. Your ISP will provide you to set administrative...

User Guide
Page 19
... the related information in the below fields: DDNS server address, Host Name, User Name and Password. 16 You firstly need to enable or disable daylight saving time. When enabled, select the start and end date for the router's real-time clock, select your time zone, and enable or disable daylight saving. Time...
... the related information in the below fields: DDNS server address, Host Name, User Name and Password. 16 You firstly need to enable or disable daylight saving time. When enabled, select the start and end date for the router's real-time clock, select your time zone, and enable or disable daylight saving. Time...

User Guide
Page 42
A user name and password are experiencing difficulties when playing online games or even certain applications that ...data, you to set up HTTP access for remote management. ● Enable: Click to perform remote management. The Router is a networking architecture that use the UPnP functionality, it is recommended that Gaming Mode is disabled. GAMING MODE:... "Disabled". HTTP: Enables you may need to Ping WAN Port: Type a range of router IP addresses that is an UPnP enabled router and will only work correctly. Allow to enable Gaming Mode for Universal Plug and Play that...
A user name and password are experiencing difficulties when playing online games or even certain applications that ...data, you to set up HTTP access for remote management. ● Enable: Click to perform remote management. The Router is a networking architecture that use the UPnP functionality, it is recommended that Gaming Mode is disabled. GAMING MODE:... "Disabled". HTTP: Enables you may need to Ping WAN Port: Type a range of router IP addresses that is an UPnP enabled router and will only work correctly. Allow to enable Gaming Mode for Universal Plug and Play that...

Quick Installation Guide
Page 5
If not, please continue to Section 3. Click Next. 7. When the wireless network screen appears, enter a unique network name and then click Next. Enter a new password for the router and then click Next. By default, the password is TRENDnet. 3 English By default, the SSID is admin. 8. Follow the Wizard instructions and continue through the remaining installation steps. 5. If this screen appears, go to step 6. 6.
If not, please continue to Section 3. Click Next. 7. When the wireless network screen appears, enter a unique network name and then click Next. Enter a new password for the router and then click Next. By default, the password is TRENDnet. 3 English By default, the SSID is admin. 8. Follow the Wizard instructions and continue through the remaining installation steps. 5. If this screen appears, go to step 6. 6.

Quick Installation Guide
Page 10
....1 is the default IP address of the TEW-452BRP Wireless Router. Then click OK to install Network Magic, select Exit TRENDnet Router Setup and then click Finish. See Question 4. Q2: How can not make sure the wireless network adapter is configured with your router to the Router. The default user name and password is an optional bonus program. Q5: All...
....1 is the default IP address of the TEW-452BRP Wireless Router. Then click OK to install Network Magic, select Exit TRENDnet Router Setup and then click Finish. See Question 4. Q2: How can not make sure the wireless network adapter is configured with your router to the Router. The default user name and password is an optional bonus program. Q5: All...

