
Manual
Page 6
...Network Management The print servers support the Simple Network Management Protocol (SNMP), which help administrator to access and manage these print servers. 1. Components and Features TE100-P2U1P (2-USB & 1-Parallel Port) Print Server ˙1 Bi-direction parallel port (IEEE 1284) for port 1(PID1) ˙2 USB 1.1 ports for ...Me/NT/2000/XP/2003, User's Guide ˙One external AC power adapter ˙One Quick Installation Guide ˙Built-in Reset Button 4 Network configuration The print servers provide an embedded web server that can be accessed via a prop web browser. A standard...
...Network Management The print servers support the Simple Network Management Protocol (SNMP), which help administrator to access and manage these print servers. 1. Components and Features TE100-P2U1P (2-USB & 1-Parallel Port) Print Server ˙1 Bi-direction parallel port (IEEE 1284) for port 1(PID1) ˙2 USB 1.1 ports for ...Me/NT/2000/XP/2003, User's Guide ˙One external AC power adapter ˙One Quick Installation Guide ˙Built-in Reset Button 4 Network configuration The print servers provide an embedded web server that can be accessed via a prop web browser. A standard...

Manual
Page 21
... order to take effect. Click Upgrade button just like a picture < >, as shown as follows: 1. Select General Upgrade. Reset allows the user to reset the print server device in the same directory as PSAdmin. Refresh searches the network for new settings to upgrade the unit please perform... the steps as follow picture 2. Refresh 1. Click Reset button just like a picture < >. 2. Make sure that the upgrade file is located in order to establish a new connection...
... order to take effect. Click Upgrade button just like a picture < >, as shown as follows: 1. Select General Upgrade. Reset allows the user to reset the print server device in the same directory as PSAdmin. Refresh searches the network for new settings to upgrade the unit please perform... the steps as follow picture 2. Refresh 1. Click Reset button just like a picture < >. 2. Make sure that the upgrade file is located in order to establish a new connection...

Manual
Page 22
...to the "Wizard" section in this chapter). 6. Select the "Print server Configuration" option and select the "Queue Serviced by clicking the "Reset" icon from your Windows. 3. After the PSAdmin is removed, the print server is no longer accessible via the PSAdmin. You have to ... connect to abnormal printing. Procedure: 20 Done. Select the Print server name you create in Step 6 into your system in the tool bar. 5. Reset the print server by Printer" option (For NetWare 4.x's PCONSOLE, please select "Printers" option and select "Printer 0" instead). 9. Note: Please refer to...
...to the "Wizard" section in this chapter). 6. Select the "Print server Configuration" option and select the "Queue Serviced by clicking the "Reset" icon from your Windows. 3. After the PSAdmin is removed, the print server is no longer accessible via the PSAdmin. You have to ... connect to abnormal printing. Procedure: 20 Done. Select the Print server name you create in Step 6 into your system in the tool bar. 5. Reset the print server by Printer" option (For NetWare 4.x's PCONSOLE, please select "Printers" option and select "Printer 0" instead). 9. Note: Please refer to...

Manual
Page 68
... and put the print server's configuration file and save its Port Name or other setting(s). Done! Please refer to the "Moving the print server to reset the entry. 1. In some cases, if necessary, delete the print server, print queue(s) or other distinguished name and click this situation is always wise to...
... and put the print server's configuration file and save its Port Name or other setting(s). Done! Please refer to the "Moving the print server to reset the entry. 1. In some cases, if necessary, delete the print server, print queue(s) or other distinguished name and click this situation is always wise to...

Manual
Page 71
Appendix: Load Default Value You can load the default setting from the WEB management as following: 69 Or, you can load the default value of print server by press the reset button. Please press 5 to 10 seconds until the status LED flash and the default value is restored.
Appendix: Load Default Value You can load the default setting from the WEB management as following: 69 Or, you can load the default value of print server by press the reset button. Please press 5 to 10 seconds until the status LED flash and the default value is restored.
Quick Installation Guide
Page 3
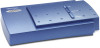
... Operating System and connected to the User's Guide in the Manual folder on the CD-ROM. Print Server Layout TE100-P2U1P USB LED Parallel LED Status LED Parallel port USB 1 port USB 2 port Reset button Power Adapter jack LAN status LED LAN port L This Quick Installation Guide contains brief instructions of the followings...
... Operating System and connected to the User's Guide in the Manual folder on the CD-ROM. Print Server Layout TE100-P2U1P USB LED Parallel LED Status LED Parallel port USB 1 port USB 2 port Reset button Power Adapter jack LAN status LED LAN port L This Quick Installation Guide contains brief instructions of the followings...