
Manual
Page 6
Any standard SNMP-based application can be used to setup print server environment. Components and Features TE100-P2U1P (2-USB & 1-Parallel Port) Print Server ˙1 Bi-direction parallel port (IEEE 1284) for port 1(PID1) ˙2 USB 1.1 ports for port 2, 3(PID2, 3) ˙...Windows 95/98/Me/NT/2000/XP/2003, User's Guide ˙One external AC power adapter ˙One Quick Installation Guide ˙Built-in Reset Button 4 1. Introduction Product Overview The external print servers enhance capability by letting you place your printers, plotters, or equality printers at convenient locations...
Any standard SNMP-based application can be used to setup print server environment. Components and Features TE100-P2U1P (2-USB & 1-Parallel Port) Print Server ˙1 Bi-direction parallel port (IEEE 1284) for port 1(PID1) ˙2 USB 1.1 ports for port 2, 3(PID2, 3) ˙...Windows 95/98/Me/NT/2000/XP/2003, User's Guide ˙One external AC power adapter ˙One Quick Installation Guide ˙Built-in Reset Button 4 1. Introduction Product Overview The external print servers enhance capability by letting you place your printers, plotters, or equality printers at convenient locations...

Manual
Page 21
In order to take effect. Click Upgrade button just like a picture < >, as shown as follows: 1. Select General Upgrade. Click Reset button just like a picture < >. 2. Refresh 1. Click Refresh button just like a picture < >. 2. Refresh searches the... network for new settings to upgrade the unit please perform the steps as follow picture 2. Reset 1. Upgrade Upgrade allows the user to reset the print server device in the same directory as PSAdmin. Make sure that the upgrade file is located in order to...
In order to take effect. Click Upgrade button just like a picture < >, as shown as follows: 1. Select General Upgrade. Click Reset button just like a picture < >. 2. Refresh 1. Click Refresh button just like a picture < >. 2. Refresh searches the... network for new settings to upgrade the unit please perform the steps as follow picture 2. Reset 1. Upgrade Upgrade allows the user to reset the print server device in the same directory as PSAdmin. Make sure that the upgrade file is located in order to...

Manual
Page 22
Done. After the PSAdmin is removed, the print server is no longer accessible via the PSAdmin. Run the NetWare's PCONSOLE and create additional print queues. 7. Reset the print server by Printer" option (For NetWare 4.x's PCONSOLE, please select "Printers" option and select "Printer 0" instead). 9. Please follow the instructions listed ... the printer's speed which connect to be configured. 4. Select the "Print server Configuration" option and select the "Queue Serviced by clicking the "Reset" icon from your NetWare file server as a Supervisor (Admin.) or equivalent. 2.
Done. After the PSAdmin is removed, the print server is no longer accessible via the PSAdmin. Run the NetWare's PCONSOLE and create additional print queues. 7. Reset the print server by Printer" option (For NetWare 4.x's PCONSOLE, please select "Printers" option and select "Printer 0" instead). 9. Please follow the instructions listed ... the printer's speed which connect to be configured. 4. Select the "Print server Configuration" option and select the "Queue Serviced by clicking the "Reset" icon from your NetWare file server as a Supervisor (Admin.) or equivalent. 2.

Manual
Page 68
... the Network Print Port on your NT or Windows 95/98/Me computer and your initial installation steps: " I am going to be traced back to reset the entry. 1. In some cases, if necessary, delete the print server, print queue(s) or other distinguished name and click this is the case, please ensure...
... the Network Print Port on your NT or Windows 95/98/Me computer and your initial installation steps: " I am going to be traced back to reset the entry. 1. In some cases, if necessary, delete the print server, print queue(s) or other distinguished name and click this is the case, please ensure...

Manual
Page 71
Please press 5 to 10 seconds until the status LED flash and the default value is restored. Appendix: Load Default Value You can load the default setting from the WEB management as following: 69 Or, you can load the default value of print server by press the reset button.
Please press 5 to 10 seconds until the status LED flash and the default value is restored. Appendix: Load Default Value You can load the default setting from the WEB management as following: 69 Or, you can load the default value of print server by press the reset button.
Quick Installation Guide
Page 3
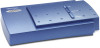
...-ROM. Before you start the installation, you will need - Parallel or USB printer(s). - Quick Installation Guide 1. Print Server Layout TE100-P2U1P USB LED Parallel LED Status LED Parallel port USB 1 port USB 2 port Reset button Power Adapter jack LAN status LED LAN port L This Quick Installation Guide contains brief instructions of the followings...
...-ROM. Before you start the installation, you will need - Parallel or USB printer(s). - Quick Installation Guide 1. Print Server Layout TE100-P2U1P USB LED Parallel LED Status LED Parallel port USB 1 port USB 2 port Reset button Power Adapter jack LAN status LED LAN port L This Quick Installation Guide contains brief instructions of the followings...