
User Guide
Page 2
... Peer to Peer Printing 11 Windows SMB Printing 18 Windows with Server-based Print Queues 20 Macintosh (AppleTalk 21 Macintosh OS X ...22 Chapter 5 BiAdmin Management Utility 24 Requirements ...24 Installation ...24 Operation ...24 Chapter 6 Web-Based Management 34 Overview ...34 Preparation...34 Connecting to the Print Server 35 Configuration Screens 35...
... Peer to Peer Printing 11 Windows SMB Printing 18 Windows with Server-based Print Queues 20 Macintosh (AppleTalk 21 Macintosh OS X ...22 Chapter 5 BiAdmin Management Utility 24 Requirements ...24 Installation ...24 Operation ...24 Chapter 6 Web-Based Management 34 Overview ...34 Preparation...34 Connecting to the Print Server 35 Configuration Screens 35...

User Guide
Page 4
Easy Installation. A number of utility programs are provided. Compact Size. Page 1 Chapter 1 Introduction This chapter provides an overview of your network simple. Your Print Server was designed to four protocols: ...
Easy Installation. A number of utility programs are provided. Compact Size. Page 1 Chapter 1 Introduction This chapter provides an overview of your network simple. Your Print Server was designed to four protocols: ...

User Guide
Page 10
... Windows NT Server/Windows 2000/Windows XP, the Network Server must be used configure the Print Server for details. • BiAdmin management utility program - see Chapter 6 for details on using the Peer-to-peer Printing installed by default when the Administrator install option is the..., and the configuration required would depend upon the environment in the root folder. 2. Page 7 Advanced Configuration and Management The BiAdmin management utility is designed to the Print Server using BiAdmin. If the setup program does not start automatically, run SETUP.exe in which it is...
... Windows NT Server/Windows 2000/Windows XP, the Network Server must be used configure the Print Server for details. • BiAdmin management utility program - see Chapter 6 for details on using the Peer-to-peer Printing installed by default when the Administrator install option is the..., and the configuration required would depend upon the environment in the root folder. 2. Page 7 Advanced Configuration and Management The BiAdmin management utility is designed to the Print Server using BiAdmin. If the setup program does not start automatically, run SETUP.exe in which it is...

User Guide
Page 27
Chapter 5 BiAdmin Management Utility This chapter describes the installation and operation of 800 * 600 or greater. Installation Use the supplied CD-ROM. If auto-run is disabled on your ...
Chapter 5 BiAdmin Management Utility This chapter describes the installation and operation of 800 * 600 or greater. Installation Use the supplied CD-ROM. If auto-run is disabled on your ...

User Guide
Page 37
... server (if you have one), and determine the IP Address allocated to the Print Server. • Use the Setup Wizard, BiAdmin or another Print Server utility to allocate a valid IP Address to the Print Server. • Add an entry to the arp table to associate the hardware address of the Print...
... server (if you have one), and determine the IP Address allocated to the Print Server. • Use the Setup Wizard, BiAdmin or another Print Server utility to allocate a valid IP Address to the Print Server. • Add an entry to the arp table to associate the hardware address of the Print...

User Guide
Page 48
User (Client) Requirements • Internet Connection. The supplied BiAdmin utility program, or the Web interface (on 100BaseT models) can also use this account. If blank, unprintable jobs will be used to check for the following ...
User (Client) Requirements • Internet Connection. The supplied BiAdmin utility program, or the Web interface (on 100BaseT models) can also use this account. If blank, unprintable jobs will be used to check for the following ...

User Guide
Page 58
... is being configured to Start printing after last page is spooled and click OK. To change this problem: Try the following: • Open the BiAdmin Utility. • Click the Printer Status icon. • Change the Printer Type setting to Low Speed or set the Handshake Signal setting to Control Panel - My...
... is being configured to Start printing after last page is spooled and click OK. To change this problem: Try the following: • Open the BiAdmin Utility. • Click the Printer Status icon. • Change the Printer Type setting to Low Speed or set the Handshake Signal setting to Control Panel - My...

User Guide
Page 64
...), to provide an IP address to the Print Server, then restart the Print Server. • Use a Windows platform and run the Setup Wizard or BiAdmin utility to allocate a valid IP Address to the Print Server. • Add an entry to the arp table to associate the hardware address of the Print...
...), to provide an IP address to the Print Server, then restart the Print Server. • Use a Windows platform and run the Setup Wizard or BiAdmin utility to allocate a valid IP Address to the Print Server. • Add an entry to the arp table to associate the hardware address of the Print...
Quick Installation Guide
Page 3
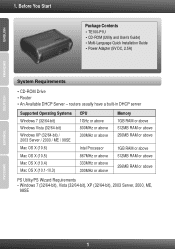
1. Router ? Before You Start Package Contents ? TE100-P1U ? Windows 7 (32/64-bit), Vista (32/64-bit), XP (32/64-bit), 2003 Server, 2000, ME, 98SE 1 Power Adapter (5V DC, 2.5A) System Requirements ? Multi-... 1GB RAM or above 512MB RAM or above 256MB RAM or above 1GB RAM or above 512MB RAM or above 256MB RAM or above PS Utility/PS Wizard Requirements ? CD-ROM (Utility and User's Guide) ? CD-ROM Drive ? An Available DHCP Server -
1. Router ? Before You Start Package Contents ? TE100-P1U ? Windows 7 (32/64-bit), Vista (32/64-bit), XP (32/64-bit), 2003 Server, 2000, ME, 98SE 1 Power Adapter (5V DC, 2.5A) System Requirements ? Multi-... 1GB RAM or above 512MB RAM or above 256MB RAM or above 1GB RAM or above 512MB RAM or above 256MB RAM or above PS Utility/PS Wizard Requirements ? CD-ROM (Utility and User's Guide) ? CD-ROM Drive ? An Available DHCP Server -

Quick Installation Guide
Page 5
... Print Server's default IP address is an available number from 2-254). PS Utility. 3 For MAC users, change your computer's CD-ROM Drive. 2. For Windows Users 1. Insert the Utility CD-ROM into your computers IP address to access the Print Server's Web Utility. 3. Then enter http://192.168.0.1 in your web browser to 192... address of 192.168.0.1. Click Run Autorun.exe (Windows 7/Vista only). 3. Configure the Print Server Note: The Print Server can be managed using the PS-Utility or a web browser. Click...
... Print Server's default IP address is an available number from 2-254). PS Utility. 3 For MAC users, change your computer's CD-ROM Drive. 2. For Windows Users 1. Insert the Utility CD-ROM into your computers IP address to access the Print Server's Web Utility. 3. Then enter http://192.168.0.1 in your web browser to 192... address of 192.168.0.1. Click Run Autorun.exe (Windows 7/Vista only). 3. Configure the Print Server Note: The Print Server can be managed using the PS-Utility or a web browser. Click...
Quick Installation Guide
Page 7
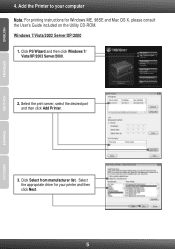
Windows 7/Vista/2003 Server/XP/2000 1. Select the print server, select the desired port and then click Add Printer. 3. Click Select from manufacturer list. Select the appropriate driver for your computer Note: For printing instructions for Windows ME, 98SE and Mac OS X, please consult the User's Guide included on the Utility CD-ROM. 4. Click PS Wizard and then click Windows 7/ Vista/XP/2003 Server/2000. 2. Add the Printer to your printer and then click Next. 5
Windows 7/Vista/2003 Server/XP/2000 1. Select the print server, select the desired port and then click Add Printer. 3. Click Select from manufacturer list. Select the appropriate driver for your computer Note: For printing instructions for Windows ME, 98SE and Mac OS X, please consult the User's Guide included on the Utility CD-ROM. 4. Click PS Wizard and then click Windows 7/ Vista/XP/2003 Server/2000. 2. Add the Printer to your printer and then click Next. 5

Quick Installation Guide
Page 8
Click OK. 7. 4. Click Finish. 8. Add Printer is now complete. For detailed information regarding the TE100-P1U configuration and advanced settings, please refer to register your product Online at http://www.trendnet.com. Click Next. 5. Register Your Product To ensure the highest level of customer service and support, please take a moment to User's Guide on the network. Click Print Test Page. 6. Repeat steps 1 to 7 to add the printer to other computers on the Utility CD-ROM, or TRENDnet's website at : www.trendnet.com/register Thank you for choosing TRENDnet 6
Click OK. 7. 4. Click Finish. 8. Add Printer is now complete. For detailed information regarding the TE100-P1U configuration and advanced settings, please refer to register your product Online at http://www.trendnet.com. Click Next. 5. Register Your Product To ensure the highest level of customer service and support, please take a moment to User's Guide on the network. Click Print Test Page. 6. Repeat steps 1 to 7 to add the printer to other computers on the Utility CD-ROM, or TRENDnet's website at : www.trendnet.com/register Thank you for choosing TRENDnet 6
Quick Installation Guide
Page 9
....exe" is running Windows 7, XP, or Vista, disable the built in firewall program. 3. Click the Advanced tab. 5. Windows Vista 1. What should I inserted the Utility CD-ROM into my computer's CD-ROM Drive but the installation menu does not appear automatically. Click Control Panel. 3. Click Apply. 9. For 98SE/XP/2000... Search box, type D:\autorun.exe where "D" in "D:\autorun.exe" is the letter assigned to see my print server. The PS Wizard / PS Utility is unable to your CD-ROM Drive, and then press the ENTER key on the bottom left -hand corner of the screen. 2. Right click on...
....exe" is running Windows 7, XP, or Vista, disable the built in firewall program. 3. Click the Advanced tab. 5. Windows Vista 1. What should I inserted the Utility CD-ROM into my computer's CD-ROM Drive but the installation menu does not appear automatically. Click Control Panel. 3. Click Apply. 9. For 98SE/XP/2000... Search box, type D:\autorun.exe where "D" in "D:\autorun.exe" is the letter assigned to see my print server. The PS Wizard / PS Utility is unable to your CD-ROM Drive, and then press the ENTER key on the bottom left -hand corner of the screen. 2. Right click on...
Quick Installation Guide
Page 10
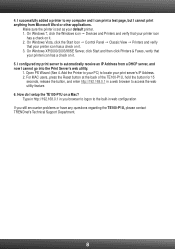
... . 5. 4. I successfully added a printer to my computer and I can print a test page, but I cannot go into the Print Server's web utility. 1. On Windows 7, click the Windows icon ? Devices and Printers and verify that your default printer. 1. Printers and verify that your PC) to access...icon has a check on a Mac? On Windows Vista, click the Start Icon ? How do I setup the TE100-P1U on it. 3. Type in http://192.168.0.1 in web configuration If you still encounter problems or have any questions regarding the TE100-P1U, please contact TRENDnet's Technical Support Department. 8
... . 5. 4. I successfully added a printer to my computer and I can print a test page, but I cannot go into the Print Server's web utility. 1. On Windows 7, click the Windows icon ? Devices and Printers and verify that your default printer. 1. Printers and verify that your PC) to access...icon has a check on a Mac? On Windows Vista, click the Start Icon ? How do I setup the TE100-P1U on it. 3. Type in http://192.168.0.1 in web configuration If you still encounter problems or have any questions regarding the TE100-P1U, please contact TRENDnet's Technical Support Department. 8
