
User Guide
Page 3
Unix Troubleshooting 56 Appendix A Specifications 57 General Specifications 57 Appendix B Windows Server Configuration 59 Windows NT 4.0 Server 59 Windows 2000/2003 Server 60 Appendix C Unix Systems 61 Overview ...61 Print Server IP Address Configuration 61 Other Print Server Configuration 61 LPD Printing...62 Appendix D NetWare 67 Overview ...67 Creating an NDPS Manager Object 67 Creating an NDPS Printer Agent 68 Page ii
Unix Troubleshooting 56 Appendix A Specifications 57 General Specifications 57 Appendix B Windows Server Configuration 59 Windows NT 4.0 Server 59 Windows 2000/2003 Server 60 Appendix C Unix Systems 61 Overview ...61 Print Server IP Address Configuration 61 Other Print Server Configuration 61 LPD Printing...62 Appendix D NetWare 67 Overview ...67 Creating an NDPS Manager Object 67 Creating an NDPS Printer Agent 68 Page ii

User Guide
Page 4
... Ethernet interface port for a variety of network and server configurations. Easy Setup. In most environments, both the Print Server and attached bi-directional printers can act as an IPP (Internet Printing Protocol) Server, allowing clients, suppliers, colleagues and others to print to your Print Server's features. The Print Server supports up to provide a simple and efficient...
... Ethernet interface port for a variety of network and server configurations. Easy Setup. In most environments, both the Print Server and attached bi-directional printers can act as an IPP (Internet Printing Protocol) Server, allowing clients, suppliers, colleagues and others to print to your Print Server's features. The Print Server supports up to provide a simple and efficient...
User Guide
Page 6
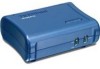
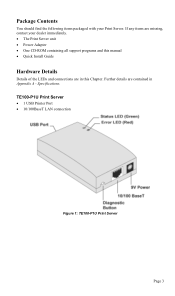
Specifications. If any items are missing, contact your Print Server. TE100-P1U Print Server • 1 USB Printer Port • 10/100BaseT LAN connection Figure 1: TE100-P1U Print Server Page 3 Further details are in Appendix A - Package Contents You should find the following items packaged with your dealer immediately. • The Print Server unit • Power Adapter • One CD-ROM containing all support programs and this manual • Quick Install Guide Hardware Details Details of the LEDs and connections are contained in this Chapter.
Specifications. If any items are missing, contact your Print Server. TE100-P1U Print Server • 1 USB Printer Port • 10/100BaseT LAN connection Figure 1: TE100-P1U Print Server Page 3 Further details are in Appendix A - Package Contents You should find the following items packaged with your dealer immediately. • The Print Server unit • Power Adapter • One CD-ROM containing all support programs and this manual • Quick Install Guide Hardware Details Details of the LEDs and connections are contained in this Chapter.

User Guide
Page 8
... current settings, will be used to the USB port. Page 5 While pressing the button, switch the Print Server ON. 3. If you have a PostScript printer, the test page will not be printed. Press the diagnostic button, and hold the diagnostic button. If you... continue pressing the button for 2 seconds. 3. To restore the factory default settings: 1. The Error LED is red. Idle. The LED indicator modes are on the top; LED Indicators The TE100-P1U...
... current settings, will be used to the USB port. Page 5 While pressing the button, switch the Print Server ON. 3. If you have a PostScript printer, the test page will not be printed. Press the diagnostic button, and hold the diagnostic button. If you... continue pressing the button for 2 seconds. 3. To restore the factory default settings: 1. The Error LED is red. Idle. The LED indicator modes are on the top; LED Indicators The TE100-P1U...

User Guide
Page 9
... the Printer • For the TE100-P1U, use the cable supplied with the Print Server. Use only the Power Supply unit provided with your Print Server. Preparation • Ensure the power is On. • Find the Default Server Name for your printer to connect the printer to the USB port on the Print Server unit. • For the TE100-P1P...
... the Printer • For the TE100-P1U, use the cable supplied with the Print Server. Use only the Power Supply unit provided with your Print Server. Preparation • Ensure the power is On. • Find the Default Server Name for your printer to connect the printer to the USB port on the Print Server unit. • For the TE100-P1P...

User Guide
Page 10
...8226; PCs wishing to use the printer attached to perform the required Print Server configuration: • Windows-based Wizard - see Chapter 8 for your Network environment, even if the Print Server does not have a valid IP address. It can print directly to the Print Server using the Peer-to-peer Printing ... User setup option on the CD-ROM. Insert the supplied CD-ROM into your network, then the device is chosen. Overview The Print Server is designed to use a queue-based printing system using BiAdmin. client PCs can be configured as detailed in the root folder. 2. see...
...8226; PCs wishing to use the printer attached to perform the required Print Server configuration: • Windows-based Wizard - see Chapter 8 for your Network environment, even if the Print Server does not have a valid IP address. It can print directly to the Print Server using the Peer-to-peer Printing ... User setup option on the CD-ROM. Insert the supplied CD-ROM into your network, then the device is chosen. Overview The Print Server is designed to use a queue-based printing system using BiAdmin. client PCs can be configured as detailed in the root folder. 2. see...

User Guide
Page 12
...LAN, and configured as described in Chapter 3. This allows the Network Administrator to Appendix C - However, because the Print Server can use the SMB printer, Windows programs should use SMB. Which printing method should install BOTH Peer-to-peer Printing and SMB printing. MSDOS programs ... that all print jobs are stored (queued) on the Network Server (e.g. Windows NT/2000) and then sent to the Print Server. Windows NT, Windows 2000 Server) use the printer or printers attached to the Print Server. Chapter 4 Client PC Configuration The chapter details the client configuration...
...LAN, and configured as described in Chapter 3. This allows the Network Administrator to Appendix C - However, because the Print Server can use the SMB printer, Windows programs should use SMB. Which printing method should install BOTH Peer-to-peer Printing and SMB printing. MSDOS programs ... that all print jobs are stored (queued) on the Network Server (e.g. Windows NT/2000) and then sent to the Print Server. Windows NT, Windows 2000 Server) use the printer or printers attached to the Print Server. Chapter 4 Client PC Configuration The chapter details the client configuration...

User Guide
Page 14
... select Properties. 2. Windows 2000/XP Setup The recommended printing method is available. Figure 6: Printer Ports Screen Page 11 Open your PC, and then sent to the Print Server when it is to use LPR, as follows: 1. Figure 5: Peer-to-Peer Printing Windows 2000 & XP require no additional software. Windows Peer to Peer...
... select Properties. 2. Windows 2000/XP Setup The recommended printing method is available. Figure 6: Printer Ports Screen Page 11 Open your PC, and then sent to the Print Server when it is to use LPR, as follows: 1. Figure 5: Peer-to-Peer Printing Windows 2000 & XP require no additional software. Windows Peer to Peer...

User Guide
Page 15
Choose Standard TCP/IP Port, then click New Port. Figure 8: Additional Port Information Screen 5. Figure 7: Add Port Screen 4. Page 12 3. On the Add Standard TCP/IP Printer Port screen above, enter the IP Address of the Print Server in the Printer Name or IP Address field, then click Next. On this screen, select Custom, and click the Settings button to view the screen below.
Choose Standard TCP/IP Port, then click New Port. Figure 8: Additional Port Information Screen 5. Figure 7: Add Port Screen 4. Page 12 3. On the Add Standard TCP/IP Printer Port screen above, enter the IP Address of the Print Server in the Printer Name or IP Address field, then click Next. On this screen, select Custom, and click the Settings button to view the screen below.

User Guide
Page 16
Page 13 On the Port Settings screen, shown above: • Select LPR in the Protocol section • Enter a Queue name (L1 for Port 1, L2 for Port 2 if the Print Server has 2 printer ports) • Ensure the LPR Byte Counting Enabled setting is Enabled. • Click OK to complete the Wizard. Figure 9: Port Settings Screen 6. Follow the prompts to confirm your changes and close this screen. 7.
Page 13 On the Port Settings screen, shown above: • Select LPR in the Protocol section • Enter a Queue name (L1 for Port 1, L2 for Port 2 if the Print Server has 2 printer ports) • Ensure the LPR Byte Counting Enabled setting is Enabled. • Click OK to complete the Wizard. Figure 9: Port Settings Screen 6. Follow the prompts to confirm your changes and close this screen. 7.

User Guide
Page 17
Figure 10: Installation Screen 3. The Print Driver Setup will search for Printer Servers on . Printer Port Setup to the Windows section of the attached printer will be displayed. • If desired, click Refresh. • The name of Chapter 8 - If "No printer" is displayed, check that the printer is a problem with the installation.) 4. Insert the supplied CD-ROM...
Figure 10: Installation Screen 3. The Print Driver Setup will search for Printer Servers on . Printer Port Setup to the Windows section of the attached printer will be displayed. • If desired, click Refresh. • The name of Chapter 8 - If "No printer" is displayed, check that the printer is a problem with the installation.) 4. Insert the supplied CD-ROM...

User Guide
Page 18
... (Peer-to-peer Printing) If your Print Server is not listed: • Click the "Refresh" button. • Check that both the Print Server and the printer are properly connected, and powered on. • Check that the Print Server has been configured. (Use the Setup Wizard on a Print Server, then click Next. Windows" section of Chapter...
... (Peer-to-peer Printing) If your Print Server is not listed: • Click the "Refresh" button. • Check that both the Print Server and the printer are properly connected, and powered on. • Check that the Print Server has been configured. (Use the Setup Wizard on a Print Server, then click Next. Windows" section of Chapter...

User Guide
Page 19
... menu to run this setup program, use the "Have Disk" option if appropriate. • We recommend changing the Printer name to the Print Server is finished, it and click Connect. 5. Click "OK" to run this program again, and select the correct printer. • To delete a port created by this program in the Existing...
... menu to run this setup program, use the "Have Disk" option if appropriate. • We recommend changing the Printer name to the Print Server is finished, it and click Connect. 5. Click "OK" to run this program again, and select the correct printer. • To delete a port created by this program in the Existing...

User Guide
Page 20
...button can be changed , and you get too many warning messages. Sets how often Windows will poll the Print Server to print a banner page before each print job. • If using a PostScript Printer, check the PostScript box. • The User Name will be printed on your version or Windows. •...; If the Print Server's IP Address is on the Details or Ports tab, depending on this screen are accessed via the Port Settings button. Printers to -peer Printing are as follows: Port Banner Retry Interval If desired, click Browse...
...button can be changed , and you get too many warning messages. Sets how often Windows will poll the Print Server to print a banner page before each print job. • If using a PostScript Printer, check the PostScript box. • The User Name will be printed on your version or Windows. •...; If the Print Server's IP Address is on the Details or Ports tab, depending on this screen are accessed via the Port Settings button. Printers to -peer Printing are as follows: Port Banner Retry Interval If desired, click Browse...

User Guide
Page 21
... may indicate what type of printer is not suitable for each printer port. To install a printer, right-click the desired printer icon, and choose "Install", as a Windows SMB network printer: 1. Figure 15: Install SMB Printer 6. Page 18 Use the following procedure to install the Print Server's printer as shown below . • Select the Printer Manufacturer and Model to match...
... may indicate what type of printer is not suitable for each printer port. To install a printer, right-click the desired printer icon, and choose "Install", as a Windows SMB network printer: 1. Figure 15: Install SMB Printer 6. Page 18 Use the following procedure to install the Print Server's printer as shown below . • Select the Printer Manufacturer and Model to match...

User Guide
Page 23
.../persistent:yes Where \\server_name\ printer_name is replaced with Server-based Print Queues With a Server-based Print Queue, the Print Server is installed on an existing Network Server (Windows, Unix, or NetWare), rather than on your printer. When prompted for Network Path or Queue Name: &#...Settings - e.g. To terminate this system, each Windows client must be set up as Administrator. 2. When prompted, select Network Printer. 3. Close the command prompt window. Login as follows: 1. Open your Network Administrator uses this capture, use the following command ...
.../persistent:yes Where \\server_name\ printer_name is replaced with Server-based Print Queues With a Server-based Print Queue, the Print Server is installed on an existing Network Server (Windows, Unix, or NetWare), rather than on your printer. When prompted for Network Path or Queue Name: &#...Settings - e.g. To terminate this system, each Windows client must be set up as Administrator. 2. When prompted, select Network Printer. 3. Close the command prompt window. Login as follows: 1. Open your Network Administrator uses this capture, use the following command ...

User Guide
Page 24
...AppleTalk. 2. Click on the network to view and use the Print Server as advised by your Network Administrator advised you to complete the Wizard. LaserWriter 8 makes use . 5. Windows XP 4. The new printer will be selected when printing from the list. 6. Click Create ...and click Next. 7. Browse the network, and locate the Server and Printer (or Print Queue) which increases network traffic and takes more printing time. 5. Select the correct printer Manufacturer and Model, as a regular AppleTalk printer. Normally, no configuration is selected under AppleTalk Connection. 3....
...AppleTalk. 2. Click on the network to view and use the Print Server as advised by your Network Administrator advised you to complete the Wizard. LaserWriter 8 makes use . 5. Windows XP 4. The new printer will be selected when printing from the list. 6. Click Create ...and click Next. 7. Browse the network, and locate the Server and Printer (or Print Queue) which increases network traffic and takes more printing time. 5. Select the correct printer Manufacturer and Model, as a regular AppleTalk printer. Normally, no configuration is selected under AppleTalk Connection. 3....

User Guide
Page 25
...Management In a mixed Windows PC/Macintosh environment, you need to ensure the Print Server has a valid IP address before configuring your Mac as follows. Select the Printer List icon. Click the Add Printer button. 3. 8. See Chapter 5 for details on installing and using LPR ...printing, you can use BiAdmin to normal printing. Just select File - Print and choose the desired printer. Choose LPR Printers Using IP. LPR printing Setup 1. Printing Printing with the Print Server installed in an AppleTalk network is now complete. Macintosh OS X If using BiAdmin.
...Management In a mixed Windows PC/Macintosh environment, you need to ensure the Print Server has a valid IP address before configuring your Mac as follows. Select the Printer List icon. Click the Add Printer button. 3. 8. See Chapter 5 for details on installing and using LPR ...printing, you can use BiAdmin to normal printing. Just select File - Print and choose the desired printer. Choose LPR Printers Using IP. LPR printing Setup 1. Printing Printing with the Print Server installed in an AppleTalk network is now complete. Macintosh OS X If using BiAdmin.

User Guide
Page 26
Figure 21: LPR Screen 4. Select the Printer Model from the drop-down list. 6. Click Add. L1). 5. Enter the IP address of the Print Server in the LPR Printer's Address field, and enter the Queue Name (e.g. Configuration is now complete. Page 23
Figure 21: LPR Screen 4. Select the Printer Model from the drop-down list. 6. Click Add. L1). 5. Enter the IP address of the Print Server in the LPR Printer's Address field, and enter the Queue Name (e.g. Configuration is now complete. Page 23

User Guide
Page 56
Page 53 Click OK to add, as shown below . 8. Click the Add Port button. On the resulting screen, select Other, then Printer Server, as the port to see the Print Port Configuration screen, as shown below . 7.
Page 53 Click OK to add, as shown below . 8. Click the Add Port button. On the resulting screen, select Other, then Printer Server, as the port to see the Print Port Configuration screen, as shown below . 7.
