
User Guide
Page 2
... 1 Introduction 1 Features...1 Safety Instructions ...2 Package Contents...3 Hardware Details ...3 Chapter 2 LAN Installation 6 Procedure...6 Chapter 3 Print Server Configuration 7 Overview ...7 Using the Windows Wizard 7 Chapter 4 Client PC Configuration 9 Overview ...9 Windows Peer to Peer Printing 11 Windows SMB Printing 18 Windows with Server-based Print Queues 20 Macintosh (AppleTalk 21 Macintosh OS X ...22 Chapter 5 BiAdmin Management Utility 24...
... 1 Introduction 1 Features...1 Safety Instructions ...2 Package Contents...3 Hardware Details ...3 Chapter 2 LAN Installation 6 Procedure...6 Chapter 3 Print Server Configuration 7 Overview ...7 Using the Windows Wizard 7 Chapter 4 Client PC Configuration 9 Overview ...9 Windows Peer to Peer Printing 11 Windows SMB Printing 18 Windows with Server-based Print Queues 20 Macintosh (AppleTalk 21 Macintosh OS X ...22 Chapter 5 BiAdmin Management Utility 24...

User Guide
Page 3
Unix Troubleshooting 56 Appendix A Specifications 57 General Specifications 57 Appendix B Windows Server Configuration 59 Windows NT 4.0 Server 59 Windows 2000/2003 Server 60 Appendix C Unix Systems 61 Overview ...61 Print Server IP Address Configuration 61 Other Print Server Configuration 61 LPD Printing...62 Appendix D NetWare 67 Overview ...67 Creating an NDPS Manager Object 67 Creating an NDPS Printer Agent 68 Page ii
Unix Troubleshooting 56 Appendix A Specifications 57 General Specifications 57 Appendix B Windows Server Configuration 59 Windows NT 4.0 Server 59 Windows 2000/2003 Server 60 Appendix C Unix Systems 61 Overview ...61 Print Server IP Address Configuration 61 Other Print Server Configuration 61 LPD Printing...62 Appendix D NetWare 67 Overview ...67 Creating an NDPS Manager Object 67 Creating an NDPS Printer Agent 68 Page ii

User Guide
Page 4
... easy method of configuration in TCP/IP networks regardless of software tools are supplied to provide a simple and efficient network printing solution. Internet Printing Protocol (IPP) Support. A variety of your printer from anywhere on the Internet. Features Congratulations on the CD-ROM...utility programs are provided. It features a 10/100BaseT Ethernet interface port for connection to configure the Print Server for a variety of your Print Server's features. The Print Server can be used even where space is packed with features, including: Versatility. Web-based Interface...
... easy method of configuration in TCP/IP networks regardless of software tools are supplied to provide a simple and efficient network printing solution. Internet Printing Protocol (IPP) Support. A variety of your printer from anywhere on the Internet. Features Congratulations on the CD-ROM...utility programs are provided. It features a 10/100BaseT Ethernet interface port for connection to configure the Print Server for a variety of your Print Server's features. The Print Server can be used even where space is packed with features, including: Versatility. Web-based Interface...

User Guide
Page 5
...crimp or otherwise damage the power cord. If using an extension cord, makes sure the total ampere rating of your local power supply, consult your Print Server, please observe the following conditions: • The power cord is properly shielded and does not pose a tripping hazard. 6. Page 2 Avoid... or removing casing may fall causing serious damage to water poses an electric-shock hazard. 3. Do not place the Print Server on the marking label. The Print Server should only be serviced by qualified service personnel under the following safety advice. 1. The device may expose you are...
...crimp or otherwise damage the power cord. If using an extension cord, makes sure the total ampere rating of your local power supply, consult your Print Server, please observe the following conditions: • The power cord is properly shielded and does not pose a tripping hazard. 6. Page 2 Avoid... or removing casing may fall causing serious damage to water poses an electric-shock hazard. 3. Do not place the Print Server on the marking label. The Print Server should only be serviced by qualified service personnel under the following safety advice. 1. The device may expose you are...
User Guide
Page 6
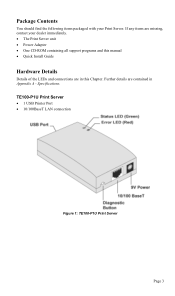
Package Contents You should find the following items packaged with your dealer immediately. • The Print Server unit • Power Adapter • One CD-ROM containing all support programs and this manual • Quick Install Guide Hardware Details Details of the LEDs and connections are in Appendix A - Specifications. If any items are contained in this Chapter. TE100-P1U Print Server • 1 USB Printer Port • 10/100BaseT LAN connection Figure 1: TE100-P1U Print Server Page 3 Further details are missing, contact your Print Server.
Package Contents You should find the following items packaged with your dealer immediately. • The Print Server unit • Power Adapter • One CD-ROM containing all support programs and this manual • Quick Install Guide Hardware Details Details of the LEDs and connections are in Appendix A - Specifications. If any items are contained in this Chapter. TE100-P1U Print Server • 1 USB Printer Port • 10/100BaseT LAN connection Figure 1: TE100-P1U Print Server Page 3 Further details are missing, contact your Print Server.

User Guide
Page 8
...TE100-P1U has two LED indicators on the end. Normal operation - a pin or paper clip can be printed. If you have a PostScript printer, the test page will be printed. The test page, containing the current settings, will be used to press it in for 10 seconds, a diagnostic page will not be printed...Push Button The button is green. While pressing the button, switch the Print Server ON. 3. No printer connected to print this page. Press the diagnostic button, and hold the diagnostic button. the TE100-P1P's LEDs are described in progress. The Error LED is red....
...TE100-P1U has two LED indicators on the end. Normal operation - a pin or paper clip can be printed. If you have a PostScript printer, the test page will be printed. The test page, containing the current settings, will be used to press it in for 10 seconds, a diagnostic page will not be printed...Push Button The button is green. While pressing the button, switch the Print Server ON. 3. No printer connected to print this page. Press the diagnostic button, and hold the diagnostic button. the TE100-P1P's LEDs are described in progress. The Error LED is red....

User Guide
Page 9
...should be needed during configuration. 2. Page 6 Connect the Printer • For the TE100-P1U, use the cable supplied with the Print Server. Start-up . Using a different Power Supply may be On. • On the TE100-P1U, the Error LED will take only a few seconds. When the Error LED goes ...off and the Status LED remains lit or flashes, the Print Server is shown on a sticker on the Print Server directly to the printer. 3. Procedure 1. Connect ...
...should be needed during configuration. 2. Page 6 Connect the Printer • For the TE100-P1U, use the cable supplied with the Print Server. Start-up . Using a different Power Supply may be On. • On the TE100-P1U, the Error LED will take only a few seconds. When the Error LED goes ...off and the Status LED remains lit or flashes, the Print Server is shown on a sticker on the Print Server directly to the printer. 3. Procedure 1. Connect ...

User Guide
Page 10
... Methods The following methods are available to -peer Printing installed by default when the Administrator install option is not necessary to configure the Print Server. It can print directly to the Print Server using the Peer-to perform the required Print Server configuration: • Windows-based Wizard - ...On the first screen, shown below for details on the CD-ROM. Page 7 Chapter 3 Print Server Configuration This chapter provides an overview of the configuration process. see Chapter 8 for details. See Chapter 5 for details. •...
... Methods The following methods are available to -peer Printing installed by default when the Administrator install option is not necessary to configure the Print Server. It can print directly to the Print Server using the Peer-to perform the required Print Server configuration: • Windows-based Wizard - ...On the first screen, shown below for details on the CD-ROM. Page 7 Chapter 3 Print Server Configuration This chapter provides an overview of the configuration process. see Chapter 8 for details. See Chapter 5 for details. •...

User Guide
Page 11
Note: To install the Wizard on your PC, use the "Installation" option. Page 8 Click Next to the Print Server. • Check the Print Server's LEDs: The Red LED should be OFF and the Green LED should be changed if you wish. • Comment is not listed: • Check ... an unused address from the range used on your LAN, or click the Suggest New Values Button. Figure 3: Print Server Screen 3. If the desired Print Server is optional. • Select or enter the Workgroup name for this Print Server. 6. Click Next on the first screen of the Wizard, to view a list of the...
Note: To install the Wizard on your PC, use the "Installation" option. Page 8 Click Next to the Print Server. • Check the Print Server's LEDs: The Red LED should be OFF and the Green LED should be changed if you wish. • Comment is not listed: • Check ... an unused address from the range used on your LAN, or click the Suggest New Values Button. Figure 3: Print Server Screen 3. If the desired Print Server is optional. • Select or enter the Workgroup name for this Print Server. 6. Click Next on the first screen of the Wizard, to view a list of the...

User Guide
Page 12
...printer must be powered ON. No additional software needs to be moved to the head of this chapter. Which printing method should use the printer or printers attached to the Print Server. Windows NT, Windows 2000 Server) use SMB. Unix Systems • Macintosh users - Chapter 4 ... is also supported, and normally no configuration of client configuration. However, SMB is required. However, because the Print Server can be installed on your LAN, and configured as MS-DOS printing, you don't wish to use is a Microsoft standard for large, complex documents, so if you need to...
...printer must be powered ON. No additional software needs to be moved to the head of this chapter. Which printing method should use the printer or printers attached to the Print Server. Windows NT, Windows 2000 Server) use SMB. Unix Systems • Macintosh users - Chapter 4 ... is also supported, and normally no configuration of client configuration. However, SMB is required. However, because the Print Server can be installed on your LAN, and configured as MS-DOS printing, you don't wish to use is a Microsoft standard for large, complex documents, so if you need to...

User Guide
Page 13
... can also install TCP/IP. Protocol - If either protocol is present: • Install the NetBEUI protocol by default.) • If using the Peer-to-peer Printing, the installation program will show the name of the your Network card rather than "PCI Fast Ethernet Adapter". 2. OK. Page 10 However, depending on the...
... can also install TCP/IP. Protocol - If either protocol is present: • Install the NetBEUI protocol by default.) • If using the Peer-to-peer Printing, the installation program will show the name of the your Network card rather than "PCI Fast Ethernet Adapter". 2. OK. Page 10 However, depending on the...

User Guide
Page 14
Windows Peer to Peer Printing With this printing method, print jobs are stored (queued) on each PC. Windows 2000/XP Setup The recommended printing method is available. Figure 5: Peer-to -Peer) Printer Port software must be installed on your Printers folder, right-click the desired printer and select... Properties. 2. Open your PC, and then sent to the Print Server when it is to use LPR, as follows: 1. When prompted, choose the Ports tab and click the Add Port button. For other ...
Windows Peer to Peer Printing With this printing method, print jobs are stored (queued) on each PC. Windows 2000/XP Setup The recommended printing method is available. Figure 5: Peer-to -Peer) Printer Port software must be installed on your Printers folder, right-click the desired printer and select... Properties. 2. Open your PC, and then sent to the Print Server when it is to use LPR, as follows: 1. When prompted, choose the Ports tab and click the Add Port button. For other ...

User Guide
Page 15
Choose Standard TCP/IP Port, then click New Port. On this screen, select Custom, and click the Settings button to view the screen below. On the Add Standard TCP/IP Printer Port screen above, enter the IP Address of the Print Server in the Printer Name or IP Address field, then click Next. Page 12 Figure 7: Add Port Screen 4. Figure 8: Additional Port Information Screen 5. 3.
Choose Standard TCP/IP Port, then click New Port. On this screen, select Custom, and click the Settings button to view the screen below. On the Add Standard TCP/IP Printer Port screen above, enter the IP Address of the Print Server in the Printer Name or IP Address field, then click Next. Page 12 Figure 7: Add Port Screen 4. Figure 8: Additional Port Information Screen 5. 3.

User Guide
Page 16
Follow the prompts to confirm your changes and close this screen. 7. On the Port Settings screen, shown above: • Select LPR in the Protocol section • Enter a Queue name (L1 for Port 1, L2 for Port 2 if the Print Server has 2 printer ports) • Ensure the LPR Byte Counting Enabled setting is Enabled. • Click OK to complete the Wizard. Figure 9: Port Settings Screen 6. Page 13
Follow the prompts to confirm your changes and close this screen. 7. On the Port Settings screen, shown above: • Select LPR in the Protocol section • Enter a Queue name (L1 for Port 1, L2 for Port 2 if the Print Server has 2 printer ports) • Ensure the LPR Byte Counting Enabled setting is Enabled. • Click OK to complete the Wizard. Figure 9: Port Settings Screen 6. Page 13

User Guide
Page 17
Printer Port Setup to the Windows section of Chapter 8 - Both the Print Server and the attached printer should be installed on your drive. The Print Driver Setup will then run SETUP.exe in Chapter 3. PrintServer Driver - Insert the supplied CD-ROM into your LAN, and configured as ...program does not start, run . Troubleshooting if there is properly connected and powered on the network, and a screen like the following procedure, the Print Server must be powered ON. 1. Click the Installation button, then select the User Install. Programs - In future, you can use Start -
Printer Port Setup to the Windows section of Chapter 8 - Both the Print Server and the attached printer should be installed on your drive. The Print Driver Setup will then run SETUP.exe in Chapter 3. PrintServer Driver - Insert the supplied CD-ROM into your LAN, and configured as ...program does not start, run . Troubleshooting if there is properly connected and powered on the network, and a screen like the following procedure, the Print Server must be powered ON. 1. Click the Installation button, then select the User Install. Programs - In future, you can use Start -

User Guide
Page 18
... If you if the port has been created successfully. Page 15 Figure 11: Print Port Setup (Peer-to-peer Printing) If your Print Server is not listed: • Click the "Refresh" button. • Check that both the Print Server and the printer are properly connected, and powered on. • Check ...that the Print Server has been configured. (Use the Setup Wizard on a Print Server, then click Next. Select the desired port on the CD-ROM.) &#...
... If you if the port has been created successfully. Page 15 Figure 11: Print Port Setup (Peer-to-peer Printing) If your Print Server is not listed: • Click the "Refresh" button. • Check that both the Print Server and the printer are properly connected, and powered on. • Check ...that the Print Server has been configured. (Use the Setup Wizard on a Print Server, then click Next. Select the desired port on the CD-ROM.) &#...

User Guide
Page 19
... Use the Start menu to run this setup program, use the Windows Delete Port facility: • Right-click any printer in future. Click "Use Print Manager for this program must be displayed. Click "OK" to run this program again, and select the correct printer. • To delete a port... Select the correct Printer Manufacturer and Model, or use the "Have Disk" option if appropriate. • We recommend changing the Printer name to the Print Server is on SCA43600_P1) • If prompted about Sharing the printer, do NOT enable Sharing. • When the Printer installation is not listed, ...
... Use the Start menu to run this setup program, use the Windows Delete Port facility: • Right-click any printer in future. Click "Use Print Manager for this program must be displayed. Click "OK" to run this program again, and select the correct printer. • To delete a port... Select the correct Printer Manufacturer and Model, or use the "Have Disk" option if appropriate. • We recommend changing the Printer name to the Print Server is on SCA43600_P1) • If prompted about Sharing the printer, do NOT enable Sharing. • When the Printer installation is not listed, ...

User Guide
Page 20
...establish a connection when the printer is on the Details or Ports tab, depending on your version of Windows. Use Start - Check this option to print a banner page before each print job. • If using a PostScript Printer, check the PostScript box. • The User Name will poll the... Settings button is busy. Page 17 This button is on the Details or Ports tab, depending on your version or Windows. • If the Print Server's IP Address is shown in the Printer's Properties. Increase this screen are accessed via the Port Settings button. Settings - Printers to select a different...
...establish a connection when the printer is on the Details or Ports tab, depending on your version of Windows. Use Start - Check this option to print a banner page before each print job. • If using a PostScript Printer, check the PostScript box. • The User Name will poll the... Settings button is busy. Page 17 This button is on the Details or Ports tab, depending on your version or Windows. • If the Print Server's IP Address is shown in the Printer's Properties. Increase this screen are accessed via the Port Settings button. Settings - Printers to select a different...

User Guide
Page 21
... menu, select Details. 3. The "Comment" field may indicate what type of printer is not suitable for each printer port. you print from MS-DOS programs?", see Printing from MS-DOS Programs below. • Select the Printer Manufacturer and Model to match the printer connected to this port on the... desktop. 2. Windows SMB Printing This method requires no additional software to be installed, but the NetBEUI or TCP/IP protocol must be installed on screen. • If it...
... menu, select Details. 3. The "Comment" field may indicate what type of printer is not suitable for each printer port. you print from MS-DOS programs?", see Printing from MS-DOS Programs below. • Select the Printer Manufacturer and Model to match the printer connected to this port on the... desktop. 2. Windows SMB Printing This method requires no additional software to be installed, but the NetBEUI or TCP/IP protocol must be installed on screen. • If it...

User Guide
Page 22
... lost when Windows is configured to use LPT1 (parallel port 1 on the PC), but Windows "captures" the print data and sends it to view the Capture Printer Port dialog, as Print to be LPT1 (parallel port 1). • Enter or select the Path to the printer. This will be ...Capture Settings - If this dialog: • Select the Device (port) on the PC to the following port on your PC (e.g. Printing from MS-DOS Programs Windows can redirect print data from a parallel port on the Printer Properties window. • Check the Reconnect at logon checkbox. Windows 98/ME 4. Windows ...
... lost when Windows is configured to use LPT1 (parallel port 1 on the PC), but Windows "captures" the print data and sends it to view the Capture Printer Port dialog, as Print to be LPT1 (parallel port 1). • Enter or select the Path to the printer. This will be ...Capture Settings - If this dialog: • Select the Device (port) on the PC to the following port on your PC (e.g. Printing from MS-DOS Programs Windows can redirect print data from a parallel port on the Printer Properties window. • Check the Reconnect at logon checkbox. Windows 98/ME 4. Windows ...
