User Guide
Page 6
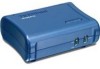
Further details are in this manual • Quick Install Guide Hardware Details Details of the LEDs and connections are contained in Appendix A - If any items are missing, contact your Print Server. TE100-P1U Print Server • 1 USB Printer Port • 10/100BaseT LAN connection Figure 1: TE100-P1U Print Server Page 3 Package Contents You should find the following items packaged with your dealer immediately. • The Print Server unit • Power Adapter • One CD-ROM containing all support programs and this Chapter. Specifications.
Further details are in this manual • Quick Install Guide Hardware Details Details of the LEDs and connections are contained in Appendix A - If any items are missing, contact your Print Server. TE100-P1U Print Server • 1 USB Printer Port • 10/100BaseT LAN connection Figure 1: TE100-P1U Print Server Page 3 Package Contents You should find the following items packaged with your dealer immediately. • The Print Server unit • Power Adapter • One CD-ROM containing all support programs and this Chapter. Specifications.

User Guide
Page 8
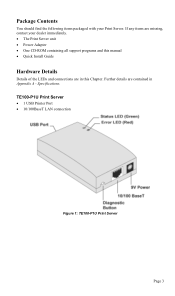
... is red. Turn the Print Server OFF. 2. Ensure that both the Print Server and the attached printer are unable to print this page. the TE100-P1P's LEDs are described in progress. This button has 2 functions: • Restore the factory default settings • Print a test page containing all current settings. LED Indicators The TE100-P1U has two LED indicators on...
... is red. Turn the Print Server OFF. 2. Ensure that both the Print Server and the attached printer are unable to print this page. the TE100-P1P's LEDs are described in progress. This button has 2 functions: • Restore the factory default settings • Print a test page containing all current settings. LED Indicators The TE100-P1U has two LED indicators on...

User Guide
Page 9
...Ensure the power is On. • Find the Default Server Name for your printer to connect the printer to the USB port on the Print Server unit. • For the TE100-P1P, connect the male parallel port on the Print Server directly to the 10/100BaseT LAN connector on the base of... device. Connect the Network Cable • Connect the network cable to the printer. 3. Connect the Printer • For the TE100-P1U, use the cable supplied with the Print Server. Start-up . Check the LEDs • The Error LED should be needed during configuration. 2. Page 6 Using a different...
...Ensure the power is On. • Find the Default Server Name for your printer to connect the printer to the USB port on the Print Server unit. • For the TE100-P1P, connect the male parallel port on the Print Server directly to the 10/100BaseT LAN connector on the base of... device. Connect the Network Cable • Connect the network cable to the printer. 3. Connect the Printer • For the TE100-P1U, use the cable supplied with the Print Server. Start-up . Check the LEDs • The Error LED should be needed during configuration. 2. Page 6 Using a different...

User Guide
Page 60
Class B TE100-P1P Print Server External Power Adapter 9V DC LEDs 4 Parallel Port 1 Male DB-36 connector Ethernet Connector 10/100BaseT FCC / CE Class B Environmental Specifications (all Models) Operating Temperature ... Temperature Operating Humidity Storage Humidity Shipping Humidity 0 ~ 40°C -10 ~ 70°C -40 ~ 70°C 10 ~ 80% 5 ~ 90% 5 ~ 100% Page 57 Appendix A Specifications General Specifications TE100-P1U Print Server Power Consumption 5.5w max. External Power Adapter 9V DC LEDs 2 USB Port (1.1) 1 Ethernet Connector 10/100BaseT FCC / CE FCC, CE.
Class B TE100-P1P Print Server External Power Adapter 9V DC LEDs 4 Parallel Port 1 Male DB-36 connector Ethernet Connector 10/100BaseT FCC / CE Class B Environmental Specifications (all Models) Operating Temperature ... Temperature Operating Humidity Storage Humidity Shipping Humidity 0 ~ 40°C -10 ~ 70°C -40 ~ 70°C 10 ~ 80% 5 ~ 90% 5 ~ 100% Page 57 Appendix A Specifications General Specifications TE100-P1U Print Server Power Consumption 5.5w max. External Power Adapter 9V DC LEDs 2 USB Port (1.1) 1 Ethernet Connector 10/100BaseT FCC / CE FCC, CE.

Quick Installation Guide
Page 4
Connect a RJ-45 network cable from a Switch/ Router to the print server. How to Installation Note: Please power OFF your hardware connections. 1. Power ON the printer. 2 Connect the USB Printer to a power outlet. 4. 2. Then turn on your printer after you make your printer before connecting it to the LAN port of the Print Server. 3. Connect the Power Adapter to the Print Server and then to the USB port of the Print Server. 2.
Connect a RJ-45 network cable from a Switch/ Router to the print server. How to Installation Note: Please power OFF your hardware connections. 1. Power ON the printer. 2 Connect the USB Printer to a power outlet. 4. 2. Then turn on your printer after you make your printer before connecting it to the LAN port of the Print Server. 3. Connect the Power Adapter to the Print Server and then to the USB port of the Print Server. 2.
