
Owner s Manual
Page 12
After reading it, keep it in other similar conditions. Please contact the store where you for choosing TEAC. Objects on top of an amplifier or other equipment that might cause noise due to a source of this unit. and other countries. oo Avoid ...Inc., registered in this manual in a safe place for future reference. oo The warranty for information about record styluses 13 Preparing the record player 14 Turntable cover 16 Changing the cartridge 16 Names and functions of parts 16 Connections 17 Basic operation 17 Recording with ground terminal × 1 AC adapter (...
After reading it, keep it in other similar conditions. Please contact the store where you for choosing TEAC. Objects on top of an amplifier or other equipment that might cause noise due to a source of this unit. and other countries. oo Avoid ...Inc., registered in this manual in a safe place for future reference. oo The warranty for information about record styluses 13 Preparing the record player 14 Turntable cover 16 Changing the cartridge 16 Names and functions of parts 16 Connections 17 Basic operation 17 Recording with ground terminal × 1 AC adapter (...
Owner s Manual
Page 14
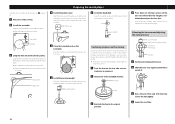
... protuberance on the end of the tone arm and turn it right to attach it . Loop the included rubber belt around the outside of the turntable, and then loop the belt around the motor pulley. Align the small cutout in its height. clockwise to remove it. 2 Attach one of ..., the pulley cover will slant. Keep the unit in the illustration below to adjust the heights of the feet to level the unit. If the turntable is secure. Motor pulley Rubber belt 3 4 3 3 4 4 0 0 0 Preparing the record player 4 Install the pulley cover. Balancing the tone arm and adjusting the stylus pressure ...
... protuberance on the end of the tone arm and turn it right to attach it . Loop the included rubber belt around the outside of the turntable, and then loop the belt around the motor pulley. Align the small cutout in its height. clockwise to remove it. 2 Attach one of ..., the pulley cover will slant. Keep the unit in the illustration below to adjust the heights of the feet to level the unit. If the turntable is secure. Motor pulley Rubber belt 3 4 3 3 4 4 0 0 0 Preparing the record player 4 Install the pulley cover. Balancing the tone arm and adjusting the stylus pressure ...

Owner s Manual
Page 15
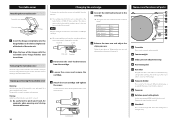
Be careful not to unlock the tone arm base. 9 Adjust the anti-skating dial. oo Do not let the turntable turn. 2 Insert the included hex wrench into the height adjustment screw hole and turn . 8 Turn the counterweight so that the stylus pressure adjustment ring scale ... that the center line aligns with it set at 1.4 and adjust it during record playback after changing the cartridge or headshell. 1 Place a record on the turntable, and put the record needle on the scale. 1 2 oo Only turn it to make the tone arm level. oo Be careful not to let the...
Be careful not to unlock the tone arm base. 9 Adjust the anti-skating dial. oo Do not let the turntable turn. 2 Insert the included hex wrench into the height adjustment screw hole and turn . 8 Turn the counterweight so that the stylus pressure adjustment ring scale ... that the center line aligns with it set at 1.4 and adjust it during record playback after changing the cartridge or headshell. 1 Place a record on the turntable, and put the record needle on the scale. 1 2 oo Only turn it to make the tone arm level. oo Be careful not to let the...
Owner s Manual
Page 16
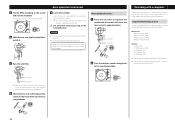
... channel + Right channel − Color White Blue Red Green 5 Balance the tone arm and adjust the stylus pressure. Opening and closing the turntable cover. 3 Attach the new cartridge and tighten the screws. VV Be careful not to pinch your hand, for the record. Names and functions... the unit. oo The signals and colors of the shell leads are shown below for the position of parts a b c 1 2 3 4 0 d e f g h i a Turntable Place records centered on page 14. 1 Disconnect the shell lead terminals from the cartridge. 2 Loosen the screws and remove the cartridge. Closing Gently lower the...
... channel + Right channel − Color White Blue Red Green 5 Balance the tone arm and adjust the stylus pressure. Opening and closing the turntable cover. 3 Attach the new cartridge and tighten the screws. VV Be careful not to pinch your hand, for the record. Names and functions... the unit. oo The signals and colors of the shell leads are shown below for the position of parts a b c 1 2 3 4 0 d e f g h i a Turntable Place records centered on page 14. 1 Disconnect the shell lead terminals from the cartridge. 2 Loosen the screws and remove the cartridge. Closing Gently lower the...

Owner s Manual
Page 17
...Be sure to connect the power cord to the computer (page 18). Connection to turn the unit on the turntable. Basic operation Playing records 1 Press the STANDBY/ON button on . 2 Open the turntable cover slowly. Continued on the power cord. A BC D FG H Included AC adapter When PHONO EQ is...the analog audio output connectors (L/R). D STANDBY/ON button Press the STANDBY/ON button to pinch your hand, for example, when opening and closing the turntable cover. 3 Raise the cartridge protector. When playing a 45 RPM large-hole single record, use any AC adapter other equipment to this is set...
...Be sure to connect the power cord to the computer (page 18). Connection to turn the unit on the turntable. Basic operation Playing records 1 Press the STANDBY/ON button on . 2 Open the turntable cover slowly. Continued on the power cord. A BC D FG H Included AC adapter When PHONO EQ is...the analog audio output connectors (L/R). D STANDBY/ON button Press the STANDBY/ON button to pinch your hand, for example, when opening and closing the turntable cover. 3 Raise the cartridge protector. When playing a 45 RPM large-hole single record, use any AC adapter other equipment to this is set...
Owner s Manual
Page 18
... from the record, and return the tone arm to its original position. 1 2 Arm lifter Tone arm 2 Turn the rotation speed setting knob to 0 to stop turntable rotation during record playback to start playback. 18 oo This unit will run with operating systems other than these is not guaranteed. VV Do not... place anything on top of the record or the track where you close the turntable cover during playback. oo Do not stop the turntable. Arm lifter Tone arm oo You can also move the tone arm to above the record without raising the arm lifter...
... from the record, and return the tone arm to its original position. 1 2 Arm lifter Tone arm 2 Turn the rotation speed setting knob to 0 to stop turntable rotation during record playback to start playback. 18 oo This unit will run with operating systems other than these is not guaranteed. VV Do not... place anything on top of the record or the track where you close the turntable cover during playback. oo Do not stop the turntable. Arm lifter Tone arm oo You can also move the tone arm to above the record without raising the arm lifter...

Owner s Manual
Page 20
... but is usually about 300 hours. oo Illustrations in this document, including warranty) × 1 oo Specifications and appearance are approximate. Turntable Drive system Rotation detection type high-precision control belt drive Motor DC motor Rotation speed 33 1/3 rpm, 45 rpm Rotation speed variation 0.2%... Wow and flutter 0.1% SN ratio 67 dB or higher (A-weighted, 20 kHz LPF) Turntable Acrylic, 30cm (12") diameter Pedestal Artificial marble and wood Tone arm Arm type Static-balanced S-shaped tone arm Effective arm length 223 ...
... but is usually about 300 hours. oo Illustrations in this document, including warranty) × 1 oo Specifications and appearance are approximate. Turntable Drive system Rotation detection type high-precision control belt drive Motor DC motor Rotation speed 33 1/3 rpm, 45 rpm Rotation speed variation 0.2%... Wow and flutter 0.1% SN ratio 67 dB or higher (A-weighted, 20 kHz LPF) Turntable Acrylic, 30cm (12") diameter Pedestal Artificial marble and wood Tone arm Arm type Static-balanced S-shaped tone arm Effective arm length 223 ...
