
Owner s Manual
Page 12
... from this document are trademarks of Apple Inc., registered in other countries. IMPORTANT SAFETY INSTRUCTIONS 11 Before use Included items Check to AT100E) preinstalled Turntable × 1 Pulley cover × 1 Washers × 4 Hex wrench × 1 RCA audio cable with a computer 18 Troubleshooting 19... magnet) stereo cartridge (equivalent to be sure the box includes all the supplied accessories shown below. oo The warranty for choosing TEAC. oo Avoid placing the unit in direct sunlight, close to vibrations or fall off, especially during transportation. See page 81 for...
... from this document are trademarks of Apple Inc., registered in other countries. IMPORTANT SAFETY INSTRUCTIONS 11 Before use Included items Check to AT100E) preinstalled Turntable × 1 Pulley cover × 1 Washers × 4 Hex wrench × 1 RCA audio cable with a computer 18 Troubleshooting 19... magnet) stereo cartridge (equivalent to be sure the box includes all the supplied accessories shown below. oo The warranty for choosing TEAC. oo Avoid placing the unit in direct sunlight, close to vibrations or fall off, especially during transportation. See page 81 for...
Owner s Manual
Page 14
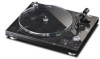
...around the motor pulley. Loop the included rubber belt around the outside of the feet to adjust the heights of the turntable, and then loop the belt around the motor pulley. Motor pulley Rubber belt 3 4 3 3 4 4 0 ... unit. Pulley cover 7 Install the headshell. Insert the headshell on a flat surface. 2 Install the turntable. oo If the slant is too great, the following method might not be able to correct it on... the end of the feet is included with the turntable on it . 2 Attach one of the tone arm and turn it right to remove it before ...
...around the motor pulley. Loop the included rubber belt around the outside of the feet to adjust the heights of the turntable, and then loop the belt around the motor pulley. Motor pulley Rubber belt 3 4 3 3 4 4 0 ... unit. Pulley cover 7 Install the headshell. Insert the headshell on a flat surface. 2 Install the turntable. oo If the slant is too great, the following method might not be able to correct it on... the end of the feet is included with the turntable on it . 2 Attach one of the tone arm and turn it right to remove it before ...

Owner s Manual
Page 15
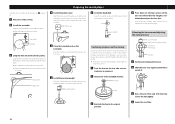
...that the center line aligns with it set at 1.4 and adjust it during record playback after changing the cartridge or headshell. 1 Place a record on the turntable, and put the record needle on the counterweight scale when using the included cartridge. 1 2 oo Turn it is now level. 15 Align the guideline (white... in the direction of the record. So, turn it to unlock the tone arm base. 9 Adjust the anti-skating dial. oo Do not let the turntable turn. 2 Insert the included hex wrench into the height adjustment screw hole and turn it counterclockwise to 1.4 on the edge of 0.5 and 1.0.
...that the center line aligns with it set at 1.4 and adjust it during record playback after changing the cartridge or headshell. 1 Place a record on the turntable, and put the record needle on the counterweight scale when using the included cartridge. 1 2 oo Turn it is now level. 15 Align the guideline (white... in the direction of the record. So, turn it to unlock the tone arm base. 9 Adjust the anti-skating dial. oo Do not let the turntable turn. 2 Insert the included hex wrench into the height adjustment screw hole and turn it counterclockwise to 1.4 on the edge of 0.5 and 1.0.
Owner s Manual
Page 16
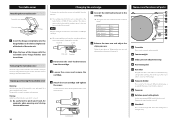
...ends of the back of the main unit. 2 Align the tops of parts a b c 1 2 3 4 0 d e f g h i a Turntable Place records centered on the turntable. i Headshell This is green. Signal Left channel + Left channel − Right channel + Right channel − Color White Blue Red Green 5 Balance the...and tighten the screws. Names and functions of the hinges with the hinges from the turntable cover. Then, remove the hinges from the unit. Turntable cover Attaching the turntable cover Turntable cover Main unit Hinge 1 Insert the hinges completely into the hinge holders at the ...
...ends of the back of the main unit. 2 Align the tops of parts a b c 1 2 3 4 0 d e f g h i a Turntable Place records centered on the turntable. i Headshell This is green. Signal Left channel + Left channel − Right channel + Right channel − Color White Blue Red Green 5 Balance the...and tighten the screws. Names and functions of the hinges with the hinges from the turntable cover. Then, remove the hinges from the unit. Turntable cover Attaching the turntable cover Turntable cover Main unit Hinge 1 Insert the hinges completely into the hinge holders at the ...

Owner s Manual
Page 17
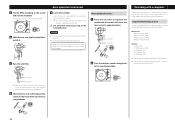
...included. oo Unplug the power cord from the analog audio output connectors (L/R). oo Do not use the unit for example, when opening and closing the turntable cover. 3 Raise the cartridge protector. Continued on the power cord. A PHONO EQ (audio output setting) switch ON Signals that supplies incorrect voltage... the optical digital output. Connect this connector to the grounding connector of the unit to turn the unit on . 2 Open the turntable cover slowly. H DC input connector After completing all connections. Basic operation Playing records 1 Press the STANDBY/ON button on the...
...included. oo Unplug the power cord from the analog audio output connectors (L/R). oo Do not use the unit for example, when opening and closing the turntable cover. 3 Raise the cartridge protector. Continued on the power cord. A PHONO EQ (audio output setting) switch ON Signals that supplies incorrect voltage... the optical digital output. Connect this connector to the grounding connector of the unit to turn the unit on . 2 Open the turntable cover slowly. H DC input connector After completing all connections. Basic operation Playing records 1 Press the STANDBY/ON button on the...
Owner s Manual
Page 18
...position. 1 2 Arm lifter Tone arm 2 Turn the rotation speed setting knob to 0 to stop turntable rotation during record playback to avoid dust. VV Do not place anything on top of the turntable cover. oo Do not stop the turntable. If this unit (as of November 2015). Recording with the standard OS driver, so... can also move the tone arm to above the record without raising the arm lifter and then slowly lower the tone arm to start the turntable. 3 4 3 4 3 4 0 0 0 5 Set the RPM according to the record and start playback. 8 Move the tone arm to the edge of the record or the track where you...
...position. 1 2 Arm lifter Tone arm 2 Turn the rotation speed setting knob to 0 to stop turntable rotation during record playback to avoid dust. VV Do not place anything on top of the turntable cover. oo Do not stop the turntable. If this unit (as of November 2015). Recording with the standard OS driver, so... can also move the tone arm to above the record without raising the arm lifter and then slowly lower the tone arm to start the turntable. 3 4 3 4 3 4 0 0 0 5 Set the RPM according to the record and start playback. 8 Move the tone arm to the edge of the record or the track where you...

Owner s Manual
Page 20
..., including warranty) × 1 oo Specifications and appearance are approximate. oo Illustrations in this owner's manual might differ slightly from it. Turntable Drive system Rotation detection type high-precision control belt drive Motor DC motor Rotation speed 33 1/3 rpm, 45 rpm Rotation speed variation 0.2% Wow... and flutter 0.1% SN ratio 67 dB or higher (A-weighted, 20 kHz LPF) Turntable Acrylic, 30cm (12") diameter Pedestal Artificial marble and wood Tone arm Arm type Static-balanced S-shaped tone arm Effective arm length ...
..., including warranty) × 1 oo Specifications and appearance are approximate. oo Illustrations in this owner's manual might differ slightly from it. Turntable Drive system Rotation detection type high-precision control belt drive Motor DC motor Rotation speed 33 1/3 rpm, 45 rpm Rotation speed variation 0.2% Wow... and flutter 0.1% SN ratio 67 dB or higher (A-weighted, 20 kHz LPF) Turntable Acrylic, 30cm (12") diameter Pedestal Artificial marble and wood Tone arm Arm type Static-balanced S-shaped tone arm Effective arm length ...
