MC-DX32i Manual
Page 3
...or similar unit. < The apparatus draws nominal non-operating power from earphones and headphones can be exposed to correct the interference by TEAC CORPORATION for help. construction shall be connected to an AC outlet with Class ! The label required in a particular installation. CAUTION <... laser radiation emitted inside of the FCC Rules. CAUTION Changes or modifications to this equipments not expressly approved by one or more of the Subwoofer Optical pickup: Type : Manufacturer : Laser output : Wavelength : SF-P200Z SANYO Electric Co., Ltd Less than 0.5 mW on , the...
...or similar unit. < The apparatus draws nominal non-operating power from earphones and headphones can be exposed to correct the interference by TEAC CORPORATION for help. construction shall be connected to an AC outlet with Class ! The label required in a particular installation. CAUTION <... laser radiation emitted inside of the FCC Rules. CAUTION Changes or modifications to this equipments not expressly approved by one or more of the Subwoofer Optical pickup: Type : Manufacturer : Laser output : Wavelength : SF-P200Z SANYO Electric Co., Ltd Less than 0.5 mW on , the...
MC-DX32i Manual
Page 6
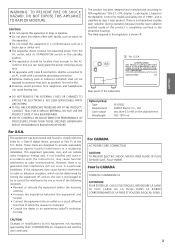
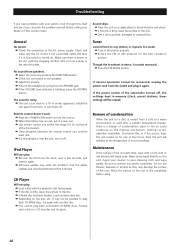
Connection CAUTION < Turn off the power of all the equipment before making connections. < Read instructions of the main unit G H I J VIDEO S-VIDEO IN IN TV (monitor) 6 To prevent hum and noise, do not bundle the connection cords with this unit. < Be sure to insert each plug securely. Speaker (R) Speaker (L) Subwoofer D F A B C Side panel of the main unit D E Rear panel of each component you intend to use with the power cord.
Connection CAUTION < Turn off the power of all the equipment before making connections. < Read instructions of the main unit G H I J VIDEO S-VIDEO IN IN TV (monitor) 6 To prevent hum and noise, do not bundle the connection cords with this unit. < Be sure to insert each plug securely. Speaker (R) Speaker (L) Subwoofer D F A B C Side panel of the main unit D E Rear panel of each component you intend to use with the power cord.
MC-DX32i Manual
Page 7
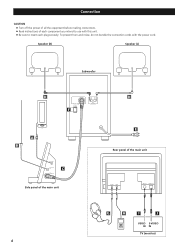
...you live in your settings, it is advisable to keep this switch to a new location. H AUX IN You can hook the AM antenna on your MC-DX32i. Use an RCA (pin) video cable to connect the Dock to minimum. Use this jack. G Headphones For private listening, first reduce the volume ...level to the composite video connector of your unit to turn the system on the power cord. When using the VOLUME buttons. C Subwoofer Connect the "TO SUBWOOFER" and the "FROM MAIN" sockets using the supplied stereo mini plug cable. Hold the power plug when plugging or unplugging the power ...
...you live in your settings, it is advisable to keep this switch to a new location. H AUX IN You can hook the AM antenna on your MC-DX32i. Use an RCA (pin) video cable to connect the Dock to minimum. Use this jack. G Headphones For private listening, first reduce the volume ...level to the composite video connector of your unit to turn the system on the power cord. When using the VOLUME buttons. C Subwoofer Connect the "TO SUBWOOFER" and the "FROM MAIN" sockets using the supplied stereo mini plug cable. Hold the power plug when plugging or unplugging the power ...
MC-DX32i Manual
Page 9
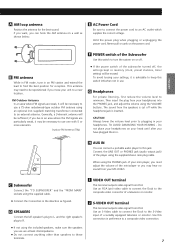
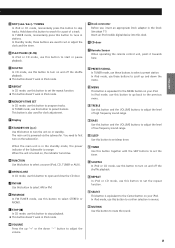
... the level of a track. X REPEAT In iPod or CD mode, use this button and the VOLUME buttons to adjust the level of the Subwoofer is powered via the subwoofer. Insert an iPod mobile digital device into this button to set the repeat function. You need to first turn on , the indicator turns... (.//) / TUNING In iPod or CD mode, momentarily press this button to set sleep timer. R MENU This button is equivalent to the Center button on the subwoofer. Hold down "-" button to adjust the volume. 9 In iPod mode, use this button to set or adjust the clock and the timer.
... the level of a track. X REPEAT In iPod or CD mode, use this button and the VOLUME buttons to adjust the level of the Subwoofer is powered via the subwoofer. Insert an iPod mobile digital device into this button to set the repeat function. You need to first turn on , the indicator turns... (.//) / TUNING In iPod or CD mode, momentarily press this button to set sleep timer. R MENU This button is equivalent to the Center button on the subwoofer. Hold down "-" button to adjust the volume. 9 In iPod mode, use this button to set or adjust the clock and the timer.

MC-DX32i Manual
Page 10
... Installation 1 2. Consult your local building codes and exercise all necessary caution when mounting these brackets as wooden frame or concrete wall. < TEAC supplies these brackets. In this case, replace the battery with a local tradesmen or building supply expert. Fix the brackets on , connect the...operation may be mounted. To hook on a wall. Only use these anchors if they are unsure how to be operated from the subwoofer. < Drill holes into the wall. Do not attempt to mount the speakers too far from a distance. Wall Mounting Remote Control Unit...
... Installation 1 2. Consult your local building codes and exercise all necessary caution when mounting these brackets as wooden frame or concrete wall. < TEAC supplies these brackets. In this case, replace the battery with a local tradesmen or building supply expert. Fix the brackets on , connect the...operation may be mounted. To hook on a wall. Only use these anchors if they are unsure how to be operated from the subwoofer. < Drill holes into the wall. Do not attempt to mount the speakers too far from a distance. Wall Mounting Remote Control Unit...
MC-DX32i Manual
Page 12
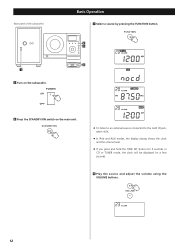
Basic Operation 3 Select a source by pressing the FUNCTION button. 2 3 4 2 Press the STANDBY/ON switch on the subwoofer. (Rear panel of the subwoofer) 1 1 Turn on the main unit. < To listen to an external source connected to the AUX IN jack, select AUX. < In iPod and AUX modes, the display always shows the clock and the volume level. < If you press and hold the TIME SET button for 3 seconds in CD or TUNER mode, the clock will be displayed for a few seconds. 4 Play the source and adjust the volume using the VOLUME buttons. 12
Basic Operation 3 Select a source by pressing the FUNCTION button. 2 3 4 2 Press the STANDBY/ON switch on the subwoofer. (Rear panel of the subwoofer) 1 1 Turn on the main unit. < To listen to an external source connected to the AUX IN jack, select AUX. < In iPod and AUX modes, the display always shows the clock and the volume level. < If you press and hold the TIME SET button for 3 seconds in CD or TUNER mode, the clock will be displayed for a few seconds. 4 Play the source and adjust the volume using the VOLUME buttons. 12

MC-DX32i Manual
Page 22
... the station using the PRESET buttons. If the power switch of page 21). 2 Press the MEMORY button. 3 Within 5 seconds, select a preset channel to 3 of the subwoofer turned off . preset channel 4 Within 5 seconds, press the MEMORY button. To store more stations, repeat steps 1 to select preset stations 1 To select FM or AM...
... the station using the PRESET buttons. If the power switch of page 21). 2 Press the MEMORY button. 3 Within 5 seconds, select a preset channel to 3 of the subwoofer turned off . preset channel 4 Within 5 seconds, press the MEMORY button. To store more stations, repeat steps 1 to select preset stations 1 To select FM or AM...
MC-DX32i Manual
Page 23
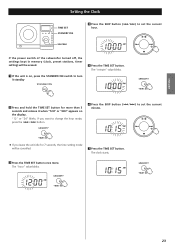
If the power switch of the subwoofer turned off, the settings kept in memory (clock, preset stations, timer setting) will be erased. 1 If the unit is on the display. The "minute" value ...
If the power switch of the subwoofer turned off, the settings kept in memory (clock, preset stations, timer setting) will be erased. 1 If the unit is on the display. The "minute" value ...
MC-DX32i Manual
Page 25
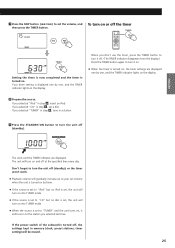
...) will gradually increase up to your set volume when the unit is turned on, the timer settings are displayed. If the power switch of the subwoofer turned off at the specified time every day. The unit will turn on and off , the settings kept in to the station you selected last...
...) will gradually increase up to your set volume when the unit is turned on, the timer settings are displayed. If the power switch of the subwoofer turned off at the specified time every day. The unit will turn on and off , the settings kept in to the station you selected last...
MC-DX32i Manual
Page 26
...occurs, leave the unit turned on . Finalize such a disc in the station properly. Tuner Cannot listen to dry completely before calling your dealer or TEAC service center. To prevent this, or if this chart and see if you have problems with the playback side facing away. e Tune in a CD...ON switch to play back unfinalized CD-R/RW discs. e Use remote control unit within the range (16 ft.) and point at the temperature of the subwoofer turned off . Load a prerecorded disc. Then the unit will be possible to turn it may solve the problem. vapor in memory (clock, preset ...
...occurs, leave the unit turned on . Finalize such a disc in the station properly. Tuner Cannot listen to dry completely before calling your dealer or TEAC service center. To prevent this, or if this chart and see if you have problems with the playback side facing away. e Tune in a CD...ON switch to play back unfinalized CD-R/RW discs. e Use remote control unit within the range (16 ft.) and point at the temperature of the subwoofer turned off . Load a prerecorded disc. Then the unit will be possible to turn it may solve the problem. vapor in memory (clock, preset ...
MC-DX32i Manual
Page 27
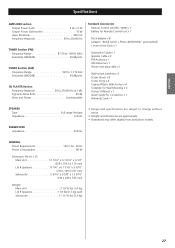
...(RC-1090) x 1 Battery for Remote Control Unit x 1 Dock adapter x 8 (adapter "60GB (color) + Photo 40GB/60GB" premounted) Cover for the Dock x 1 Subwoofer Cable x 1 Speaker Cable x 2 FM Antenna x 1 AM Antenna x 1 Stereo mini plug cable x 1 Wall mount brackets x 4 Screw (short) x 8 Screw (...Mounting x 2 Owner's Manual x 1 Quick Guide for Connection x 1 Warranty Card x 1 SPEAKER Type Full range flat type Impedance 4 ohms SUBWOOFER Impedance 8 ohms • Design and specifications are subject to change without notice. • Weight and dimensions are approximate. • Illustrations may ...
...(RC-1090) x 1 Battery for Remote Control Unit x 1 Dock adapter x 8 (adapter "60GB (color) + Photo 40GB/60GB" premounted) Cover for the Dock x 1 Subwoofer Cable x 1 Speaker Cable x 2 FM Antenna x 1 AM Antenna x 1 Stereo mini plug cable x 1 Wall mount brackets x 4 Screw (short) x 8 Screw (...Mounting x 2 Owner's Manual x 1 Quick Guide for Connection x 1 Warranty Card x 1 SPEAKER Type Full range flat type Impedance 4 ohms SUBWOOFER Impedance 8 ohms • Design and specifications are subject to change without notice. • Weight and dimensions are approximate. • Illustrations may ...
MC-DX32i Quick Start Guide
Page 1
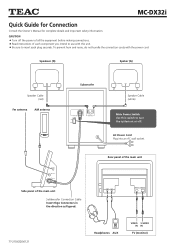
...an AC wall socket. Rear panel of the main unit Side panel of each plug securely. Speakeer (D) Speker (G) Speaker Cable (red) Fm antenna AM antenna Subwoofer Speaker Cable (white) Main Power Switch Use this unit. < Be sure to insert each component you intend to turn the system on or off. To... of the main unit Subbwoofer Connection Cable Insert thge Connectors in the direction as figured. 77-21DX32I00121 Headphones AUX VIDEO S-VIDEO IN IN TV (monitor) Z MC-DX32i Quick Guide for Connection Consult the Owner's Manual for complete details and important safety information.
...an AC wall socket. Rear panel of the main unit Side panel of each plug securely. Speakeer (D) Speker (G) Speaker Cable (red) Fm antenna AM antenna Subwoofer Speaker Cable (white) Main Power Switch Use this unit. < Be sure to insert each component you intend to turn the system on or off. To... of the main unit Subbwoofer Connection Cable Insert thge Connectors in the direction as figured. 77-21DX32I00121 Headphones AUX VIDEO S-VIDEO IN IN TV (monitor) Z MC-DX32i Quick Guide for Connection Consult the Owner's Manual for complete details and important safety information.


