
Owners Manual
Page 4
...If the unit is to be sure to remove the record or disc. If you for choosing TEAC. Contents Before using the unit 4 Handling Records 5 How to Replace the Stylus 5 Discs 6 Turntable Cover 7 Connection 8 Parts of your dealer or service company. < When removing the power plug ...from this before attempting any doubt regarding this matter, consult an electrician. < Choose the installation location of the Turntable 9 Unit Functions and Remote Control 10 Remote Control Unit 12 Basic Operation (Listening to an external source 12 Listening to the Radio 13...
...If the unit is to be sure to remove the record or disc. If you for choosing TEAC. Contents Before using the unit 4 Handling Records 5 How to Replace the Stylus 5 Discs 6 Turntable Cover 7 Connection 8 Parts of your dealer or service company. < When removing the power plug ...from this before attempting any doubt regarding this matter, consult an electrician. < Choose the installation location of the Turntable 9 Unit Functions and Remote Control 10 Remote Control Unit 12 Basic Operation (Listening to an external source 12 Listening to the Radio 13...
Owners Manual
Page 5
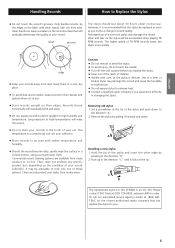
...5 Keep them in a cool, dry place. < To avoid dust and scratches, keep records in changing the stylus. Please contact TEAC Parts at : (800) 447TEAC for this LP-R400 is an STL-103. Only handle records, by the edges or the label, with stable temperature and humidity. < Should the record... "B". 2. TEAC does not endorse any specific product but, depending on -line. Use of the stylus and push down . Commercial record cleaning systems are available from dust. However, it locks at the tip of a bent or broken stylus may damage the record and cause the turntable to malfunction....
...5 Keep them in a cool, dry place. < To avoid dust and scratches, keep records in changing the stylus. Please contact TEAC Parts at : (800) 447TEAC for this LP-R400 is an STL-103. Only handle records, by the edges or the label, with stable temperature and humidity. < Should the record... "B". 2. TEAC does not endorse any specific product but, depending on -line. Use of the stylus and push down . Commercial record cleaning systems are available from dust. However, it locks at the tip of a bent or broken stylus may damage the record and cause the turntable to malfunction....
Owners Manual
Page 7
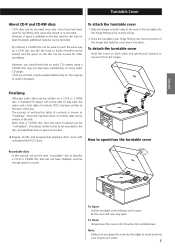
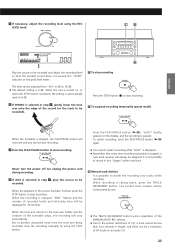
... track or tracks recorded can be erased, and the space on a CD-R or CD-RW disc, a standard CD player will go. 2. To Open: Lift the turntable cover halfway until a final table of contents (TOC) has been written at the start of audio CD players. Note that a CD-RW disc that there..., shuffle and programmed playback don't work with unfinalized (NO TOC) discs. To Close: Slowly lower the cover until it from the hinges. To attach the turntable cover 1. However, you grasp the cover by contrast, may not play back the audio until it closes. 7 The process of writing this table of contents...
... track or tracks recorded can be erased, and the space on a CD-R or CD-RW disc, a standard CD player will go. 2. To Open: Lift the turntable cover halfway until a final table of contents (TOC) has been written at the start of audio CD players. Note that a CD-RW disc that there..., shuffle and programmed playback don't work with unfinalized (NO TOC) discs. To Close: Slowly lower the cover until it from the hinges. To attach the turntable cover 1. However, you grasp the cover by contrast, may not play back the audio until it closes. 7 The process of writing this table of contents...
Owners Manual
Page 9
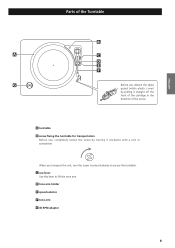
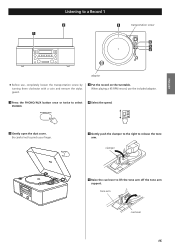
When you transport the unit, turn the screw counterclockwise to lift the tone arm. ENGLISH Parts of the arrow. C cue-lever Use this lever to secure the turntable. D tone arm holder E speed selector F tone arm G 45 RPM adaptor 9 A turntable B screw fixing the turntable for transportation Before use, completely loosen the screw by turning it straight off the front of the cartridge in the direction of the Turntable B A C D E F G Before use, detach the stylus guard (white plastic cover) by pulling it clockwise with a coin or screwdriver.
When you transport the unit, turn the screw counterclockwise to lift the tone arm. ENGLISH Parts of the arrow. C cue-lever Use this lever to secure the turntable. D tone arm holder E speed selector F tone arm G 45 RPM adaptor 9 A turntable B screw fixing the turntable for transportation Before use, completely loosen the screw by turning it straight off the front of the cartridge in the direction of the Turntable B A C D E F G Before use, detach the stylus guard (white plastic cover) by pulling it clockwise with a coin or screwdriver.
Owners Manual
Page 15
... screw 6 5 4 adaptor < Before use, completely loosen the transportation screw by turning them clockwise with a coin and remove the stylus guard. 3 Put the record on the turntable.
... screw 6 5 4 adaptor < Before use, completely loosen the transportation screw by turning them clockwise with a coin and remove the stylus guard. 3 Put the record on the turntable.

Owners Manual
Page 16
... arm holder. 8 tone arm 7 7 Move the tone arm gently to the edge of the record (or the starting point of the turntable cover, especially while playing a record. 16 The turntable will prevent dust from settling on top of a track). You can lower the tone arm manually if the cue lever has not... been raised. Please do not place anything on the turntable. cue lever < Playing records with the dust cover down will begin to the tone arm holder and the rotation stops. cue lever 8 Gently lower the...
... arm holder. 8 tone arm 7 7 Move the tone arm gently to the edge of the record (or the starting point of the turntable cover, especially while playing a record. 16 The turntable will prevent dust from settling on top of a track). You can lower the tone arm manually if the cue lever has not... been raised. Please do not place anything on the turntable. cue lever < Playing records with the dust cover down will begin to the tone arm holder and the rotation stops. cue lever 8 Gently lower the...
Owners Manual
Page 23
...stopped, "END" flashes and the number of recorded tracks and total play the source to the tone arm holder and the rotation of the turntable sotps, the recording will be assigned. When the recording is selected in step 1 , play time will stop the recording manually by one track.... When the tone arm returns to be recorded. The current track number will be recorded). B To suspend recording temporarily (pause mode) When the turntable is displayed. < Remember that the loudest sound does not exceed the "OVER" indicator on an audio CD. 23 Press the PLAY/PAUSE button (y/J)....
...stopped, "END" flashes and the number of recorded tracks and total play the source to the tone arm holder and the rotation of the turntable sotps, the recording will be assigned. When the recording is selected in step 1 , play time will stop the recording manually by one track.... When the tone arm returns to be recorded. The current track number will be recorded). B To suspend recording temporarily (pause mode) When the turntable is displayed. < Remember that the loudest sound does not exceed the "OVER" indicator on an audio CD. 23 Press the PLAY/PAUSE button (y/J)....
Owners Manual
Page 26
... Adjust the recording level. The unit will be obtained, unplug the power cord from a cold to turn it ON. Maintenance Always keep the turntable clean. Be sure to any excess liquid completely. e Clear obstacles that protects the stylus during transportation. e Depending on . If normal operation ... Remote control doesn't work. e Load a disc with the unit, please take a moment to dry completely before you call your dealer or a TEAC service center. e If the disc is near the unit, turn the other appliances off . e Don't use thinner, benzine or alcohol as a ...
... Adjust the recording level. The unit will be obtained, unplug the power cord from a cold to turn it ON. Maintenance Always keep the turntable clean. Be sure to any excess liquid completely. e Clear obstacles that protects the stylus during transportation. e Depending on . If normal operation ... Remote control doesn't work. e Load a disc with the unit, please take a moment to dry completely before you call your dealer or a TEAC service center. e If the disc is near the unit, turn the other appliances off . e Don't use thinner, benzine or alcohol as a ...
