
Owners Manual
Page 4
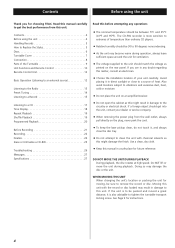
If you for choosing TEAC. Contents Before using the unit 4 Handling Records 5 How to Replace the Stylus 5 Discs 6 ...The CD-RW recorder is also advisable to remove the record or disc. Use a clean, dry cloth. < Keep this manual in a safe place for moving, be 30 to 90 degrees noncondensing. < As the unit may result in damage to ...ventilation. < The voltage supplied to the unit should be sure to tighten the turntable transport locking screw. Read this manual carefully to get into the unit, contact your unit carefully. Avoid placing it , and always close to the circuitry...
If you for choosing TEAC. Contents Before using the unit 4 Handling Records 5 How to Replace the Stylus 5 Discs 6 ...The CD-RW recorder is also advisable to remove the record or disc. Use a clean, dry cloth. < Keep this manual in a safe place for moving, be 30 to 90 degrees noncondensing. < As the unit may result in damage to ...ventilation. < The voltage supplied to the unit should be sure to tighten the turntable transport locking screw. Read this manual carefully to get into the unit, contact your unit carefully. Avoid placing it , and always close to the circuitry...
Owners Manual
Page 6
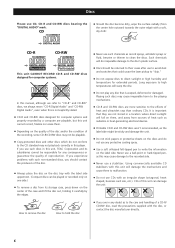
... not conform to the CD standard may cause irreparable harm to the playing mechanisms. < CD-R and CD-RW discs are not stored in this unit, TEAC Corporation and its storage case, press down on the center of this sort can be sticky and damage the unit. < Do not stick papers or... the disc tray with a soft, dry cloth: CD-R CD-RW This unit CANNOT RECORD CD-R and CD-RW discs designed for computer systems. In this manual, although we refer to "CD-R" and CD-RW" discs, we always mean "CD-R Digital Audio" and "CD-RW Digital Audio", even when this is important...
... not conform to the CD standard may cause irreparable harm to the playing mechanisms. < CD-R and CD-RW discs are not stored in this unit, TEAC Corporation and its storage case, press down on the center of this sort can be sticky and damage the unit. < Do not stick papers or... the disc tray with a soft, dry cloth: CD-R CD-RW This unit CANNOT RECORD CD-R and CD-RW discs designed for computer systems. In this manual, although we refer to "CD-R" and CD-RW" discs, we always mean "CD-R Digital Audio" and "CD-RW Digital Audio", even when this is important...
Owners Manual
Page 7
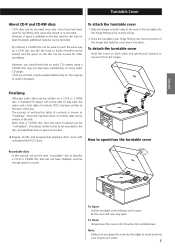
... on the disc can be able to avoid pinching your fingers as they will now stay open /close the turntable cover Recordable discs In this manual, we use the term "recordable" disc to describe a CD-R or CD-RW disc that there is available on the majority of the hinges and slide...
... on the disc can be able to avoid pinching your fingers as they will now stay open /close the turntable cover Recordable discs In this manual, we use the term "recordable" disc to describe a CD-R or CD-RW disc that there is available on the majority of the hinges and slide...

Owners Manual
Page 11
C MANUAL/AUTO REC, PRESET Use this button to start or pause playback and recording. Also use this button to select the mode of track number assignment. ... your headphones into the PHONES jack, and adjust the volume by turning the VOLUME knob. In FM/AM mode, use this button to the radio. R MANUAL/AUTO REC Use this button to select the mode of a track. L OPEN/CLOSE In CD or PHONO/AUX mode, use this button to select a preset...
C MANUAL/AUTO REC, PRESET Use this button to start or pause playback and recording. Also use this button to select the mode of track number assignment. ... your headphones into the PHONES jack, and adjust the volume by turning the VOLUME knob. In FM/AM mode, use this button to the radio. R MANUAL/AUTO REC Use this button to select the mode of a track. L OPEN/CLOSE In CD or PHONO/AUX mode, use this button to select a preset...
Owners Manual
Page 13
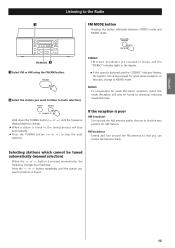
... by a fixed step. STEREO FM stereo broadcasts are received in stereo and the "STEREO" indicator lights in , the tuning process will now be tuned automatically (manual selection) When the or button is found. 13
... by a fixed step. STEREO FM stereo broadcasts are received in stereo and the "STEREO" indicator lights in , the tuning process will now be tuned automatically (manual selection) When the or button is found. 13

Owners Manual
Page 16
... from settling on top of a track). Please do not place anything on the turntable. You can lower the tone arm manually if the cue lever has not been raised. To stop playback manually, slightly lift the tone arm using the cue lever and return it to the tone arm holder. 8 tone arm...
... from settling on top of a track). Please do not place anything on the turntable. You can lower the tone arm manually if the cue lever has not been raised. To stop playback manually, slightly lift the tone arm using the cue lever and return it to the tone arm holder. 8 tone arm...
Owners Manual
Page 22
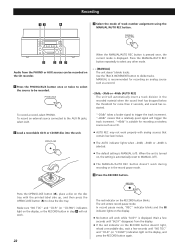
... analog source such as a CD. 2 Load a recordable CD-R or CD-RW disc into the unit. < AUTO REC may not work while "bUSY" is MANUAL (off ). < The MANUAL/AUTO REC button doesn't work . 22 The red indicator on , the setting is displayed. Make sure "NO TOC" and "CD-R" (or "CD-RW") ... not work during recording or in the record pause mode. 4 Press the RECORD button. 13 4 Recording 3 Select the mode of track number assignment using the MANUAL/AUTO REC button. 5 2 27 Audio from the display. < If the red indicator on the RECORD button doesn't light, reload a recordable disc, wait a few...
... analog source such as a CD. 2 Load a recordable CD-R or CD-RW disc into the unit. < AUTO REC may not work while "bUSY" is MANUAL (off ). < The MANUAL/AUTO REC button doesn't work . 22 The red indicator on , the setting is displayed. Make sure "NO TOC" and "CD-R" (or "CD-RW") ... not work during recording or in the record pause mode. 4 Press the RECORD button. 13 4 Recording 3 Select the mode of track number assignment using the MANUAL/AUTO REC button. 5 2 27 Audio from the display. < If the red indicator on the RECORD button doesn't light, reload a recordable disc, wait a few...
Owners Manual
Page 23
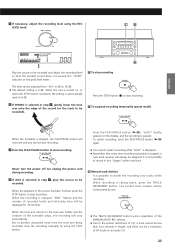
... To stop recording Press the STOP button (H) to stop recording. "bUSY" briefly appears on an audio CD. 23 When the playback of the MANUAL/AUTO REC setting. < Due to start recording. The current track number will be incremented by using the REC LEVEL knob. C B ENGLISH A...STOP button to stop recording. But to be assigned. While recording is not possible to divide the recording into tracks while recording. C Manual track division It is stopped, the PLAY/PAUSE button will always be recorded). B To suspend recording temporarily (pause mode) When the ...
... To stop recording Press the STOP button (H) to stop recording. "bUSY" briefly appears on an audio CD. 23 When the playback of the MANUAL/AUTO REC setting. < Due to start recording. The current track number will be incremented by using the REC LEVEL knob. C B ENGLISH A...STOP button to stop recording. But to be assigned. While recording is not possible to divide the recording into tracks while recording. C Manual track division It is stopped, the PLAY/PAUSE button will always be recorded). B To suspend recording temporarily (pause mode) When the ...
Owners Manual
Page 27
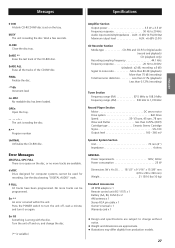
.../16 lbs (10 kg) Standard Accessories 45 RPM adaptor x 1 Remote control unit (RC-1157) x 1 Battery (AA, R6, SUM-3) x 2 AM antenna x 1 Stereo RCA pin cable x 1 Owner's manual x 1 Warranty card x 1 < Design and specifications are subject to 20 kHz Audio input sensitivity/Impedance . P-** Program number UnFINAL Unfinalize the CD-RW disc.
.../16 lbs (10 kg) Standard Accessories 45 RPM adaptor x 1 Remote control unit (RC-1157) x 1 Battery (AA, R6, SUM-3) x 2 AM antenna x 1 Stereo RCA pin cable x 1 Owner's manual x 1 Warranty card x 1 < Design and specifications are subject to 20 kHz Audio input sensitivity/Impedance . P-** Program number UnFINAL Unfinalize the CD-RW disc.