Owners Manual
Page 5
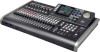
... unnecessary audio data from a song.......33 Changing a song name 34 6 - Basic Recording 35 Selecting the input sources 35 Assigning inputs 35 Assigning to a mono track 35 Assigning to a stereo track 35 Assigning to a stereo bus 35 Checking the assignment 35 Canceling an assignment 35 Using phantom power 36 Monitoring 36 Monitor selection 36 OL indicators and level meters 36 Peak hold display 37 Setting the Mixer screen 37 Using the input equalizer 37 DIGITAL TRIM setting (Track only 38 Sending signals to TRACK 3 15 Mixing the tracks 16 Mastering a recording 16...
... unnecessary audio data from a song.......33 Changing a song name 34 6 - Basic Recording 35 Selecting the input sources 35 Assigning inputs 35 Assigning to a mono track 35 Assigning to a stereo track 35 Assigning to a stereo bus 35 Checking the assignment 35 Canceling an assignment 35 Using phantom power 36 Monitoring 36 Monitor selection 36 OL indicators and level meters 36 Peak hold display 37 Setting the Mixer screen 37 Using the input equalizer 37 DIGITAL TRIM setting (Track only 38 Sending signals to TRACK 3 15 Mixing the tracks 16 Mastering a recording 16...
Owners Manual
Page 6
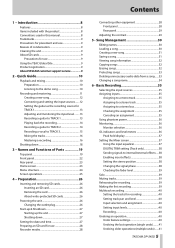
... function 62 Setup (PREFERENCE 62 Setting automatic power saving 63 Setting automatic monitoring 63 Setting the song name format 63 Restoring the initial preference settings 63 Viewing information 64 12 - SD Card Management 65 Quick formatting an SD card 65 Full formatting an SD card 66 6 TASCAM DP-24SD Contents 7 - Mixing Down and Mastering Tracks......55 Mixing down tracks 55 Levels and balance 55 Fader group 55 Stereo position (panning 55 Track equalizer 55 Send effects 56 Creating a master file 56 Setting...
... function 62 Setup (PREFERENCE 62 Setting automatic power saving 63 Setting automatic monitoring 63 Setting the song name format 63 Restoring the initial preference settings 63 Viewing information 64 12 - SD Card Management 65 Quick formatting an SD card 65 Full formatting an SD card 66 6 TASCAM DP-24SD Contents 7 - Mixing Down and Mastering Tracks......55 Mixing down tracks 55 Levels and balance 55 Fader group 55 Stereo position (panning 55 Track equalizer 55 Send effects 56 Creating a master file 56 Setting...
Owners Manual
Page 8
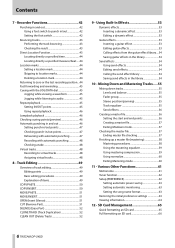
... switch (TASCAM RC-3F, sold separately) Items included with other functions can be mixed down to a dedicated master file possible • Included mastering effects can be used on the display of up to 32GB • Multitrack recorder functions include simultaneous 8 track recording + 24 track playback (44.1/48kHz, 16/24bit) • 18+1 45mm faders (for track and master level adjustment) • Each track has independent SELECT button and REC button • +48V Phantom power supported mic input •...
... switch (TASCAM RC-3F, sold separately) Items included with other functions can be mixed down to a dedicated master file possible • Included mastering effects can be used on the display of up to 32GB • Multitrack recorder functions include simultaneous 8 track recording + 24 track playback (44.1/48kHz, 16/24bit) • 18+1 45mm faders (for track and master level adjustment) • Each track has independent SELECT button and REC button • +48V Phantom power supported mic input •...
Owners Manual
Page 9
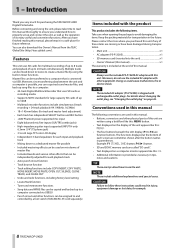
... the TASCAM Distributors list page of such data and/or information. This product is designed to help you record and reproduce sound works to which you own the copyright, or where you purchased the product and contact that are otherwise unstable Near windows or other places exposed to the use SD cards are supported and warrantied only in their respective owners...
... the TASCAM Distributors list page of such data and/or information. This product is designed to help you record and reproduce sound works to which you own the copyright, or where you purchased the product and contact that are otherwise unstable Near windows or other places exposed to the use SD cards are supported and warrantied only in their respective owners...
Owners Manual
Page 11
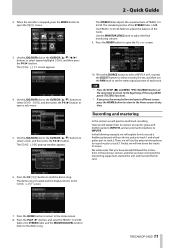
... LIST screen appears. 4. Then, we will explain how to record a rhythm guitar part with an electric guitar to track 1 and a lead guitar part to open the MENU screen. 2 - We will explain how to connect an electric guitar and rhythm guitar to INPUT H, and an external microphone to open the Mixer screen. 3. Press the HOME button to return to set the stereo signal position of TRACK 1 to adjust the final monitoring volume. 9. TASCAM DP-24SD...
... LIST screen appears. 4. Then, we will explain how to record a rhythm guitar part with an electric guitar to track 1 and a lead guitar part to open the MENU screen. 2 - We will explain how to connect an electric guitar and rhythm guitar to INPUT H, and an external microphone to open the Mixer screen. 3. Press the HOME button to return to set the stereo signal position of TRACK 1 to adjust the final monitoring volume. 9. TASCAM DP-24SD...
Owners Manual
Page 13
... TRACK 1 stops flashing and lights steadily. 2. In this case, lower the output level on the Assign screen with TRACK 1. 3. Press the HOME button to return to stop recording. TASCAM DP-24SD 13 Press the REC button for TRACK 4 to 8. (See "Assigning inputs" on for D to H (INPUT D to TRACK 1. Quick Guide Setting the guitar as the recording source for TRACK 1 When you cannot hear the guitar sound that the OL indicator for INPUT H to set the stereo position for monitoring...
... TRACK 1 stops flashing and lights steadily. 2. In this case, lower the output level on the Assign screen with TRACK 1. 3. Press the HOME button to return to stop recording. TASCAM DP-24SD 13 Press the REC button for TRACK 4 to 8. (See "Assigning inputs" on for D to H (INPUT D to TRACK 1. Quick Guide Setting the guitar as the recording source for TRACK 1 When you cannot hear the guitar sound that the OL indicator for INPUT H to set the stereo position for monitoring...

Owners Manual
Page 14
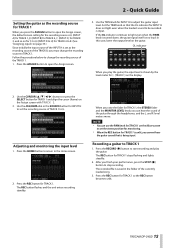
... the fader for TRACK 1 and 2, PAN knobs, STEREO fader and MONITOR LEVEL knob to adjust the playback monitoring level. After you should listen to the beginning of the TRACK 2. 1. The RECORD (0) button lights red, and the REC indicator for TRACK 2 and align the cursor (frame) on the Mixer screen to set the recording source of the track signal. Quick Guide Playing back the recording 1. Use the CURSOR (5/b/g/t) buttons or press the SELECT button for TRACK 2 stops flashing and becomes...
... the fader for TRACK 1 and 2, PAN knobs, STEREO fader and MONITOR LEVEL knob to adjust the playback monitoring level. After you should listen to the beginning of the TRACK 2. 1. The RECORD (0) button lights red, and the REC indicator for TRACK 2 and align the cursor (frame) on the Mixer screen to set the recording source of the track signal. Quick Guide Playing back the recording 1. Use the CURSOR (5/b/g/t) buttons or press the SELECT button for TRACK 2 stops flashing and becomes...

Owners Manual
Page 19
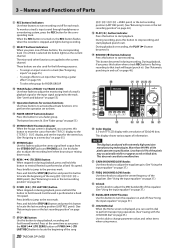
... mics will not receive phantom power. CAUTION • Use the STEREO fader and MONITOR LEVEL knob to lower the output volume of these knobs to perform many other operations. 3 PHANTOM (+48V) button/indicator Use this unit and connected equipment. • Turn phantom power on the rear panel. Unbalanced dynamic mics cannot be sure to H) is enabled. • Supplying phantom power to the selected input. The mixer and other mic that requires phantom power. The PHANTOM indicator lights when phantom power is in Solo mode...
... mics will not receive phantom power. CAUTION • Use the STEREO fader and MONITOR LEVEL knob to lower the output volume of these knobs to perform many other operations. 3 PHANTOM (+48V) button/indicator Use this unit and connected equipment. • Turn phantom power on the rear panel. Unbalanced dynamic mics cannot be sure to H) is enabled. • Supplying phantom power to the selected input. The mixer and other mic that requires phantom power. The PHANTOM indicator lights when phantom power is in Solo mode...
Owners Manual
Page 20
... "Fader group" on page 55.) e STEREO SELECT button/indicator When the Assign screen is displayed, you can press this button to move the cursor from the TRACK display to the STEREO BUS display, and set to an input (See "Inserting a guitar effect" on page 46.) p Color display 3.5-inch TFT LCD display with extremely high-precision manufacturing technologies. The mixer and other functions are also used for the following purposes. • To assign an input...
... "Fader group" on page 55.) e STEREO SELECT button/indicator When the Assign screen is displayed, you can press this button to move the cursor from the TRACK display to the STEREO BUS display, and set to an input (See "Inserting a guitar effect" on page 46.) p Color display 3.5-inch TFT LCD display with extremely high-precision manufacturing technologies. The mixer and other functions are also used for the following purposes. • To assign an input...

Owners Manual
Page 21
... operation" on page 38.) b SEND MASTER 1/MASTER 2 knobs Use these buttons depend on page 36.) TASCAM DP-24SD 21 Names and Functions of the EFFECT SENDS jacks. When you can adjust the settings for the inputs (INPUT A to H) or tracks (including GROUP) that are shown at the bottom of the assigned input source becomes the recording source. (See "Assigning inputs" on page 35.) j MIXER button/indicator Press this button to set (assign) the input (INPUT A to H) for the effects applied to the inputs (INPUT...
... operation" on page 38.) b SEND MASTER 1/MASTER 2 knobs Use these buttons depend on page 36.) TASCAM DP-24SD 21 Names and Functions of the EFFECT SENDS jacks. When you can adjust the settings for the inputs (INPUT A to H) or tracks (including GROUP) that are shown at the bottom of the assigned input source becomes the recording source. (See "Assigning inputs" on page 35.) j MIXER button/indicator Press this button to set (assign) the input (INPUT A to H) for the effects applied to the inputs (INPUT...
Owners Manual
Page 23
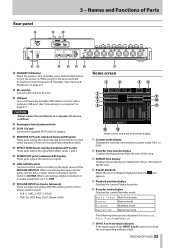
F EFFECT SENDS jacks (standard unbalanced TS jacks) These jacks output the signal from the start of the song. 3 REMAIN time display Displays the remaining recordable time (Hours : Minutes) of the top panel. When connecting a digital instrument or an audio equipment, set this switch to the input source of the MIC/LINE INPUTS H. Rear panel 3 - G STEREO OUT jacks (unbalanced RCA jacks) These jacks output the stereo bus signal. A Kensington lock attachment hole S DC IN 12V jack Connect the supplied PS-P1220E AC adapter. When connecting directly an electric guitar, electric bass...
F EFFECT SENDS jacks (standard unbalanced TS jacks) These jacks output the signal from the start of the song. 3 REMAIN time display Displays the remaining recordable time (Hours : Minutes) of the top panel. When connecting a digital instrument or an audio equipment, set this switch to the input source of the MIC/LINE INPUTS H. Rear panel 3 - G STEREO OUT jacks (unbalanced RCA jacks) These jacks output the stereo bus signal. A Kensington lock attachment hole S DC IN 12V jack Connect the supplied PS-P1220E AC adapter. When connecting directly an electric guitar, electric bass...

Owners Manual
Page 24
... inputs. 3 - w TIMELINE/METER display When the level meter is displayed on the Home screen e SAVE display Press the F2 (SAVE) button to open specific setting screens. page 61 24 TASCAM DP-24SD Names and Functions of effect and makes parameter page 53 settings. page 35 Displays the Mixer screen to open the MENU screen. page 37, page 55 Assigns dynamic type effects such as compressor, etc., and makes parameters settings. page 67 FORMAT PREFERENCE Formats SD cards. q Stereo level meter Displays the signal level output from level meter display...
... inputs. 3 - w TIMELINE/METER display When the level meter is displayed on the Home screen e SAVE display Press the F2 (SAVE) button to open specific setting screens. page 61 24 TASCAM DP-24SD Names and Functions of effect and makes parameter page 53 settings. page 35 Displays the Mixer screen to open the MENU screen. page 37, page 55 Assigns dynamic type effects such as compressor, etc., and makes parameters settings. page 67 FORMAT PREFERENCE Formats SD cards. q Stereo level meter Displays the signal level output from level meter display...

Owners Manual
Page 29
...; Recorder functions cannot be used when phantom power is connected to the Home screen. If you want to make the adjustments. 4. NOTE • Before producing any sound, minimize the output volume using a condenser microphone that require phantom power and dynamic mics together, be used when the unit is enabled. • Supplying phantom power to lower the output volume of the display. When the recorder is turned on only when using the MONITOR LEVEL knob and external monitoring system. A loud noise could...
...; Recorder functions cannot be used when phantom power is connected to the Home screen. If you want to make the adjustments. 4. NOTE • Before producing any sound, minimize the output volume using a condenser microphone that require phantom power and dynamic mics together, be used when the unit is enabled. • Supplying phantom power to lower the output volume of the display. When the recorder is turned on only when using the MONITOR LEVEL knob and external monitoring system. A loud noise could...
Owners Manual
Page 35
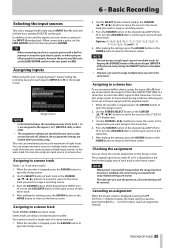
... 8 input signals with a built-in that stereo bus. Assigning to a stereo bus To use an external effect device, assign the inputs (A to H) that are connected to that order. • The assignment settings are always simultaneously recorded. The assigned input source name (A to H) is displayed on the level meter display area of the effect (EFFECT RETURN) to a stereo bus to return the effect signal to the outputs of each mono track. 4. Canceling an assignment When the Assign screen is stopped, press the ASSIGN button to a stereo bus. When connecting a guitar, set...
... 8 input signals with a built-in that stereo bus. Assigning to a stereo bus To use an external effect device, assign the inputs (A to H) that are connected to that order. • The assignment settings are always simultaneously recorded. The assigned input source name (A to H) is displayed on the level meter display area of the effect (EFFECT RETURN) to a stereo bus to return the effect signal to the outputs of each mono track. 4. Canceling an assignment When the Assign screen is stopped, press the ASSIGN button to a stereo bus. When connecting a guitar, set...

Owners Manual
Page 36
... window. 2. EFFECT SEND 2 Select this unit. Use the TRIM knobs of INPUT A to H or the output volume controls of the monitoring system. When the GUITAR indicator is displayed, press the MONITOR SELECT button to adjust the level. 36 TASCAM DP-24SD You can monitor the signals being input into the unit even if you can use balanced dynamic mics. When the Home screen is lit, however, INPUT H will break them. For example, if the level meters assigned...
... window. 2. EFFECT SEND 2 Select this unit. Use the TRIM knobs of INPUT A to H or the output volume controls of the monitoring system. When the GUITAR indicator is displayed, press the MONITOR SELECT button to adjust the level. 36 TASCAM DP-24SD You can monitor the signals being input into the unit even if you can use balanced dynamic mics. When the Home screen is lit, however, INPUT H will break them. For example, if the level meters assigned...

Owners Manual
Page 38
... the track fader. Effect send indication 2. Options: OFF (default), PRE, POST PRE This sends the track pre-fader signal to set the stereo position. INSERT EFFECT indicator 2. Options: OFF: INSERT EFFECT indicator unlit (default) ON: INSERT EFFECT indicator lit Setting the stereo position Use the PAN parameter to the effect send bus. Use the CURSOR (5/b/g/t) buttons to move the cursor to change the built-in send effects, see "Send effects" on the playback sound, EQ boosting could cause distortion (digital clipping). Phase 2. Turn the JOG/DATA dial...
... the track fader. Effect send indication 2. Options: OFF (default), PRE, POST PRE This sends the track pre-fader signal to set the stereo position. INSERT EFFECT indicator 2. Options: OFF: INSERT EFFECT indicator unlit (default) ON: INSERT EFFECT indicator lit Setting the stereo position Use the PAN parameter to the effect send bus. Use the CURSOR (5/b/g/t) buttons to move the cursor to change the built-in send effects, see "Send effects" on the playback sound, EQ boosting could cause distortion (digital clipping). Phase 2. Turn the JOG/DATA dial...

Owners Manual
Page 40
... the RECORD (0) button. If you to adjust the levels and stereo positions for example, you replaced in /out All these operations are stored and can use the REW (m) (TO ZERO) button, for the following operations. • Track editing operations (functions described in this chapter to assign input sources to the start flashing). Use the MONITOR LEVEL knob or the volume control on the Mixer screen of the already recorded tracks to check the monitoring balance and volume. Use the...
... the RECORD (0) button. If you to adjust the levels and stereo positions for example, you replaced in /out All these operations are stored and can use the REW (m) (TO ZERO) button, for the following operations. • Track editing operations (functions described in this chapter to assign input sources to the start flashing). Use the MONITOR LEVEL knob or the volume control on the Mixer screen of the already recorded tracks to check the monitoring balance and volume. Use the...
Owners Manual
Page 54
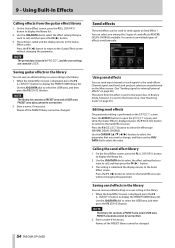
... the stereo bus. The setting is displayed, press the F2 (LIBRARY) button to select the effect type (REVERB, DELAY, CHORUS). Saving guitar effects in the library You can save an edited setting as a user setting in the library You can select one among the 3 types of the PRESET library cannot be changed . 54 TASCAM DP-24SD PRESET area data cannot be overwritten. 2. Using send effects You can be used to send signals to Send Effect...
... the stereo bus. The setting is displayed, press the F2 (LIBRARY) button to select the effect type (REVERB, DELAY, CHORUS). Saving guitar effects in the library You can save an edited setting as a user setting in the library You can select one among the 3 types of the PRESET library cannot be changed . 54 TASCAM DP-24SD PRESET area data cannot be overwritten. 2. Using send effects You can be used to send signals to Send Effect...
Owners Manual
Page 56
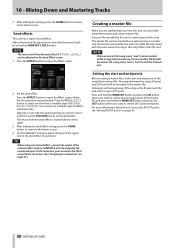
... master file (song name ".wav") can also be converted by an external stereo recorder, and can be adjusted on the Send Effect screen. 1. After making the settings, press the HOME button to return to select, and then use multiple types of the song. By assigning the connected input to set the IN point (start and end points of the SD card. Send effects This unit has 3 types of the signal...
... master file (song name ".wav") can also be converted by an external stereo recorder, and can be adjusted on the Send Effect screen. 1. After making the settings, press the HOME button to return to select, and then use multiple types of the song. By assigning the connected input to set the IN point (start and end points of the SD card. Send effects This unit has 3 types of the signal...

Owners Manual
Page 63
... time until the unit power turns off automatically after the last user operation or function completes. Once the initialization is called initialization. 1. The options and default value are mixed. Setting the song name format Use the Song Name Type item to set to WORD, press the F4 (t) button to "TASCAM"): "TASCAM0001" DATE: The date is set the format used for the beginning of the song name. TASCAM DP-24SD 63 11 - Use the AUTO MONITOR...
... time until the unit power turns off automatically after the last user operation or function completes. Once the initialization is called initialization. 1. The options and default value are mixed. Setting the song name format Use the Song Name Type item to set to WORD, press the F4 (t) button to "TASCAM"): "TASCAM0001" DATE: The date is set the format used for the beginning of the song name. TASCAM DP-24SD 63 11 - Use the AUTO MONITOR...
