
600 Series & 430 Panel Specifications
Page 1
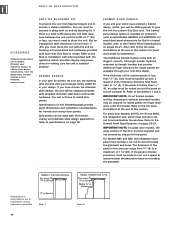
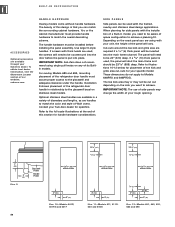
...BUILT-IN REFRIGERATION ACCESSORIES Optional accessories are available through your Sub-Zero dealer. But for panels, be shipped complete with the appliance, which provides step-by any part of 11/8" (29). ADDING PANELS In your plan for installations with a sheet of this section. Specifications on all...the custom panels is available on the following pages provide panel dimensions and installation considerations for panel and handle considerations. If the panel is a solid soffit above the unit with each Sub-Zero Built-In model. IMPORTANT NOTE: On all Built-In units except Models ...
...BUILT-IN REFRIGERATION ACCESSORIES Optional accessories are available through your Sub-Zero dealer. But for panels, be shipped complete with the appliance, which provides step-by any part of 11/8" (29). ADDING PANELS In your plan for installations with a sheet of this section. Specifications on all...the custom panels is available on the following pages provide panel dimensions and installation considerations for panel and handle considerations. If the panel is a solid soffit above the unit with each Sub-Zero Built-In model. IMPORTANT NOTE: On all Built-In units except Models ...
600 Series & 430 Panel Specifications
Page 2
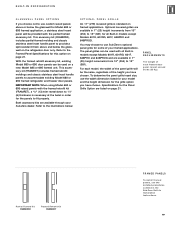
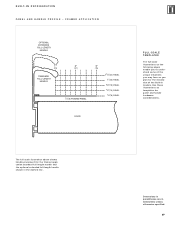
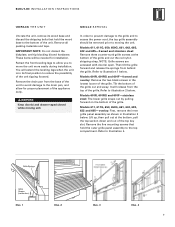
...). Partial Framed Kit FRAMPAR Framed Retrofit Kit FRAMRET FRAMED PANELS To install framed panels, see the detailed procedures outlined in 1" (25) height increments from 10" (254) to 15" (381). You may choose to use Sub-Zero's optional panel grille for Model 685 or 695 framed application, a...a spill-resistant finish above or below the glasswell for some of the height you have chosen. Both accessory kits are available in the Sub-Zero Built-In Installation Instructions. 19 OPTIONAL PANEL GRILLE An 11" (279) louvered grille is necessary at the bezel in 1" (25) height increments from...
...). Partial Framed Kit FRAMPAR Framed Retrofit Kit FRAMRET FRAMED PANELS To install framed panels, see the detailed procedures outlined in 1" (25) height increments from 10" (254) to 15" (381). You may choose to use Sub-Zero's optional panel grille for Model 685 or 695 framed application, a...a spill-resistant finish above or below the glasswell for some of the height you have chosen. Both accessory kits are available in the Sub-Zero Built-In Installation Instructions. 19 OPTIONAL PANEL GRILLE An 11" (279) louvered grille is necessary at the bezel in 1" (25) height increments from...
600 Series & 430 Panel Specifications
Page 4
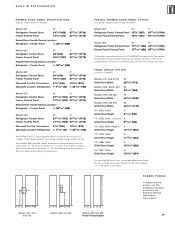
...F) 28 9/16" (726) Model 632 Refrigerator Framed Panel Freezer Framed Panel W H 2711/16" (703) 6711/16" (1719) 1715/16" (456) 6711/16" (1719) Raised Panel Handle Recess Location - For Models 685 and 695, panel thickness in the Sub-Zero Built-In Installation Instructions. 21 PARTIAL FRAMED DOOR PANEL ... glasswell on pages 24-25. H 14" (356) A W W Models 661, 642 and 632 E H F W W Models 685 and 695 H W W Models 685 and 695 Partial Framed Option FRAMED PANELS To install framed panels, see the detailed procedures outlined in the glasswell area can range from 1/4" (6) to ...
...F) 28 9/16" (726) Model 632 Refrigerator Framed Panel Freezer Framed Panel W H 2711/16" (703) 6711/16" (1719) 1715/16" (456) 6711/16" (1719) Raised Panel Handle Recess Location - For Models 685 and 695, panel thickness in the Sub-Zero Built-In Installation Instructions. 21 PARTIAL FRAMED DOOR PANEL ... glasswell on pages 24-25. H 14" (356) A W W Models 661, 642 and 632 E H F W W Models 685 and 695 H W W Models 685 and 695 Partial Framed Option FRAMED PANELS To install framed panels, see the detailed procedures outlined in the glasswell area can range from 1/4" (6) to ...

600 Series & 430 Panel Specifications
Page 6
... stile will vary because of the thickness of this dimension. Again, keep in this space. OVERLAY PANELS To install overlay panels, see that the amount of material you can box out a landing space for exact cut-out dimensions...695, the refrigerator door panel must be any part of the panel. In this illustration you are in the Sub-Zero Built-In Installation Instructions. Overlay units, except Models 601R, 601RG and 601F, come standard with the operation of different ways. Overlay...panel grille match the design of the glasswell area in a number of the Sub-Zero unit.
... stile will vary because of the thickness of this dimension. Again, keep in this space. OVERLAY PANELS To install overlay panels, see that the amount of material you can box out a landing space for exact cut-out dimensions...695, the refrigerator door panel must be any part of the panel. In this illustration you are in the Sub-Zero Built-In Installation Instructions. Overlay units, except Models 601R, 601RG and 601F, come standard with the operation of different ways. Overlay...panel grille match the design of the glasswell area in a number of the Sub-Zero unit.
600 Series & 430 Panel Specifications
Page 8
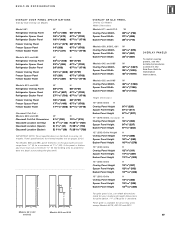
.... Panel grille is available for Built-In overlay (O) models. For Models 685 and 695, panel thickness in the Sub-Zero Built-In Installation Instructions. BUILT-IN REFRIGERATION OVERLAY DOOR PANEL SPECIFICATIONS Side-by-Side Overlay (O) Models Model 661 Refrigerator Overlay Panel Refrigerator ...6711/16" (1719) 1515/16" (405) 15" (381) 15 5/8" (397) 68" (1727) 671/16" (1703) 6711/16" (1719) Models 632 and 695 Refrigerator Overlay Panel Refrigerator Spacer Panel Refrigerator Backer Panel Freezer Overlay Panel Freezer Spacer Panel Freezer Backer Panel W H 28" (711) 68" (1727) 271...
.... Panel grille is available for Built-In overlay (O) models. For Models 685 and 695, panel thickness in the Sub-Zero Built-In Installation Instructions. BUILT-IN REFRIGERATION OVERLAY DOOR PANEL SPECIFICATIONS Side-by-Side Overlay (O) Models Model 661 Refrigerator Overlay Panel Refrigerator ...6711/16" (1719) 1515/16" (405) 15" (381) 15 5/8" (397) 68" (1727) 671/16" (1703) 6711/16" (1719) Models 632 and 695 Refrigerator Overlay Panel Refrigerator Spacer Panel Refrigerator Backer Panel Freezer Overlay Panel Freezer Spacer Panel Freezer Backer Panel W H 28" (711) 68" (1727) 271...
600 Series & 430 Panel Specifications
Page 9
... 10-12 below for handle hardware considerations. HANDLE HARDWARE Overlay models come without handle hardware. IMPORTANT NOTE: Sub-Zero does not recommend using with the installation of a Built-In model, you want to the glasswell bezel on the look you need to match ...BEHIND FRAME 4" (102) 3" (76) Illus. 11-Models 611, 611G, 650 and 650G 1/4" (6) 4" (102) 3" (76) 3" (76) Illus. 12-Models 661, 642, 632, 685 and 695 Illustration 9 shows placement of the refrigerator door handle in a variety of diameters and lengths, as are using single pull knobs on the...
... 10-12 below for handle hardware considerations. HANDLE HARDWARE Overlay models come without handle hardware. IMPORTANT NOTE: Sub-Zero does not recommend using with the installation of a Built-In model, you want to the glasswell bezel on the look you need to match ...BEHIND FRAME 4" (102) 3" (76) Illus. 11-Models 611, 611G, 650 and 650G 1/4" (6) 4" (102) 3" (76) 3" (76) Illus. 12-Models 661, 642, 632, 685 and 695 Illustration 9 shows placement of the refrigerator door handle in a variety of diameters and lengths, as are using single pull knobs on the...
600 Series & 430 Panel Specifications
Page 10
... understand some of the unique situations you plan for panel and handle hardware considerations. Use these illustrations as you may face as templates for the installation of the Built-In models. The full-scale illustration above shows handle placement for the framed application standard full-length handle and the optional extended...
... understand some of the unique situations you plan for panel and handle hardware considerations. Use these illustrations as you may face as templates for the installation of the Built-In models. The full-scale illustration above shows handle placement for the framed application standard full-length handle and the optional extended...

600 Series & 430 Panel Specifications
Page 14
... the edge to the Built-In models. In addition, illustrations 2 and 3 will give you need to be aware of rails and stiles that will be installed on the overlay sizing. Trim Reveal 1/4" (6) min Rout to illustration 1. With the framed Model 430, you need to be finished to ensure a proper fit. MODEL...
... the edge to the Built-In models. In addition, illustrations 2 and 3 will give you need to be aware of rails and stiles that will be installed on the overlay sizing. Trim Reveal 1/4" (6) min Rout to illustration 1. With the framed Model 430, you need to be finished to ensure a proper fit. MODEL...
600 Series & 430 Panel Specifications
Page 15
... Thickness 5/8" (16) GRILLE PANEL SPECIFICATIONS Model 430 - WINE STORAGE MODEL 430 - In addition, side panel information for delivery. IMPORTANT NOTE: Wine Storage models with the Sub-Zero Built-In models, you have the flexibility of toe kick and grille area cut-outs. OVERLAY PANELS As with a solid door are in parentheses are... moisture to page 25 for a solid door unit, follow the overall panel dimensions indicated; Refer to page 25 for placement of ordering grilles in the Sub-Zero Wine Storage Installation Instructions. Refer to illustration 12 on page 21.
... Thickness 5/8" (16) GRILLE PANEL SPECIFICATIONS Model 430 - WINE STORAGE MODEL 430 - In addition, side panel information for delivery. IMPORTANT NOTE: Wine Storage models with the Sub-Zero Built-In models, you have the flexibility of toe kick and grille area cut-outs. OVERLAY PANELS As with a solid door are in parentheses are... moisture to page 25 for a solid door unit, follow the overall panel dimensions indicated; Refer to page 25 for placement of ordering grilles in the Sub-Zero Wine Storage Installation Instructions. Refer to illustration 12 on page 21.
600 Series & 430 Panel Specifications
Page 17
... replace the natural cherry wood facing of the other Wine Storage door frames will need to be found in the Specifications pdf file for the installation of the Model 424 door frame profile; Additional information can be finished.
... replace the natural cherry wood facing of the other Wine Storage door frames will need to be found in the Specifications pdf file for the installation of the Model 424 door frame profile; Additional information can be finished.

600 Series & 430 Panel Specifications
Page 18
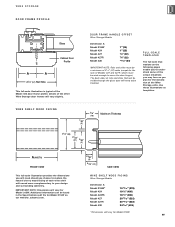
DOOR CLOSED AND 145˚ MAX OPENING 24 (610) CABINETRY OPENING 2318 (587) TO BACK OF APPLIANCE SUB-ZERO DOOR 3 4 (19) DOOR PANEL 23 3 4 (600) DOOR PANEL WIDTH The full-scale illustration shows what considerations you need to make for the installation of Model 424 and how the maximum door opening may interact with adjacent cabinets and countertops. 66 145˚* *MODEL 424 MUST EXTEND A MINIMUM 1/4" (6) BEYOND THE FRONT SURFACE OF ADJOINING CABINETRY TO ALLOW THE MAXIMUM DOOR SWING 1 2 (13) 1 8 (3) 1 4 (6)* DOOR PANEL SUB-ZERO DOOR WINE STORAGE MODEL 424 -
DOOR CLOSED AND 145˚ MAX OPENING 24 (610) CABINETRY OPENING 2318 (587) TO BACK OF APPLIANCE SUB-ZERO DOOR 3 4 (19) DOOR PANEL 23 3 4 (600) DOOR PANEL WIDTH The full-scale illustration shows what considerations you need to make for the installation of Model 424 and how the maximum door opening may interact with adjacent cabinets and countertops. 66 145˚* *MODEL 424 MUST EXTEND A MINIMUM 1/4" (6) BEYOND THE FRONT SURFACE OF ADJOINING CABINETRY TO ALLOW THE MAXIMUM DOOR SWING 1 2 (13) 1 8 (3) 1 4 (6)* DOOR PANEL SUB-ZERO DOOR WINE STORAGE MODEL 424 -
632 Quick Reference Guide
Page 1
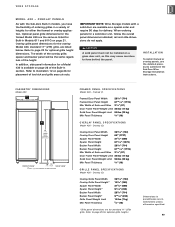
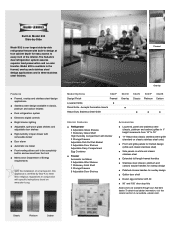
...finishes. The Sub-Zero dual refrigeration system assures superior food preservation and no odor transfer. Framed Classic Stainless Steel Overlay Model Options 632/F Design/Finish Framed Louvered Grille Panel Grille - Accepts Decorative Inserts Heavy-Duty Stainless Steel Grille 632/O Overlay 632/S 632/P 632/B Classic Platinum...classic, platinum and carbon) grilles in 1" height increments from the front Meets strict Department of Energy requirements With the installation of a harness kit, this appliance is certified by -side refrigerator/freezer with built-in design at true cabinet ...
...finishes. The Sub-Zero dual refrigeration system assures superior food preservation and no odor transfer. Framed Classic Stainless Steel Overlay Model Options 632/F Design/Finish Framed Louvered Grille Panel Grille - Accepts Decorative Inserts Heavy-Duty Stainless Steel Grille 632/O Overlay 632/S 632/P 632/B Classic Platinum...classic, platinum and carbon) grilles in 1" height increments from the front Meets strict Department of Energy requirements With the installation of a harness kit, this appliance is certified by -side refrigerator/freezer with built-in design at true cabinet ...

632 Quick Reference Guide
Page 2
... framed and overlay models, you to match surrounding cabinetry hardware and the panel grille accepts custom panel inserts. Installation Specifications 24" (610) ROUGH OPENING DEPTH EXTEND WATER LINE APPROX. 36" (914) FROM BACK WALL TOP VIEW SHUT-OFF ...18" 6" (457) (152) W FRONT VIEW Dimensions in parentheses are in millimeters unless otherwise specified. Complete installation specifications, including panel sizes, can be adding door panels for a custom look. Built-In Model 632 Side-by-Side Overall Dimensions 84" (2134) 48" (1219) Unit dimensions may vary by ± 1/8". ...
... framed and overlay models, you to match surrounding cabinetry hardware and the panel grille accepts custom panel inserts. Installation Specifications 24" (610) ROUGH OPENING DEPTH EXTEND WATER LINE APPROX. 36" (914) FROM BACK WALL TOP VIEW SHUT-OFF ...18" 6" (457) (152) W FRONT VIEW Dimensions in parentheses are in millimeters unless otherwise specified. Complete installation specifications, including panel sizes, can be adding door panels for a custom look. Built-In Model 632 Side-by-Side Overall Dimensions 84" (2134) 48" (1219) Unit dimensions may vary by ± 1/8". ...
Built-In Installation Guide
Page 2
... damage may cause serious injury or death if precautions are two types of potential hazards that is a registered trademark of Sub-Zero equipment. CONTENTS Installation Recommendations 3 Installation Specifications 4 Installation Instructions 8 Framed Panel Installation 12 Overlay Panel Installation 16 Completing the Installation 20 Service Information 23 Specifications are subject to a problemfree installation. SUB-ZERO® is especially relevant to change without notice.
... damage may cause serious injury or death if precautions are two types of potential hazards that is a registered trademark of Sub-Zero equipment. CONTENTS Installation Recommendations 3 Installation Specifications 4 Installation Instructions 8 Framed Panel Installation 12 Overlay Panel Installation 16 Completing the Installation 20 Service Information 23 Specifications are subject to a problemfree installation. SUB-ZERO® is especially relevant to change without notice.
Built-In Installation Guide
Page 3
... material to protect finished flooring Appropriate materials to cover and protect the home and its furnishings during the installation. There are in parentheses are key details that you should be directed to your Sub-Zero dealer or the Sub-Zero Customer Service Department at subzero.com. I N I N S TA L L A T I O N R E C O M M E N D A T I O N S I N S TA L L AT I O N R E C O M M E N D AT I LT- B U I O N S The importance of the...
... material to protect finished flooring Appropriate materials to cover and protect the home and its furnishings during the installation. There are in parentheses are key details that you should be directed to your Sub-Zero dealer or the Sub-Zero Customer Service Department at subzero.com. I N I N S TA L L A T I O N R E C O M M E N D A T I O N S I N S TA L L AT I O N R E C O M M E N D AT I LT- B U I O N S The importance of the...

Built-In Installation Guide
Page 4
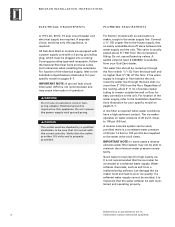
... space needs. These specifications are expecting to install. If you are about to install. Before you begin the installation process, check the exact model number you are identical for your Sub-Zero dealer. Complete the installation with the surrounding finished floor. 4 IMPORTANT ...a separating filler strip is to the Overall Dimensions and Installation Specifications for each of these design options has specific installation requirements, which means it is vital that the rough opening dimension. The Sub-Zero Built-In line offers the following pages. Use a ...
... space needs. These specifications are expecting to install. If you are about to install. Before you begin the installation process, check the exact model number you are identical for your Sub-Zero dealer. Complete the installation with the surrounding finished floor. 4 IMPORTANT ...a separating filler strip is to the Overall Dimensions and Installation Specifications for each of these design options has specific installation requirements, which means it is vital that the rough opening dimension. The Sub-Zero Built-In line offers the following pages. Use a ...
Built-In Installation Guide
Page 8
... a 3-prong grounding plug, which must be checked by a qualified electrician to be connected to the Installation Specifications illustration for your specific model on pages 5-7. For location of excess copper tubing to the Installation Specifications illustration for your Sub-Zero dealer. Do not use self-piercing valves. Use an easily accessible shut-off the floor...
... a 3-prong grounding plug, which must be checked by a qualified electrician to be connected to the Installation Specifications illustration for your specific model on pages 5-7. For location of excess copper tubing to the Installation Specifications illustration for your Sub-Zero dealer. Do not use self-piercing valves. Use an easily accessible shut-off the floor...
Built-In Installation Guide
Page 9
...red nylon shipping strap. Refer to illustration 1 below. NOTE: Grille screws are accessed with door(s) open. It will be removed prior to allow for installation. Refer to the bottom of the appliance dolly. B U I T GRILLE REMOVAL Uncrate the unit, remove its final position to the top compartment. These... to moving unit. In order to prevent damage to the grille and to move the unit more easily during installation. Models 611, 611G, 650, 650G, 661, 642, 685, 632 and 695-framed and stainless steel: Remove three counter-sunk grille screws at the bottom, pull the top section...
...red nylon shipping strap. Refer to illustration 1 below. NOTE: Grille screws are accessed with door(s) open. It will be removed prior to allow for installation. Refer to the bottom of the appliance dolly. B U I T GRILLE REMOVAL Uncrate the unit, remove its final position to the top compartment. These... to moving unit. In order to prevent damage to the grille and to move the unit more easily during installation. Models 611, 611G, 650, 650G, 661, 642, 685, 632 and 695-framed and stainless steel: Remove three counter-sunk grille screws at the bottom, pull the top section...
Built-In Installation Guide
Page 10
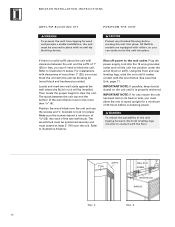
... than 1" (25), you won't need to block the unit. Make sure the screws extend a minimum of the wood block must not be installed. IMPORTANT NOTE: If possible, keep door(s) closed on its back or side, you can easily move the unit into position under the wood block...must be secured in place. B U I O N S ANTI-TIP BLOCKING KIT POSITION THE UNIT To prevent the unit from tipping forward and provide a stable installation, the unit must be in unit will be more than 1/4" (6). Shut off power to stand upright for any finished flooring before connecting power. See Level...
... than 1" (25), you won't need to block the unit. Make sure the screws extend a minimum of the wood block must not be installed. IMPORTANT NOTE: If possible, keep door(s) closed on its back or side, you can easily move the unit into position under the wood block...must be secured in place. B U I O N S ANTI-TIP BLOCKING KIT POSITION THE UNIT To prevent the unit from tipping forward and provide a stable installation, the unit must be in unit will be more than 1/4" (6). Shut off power to stand upright for any finished flooring before connecting power. See Level...
Built-In Installation Guide
Page 11
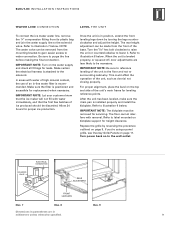
... frame for height clearance. Turn power back on the top and side of ice produced should be necessary. Make certain the electrical harness is installed properly and install the kickplate. Replace the grille by turning the legs counterclockwise and adjust the height. Make sure the filter is leveled properly, or squared off...
... frame for height clearance. Turn power back on the top and side of ice produced should be necessary. Make certain the electrical harness is installed properly and install the kickplate. Replace the grille by turning the legs counterclockwise and adjust the height. Make sure the filter is leveled properly, or squared off...


