Product Instruction Manual
Page 3
... maintenance instructions in this Manual Important Safety Instructions Safety Precautions and Working Techniques Description of Operation Using the Unit Mulching Mounting the Handlebar Grassbox Adjusting Cutting Height Connecting Charger to Power Supply Charging the Battery Light Emitting Diodes (LED) on Battery Light Emitting Diodes (LED) on chlorine-free paper Printing inks contain vegetable oils, paper can go to operate your lawn mower. 33 To receive maximum performance and satisfaction from your STIHL lawn mower, it is battery-powered...
... maintenance instructions in this Manual Important Safety Instructions Safety Precautions and Working Techniques Description of Operation Using the Unit Mulching Mounting the Handlebar Grassbox Adjusting Cutting Height Connecting Charger to Power Supply Charging the Battery Light Emitting Diodes (LED) on Battery Light Emitting Diodes (LED) on chlorine-free paper Printing inks contain vegetable oils, paper can go to operate your lawn mower. 33 To receive maximum performance and satisfaction from your STIHL lawn mower, it is battery-powered...
Product Instruction Manual
Page 4
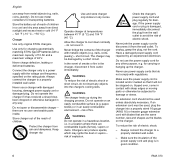
.... 4. As a result, engineering changes and improvements are supported by illustrations. Important Safety Instructions WARNING When using electric lawn mowers, basic safety precautions should be followed to or embossed on the model concerned, the following : READ ALL INSTRUCTIONS 1. Key Symbols in severe or fatal injury. Avoid Dangerous Environments - Dress Properly - Do Not Force Lawn Mower - English Guide to Using this Manual Pictograms The meanings of the pictograms attached to reduce...
.... 4. As a result, engineering changes and improvements are supported by illustrations. Important Safety Instructions WARNING When using electric lawn mowers, basic safety precautions should be followed to or embossed on the model concerned, the following : READ ALL INSTRUCTIONS 1. Key Symbols in severe or fatal injury. Avoid Dangerous Environments - Dress Properly - Do Not Force Lawn Mower - English Guide to Using this Manual Pictograms The meanings of the pictograms attached to reduce...
Product Instruction Manual
Page 5
... children. 12. Disconnect Lawn Mower - Inspect for best and safest performance. Use identical replacement blades only. It is battery-powered, special safety precautions must be observed to operate your STIHL dealer show you are tired. 10. Have your power tool. Observe all objects prior to the machine. Be sure that anyone using it for lubricating and changing accessories. 13. Use common sense. Keep guards in place and...
... children. 12. Disconnect Lawn Mower - Inspect for best and safest performance. Use identical replacement blades only. It is battery-powered, special safety precautions must be observed to operate your STIHL dealer show you are tired. 10. Have your power tool. Observe all objects prior to the machine. Be sure that anyone using it for lubricating and changing accessories. 13. Use common sense. Keep guards in place and...
Product Instruction Manual
Page 6
... power tool 3. WARNING Be alert - Thrown objects may cause serious or fatal injury. Avoid loose-fitting jackets, scarfs, neckties, jewelry, flared or cuffed pants, unconfined long hair or anything that could become caught in loss of control. Different models may result in scrub or moving parts of the unit. Always remove fuse key and battery before operating this , remove fuse key and battery from all STIHL lawn mowers...
... power tool 3. WARNING Be alert - Thrown objects may cause serious or fatal injury. Avoid loose-fitting jackets, scarfs, neckties, jewelry, flared or cuffed pants, unconfined long hair or anything that could become caught in loss of control. Different models may result in scrub or moving parts of the unit. Always remove fuse key and battery before operating this , remove fuse key and battery from all STIHL lawn mowers...
Product Instruction Manual
Page 7
... condition before use or charge a defective, damaged, cracked or deformed battery. Do not place the battery in direct sunlight or store it checked by STIHL for any other high-temperature locations. Protect the battery from the vicinity of any spilled liquids. WARNING Use STIHL batteries only with STIHL power tools and charge them only with water is not used properly - do not rub your lawn mower in other...
... condition before use or charge a defective, damaged, cracked or deformed battery. Do not place the battery in direct sunlight or store it checked by STIHL for any other high-temperature locations. Protect the battery from the vicinity of any spilled liquids. WARNING Use STIHL batteries only with STIHL power tools and charge them only with water is not used properly - do not rub your lawn mower in other...
Product Instruction Manual
Page 8
... store charger only indoors in a hazardous location, i.e. WARNING The charger heats up the charger. for damage. Charger Use only original STIHL chargers. Never charge defective, leaking or deformed batteries. Never use power supply cords that are the same number, size and shapes as the blades on the rating plate. Check the charger's power supply cord and plug regularly for carrying or hanging up...
... store charger only indoors in a hazardous location, i.e. WARNING The charger heats up the charger. for damage. Charger Use only original STIHL chargers. Never charge defective, leaking or deformed batteries. Never use power supply cords that are the same number, size and shapes as the blades on the rating plate. Check the charger's power supply cord and plug regularly for carrying or hanging up...
Product Instruction Manual
Page 9
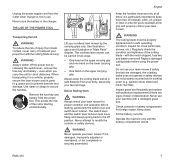
... control your lawn mower if safety devices are damaged, the coasting brake does not operate or safety devices are signs of the cutting blade - ejection chute shield and lower rear flap). THE USE OF THE POWER TOOL Transporting the Unit WARNING To reduce the risk of the motor starting , particularly the switch lever and switch lever lockout. See illustration above and illustration in two ways: - Remove the fuse key and battery from the power...
... control your lawn mower if safety devices are damaged, the coasting brake does not operate or safety devices are signs of the cutting blade - ejection chute shield and lower rear flap). THE USE OF THE POWER TOOL Transporting the Unit WARNING To reduce the risk of the motor starting , particularly the switch lever and switch lever lockout. See illustration above and illustration in two ways: - Remove the fuse key and battery from the power...
Product Instruction Manual
Page 10
... grass can result in severe injury. Be extremely cautious when working . WARNING Mow parallel to the slope, never up or down and behind the handle when the motor is a one hand. Do not allow other part of your hand or any dust raised by the power tool away from cutting blade, deck or ejection chute without first switching off motor and removing fuse key and battery...
... grass can result in severe injury. Be extremely cautious when working . WARNING Mow parallel to the slope, never up or down and behind the handle when the motor is a one hand. Do not allow other part of your hand or any dust raised by the power tool away from cutting blade, deck or ejection chute without first switching off motor and removing fuse key and battery...
Product Instruction Manual
Page 11
... your power tool with electrical cables or wires - To reduce the risk of trouble. Vibration is a blockage in the discharge duct or in high grass. WARNING If the cutting blade becomes obstructed, or if there is generelly a warning of damage to property, also maintain this distance from cutting blade. For specific starting instructions, see chapter "Switching On". Switch off the motor, remove the fuse key and battery and make sure the cutting blade has...
... your power tool with electrical cables or wires - To reduce the risk of trouble. Vibration is a blockage in the discharge duct or in high grass. WARNING If the cutting blade becomes obstructed, or if there is generelly a warning of damage to property, also maintain this distance from cutting blade. For specific starting instructions, see chapter "Switching On". Switch off the motor, remove the fuse key and battery and make sure the cutting blade has...
Product Instruction Manual
Page 12
... fuse key and battery and make a warranty claim for maintenance and repair, including the cutting blade. Do not attempt any repairs or maintenance work or cleaning the power tool. Clean plastic components with water. Do not use . The drive motor is in motor housing as necessary. clean as necessary. Maintain or replace warning and instruction labels as replacing the cutting blade. Always switch off the motor by releasing the switch lever before doing any wires or cables (power...
... fuse key and battery and make a warranty claim for maintenance and repair, including the cutting blade. Do not attempt any repairs or maintenance work or cleaning the power tool. Clean plastic components with water. Do not use . The drive motor is in motor housing as necessary. clean as necessary. Maintain or replace warning and instruction labels as replacing the cutting blade. Always switch off the motor by releasing the switch lever before doing any wires or cables (power...
Product Instruction Manual
Page 14
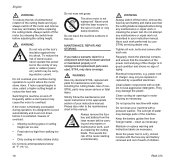
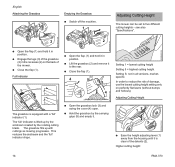
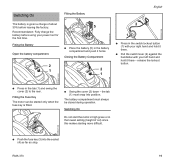
... process. Mow very high grass in gradual stages The housing can be removed and the rear ejection chute used. One third of a mulching blade, blade mounting screw and mulch plug, converts the conventional mower into a multi-purpose mower. Use properly sharpened blades - see instruction sheet supplied with mulch kit. Cable Clip The electric cable is wet. Optimum cutting height (between setting 3 and 5) - Vary mowing direction and overlap the cuts - N Insert screw with cable guide and screw (6) through the cable guide (2) and attach the electric cable...
... process. Mow very high grass in gradual stages The housing can be removed and the rear ejection chute used. One third of a mulching blade, blade mounting screw and mulch plug, converts the conventional mower into a multi-purpose mower. Use properly sharpened blades - see instruction sheet supplied with mulch kit. Cable Clip The electric cable is wet. Optimum cutting height (between setting 3 and 5) - Vary mowing direction and overlap the cuts - N Insert screw with cable guide and screw (6) through the cable guide (2) and attach the electric cable...
Product Instruction Manual
Page 16
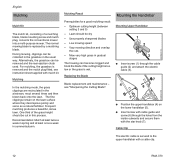
... is equipped with cuttings as mowing progresses. This reduces the airstream and the 'full' indicator drops. N Hold the grassbox by the rotating cutting blade. Higher cutting height: 9929BA012 KN 14 RMA 370 The 'full' indicator is clear of the mower. Adjusting Cutting Height 12 3 N Ease the height adjusting lever (1) away from the housing until it . 9929BA011 KN Setting 1 = lowest cutting height Setting 5 = highest cutting height Setting S: not in position. see also "Specifications". 9929BA035 KN...
... is equipped with cuttings as mowing progresses. This reduces the airstream and the 'full' indicator drops. N Hold the grassbox by the rotating cutting blade. Higher cutting height: 9929BA012 KN 14 RMA 370 The 'full' indicator is clear of the mower. Adjusting Cutting Height 12 3 N Ease the height adjusting lever (1) away from the housing until it . 9929BA011 KN Setting 1 = lowest cutting height Setting 5 = highest cutting height Setting S: not in position. see also "Specifications". 9929BA035 KN...
Product Instruction Manual
Page 21
... cut) since this makes starting more difficult. 4 9929BA015 KN N Push the fuse key (3) into position. The battery compartment must snap into the socket (4) as far as stop. RMA 370 19 N Pull the switch lever (2) against the handlebar with your right hand and hold it home. Switching On Fitting the Battery The battery is fitted. Recommendation: Fully charge the battery before leaving the factory. Switching On 3 Do not start the motor in high grass...
... cut) since this makes starting more difficult. 4 9929BA015 KN N Push the fuse key (3) into position. The battery compartment must snap into the socket (4) as far as stop. RMA 370 19 N Pull the switch lever (2) against the handlebar with your right hand and hold it home. Switching On Fitting the Battery The battery is fitted. Recommendation: Fully charge the battery before leaving the factory. Switching On 3 Do not start the motor in high grass...
Product Instruction Manual
Page 24
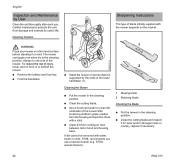
... in the cleaning position. STIHL special cleaner). Sharpening Instructions The type of blade initially supplied with a stick. N Remove the battery and fuse key. N Use a brush and water to one side of the mower. 9929BA021 KN 9929BA037 KN English Inspection and Maintenance by the ends of the lower handlebar (1). Careful maintenance protects the unit from cooling air duct between motor hood and housing base. N Clean dirt...
... in the cleaning position. STIHL special cleaner). Sharpening Instructions The type of blade initially supplied with a stick. N Remove the battery and fuse key. N Use a brush and water to one side of the mower. 9929BA021 KN 9929BA037 KN English Inspection and Maintenance by the ends of the lower handlebar (1). Careful maintenance protects the unit from cooling air duct between motor hood and housing base. N Clean dirt...
Product Instruction Manual
Page 26
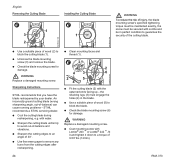
English Removing the Cutting Blade 1 3 2 Installing the Cutting Blade 1 WARNING To reduce the risk of injury, the blade mounting screw's specified tightening torque must be maintained exactly, the screw must engage the holes (4) in perfect condition to guarantee the security of the cutting blade. 9929BA042 KN 9929BA041 KN N Use a suitable piece of wood (5) to block the blade. Sharpening Instructions STIHL recommends that you have the blade resharpened by...
English Removing the Cutting Blade 1 3 2 Installing the Cutting Blade 1 WARNING To reduce the risk of injury, the blade mounting screw's specified tightening torque must be maintained exactly, the screw must engage the holes (4) in perfect condition to guarantee the security of the cutting blade. 9929BA042 KN 9929BA041 KN N Use a suitable piece of wood (5) to block the blade. Sharpening Instructions STIHL recommends that you have the blade resharpened by...
Product Instruction Manual
Page 27
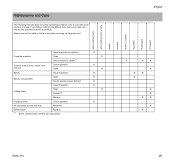
...X X X RMA 370 25 Maintenance and Care The following intervals apply to normal operating conditions only. Visual inspection (condition) Complete machine Clean Have serviced by dealer1) Controls (switch lever, switch lever lockout) Check operation Clean Battery Visual inspection Battery compartment Clean Check operation (eject battery) Visual inspection Cutting blade Clean Sharpen1) Replace Coasting brake Check operation All accessible screws and nuts Retighten Safety labels Replace 1) STIHL recommends a STIHL servicing dealer. If your daily working on the power tool.
...X X X RMA 370 25 Maintenance and Care The following intervals apply to normal operating conditions only. Visual inspection (condition) Complete machine Clean Have serviced by dealer1) Controls (switch lever, switch lever lockout) Check operation Clean Battery Visual inspection Battery compartment Clean Check operation (eject battery) Visual inspection Cutting blade Clean Sharpen1) Replace Coasting brake Check operation All accessible screws and nuts Retighten Safety labels Replace 1) STIHL recommends a STIHL servicing dealer. If your daily working on the power tool.
Product Instruction Manual
Page 29
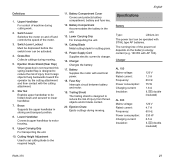
... required height. 11. Cutting Height Adjustment Used to set cutting blade to lower handlebar. 7. Battery Supplies the motor with AP 160). Charger AL 100 Mains voltage: Rated current: Frequency: Power consumption: Charging current: Insulation: AL 300 Mains voltage: Rated current: Frequency: Power consumption: Charging current: Insulation: 120 V 1.3 A 60 Hz 75 W 1.6 A II, E (double insulated) 120 V 4.7 A 60 Hz 330 W 6.5 A II, E (double insulated) RMA 370 27 Switch Lever Switches the motor on the battery...
... required height. 11. Cutting Height Adjustment Used to set cutting blade to lower handlebar. 7. Battery Supplies the motor with AP 160). Charger AL 100 Mains voltage: Rated current: Frequency: Power consumption: Charging current: Insulation: AL 300 Mains voltage: Rated current: Frequency: Power consumption: Charging current: Insulation: 120 V 1.3 A 60 Hz 75 W 1.6 A II, E (double insulated) 120 V 4.7 A 60 Hz 330 W 6.5 A II, E (double insulated) RMA 370 27 Switch Lever Switches the motor on the battery...
Product Instruction Manual
Page 30
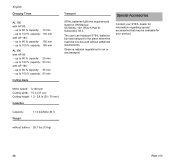
... min - up to 80 % capacity: 35 min - Special Accessories Contact your product. English Charging Times AL 100 with AP 160: - Observe national regulations for your STIHL dealer for information regarding special accessories that may be used without battery 28.7 lbs (13 kg) 28 RMA 370 Motor speed: 3,100 rpm Cutting width: 15 in (37 cm) Cutting height: 1.2 - 2.8 in UN-Manual ST/SG/AC.10/11...
... min - up to 80 % capacity: 35 min - Special Accessories Contact your product. English Charging Times AL 100 with AP 160: - Observe national regulations for your STIHL dealer for information regarding special accessories that may be used without battery 28.7 lbs (13 kg) 28 RMA 370 Motor speed: 3,100 rpm Cutting width: 15 in (37 cm) Cutting height: 1.2 - 2.8 in UN-Manual ST/SG/AC.10/11...
Product Instruction Manual
Page 32
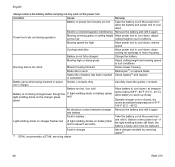
... air openings in motor housing Battery is not fully charged Charge the battery Mowing high or damp grass Adjust cutting height and mowing speed to cool down Electric or electromagnetic interference Remove the battery and refit it . Condition Cause Remedy Battery or power tool circuitry too hot Take the battery out of battery has been reached or exceeded Clean mower housing Resharpen1) or replace blade Check battery1) and replace Battery jams when being charged even though the (1 light emitting diode on battery...
... air openings in motor housing Battery is not fully charged Charge the battery Mowing high or damp grass Adjust cutting height and mowing speed to cool down Electric or electromagnetic interference Remove the battery and refit it . Condition Cause Remedy Battery or power tool circuitry too hot Take the battery out of battery has been reached or exceeded Clean mower housing Resharpen1) or replace blade Check battery1) and replace Battery jams when being charged even though the (1 light emitting diode on battery...
Product Instruction Manual
Page 33
... Maintenance and Repairs Battery Recycling Disposal Users of charge. Observe all country-specific waste disposal rules and regulations. Electrical appliances must not be thrown in your area. The symbol may be found on waste disposal. 264BA050 KN RMA 370 31 The seal has a toll free phone number (1-800-822-8837) that are environmentally responsible. Warranty claims following repairs can be identified by authorized STIHL service shops...
... Maintenance and Repairs Battery Recycling Disposal Users of charge. Observe all country-specific waste disposal rules and regulations. Electrical appliances must not be thrown in your area. The symbol may be found on waste disposal. 264BA050 KN RMA 370 31 The seal has a toll free phone number (1-800-822-8837) that are environmentally responsible. Warranty claims following repairs can be identified by authorized STIHL service shops...


