

Instruction Manual
Page 2
...Throttle Rod 76 11. Contents 1. Models with QuickStop Super 24 5.4.1 Adjusting the brake cable 26 5.4.2 Brake cable Removing and Installing 27 5.5 Chain Tensioner 29 5.5.1 Quick Chain Tensioner 30 5.5.2 Chain Catcher 30 5.6 Bar Mounting Stud 31 6. Engine 32 6.1 6.2 6.2.1 6.2.2 6.2.3 6.3 6.3.1 6.3.2 6.4 6.5 6.6 6.7 6.8 6.9 Muffler...Pump 85 12.5 Carburetor 88 12.5.1 Leakage Test 89 RA_737_00_01_01 MS 231, MS 231 C, MS 251, MS 251 C q © ANDREAS STIHL AG & Co. QuickStop Super 73 10.3.1 Switch Lever QuickStop Super 74 10.3.2 Lockout Lever -
...Throttle Rod 76 11. Contents 1. Models with QuickStop Super 24 5.4.1 Adjusting the brake cable 26 5.4.2 Brake cable Removing and Installing 27 5.5 Chain Tensioner 29 5.5.1 Quick Chain Tensioner 30 5.5.2 Chain Catcher 30 5.6 Bar Mounting Stud 31 6. Engine 32 6.1 6.2 6.2.1 6.2.2 6.2.3 6.3 6.3.1 6.3.2 6.4 6.5 6.6 6.7 6.8 6.9 Muffler...Pump 85 12.5 Carburetor 88 12.5.1 Leakage Test 89 RA_737_00_01_01 MS 231, MS 231 C, MS 251, MS 251 C q © ANDREAS STIHL AG & Co. QuickStop Super 73 10.3.1 Switch Lever QuickStop Super 74 10.3.2 Lockout Lever -
Instruction Manual
Page 5
...hand, to ensure the tightness of engine damage due to overheating. 4 MS 231, MS 231 C, MS 251, MS 251 C Improper handling may result in certain conditions. Check disassembled parts for servicing Remove the chain sprocket cover, saw chain and guide bar before re-installing - hose barb connectors Pull off or ... environmental regulations. 1.2 Safety Precautions If the machine is started up in the course of the hoses and the connectors with STIHL press fluid and then push the new hoses on tightening torques lists all the procedures described in position - replace as the...
...hand, to ensure the tightness of engine damage due to overheating. 4 MS 231, MS 231 C, MS 251, MS 251 C Improper handling may result in certain conditions. Check disassembled parts for servicing Remove the chain sprocket cover, saw chain and guide bar before re-installing - hose barb connectors Pull off or ... environmental regulations. 1.2 Safety Precautions If the machine is started up in the course of the hoses and the connectors with STIHL press fluid and then push the new hoses on tightening torques lists all the procedures described in position - replace as the...
Instruction Manual
Page 6
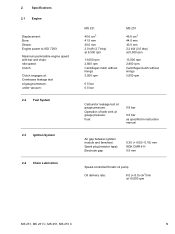
...: Crankcase leakage test at gauge pressure: under vacuum: 2.2 Fuel System 2.3 Ignition System 2.4 Chain Lubrication MS 231 40.6 cm3 41.5 mm 30.0 mm 2.0 kW (2.7 bhp) at 9,500 rpm 13,000 rpm 2,800 rpm Centrifugal clutch without linings 3,500 rpm 0.5 bar 0.5 bar MS 251 45.6 cm3 44.0 mm 30.0 mm 2.2 kW (3.0 bhp) at 9,500 rpm 13... (resistor type): Electrode gap: 0.30 (+ 0.05/- 0.10) mm NGK CMR 6 H 0.5 mm Speed-controlled Ematic oil pump Oil delivery rate: 8.0 (+/3.0) cm3/min at 10,000 rpm MS 231, MS 231 C, MS 251, MS 251 C 5
...: Crankcase leakage test at gauge pressure: under vacuum: 2.2 Fuel System 2.3 Ignition System 2.4 Chain Lubrication MS 231 40.6 cm3 41.5 mm 30.0 mm 2.0 kW (2.7 bhp) at 9,500 rpm 13,000 rpm 2,800 rpm Centrifugal clutch without linings 3,500 rpm 0.5 bar 0.5 bar MS 251 45.6 cm3 44.0 mm 30.0 mm 2.2 kW (3.0 bhp) at 9,500 rpm 13... (resistor type): Electrode gap: 0.30 (+ 0.05/- 0.10) mm NGK CMR 6 H 0.5 mm Speed-controlled Ematic oil pump Oil delivery rate: 8.0 (+/3.0) cm3/min at 10,000 rpm MS 231, MS 231 C, MS 251, MS 251 C 5
Instruction Manual
Page 7
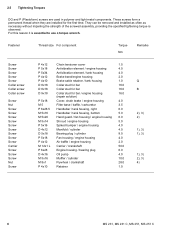
...observed. 2.5 Tightening Torques DG and P (Plastoform) screws are installed for bar / engine housing 16.0 (repair solution) P 5x18 Cover, chain brake / engine housing 4.0 M 5 Filter base / baffle / carburetor 3.5 P 6x26.5 Handlebar / tank housing, right 6.0 M 5x16 ... Muffler / cylinder 10.0 M 8x1 Flywheel / crankshaft 28.0 P 4x10 Retainer 1.0 Q B 2), 3) 2) 1), 3) 1), 3) 1), 3) 2), 3) 4) 6 MS 231, MS 231 C, MS 251, MS 251 C These screws form a permanent thread when they are used in polymer and light metal components. They can be removed and installed as often as...
...observed. 2.5 Tightening Torques DG and P (Plastoform) screws are installed for bar / engine housing 16.0 (repair solution) P 5x18 Cover, chain brake / engine housing 4.0 M 5 Filter base / baffle / carburetor 3.5 P 6x26.5 Handlebar / tank housing, right 6.0 M 5x16 ... Muffler / cylinder 10.0 M 8x1 Flywheel / crankshaft 28.0 P 4x10 Retainer 1.0 Q B 2), 3) 2) 1), 3) 1), 3) 1), 3) 2), 3) 4) 6 MS 231, MS 231 C, MS 251, MS 251 C These screws form a permanent thread when they are used in polymer and light metal components. They can be removed and installed as often as...
Instruction Manual
Page 8
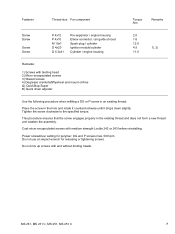
MS 231, MS 231 C, MS 251, MS 251 C 7 Power screwdriver setting for polymer: DG and P screws max. 500 rpm Do not use an impact wrench for releasing or tightening screws. Do not mix ... Cylinder / engine housing 2.0 1.6 12.0 4.5 11.0 1), 3) Remarks: 1) Screws with binding head 2) Micro-encapsulated screws 3) Waxed screws 4) Degrease crankshaft/flywheel and mount oil-free Q) QuickStop Super B) Quick chain adjuster Use the following procedure when refitting a DG or P screw in an existing thread: Place the screw in the existing thread and does not form...
MS 231, MS 231 C, MS 251, MS 251 C 7 Power screwdriver setting for polymer: DG and P screws max. 500 rpm Do not use an impact wrench for releasing or tightening screws. Do not mix ... Cylinder / engine housing 2.0 1.6 12.0 4.5 11.0 1), 3) Remarks: 1) Screws with binding head 2) Micro-encapsulated screws 3) Waxed screws 4) Degrease crankshaft/flywheel and mount oil-free Q) QuickStop Super B) Quick chain adjuster Use the following procedure when refitting a DG or P screw in an existing thread: Place the screw in the existing thread and does not form...

Instruction Manual
Page 9
... under full load Cause Clutch shoes badly worn Clutch drum badly worn Remedy Install new clutch Install new clutch drum Saw chain rotates at idle speed Engine idle speed too high Clutch springs stretched Clutch springs broken Readjust idle speed screw LA Replace the clutch springs or ... Clutch shoe retainer broken Clutch shoes and carrier worn Replace all clutch springs Fit new needle cage Install new retainer or clutch Install new clutch 8 MS 231, MS 231 C, MS 251, MS 251 C
... under full load Cause Clutch shoes badly worn Clutch drum badly worn Remedy Install new clutch Install new clutch drum Saw chain rotates at idle speed Engine idle speed too high Clutch springs stretched Clutch springs broken Readjust idle speed screw LA Replace the clutch springs or ... Clutch shoe retainer broken Clutch shoes and carrier worn Replace all clutch springs Fit new needle cage Install new retainer or clutch Install new clutch 8 MS 231, MS 231 C, MS 251, MS 251 C
Instruction Manual
Page 10
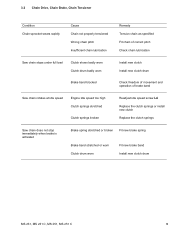
...drum badly worn Brake band blocked Install new clutch Install new clutch drum Check freedom of movement and operation of brake band Saw chain rotates at idle speed Engine idle speed too high Clutch springs stretched Clutch springs broken Readjust idle speed screw LA Replace the clutch... springs or install new clutch Replace the clutch springs Saw chain does not stop immediately when brake is activated Brake spring stretched or broken Fit new brake spring Brake band stretched or worn Clutch drum worn Fit new brake band Install new clutch drum MS 231, MS 231 C, MS 251, MS 251 C 9
...drum badly worn Brake band blocked Install new clutch Install new clutch drum Check freedom of movement and operation of brake band Saw chain rotates at idle speed Engine idle speed too high Clutch springs stretched Clutch springs broken Readjust idle speed screw LA Replace the clutch... springs or install new clutch Replace the clutch springs Saw chain does not stop immediately when brake is activated Brake spring stretched or broken Fit new brake spring Brake band stretched or worn Clutch drum worn Fit new brake band Install new clutch drum MS 231, MS 231 C, MS 251, MS 251 C 9
Instruction Manual
Page 12
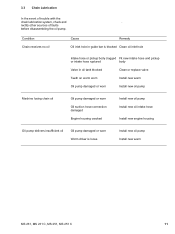
... the event of faults before disassembling the oil pump. rectify other sources of trouble with the chain lubrication system, check and . Condition Chain receives no oil Cause Remedy Oil inlet hole in guide bar is blocked Clean oil inlet hole Intake hose or pickup ...chain oil Oil pump damaged or worn Oil suction hose connection damaged Engine housing cracked Install new oil pump Install new oil intake hose Install new engine housing Oil pump delivers insufficient oil Oil pump damaged or worn Worm driver is loose Install new oil pump Install new worm MS 231, MS 231 C, MS 251, MS 251...
... the event of faults before disassembling the oil pump. rectify other sources of trouble with the chain lubrication system, check and . Condition Chain receives no oil Cause Remedy Oil inlet hole in guide bar is blocked Clean oil inlet hole Intake hose or pickup ...chain oil Oil pump damaged or worn Oil suction hose connection damaged Engine housing cracked Install new oil pump Install new oil intake hose Install new engine housing Oil pump delivers insufficient oil Oil pump damaged or worn Worm driver is loose Install new oil pump Install new worm MS 231, MS 231 C, MS 251, MS 251...
Instruction Manual
Page 17
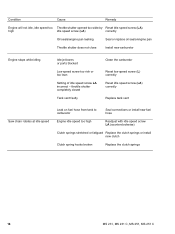
... - throttle shutter completely closed Tank vent faulty Clean the carburetor Reset low speed screw (L) correctly Reset idle speed screw (LA) correctly Replace tank vent Saw chain rotates at idle speed Leak on fuel hose from tank to carburetor Seal connections or install new fuel hose Engine idle speed too high Readjust... screw LA (counterclockwise) Clutch springs stretched or fatigued Replace the clutch springs or install new clutch Clutch spring hooks broken Replace the clutch springs 16 MS 231, MS 231 C, MS 251, MS 251 C
... - throttle shutter completely closed Tank vent faulty Clean the carburetor Reset low speed screw (L) correctly Reset idle speed screw (LA) correctly Replace tank vent Saw chain rotates at idle speed Leak on fuel hose from tank to carburetor Seal connections or install new fuel hose Engine idle speed too high Readjust... screw LA (counterclockwise) Clutch springs stretched or fatigued Replace the clutch springs or install new clutch Clutch spring hooks broken Replace the clutch springs 16 MS 231, MS 231 C, MS 251, MS 251 C
Instruction Manual
Page 21
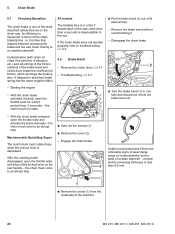
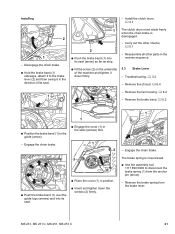
...(1). : Remove the cover (2). 219RA049 TG Machines with chain oil, chips, fine particles of abrasion, etc.) and smoothing of the friction surfaces of the brake band and clutch drum impair the coefficient of the machine. 20 MS 231, MS 231 C, MS 251, MS 251 C Remove the clutch drum, b 4.1 - Starting ...the engine 2 1 - Disengage the chain brake 2 OP 1 : Turn the brake band (1) to a complete standstill. Install a...
...(1). : Remove the cover (2). 219RA049 TG Machines with chain oil, chips, fine particles of abrasion, etc.) and smoothing of the friction surfaces of the brake band and clutch drum impair the coefficient of the machine. 20 MS 231, MS 231 C, MS 251, MS 251 C Remove the clutch drum, b 4.1 - Starting ...the engine 2 1 - Disengage the chain brake 2 OP 1 : Turn the brake band (1) to a complete standstill. Install a...
Instruction Manual
Page 22
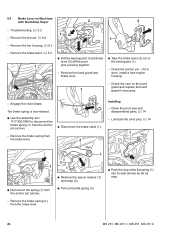
...position. : Push the brake band (1) over the guide lugs (arrows) and into its seat. : Insert and tighten down firmly. 5.3 Brake Lever - Engage the chain brake. 1 2 TOP 2 TOP 1 2310RA011 TG : Place the cover (1) in the reverse sequence. : Fit the screw (2) on the underside of its seat.... clutch drum must rotate freely when the chain brake is now relaxed. : Use the assembly tool 1117 890 0900 to the brake lever (2) and then swing it to disconnect the brake spring (1) from the brake lever. 2310RA015 TG MS 231, MS 231 C, MS 251, MS 251 C 21 Installing - Remove the brake ...
...position. : Push the brake band (1) over the guide lugs (arrows) and into its seat. : Insert and tighten down firmly. 5.3 Brake Lever - Engage the chain brake. 1 2 TOP 2 TOP 1 2310RA011 TG : Place the cover (1) in the reverse sequence. : Fit the screw (2) on the underside of its seat.... clutch drum must rotate freely when the chain brake is now relaxed. : Use the assembly tool 1117 890 0900 to the brake lever (2) and then swing it to disconnect the brake spring (1) from the brake lever. 2310RA015 TG MS 231, MS 231 C, MS 251, MS 251 C 21 Installing - Remove the brake ...
Instruction Manual
Page 25
... cable (1). - Engage the chain brake. Clean the pivot pins and disassembled parts, b 14 - Remove the fan housing, b 8.2 - Remove the hand guard and brake lever. 2310RA033 TG 1 : Take the brake lever (2) out of the flat spring (1) into its seat (arrow) as far as stop. 2310RA020 TG 24 MS 231, MS 231 C, MS 251, MS 251 C Troubleshooting, b 3.2 - Remove the...
... cable (1). - Engage the chain brake. Clean the pivot pins and disassembled parts, b 14 - Remove the fan housing, b 8.2 - Remove the hand guard and brake lever. 2310RA033 TG 1 : Take the brake lever (2) out of the flat spring (1) into its seat (arrow) as far as stop. 2310RA020 TG 24 MS 231, MS 231 C, MS 251, MS 251 C Troubleshooting, b 3.2 - Remove the...

Instruction Manual
Page 27
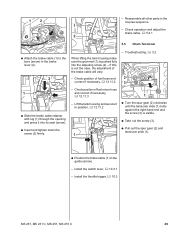
... travel is visible. : Attach the spring (1) to the anchor pin (2). : Use the assembly tool 1117 890 0900 to the brake lever (arrow). 26 MS 231, MS 231 C, MS 251, MS 251 C Remove the chain brake cover, b 5.2 The brake cable must be tightly against engine housing (arrows) and the clutch drum must be within the mark (a). Free travel...
... travel is visible. : Attach the spring (1) to the anchor pin (2). : Use the assembly tool 1117 890 0900 to the brake lever (arrow). 26 MS 231, MS 231 C, MS 251, MS 251 C Remove the chain brake cover, b 5.2 The brake cable must be tightly against engine housing (arrows) and the clutch drum must be within the mark (a). Free travel...
Instruction Manual
Page 30
... switch lever, b 10.3.1 - Check operation and adjust the brake cable, b 5.4.1 2310RA060 TG 2710RA079 TG 5.5 Chain Tensioner 2310RA066 TG : Attach the brake cable (1) to the bore (arrow) in the reverse sequence. - Install the throttle trigger, b 10.3 MS 231, MS 231 C, MS 251, MS 251 C 29 if this is not the case, the adjustment of fuel hose and correct...
... switch lever, b 10.3.1 - Check operation and adjust the brake cable, b 5.4.1 2310RA060 TG 2710RA079 TG 5.5 Chain Tensioner 2310RA066 TG : Attach the brake cable (1) to the bore (arrow) in the reverse sequence. - Install the throttle trigger, b 10.3 MS 231, MS 231 C, MS 251, MS 251 C 29 if this is not the case, the adjustment of fuel hose and correct...
Instruction Manual
Page 31
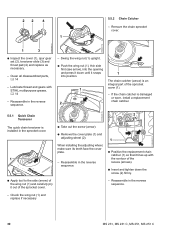
... screw (arrow). : Remove the cover plate (1) and adjusting wheel (2). If the chain catcher is damaged or worn, install a replacement chain catcher. 2310RA045 TG 5.5.1 Quick Chain Tensioner The quick chain tensioner is an integral part of the sprocket cover (1). - Swing the wing nut ... in the reverse sequence. 1 : Position the replacement chain catcher (1) so that it lines up with STIHL multipurpose grease, b 14 - Check the wing nut (1) and replace if necessary 30 MS 231, MS 231 C, MS 251, MS 251 C Remove the chain sprocket cover. 165RA007 TG 533RA058 TG 2310RA048 TG 1 ...
... screw (arrow). : Remove the cover plate (1) and adjusting wheel (2). If the chain catcher is damaged or worn, install a replacement chain catcher. 2310RA045 TG 5.5.1 Quick Chain Tensioner The quick chain tensioner is an integral part of the sprocket cover (1). - Swing the wing nut ... in the reverse sequence. 1 : Position the replacement chain catcher (1) so that it lines up with STIHL multipurpose grease, b 14 - Check the wing nut (1) and replace if necessary 30 MS 231, MS 231 C, MS 251, MS 251 C Remove the chain sprocket cover. 165RA007 TG 533RA058 TG 2310RA048 TG 1 ...
Instruction Manual
Page 32
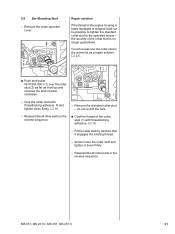
...the collar stud is badly damaged or stripped it down firmly, b 14 - Coat the collar stud with threadlocking adhesive, b 14 - MS 231, MS 231 C, MS 251, MS 251 C 31 5.6 Bar Mounting Stud - Reassemble all other parts in the reverse sequence. Remove the standard collar stud - Screw home the ...the engine housing is no longer guaranteed. the security of the collar stud (1) with threadlocking adhesive, fit and tighten down firmly. - Remove the chain sprocket cover. 2 1 Repair solution If the thread in the screw list as a repair solution, b 2.5. 1 2310RA046 TG 2310RA047 TG : ...
...the collar stud is badly damaged or stripped it down firmly, b 14 - Coat the collar stud with threadlocking adhesive, b 14 - MS 231, MS 231 C, MS 251, MS 251 C 31 5.6 Bar Mounting Stud - Reassemble all other parts in the reverse sequence. Remove the standard collar stud - Screw home the ...the engine housing is no longer guaranteed. the security of the collar stud (1) with threadlocking adhesive, fit and tighten down firmly. - Remove the chain sprocket cover. 2 1 Repair solution If the thread in the screw list as a repair solution, b 2.5. 1 2310RA046 TG 2310RA047 TG : ...
Instruction Manual
Page 79
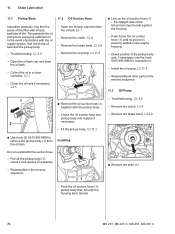
... oil tank if necessary, b1 : Line up the oil suction hose (1) - Reassemble all other parts in the engine housing. - Installing - Chain Lubrication 11.1 Pickup Body 11.2 Oil Suction Hose Impurities gradually clog the fine pores of problems with the oil supply system, first check the oil...hose (1) together with minute particles of dirt. Push the oil suction hose (1), pickup body first, through the housing bore (arrow). 78 MS 231, MS 231 C, MS 251, MS 251 C Install the oil pump, b 11.3 - In the event of the filter with the pickup body. - Check the oil suction hose...
... oil tank if necessary, b1 : Line up the oil suction hose (1) - Reassemble all other parts in the engine housing. - Installing - Chain Lubrication 11.1 Pickup Body 11.2 Oil Suction Hose Impurities gradually clog the fine pores of problems with the oil supply system, first check the oil...hose (1) together with minute particles of dirt. Push the oil suction hose (1), pickup body first, through the housing bore (arrow). 78 MS 231, MS 231 C, MS 251, MS 251 C Install the oil pump, b 11.3 - In the event of the filter with the pickup body. - Check the oil suction hose...
Instruction Manual
Page 96
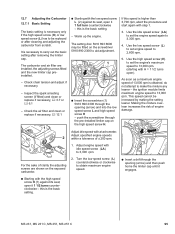
... 1 2 : Starting with a tachometer. Inspect the spark arresting screen (if fitted) and clean or replace if necessary, b 3.7 or b 6.1 - MS 231, MS 231 C, MS 251, MS 251 C 95 push the screwdriver through the opening (arrow) and into the low speed screw L and high speed screw H - As soon as a maximum engine...from scratch. It is necessary only if the high speed screw (H) or low speed screw (L) has to 2,800 rpm. 5. Check chain tension and adjust if necessary. - this speed is the basic setting. - Adjust specified engine speeds within a tolerance of 13,000 ...
... 1 2 : Starting with a tachometer. Inspect the spark arresting screen (if fitted) and clean or replace if necessary, b 3.7 or b 6.1 - MS 231, MS 231 C, MS 251, MS 251 C 95 push the screwdriver through the opening (arrow) and into the low speed screw L and high speed screw H - As soon as a maximum engine...from scratch. It is necessary only if the high speed screw (H) or low speed screw (L) has to 2,800 rpm. 5. Check chain tension and adjust if necessary. - this speed is the basic setting. - Adjust specified engine speeds within a tolerance of 13,000 ...
Instruction Manual
Page 97
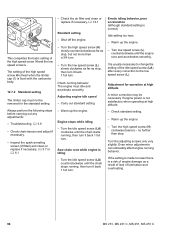
...of lubrication and overheating. 96 MS 231, MS 231 C, MS 251, MS 251 C Turn the low speed screw (L) slowly clockwise as far as stop . Warm up the engine. - Engine stops while idling - Erratic idling behavior, poor acceleration (although standard setting is idling - Check chain tension and adjust if necessary... idle speed screw (LA) clockwise until the engine runs and accelerates smoothly. Turn low speed screw (L) counterclockwise until the chain starts running behavior: The engine must not be necessary if engine power is not satisfactory when operating at high altitude A ...
...of lubrication and overheating. 96 MS 231, MS 231 C, MS 251, MS 251 C Turn the low speed screw (L) slowly clockwise as far as stop . Warm up the engine. - Engine stops while idling - Erratic idling behavior, poor acceleration (although standard setting is idling - Check chain tension and adjust if necessary... idle speed screw (LA) clockwise until the engine runs and accelerates smoothly. Turn low speed screw (L) counterclockwise until the chain starts running behavior: The engine must not be necessary if engine power is not satisfactory when operating at high altitude A ...


