
Instruction Manual
Page 5
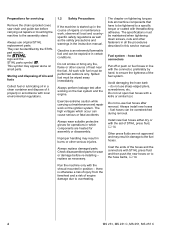
... with the shroud mounted in certain conditions. Run the machine only with the aid of STIHL press fluid, b 14. Preparations for servicing Remove the chain sprocket cover, saw chain and...for wear or damage before carrying out repairs or mounting the machine to overheating. 4 MS 231, MS 231 C, MS 251, MS 251 C do not use fuel hoses after working on tightening torques lists all the procedures ... cut open fuel hoses with local environmental regulations. 1.2 Safety Precautions If the machine is started up in accordance with a knife or similar tool. All work on fuel hoses in ...
... with the shroud mounted in certain conditions. Run the machine only with the aid of STIHL press fluid, b 14. Preparations for servicing Remove the chain sprocket cover, saw chain and...for wear or damage before carrying out repairs or mounting the machine to overheating. 4 MS 231, MS 231 C, MS 251, MS 251 C do not use fuel hoses after working on tightening torques lists all the procedures ... cut open fuel hoses with local environmental regulations. 1.2 Safety Precautions If the machine is started up in accordance with a knife or similar tool. All work on fuel hoses in ...
Instruction Manual
Page 19
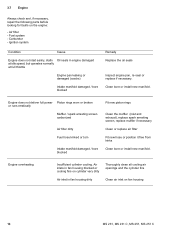
... Cause Engine does not start easily, stalls Oil seals in fan housing dirty Clean air inlet on the engine: - Air filter - Clean bore or install new manifold. 3.7 Engine Always check and, if necessary, repair the following parts before looking for faults on fan housing 18 MS 231, MS 231 C, MS 251, MS 251 C Fuel system - Engine does...
... Cause Engine does not start easily, stalls Oil seals in fan housing dirty Clean air inlet on the engine: - Air filter - Clean bore or install new manifold. 3.7 Engine Always check and, if necessary, repair the following parts before looking for faults on fan housing 18 MS 231, MS 231 C, MS 251, MS 251 C Fuel system - Engine does...
Instruction Manual
Page 21
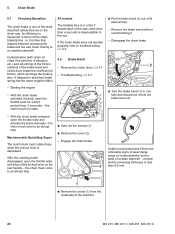
Its efficiency is measured in order if deceleration of the machine. 20 MS 231, MS 231 C, MS 251, MS 251 C Contamination (with QuickStop Super - With the chain brake activated (locked), open the throttle wide and activate the brake manually - The clutch drum must ..., chips, fine particles of abrasion, etc.) and smoothing of the friction surfaces of the brake band and clutch drum impair the coefficient of outside diameter - Starting the engine 2 1 - Disengage the chain brake 2 OP 1 : Turn the brake band (1) to a complete standstill. the chain must rotate freely when the ...
Its efficiency is measured in order if deceleration of the machine. 20 MS 231, MS 231 C, MS 251, MS 251 C Contamination (with QuickStop Super - With the chain brake activated (locked), open the throttle wide and activate the brake manually - The clutch drum must ..., chips, fine particles of abrasion, etc.) and smoothing of the friction surfaces of the brake band and clutch drum impair the coefficient of outside diameter - Starting the engine 2 1 - Disengage the chain brake 2 OP 1 : Turn the brake band (1) to a complete standstill. the chain must rotate freely when the ...
Instruction Manual
Page 48
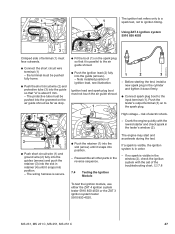
...the cylinder and tighten it snaps into position. - Before starting the test, install a new spark plug in retainer (4) until it down firmly. : Connect spark plug boot to the input terminal (1). Note installed position of electric shock. - MS 231, MS 231 C, MS 251, MS 251 C 47 1 a 2 The ignition test refers only...so that it snaps into the slot (arrow) until it is secure. : Push the retainer (1) into position. - The engine may start and accelerate during the test. If no spark is in the reverse sequence. The protective tube must be pushed into the guide (arrows...
...the cylinder and tighten it snaps into position. - Before starting the test, install a new spark plug in retainer (4) until it down firmly. : Connect spark plug boot to the input terminal (1). Note installed position of electric shock. - MS 231, MS 231 C, MS 251, MS 251 C 47 1 a 2 The ignition test refers only...so that it snaps into the slot (arrow) until it is secure. : Push the retainer (1) into position. - The engine may start and accelerate during the test. If no spark is in the reverse sequence. The protective tube must be pushed into the guide (arrows...

Instruction Manual
Page 49
...'s window (3). Before starting the test, install a new spark plug in the window (3), check the ignition system with STIHL press fluid, b 14 : Hold the ignition lead and leg spring together and push them into the pierced hole in the center of the leg spring into the spark plug boot. 48 MS 231, MS 231 C, MS 251, MS 251 C A new...
...'s window (3). Before starting the test, install a new spark plug in the window (3), check the ignition system with STIHL press fluid, b 14 : Hold the ignition lead and leg spring together and push them into the pierced hole in the center of the leg spring into the spark plug boot. 48 MS 231, MS 231 C, MS 251, MS 251 C A new...

Instruction Manual
Page 64
... to one additional turn of breakage. If the rewind spring can rewind properly. 1 - MS 231, MS 231 C, MS 251, MS 251 C 63 Installing new rewind spring 1 2 - If this is not the case, tension...The replacement spring, in the reverse sequence. 8.8 Replacing the Rewind Spring - Relieve tension of STIHL special lubricant before maximum spring tension is reached. Even a worn rewind spring is still pre-loaded...The starter grip (1) must still be properly tensioned, install a new spring. : Starting at the anchor loop, apply suitable tool to the recesses (arrows) and push the rewind ...
... to one additional turn of breakage. If the rewind spring can rewind properly. 1 - MS 231, MS 231 C, MS 251, MS 251 C 63 Installing new rewind spring 1 2 - If this is not the case, tension...The replacement spring, in the reverse sequence. 8.8 Replacing the Rewind Spring - Relieve tension of STIHL special lubricant before maximum spring tension is reached. Even a worn rewind spring is still pre-loaded...The starter grip (1) must still be properly tensioned, install a new spring. : Starting at the anchor loop, apply suitable tool to the recesses (arrows) and push the rewind ...
Instruction Manual
Page 82
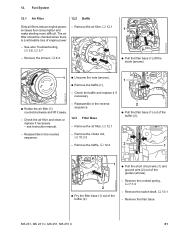
....1 - See also Troubleshooting, b 3.6, b 3.7 1 - see instruction manual. - Remove the air filter, b 12.1 2 : Pull the filter base (1) out of engine power. - Remove the choke rod, b 10.3.3 - MS 231, MS 231 C, MS 251, MS 251 C 81 The air filter should be checked when there is a noticeable loss of the buffer (2). - Reassemble in the reverse sequence. 12.3 Filter Base - Remove... in the reverse sequence. - 2310RA198 TG 12. Fuel System 12.1 Air Filter 12.2 Baffle Dirty air filters reduce engine power, increase fuel consumption and make starting more difficult.
....1 - See also Troubleshooting, b 3.6, b 3.7 1 - see instruction manual. - Remove the air filter, b 12.1 2 : Pull the filter base (1) out of engine power. - Remove the choke rod, b 10.3.3 - MS 231, MS 231 C, MS 251, MS 251 C 81 The air filter should be checked when there is a noticeable loss of the buffer (2). - Reassemble in the reverse sequence. 12.3 Filter Base - Remove... in the reverse sequence. - 2310RA198 TG 12. Fuel System 12.1 Air Filter 12.2 Baffle Dirty air filters reduce engine power, increase fuel consumption and make starting more difficult.
Instruction Manual
Page 88
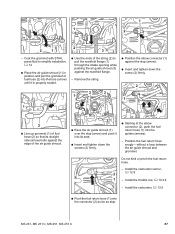
... hose snugly - without a loop between the air guide shroud and grommet. MS 231, MS 231 C, MS 251, MS 251 C 87 1 1 2 2310RA343 TG 2310RA345 TG 2310RA348 TG 2 2 1 3 - Install the throttle rod, b 10.3.4 - Coat the grommet with STIHL press fluid to pull the manifold flange (1) through the intake opening while pushing...the air guide shroud (1) over the stop (arrow) and push it into its seat. : Insert and tighten down the screws (2) firmly. : Starting at the elbow connector (2), push the fuel return hose (1) into the guides (arrows). - Do not kink or pinch the fuel return hose. ...
... hose snugly - without a loop between the air guide shroud and grommet. MS 231, MS 231 C, MS 251, MS 251 C 87 1 1 2 2310RA343 TG 2310RA345 TG 2310RA348 TG 2 2 1 3 - Install the throttle rod, b 10.3.4 - Coat the grommet with STIHL press fluid to pull the manifold flange (1) through the intake opening while pushing...the air guide shroud (1) over the stop (arrow) and push it into its seat. : Insert and tighten down the screws (2) firmly. : Starting at the elbow connector (2), push the fuel return hose (1) into the guides (arrows). - Do not kink or pinch the fuel return hose. ...
Instruction Manual
Page 96
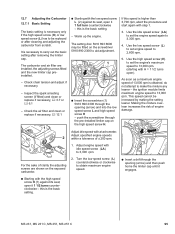
... - Turn the low speed screw (L) counterclockwise or clockwise to 13,000 rpm. (starting with the low speed screw L (2) against its seat, open it 1 full turn counterclockwise - MS 231, MS 231 C, MS 251, MS 251 C 95 12.7 Adjusting the Carburetor 12.7.1 Basic Setting The basic setting is necessary only.... It is necessary to make the mixture any leaner - Check the air filter and clean or replace if necessary, b 12.1 1 2 : Starting with H = 1 1/2 turns open). As soon as a maximum engine speed of clarity the adjusting screws are installed, the adjusting screws fitted and...
... - Turn the low speed screw (L) counterclockwise or clockwise to 13,000 rpm. (starting with the low speed screw L (2) against its seat, open it 1 full turn counterclockwise - MS 231, MS 231 C, MS 251, MS 251 C 95 12.7 Adjusting the Carburetor 12.7.1 Basic Setting The basic setting is necessary only.... It is necessary to make the mixture any leaner - Check the air filter and clean or replace if necessary, b 12.1 1 2 : Starting with H = 1 1/2 turns open). As soon as a maximum engine speed of clarity the adjusting screws are installed, the adjusting screws fitted and...
Instruction Manual
Page 97
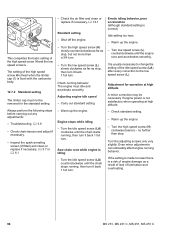
...- Warm up the engine. - Turn the high speed screw (H) clockwise (leaner) - Turn the idle speed screw (LA) clockwise until the chain starts running behavior. Turn the low speed screw (L) slowly clockwise as far as stop, but not more than stop , then turn it back 1 full... Even minor adjustments can noticeably affect engine running , then turn it back 1 full turn . The setting of lubrication and overheating. 96 MS 231, MS 231 C, MS 251, MS 251 C Inspect the spark arresting screen (if fitted) and clean or replace if necessary, b 3.7 or b 6.1 2310RA285 TG - Saw chain...
...- Warm up the engine. - Turn the high speed screw (H) clockwise (leaner) - Turn the idle speed screw (LA) clockwise until the chain starts running behavior. Turn the low speed screw (L) slowly clockwise as far as stop, but not more than stop , then turn it back 1 full... Even minor adjustments can noticeably affect engine running , then turn it back 1 full turn . The setting of lubrication and overheating. 96 MS 231, MS 231 C, MS 251, MS 251 C Inspect the spark arresting screen (if fitted) and clean or replace if necessary, b 3.7 or b 6.1 2310RA285 TG - Saw chain...


