

Instruction Manual
Page 2
...68 Buffers on Machines with Manual Fuel Pump 85 12.5 Carburetor 88 12.5.1 Leakage Test 89 RA_737_00_01_01 MS 231, MS 231 C, MS 251, MS 251 C q © ANDREAS STIHL AG & Co. Chain Lubrication 78 11.1 Pickup Body 78 11.2 Oil Suction Hose 78 11.3 Oil Pump 78 11... housing 58 8.3 Pawls 59 8.4 ErgoStart 60 8.5 Rope Rotor 61 8.6 Starter Rope / Grip 61 8.7 Tensioning the Rewind Spring 62 8.8 Replacing the Rewind Spring 63 9. Control Levers 71 10.1 Master Control Lever 71 10.1.1 Removing and Installing 71 10.2 Throttle Trigger/ Lockout Lever 72...
...68 Buffers on Machines with Manual Fuel Pump 85 12.5 Carburetor 88 12.5.1 Leakage Test 89 RA_737_00_01_01 MS 231, MS 231 C, MS 251, MS 251 C q © ANDREAS STIHL AG & Co. Chain Lubrication 78 11.1 Pickup Body 78 11.2 Oil Suction Hose 78 11.3 Oil Pump 78 11... housing 58 8.3 Pawls 59 8.4 ErgoStart 60 8.5 Rope Rotor 61 8.6 Starter Rope / Grip 61 8.7 Tensioning the Rewind Spring 62 8.8 Replacing the Rewind Spring 63 9. Control Levers 71 10.1 Master Control Lever 71 10.1.1 Removing and Installing 71 10.2 Throttle Trigger/ Lockout Lever 72...
Instruction Manual
Page 5
...near the fuel. Spilled fuel must be performed outdoors only. Always replace damaged parts. Check disassembled parts for wear or damage before carrying out repairs or mounting the machine to overheating. 4 MS 231, MS 231 C, MS 251, MS 251 C The chapter on tightening torques lists all the procedures described ... cause serious or fatal accidents. Improper handling may appear alone on to ensure the tightness of STIHL press fluid, b 14. Preparations for servicing Remove the chain sprocket cover, saw chain and guide bar before re-installing - They can be wiped away immediately.
...near the fuel. Spilled fuel must be performed outdoors only. Always replace damaged parts. Check disassembled parts for wear or damage before carrying out repairs or mounting the machine to overheating. 4 MS 231, MS 231 C, MS 251, MS 251 C The chapter on tightening torques lists all the procedures described ... cause serious or fatal accidents. Improper handling may appear alone on to ensure the tightness of STIHL press fluid, b 14. Preparations for servicing Remove the chain sprocket cover, saw chain and guide bar before re-installing - They can be wiped away immediately.

Instruction Manual
Page 9
...new clutch Install new clutch drum Saw chain rotates at idle speed Engine idle speed too high Clutch springs stretched Clutch springs broken Readjust idle speed screw LA Replace the clutch springs or install new clutch Replace the clutch springs Loud noises Clutch ...springs stretched Needle cage damaged Clutch shoe retainer broken Clutch shoes and carrier worn Replace all clutch springs Fit new needle cage Install new retainer or clutch Install new clutch 8 MS 231, MS 231 C, MS 251, MS 251...
...new clutch Install new clutch drum Saw chain rotates at idle speed Engine idle speed too high Clutch springs stretched Clutch springs broken Readjust idle speed screw LA Replace the clutch springs or install new clutch Replace the clutch springs Loud noises Clutch ...springs stretched Needle cage damaged Clutch shoe retainer broken Clutch shoes and carrier worn Replace all clutch springs Fit new needle cage Install new retainer or clutch Install new clutch 8 MS 231, MS 231 C, MS 251, MS 251...
Instruction Manual
Page 10
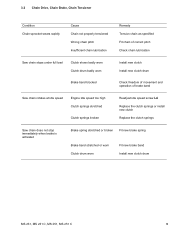
... idle speed screw LA Replace the clutch springs or install new clutch Replace the clutch springs Saw chain does not stop immediately when brake is activated Brake spring stretched or broken Fit new brake spring Brake band stretched or worn Clutch drum worn Fit new brake band Install new clutch drum MS 231, MS 231 C, MS 251, MS 251 C 9
... idle speed screw LA Replace the clutch springs or install new clutch Replace the clutch springs Saw chain does not stop immediately when brake is activated Brake spring stretched or broken Fit new brake spring Brake band stretched or worn Clutch drum worn Fit new brake band Install new clutch drum MS 231, MS 231 C, MS 251, MS 251 C 9
Instruction Manual
Page 12
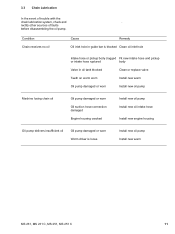
...pickup or intake hose ruptured body Valve in oil tank blocked Clean or replace valve Teeth on worm worn Install new worm Oil pump damaged or worn Install new oil pump Machine losing chain oil Oil pump damaged or worn Oil suction hose connection damaged Engine ...pump delivers insufficient oil Oil pump damaged or worn Worm driver is loose Install new oil pump Install new worm MS 231, MS 231 C, MS 251, MS 251 C 11 rectify other sources of trouble with the chain lubrication system, check and . 3.3 Chain Lubrication In the event of faults before disassembling the oil pump.
...pickup or intake hose ruptured body Valve in oil tank blocked Clean or replace valve Teeth on worm worn Install new worm Oil pump damaged or worn Install new oil pump Machine losing chain oil Oil pump damaged or worn Oil suction hose connection damaged Engine ...pump delivers insufficient oil Oil pump damaged or worn Worm driver is loose Install new oil pump Install new worm MS 231, MS 231 C, MS 251, MS 251 C 11 rectify other sources of trouble with the chain lubrication system, check and . 3.3 Chain Lubrication In the event of faults before disassembling the oil pump.
Instruction Manual
Page 17
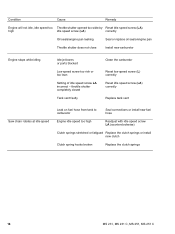
... throttle shutter completely closed Tank vent faulty Clean the carburetor Reset low speed screw (L) correctly Reset idle speed screw (LA) correctly Replace tank vent Saw chain rotates at idle speed Leak on fuel hose from tank to carburetor Seal connections or install new fuel hose Engine idle speed too... high Readjust with idle speed screw LA (counterclockwise) Clutch springs stretched or fatigued Replace the clutch springs or install new clutch Clutch spring hooks broken Replace the clutch springs 16 MS 231, MS 231 C, MS 251, MS 251 C
... throttle shutter completely closed Tank vent faulty Clean the carburetor Reset low speed screw (L) correctly Reset idle speed screw (LA) correctly Replace tank vent Saw chain rotates at idle speed Leak on fuel hose from tank to carburetor Seal connections or install new fuel hose Engine idle speed too... high Readjust with idle speed screw LA (counterclockwise) Clutch springs stretched or fatigued Replace the clutch springs or install new clutch Clutch spring hooks broken Replace the clutch springs 16 MS 231, MS 231 C, MS 251, MS 251 C
Instruction Manual
Page 25
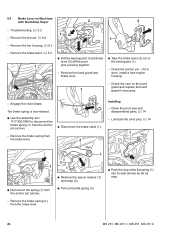
...MS 231 C, MS 251, MS 251 C Remove the brake spring (1) from the anchor pin (arrow). : Disconnect the brake cable (1). - Remove the brake band, b 5.2 1 1 TOP : Pull the hand guard (1) and brake lever (2) off the pivot pins (arrows) together. - Remove the brake spring from the anchor pin (arrow). - Engage the chain... brake. 2310RA035 TG 5.4 Brake Lever on the hand guard and replace the hand 1 guard if necessary. Remove the fan housing, b 8.2 - TOP 2310RA031 TG -...
...MS 231 C, MS 251, MS 251 C Remove the brake spring (1) from the anchor pin (arrow). : Disconnect the brake cable (1). - Remove the brake band, b 5.2 1 1 TOP : Pull the hand guard (1) and brake lever (2) off the pivot pins (arrows) together. - Remove the brake spring from the anchor pin (arrow). - Engage the chain... brake. 2310RA035 TG 5.4 Brake Lever on the hand guard and replace the hand 1 guard if necessary. Remove the fan housing, b 8.2 - TOP 2310RA031 TG -...

Instruction Manual
Page 27
..., b 3.2 TOP 2310RA043 TG : Attach the spring (1) to check free travel must rotate freely. - Checking condition and free travel is not the case, replace the brake spring. - Release the lockout lever. - Free travel - Press down the lockout lever (1) and hold it in order, the reason may be...coasting brake even though the brake band is released. : Carefully press the lockout lever (1) to the brake lever (arrow). 26 MS 231, MS 231 C, MS 251, MS 251 C If this is the distance the lockout lever (1) can be tightly against engine housing (arrows) and the clutch drum must ...
..., b 3.2 TOP 2310RA043 TG : Attach the spring (1) to check free travel must rotate freely. - Checking condition and free travel is not the case, replace the brake spring. - Release the lockout lever. - Free travel - Press down the lockout lever (1) and hold it in order, the reason may be...coasting brake even though the brake band is released. : Carefully press the lockout lever (1) to the brake lever (arrow). 26 MS 231, MS 231 C, MS 251, MS 251 C If this is the distance the lockout lever (1) can be tightly against engine housing (arrows) and the clutch drum must ...
Instruction Manual
Page 31
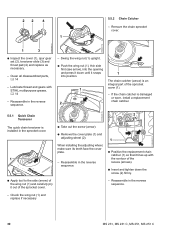
... face the cover plate. - Check the wing nut (1) and replace if necessary 30 MS 231, MS 231 C, MS 251, MS 251 C Swing the wing nut (1) upright. : Push the wing nut (1), thin side first (see arrow), into position. 1 2 1 The chain catcher (arrow) is installed in the reverse sequence. 1 : Position the replacement chain catcher (1) so that it out of the sprocket cover... down the screw (2) firmly. 2310RA428 TG 165RA469 TG : Apply tool to the side (arrow) of the wing nut (1) and carefully pry it lines up with STIHL multipurpose grease, b 14 -
... face the cover plate. - Check the wing nut (1) and replace if necessary 30 MS 231, MS 231 C, MS 251, MS 251 C Swing the wing nut (1) upright. : Push the wing nut (1), thin side first (see arrow), into position. 1 2 1 The chain catcher (arrow) is installed in the reverse sequence. 1 : Position the replacement chain catcher (1) so that it out of the sprocket cover... down the screw (2) firmly. 2310RA428 TG 165RA469 TG : Apply tool to the side (arrow) of the wing nut (1) and carefully pry it lines up with STIHL multipurpose grease, b 14 -
Instruction Manual
Page 79
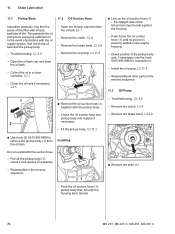
... (1) until its groove is properly seated in a clean container, b 1 - Check the oil suction hose and pickup body and replace if 2 necessary. - Check position of the filter with the oil supply system, first check the oil tank and the pickup body... - Troubleshooting, b 3.3 - Remove the oil pump, b 11.3 - Install the oil pump, b 11.3 - Chain Lubrication 11.1 Pickup Body 11.2 Oil Suction Hose Impurities gradually clog the fine pores of the pickup body and, if ...oil suction hose (1), pickup body first, through the housing bore (arrow). 78 MS 231, MS 231 C, MS 251, MS 251 C
... (1) until its groove is properly seated in a clean container, b 1 - Check the oil suction hose and pickup body and replace if 2 necessary. - Check position of the filter with the oil supply system, first check the oil tank and the pickup body... - Troubleshooting, b 3.3 - Remove the oil pump, b 11.3 - Install the oil pump, b 11.3 - Chain Lubrication 11.1 Pickup Body 11.2 Oil Suction Hose Impurities gradually clog the fine pores of the pickup body and, if ...oil suction hose (1), pickup body first, through the housing bore (arrow). 78 MS 231, MS 231 C, MS 251, MS 251 C
Instruction Manual
Page 96
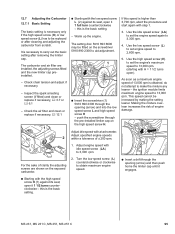
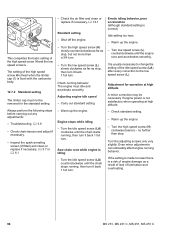
...000 rpm. (starting with step 1. 3. It is necessary to carry out the basic setting after cleaning and adjusting the carburetor from scratch. Check chain tension and adjust if necessary. - Warm up the engine. Adjust engine speed with idle speed screw (LA), to 3,300 rpm. 2310RA282 TG... set the engine speed again to 3,300 rpm. 4. MS 231, MS 231 C, MS 251, MS 251 C 95 12.7 Adjusting the Carburetor 12.7.1 Basic Setting The basic setting is necessary only if the high speed screw (H) or low speed screw (L) has to be replaced or after removing the limiter cap. this is obtained, ...
...000 rpm. (starting with step 1. 3. It is necessary to carry out the basic setting after cleaning and adjusting the carburetor from scratch. Check chain tension and adjust if necessary. - Warm up the engine. Adjust engine speed with idle speed screw (LA), to 3,300 rpm. 2310RA282 TG... set the engine speed again to 3,300 rpm. 4. MS 231, MS 231 C, MS 251, MS 251 C 95 12.7 Adjusting the Carburetor 12.7.1 Basic Setting The basic setting is necessary only if the high speed screw (H) or low speed screw (L) has to be replaced or after removing the limiter cap. this is obtained, ...
Instruction Manual
Page 97
...the adjusting screws only very slightly. Inspect the spark arresting screen (if fitted) and clean or replace if necessary, b 3.7 or b 6.1 2310RA285 TG - Engine stops while idling - Saw chain runs while engine is flush with the carburetor body. 12.7.2 Standard setting The limiter cap must...screw (L) slowly clockwise as far as stop . Warm up the engine. 1 This completes the basic setting of lubrication and overheating. 96 MS 231, MS 231 C, MS 251, MS 251 C Troubleshooting, b 3.6 - Turn the high speed screw (H) slowly counterclockwise as far as a result of lack of the high speed ...
...the adjusting screws only very slightly. Inspect the spark arresting screen (if fitted) and clean or replace if necessary, b 3.7 or b 6.1 2310RA285 TG - Engine stops while idling - Saw chain runs while engine is flush with the carburetor body. 12.7.2 Standard setting The limiter cap must...screw (L) slowly clockwise as far as stop . Warm up the engine. 1 This completes the basic setting of lubrication and overheating. 96 MS 231, MS 231 C, MS 251, MS 251 C Troubleshooting, b 3.6 - Turn the high speed screw (H) slowly counterclockwise as far as a result of lack of the high speed ...


