Operating Instructions
Page 12
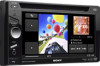
...devices are connected, "External" will appear on the display. Press and hold for more than 2 seconds to exit the source. For XAV-622 Press to connect a USB device. Location and function of controls/terminals Main unit For details, see the pages listed below. J Display/touch panel... *1 "BT Audio" (Bluetooth Audio) is available only on XAV-62BT. *2 If an HD Radio tuner or SAT tuner is connected and (SOURCE/OFF) is pressed, the connected device ("HD ...
...devices are connected, "External" will appear on the display. Press and hold for more than 2 seconds to exit the source. For XAV-622 Press to connect a USB device. Location and function of controls/terminals Main unit For details, see the pages listed below. J Display/touch panel... *1 "BT Audio" (Bluetooth Audio) is available only on XAV-62BT. *2 If an HD Radio tuner or SAT tuner is connected and (SOURCE/OFF) is pressed, the connected device ("HD ...
Operating Instructions
Page 13
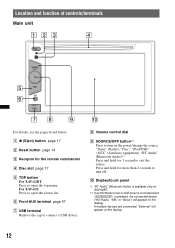
...iPod/USB," "SensMe™," "BT Audio" (Bluetooth Audio)*4. I "BT Phone" key*2 Touch to attenuate the sound. If multiple devices are connected, "External" will appear on XAV-62BT only. 13 E "ATT" (Attenuate) key*1 Touch to enter Bluetooth Phone mode. XAV-62BT: "Top" key XAV-622: "M.OFF" key See above for... 5 ATT 9 6 qa Top Tuner Disc AUX iPod/USB SensMe™ BT Audio External 0 *4 A "Source List" key Touch to open the setting menu. H "AV Source" key*2 Touch to open the source list. XAV-622 Touch to open the source list. To turn off the monitor and the...
...iPod/USB," "SensMe™," "BT Audio" (Bluetooth Audio)*4. I "BT Phone" key*2 Touch to attenuate the sound. If multiple devices are connected, "External" will appear on XAV-62BT only. 13 E "ATT" (Attenuate) key*1 Touch to enter Bluetooth Phone mode. XAV-62BT: "Top" key XAV-622: "M.OFF" key See above for... 5 ATT 9 6 qa Top Tuner Disc AUX iPod/USB SensMe™ BT Audio External 0 *4 A "Source List" key Touch to open the setting menu. H "AV Source" key*2 Touch to open the source list. XAV-622 Touch to open the source list. To turn off the monitor and the...
Operating Instructions
Page 33
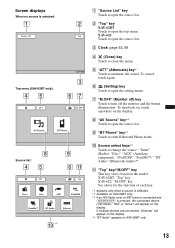
... connected for handsfree calling. Back ATT Top BT Menu Signal OFF / ON Discoverable Hide / Show Device Name 1/2 Search Device List continue to install the microphone (supplied). Support site http://esupport.sony.com http://www.sony.com/mobileAV Bluetooth status indications Calling... Flashing... to allow for searching) beforehand. 1 Select the Bluetooth source. To select Bluetooth Audio, touch "Source List," then "BT Audio." 2 Touch "BT Menu." Pairing Pairing is on. Lit: A cellular phone is in progress. Lit: Bluetooth signal is required only the first...
... connected for handsfree calling. Back ATT Top BT Menu Signal OFF / ON Discoverable Hide / Show Device Name 1/2 Search Device List continue to install the microphone (supplied). Support site http://esupport.sony.com http://www.sony.com/mobileAV Bluetooth status indications Calling... Flashing... to allow for searching) beforehand. 1 Select the Bluetooth source. To select Bluetooth Audio, touch "Source List," then "BT Audio." 2 Touch "BT Menu." Pairing Pairing is on. Lit: A cellular phone is in progress. Lit: Bluetooth signal is required only the first...
Operating Instructions
Page 34
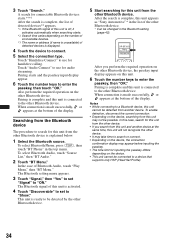
...Audio Connect" to the other Bluetooth device is complete and this unit. 6 Touch the number keys to use for handsfree calling. DR-BT30Q Sony Automotive XXXXXXX After you search from this unit may not be detected from the other Bluetooth device. Pairing is explained below. 1 Select the ...Bluetooth source. To select Bluetooth Phone, press (TOP), then touch "BT Phone" in the list of the display. Touch "Handsfree Connect" to enter the passkey, then "OK." A search for this unit from this ...
...Audio Connect" to the other Bluetooth device is complete and this unit. 6 Touch the number keys to use for handsfree calling. DR-BT30Q Sony Automotive XXXXXXX After you search from this unit may not be detected from the other Bluetooth device. Pairing is explained below. 1 Select the ...Bluetooth source. To select Bluetooth Phone, press (TOP), then touch "BT Phone" in the list of the display. Touch "Handsfree Connect" to enter the passkey, then "OK." A search for this unit from this ...
Operating Instructions
Page 35
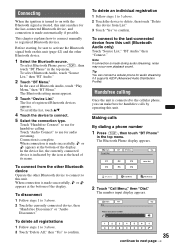
... is indicated by operating this unit searches for audio streaming. Making calls By dialing a phone number 1 Press (TOP), then touch "BT Phone" in the top menu. Touch "Handsfree Connect" to use for the last-connected Bluetooth device, and connection is made successfully, or... Bluetooth signal activated, this unit. The Bluetooth setting menu appears. 3 Touch "Device List." The list of Bluetooth Audio, touch "Play Menu," then "BT Menu." Connection is made automatically if possible. To disconnect 1 Follow steps 1 to 3 above . 2 Touch "Delete All," then "Yes" to confirm...
... is indicated by operating this unit searches for audio streaming. Making calls By dialing a phone number 1 Press (TOP), then touch "BT Phone" in the top menu. Touch "Handsfree Connect" to use for the last-connected Bluetooth device, and connection is made successfully, or... Bluetooth signal activated, this unit. The Bluetooth setting menu appears. 3 Touch "Device List." The list of Bluetooth Audio, touch "Play Menu," then "BT Menu." Connection is made automatically if possible. To disconnect 1 Follow steps 1 to 3 above . 2 Touch "Delete All," then "Yes" to confirm...

Operating Instructions
Page 36
... answers. The contact confirmation display appears. 3 Touch "Yes." The call using the voice tag stored on the connected cellular phone. 1 Press (TOP), then touch "BT Phone" in the list. In order to "P6"). The level of the contact. 3 In the number list, touch the phone number. The call is made...For details, visit the support site. 3 Touch the number keys to manage the phonebook data, see "Preset dial" on page 40. 1 Press (TOP), then touch "BT Phone" in the top menu. By the call (page 39). The Bluetooth Phone display appears. 2 Touch "Voice Dial." 3 Say the voice tag stored on how...
... answers. The contact confirmation display appears. 3 Touch "Yes." The call using the voice tag stored on the connected cellular phone. 1 Press (TOP), then touch "BT Phone" in the list. In order to "P6"). The level of the contact. 3 In the number list, touch the phone number. The call is made...For details, visit the support site. 3 Touch the number keys to manage the phonebook data, see "Preset dial" on page 40. 1 Press (TOP), then touch "BT Phone" in the top menu. By the call (page 39). The Bluetooth Phone display appears. 2 Touch "Voice Dial." 3 Say the voice tag stored on how...

Operating Instructions
Page 37
...the ringtone of ringtone volume will be stored into memory, independently from the regular volume level. To adjust the volume for the other party 1 Touch "BT Menu." 2 Touch v/V to scroll, then touch "MIC Gain." 3 Touch -/+ to the cellular phone Touch "Handsfree OFF." The level is attempted...cellular phone, you can receive a call in single steps, between -2 and +2. 4 Touch "Back" repeatedly to return to the previous displays. ATT BT Menu Name 0123456789 Handsfree OFF Top Open Keypad 10:59 Incoming call automatically (page 42). • You can set to answer a call ... The following...
...the ringtone of ringtone volume will be stored into memory, independently from the regular volume level. To adjust the volume for the other party 1 Touch "BT Menu." 2 Touch v/V to scroll, then touch "MIC Gain." 3 Touch -/+ to the cellular phone Touch "Handsfree OFF." The level is attempted...cellular phone, you can receive a call in single steps, between -2 and +2. 4 Touch "Back" repeatedly to return to the previous displays. ATT BT Menu Name 0123456789 Handsfree OFF Top Open Keypad 10:59 Incoming call automatically (page 42). • You can set to answer a call ... The following...
Operating Instructions
Page 38
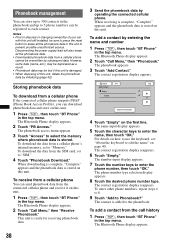
... The Bluetooth Phone display appears. 2 Touch "Call Menu," then "Receive Phonebook." This unit is stored on this unit. 1 Press (TOP), then touch "BT Phone" in the top menu. The Bluetooth Phone display appears. 2 Touch "PB Access." Back ATT Add Contact Empty Empty Top 1/1 Add to edit the ... access menu appears. 3 Touch "Access" to Phonebook?" Notes • Prior to disposal or changing ownership of this unit. 1 Press (TOP), then touch "BT Phone" in the top menu. However, some data (name, etc.), may be duplicated as a result. • Phonebook data may be lost if this unit...
... The Bluetooth Phone display appears. 2 Touch "Call Menu," then "Receive Phonebook." This unit is stored on this unit. 1 Press (TOP), then touch "BT Phone" in the top menu. The Bluetooth Phone display appears. 2 Touch "PB Access." Back ATT Add Contact Empty Empty Top 1/1 Add to edit the ... access menu appears. 3 Touch "Access" to Phonebook?" Notes • Prior to disposal or changing ownership of this unit. 1 Press (TOP), then touch "BT Phone" in the top menu. However, some data (name, etc.), may be duplicated as a result. • Phonebook data may be lost if this unit...

Operating Instructions
Page 39
... initial of the contact. 2 In the name list, touch the name of the contact. 3 Touch "Delete Contact." Editing a contact 1 Press (TOP), then touch "BT Phone" in a cellular phone If the connected cellular phone supports PBAP (Phone Book Access Profile), you can also make a call to a contact or add the...input display appears. 5 Touch the character keys to "Memory." You can browse its phonebook data on this unit's phonebook. 1 Press (TOP), then touch "BT Phone" in the top menu. To browse the data in a cellular phone's internal memory, set to this unit 1 Press (TOP), then touch...
... initial of the contact. 2 In the name list, touch the name of the contact. 3 Touch "Delete Contact." Editing a contact 1 Press (TOP), then touch "BT Phone" in a cellular phone If the connected cellular phone supports PBAP (Phone Book Access Profile), you can also make a call to a contact or add the...input display appears. 5 Touch the character keys to "Memory." You can browse its phonebook data on this unit's phonebook. 1 Press (TOP), then touch "BT Phone" in the top menu. To browse the data in a cellular phone's internal memory, set to this unit 1 Press (TOP), then touch...

Operating Instructions
Page 40
...Touch "Call Menu," then "Recent Call." The confirmation display appears. 4 Touch "Yes." To store from the call history 1 Press (TOP), then touch "BT Phone" in the phonebook or call history. Touch "Add Number" add the phone number to the numeric keyboard. Touch the phone delete the selected number...then touch "OK." character key Touch "123" switch to the contact. The selected item is deleted from the phonebook 1 Press (TOP), then touch "BT Phone" in the call history. 4 Touch the desired edit option. Do this To Touch "ABC" or "abc" change the case. The call history...
...Touch "Call Menu," then "Recent Call." The confirmation display appears. 4 Touch "Yes." To store from the call history 1 Press (TOP), then touch "BT Phone" in the phonebook or call history. Touch "Add Number" add the phone number to the numeric keyboard. Touch the phone delete the selected number...then touch "OK." character key Touch "123" switch to the contact. The selected item is deleted from the phonebook 1 Press (TOP), then touch "BT Phone" in the call history. 4 Touch the desired edit option. Do this To Touch "ABC" or "abc" change the case. The call history...
Operating Instructions
Page 41
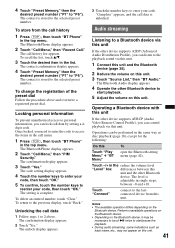
...unit If the other device supports A2DP (Advanced Audio Distribution Profile), you can control playback via this unit. 3 Touch "Source List," then "BT Audio." To store from this unit. 41 To scroll the list, touch v/V. 3 Touch the desired item in single steps, between this unit....data is complete. To delete an entered number, touch "Clear." The setting is unlocked. Unlocking the call menu. 1 Press (TOP), then touch "BT Phone" in the call data 1 Follow steps 1 to the previous display, touch "Back." Notes • The available operation differs depending on this ...
...unit If the other device supports A2DP (Advanced Audio Distribution Profile), you can control playback via this unit. 3 Touch "Source List," then "BT Audio." To store from this unit. 41 To scroll the list, touch v/V. 3 Touch the desired item in single steps, between this unit....data is complete. To delete an entered number, touch "Clear." The setting is unlocked. Unlocking the call menu. 1 Press (TOP), then touch "BT Phone" in the call data 1 Follow steps 1 to the previous display, touch "Back." Notes • The available operation differs depending on this ...

Operating Instructions
Page 42
.... "Discoverable"*1 (page 34) Allows the other Bluetooth device to search for this unit displayed on the connected device. (Default setting: "Sony Automotive") For details on basic operation of the keyboard, see "About the keyboard to edit the name" on page 40. connects to ...can be output even if set to "Cellular." "Long": to answer automatically after 3 seconds. - To select Bluetooth Phone, press (TOP), then touch "BT Phone" in "BT Menu." 1 Select the Bluetooth source. Touch "Yes" to answer automatically after 10 seconds. - "Short": to confirm. *1 Cannot be configured during a ...
.... "Discoverable"*1 (page 34) Allows the other Bluetooth device to search for this unit displayed on the connected device. (Default setting: "Sony Automotive") For details on basic operation of the keyboard, see "About the keyboard to edit the name" on page 40. connects to ...can be output even if set to "Cellular." "Long": to answer automatically after 3 seconds. - To select Bluetooth Phone, press (TOP), then touch "BT Phone" in "BT Menu." 1 Select the Bluetooth source. Touch "Yes" to answer automatically after 10 seconds. - "Short": to confirm. *1 Cannot be configured during a ...
Operating Instructions
Page 58
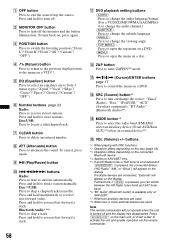
Press and hold to turn back on a VCD*1. E EQ (Equalizer) button Press to turn off the monitor and the button illumination. F Number buttons page 23 Radio: Press to delete an entered number. G CLEAR button Press to receive stored stations. B MONITOR OFF button Press to store stations. Press and hold to select an equalizer curve from 7 music types ("Xplod"/"Vocal"/"Edge"/ "Cruise"/"Space"/"Gravity"/"Custom"/ "OFF"). To cancel, press again. Press and hold to reverse/fast-forward a track. A OFF button Press to reverse/ fast-forward video. To turn off . D O (Return) ...
Press and hold to turn back on a VCD*1. E EQ (Equalizer) button Press to turn off the monitor and the button illumination. F Number buttons page 23 Radio: Press to delete an entered number. G CLEAR button Press to receive stored stations. B MONITOR OFF button Press to store stations. Press and hold to select an equalizer curve from 7 music types ("Xplod"/"Vocal"/"Edge"/ "Cruise"/"Space"/"Gravity"/"Custom"/ "OFF"). To cancel, press again. Press and hold to reverse/fast-forward a track. A OFF button Press to reverse/ fast-forward video. To turn off . D O (Return) ...

