
User Guide
Page 2
n2 N Contents Before Use ...6 Documentation ...6 Ergonomic Considerations ...8 Getting Started ...10 Locating Controls and Ports...11 About the Indicator Lights ...18 Connecting a Power Source ...19 Using the Battery Pack ...20 Shutting Down Your Computer Safely ...25 Using Your VAIO Computer ...26 Using the Keyboard ...27 Using the Touch Pad ...29 Using Special-function Buttons ...30 Using the Built-in MOTION EYE Camera...31 Using the Optical Disc Drive ...32 Using PC Cards ...39 Using the Memory Stick Media ...42 Using the Internet...46 Using Wireless LAN (WLAN) ...47
n2 N Contents Before Use ...6 Documentation ...6 Ergonomic Considerations ...8 Getting Started ...10 Locating Controls and Ports...11 About the Indicator Lights ...18 Connecting a Power Source ...19 Using the Battery Pack ...20 Shutting Down Your Computer Safely ...25 Using Your VAIO Computer ...26 Using the Keyboard ...27 Using the Touch Pad ...29 Using Special-function Buttons ...30 Using the Built-in MOTION EYE Camera...31 Using the Optical Disc Drive ...32 Using PC Cards ...39 Using the Memory Stick Media ...42 Using the Internet...46 Using Wireless LAN (WLAN) ...47

User Guide
Page 3
... External Microphone ...71 Connecting a Universal Serial Bus (USB) Device...72 Connecting a Printer ...75 Connecting an i.LINK Device ...77 Connecting to a Network (LAN) ...79 Customizing Your VAIO Computer ...81 Setting the Password ...82 Setting Up Your Computer with VAIO Central ...85 Using the Power Saving Modes ...86 Managing Power with...
... External Microphone ...71 Connecting a Universal Serial Bus (USB) Device...72 Connecting a Printer ...75 Connecting an i.LINK Device ...77 Connecting to a Network (LAN) ...79 Customizing Your VAIO Computer ...81 Setting the Password ...82 Setting Up Your Computer with VAIO Central ...85 Using the Power Saving Modes ...86 Managing Power with...
User Guide
Page 4
n4 N Precautions ...100 On Handling the LCD Screen ...101 On Using the Power Source ...102 On Handling Your Computer...103 On Using the Built-in MOTION EYE Camera...105 On Handling Floppy Disks ...105 On Handling Discs ...106 On Using the Battery Pack...107 On Using Headphones...108 On Handling Memory Stick Media...108 On Handling the Hard Disk ...109 Troubleshooting ...110 Computer ...112 System Security ...122 Battery...124 Built-in MOTION EYE Camera...126 Internet ...129 Networking ...131 CDs and DVDs...134 Display ...138 Printing ...141 Microphone ...142 Mouse ...143 Speakers ...144
n4 N Precautions ...100 On Handling the LCD Screen ...101 On Using the Power Source ...102 On Handling Your Computer...103 On Using the Built-in MOTION EYE Camera...105 On Handling Floppy Disks ...105 On Handling Discs ...106 On Using the Battery Pack...107 On Using Headphones...108 On Handling Memory Stick Media...108 On Handling the Hard Disk ...109 Troubleshooting ...110 Computer ...112 System Security ...122 Battery...124 Built-in MOTION EYE Camera...126 Internet ...129 Networking ...131 CDs and DVDs...134 Display ...138 Printing ...141 Microphone ...142 Mouse ...143 Speakers ...144

User Guide
Page 6
Contains safety guidelines and owner information. n6 N Before Use Before Use Congratulations on your VAIO computer. Contains an overview of this Sony VAIO® computer, and welcome to the on your purchase of connections, setting up information, etc. ❑ Safety information - Sony has combined leading-edge technology in audio, video, computing, and communications to read on -screen User Guide. Printed Documentation ❑ Welcome mat - Documentation Your documentation includes printed information and user guides to provide state-of-the-art personal computing.
Contains safety guidelines and owner information. n6 N Before Use Before Use Congratulations on your VAIO computer. Contains an overview of this Sony VAIO® computer, and welcome to the on your purchase of connections, setting up information, etc. ❑ Safety information - Sony has combined leading-edge technology in audio, video, computing, and communications to read on -screen User Guide. Printed Documentation ❑ Welcome mat - Documentation Your documentation includes printed information and user guides to provide state-of-the-art personal computing.
User Guide
Page 7
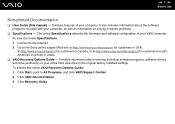
... User Guide (this online VAIO Recovery Options Guide: 1 Click Start, point to the Sony online support Web site at http://www.sony.com/pcsupport for customers in USA, at http://www.sony.ca/support for customers in Canada, or at http://www.sony.com/lapcsupport for customers in ...Latin American countries or areas. ❑ VAIO Recovery Options Guide - To view the online Specifications: 1 Connect to the Internet. 2 Go to All Programs, and click VAIO Support Central. 2 Click VAIO Documentation. 3 Click Recovery Guide. ...
... User Guide (this online VAIO Recovery Options Guide: 1 Click Start, point to the Sony online support Web site at http://www.sony.com/pcsupport for customers in USA, at http://www.sony.ca/support for customers in Canada, or at http://www.sony.com/lapcsupport for customers in ...Latin American countries or areas. ❑ VAIO Recovery Options Guide - To view the online Specifications: 1 Connect to the Internet. 2 Go to All Programs, and click VAIO Support Central. 2 Click VAIO Documentation. 3 Click Recovery Guide. ...

User Guide
Page 8
Let your upper arms hang naturally at your computer. Have breaks during sessions with your wrists in a neutral, comfortable position (3) while using your computer as a portable device in a chair with good back support. Adjust the level of your feet are flat on the floor. Whenever possible, you should attempt to take account of the following ergonomic considerations to both stationary and portable environments: ❑ Position of the chair so your computer - Keep your forearms horizontal (2), with your sides. Sit in front of you more comfortable. A footrest may ...
Let your upper arms hang naturally at your computer. Have breaks during sessions with your wrists in a neutral, comfortable position (3) while using your computer as a portable device in a chair with good back support. Adjust the level of your feet are flat on the floor. Whenever possible, you should attempt to take account of the following ergonomic considerations to both stationary and portable environments: ❑ Position of the chair so your computer - Keep your forearms horizontal (2), with your sides. Sit in front of you more comfortable. A footrest may ...

User Guide
Page 9
Use indirect lighting to your display that help reduce glare. When using an external display, set the display at eye level or slightly lower when you are sitting in front of the computer's display - Choose a location where windows and lights do not create glare and reflection on the display. Use the display's tilting feature to the proper position. Proper lighting adds to avoid bright spots on the display. Make sure the display screen is at a comfortable viewing distance. You can also purchase accessories for your comfort and work effectiveness. ❑ Positioning ...
Use indirect lighting to your display that help reduce glare. When using an external display, set the display at eye level or slightly lower when you are sitting in front of the computer's display - Choose a location where windows and lights do not create glare and reflection on the display. Use the display's tilting feature to the proper position. Proper lighting adds to avoid bright spots on the display. Make sure the display screen is at a comfortable viewing distance. You can also purchase accessories for your comfort and work effectiveness. ❑ Positioning ...

User Guide
Page 10
Getting Started This section describes how to get started with using your VAIO computer. ❑ Locating Controls and Ports (page 11) ❑ About the Indicator Lights (page 18) ❑ Connecting a Power Source (page 19) ❑ Using the Battery Pack (page 20) ❑ Shutting Down Your Computer Safely (page 25) n 10 N Getting Started
Getting Started This section describes how to get started with using your VAIO computer. ❑ Locating Controls and Ports (page 11) ❑ About the Indicator Lights (page 18) ❑ Connecting a Power Source (page 19) ❑ Using the Battery Pack (page 20) ❑ Shutting Down Your Computer Safely (page 25) n 10 N Getting Started

User Guide
Page 11
n 11 N Getting Started Locating Controls and Ports Take a moment to identify the controls and ports shown on the country or area of your model, depending on the following illustrations may appear different from your residency. The following pages. !
n 11 N Getting Started Locating Controls and Ports Take a moment to identify the controls and ports shown on the country or area of your model, depending on the following illustrations may appear different from your residency. The following pages. !

User Guide
Page 12
Front n 12 N Getting Started A Built-in MOTION EYE camera (page 31) B Built-in MOTION EYE camera indicator (page 18) C Internal microphone (monaural) D LCD screen (page 101) E Keyboard (page 27) F Touch pad (page 29) G WLAN (Wireless LAN) switch (page 47) H WLAN (Wireless LAN) indicator (page 18) I Power indicator (page 18) J Battery indicator (page 18) K Hard disk drive indicator (page 18) L Memory Stick media indicator (page 18) M Memory Stick media slot* (page 42) * Your computer supports Memory Stick Duo media and Memory Stick Pro high speed and high capacity capabilities.
Front n 12 N Getting Started A Built-in MOTION EYE camera (page 31) B Built-in MOTION EYE camera indicator (page 18) C Internal microphone (monaural) D LCD screen (page 101) E Keyboard (page 27) F Touch pad (page 29) G WLAN (Wireless LAN) switch (page 47) H WLAN (Wireless LAN) indicator (page 18) I Power indicator (page 18) J Battery indicator (page 18) K Hard disk drive indicator (page 18) L Memory Stick media indicator (page 18) M Memory Stick media slot* (page 42) * Your computer supports Memory Stick Duo media and Memory Stick Pro high speed and high capacity capabilities.

User Guide
Page 13
A Speakers B Num lock indicator (page 18) C Caps lock indicator (page 18) D Scroll lock indicator (page 18) E S1/S2 buttons (page 30) F Power button n 13 N Getting Started
A Speakers B Num lock indicator (page 18) C Caps lock indicator (page 18) D Scroll lock indicator (page 18) E S1/S2 buttons (page 30) F Power button n 13 N Getting Started

User Guide
Page 14
Back A Battery connector (page 20) n 14 N Getting Started
Back A Battery connector (page 20) n 14 N Getting Started
User Guide
Page 15
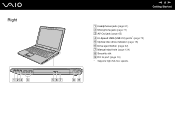
speeds. Right n 15 N Getting Started A Headphones jack (page 61) B Microphone jack (page 71) C AV Out jack (page 65) D Hi-Speed USB (USB 2.0) ports* (page 72) E Optical disc drive indicator (page 18) F Drive eject button (page 32) G Manual eject hole (page 134) H Security slot I DC In port (page 19) * Supports high-/full-/low-
speeds. Right n 15 N Getting Started A Headphones jack (page 61) B Microphone jack (page 71) C AV Out jack (page 65) D Hi-Speed USB (USB 2.0) ports* (page 72) E Optical disc drive indicator (page 18) F Drive eject button (page 32) G Manual eject hole (page 134) H Security slot I DC In port (page 19) * Supports high-/full-/low-

User Guide
Page 16
Left n 16 N Getting Started A Network (Ethernet) port *1 (page 79) B Modem port (page 46) C i.LINK® (IEEE1394) S400 port (page 77) D Air vent E Monitor (VGA) port *1(page 63) F Hi-Speed USB (USB 2.0) port*2 (page 72) G PC Card slot (page 39) H PC Card eject button (page 41) *1 Disabled when the computer is attached to the optional port replicator. *2 Supports high-/full-/low- Obstructed and unavailable when the computer is attached to the optional port replicator. speeds.
Left n 16 N Getting Started A Network (Ethernet) port *1 (page 79) B Modem port (page 46) C i.LINK® (IEEE1394) S400 port (page 77) D Air vent E Monitor (VGA) port *1(page 63) F Hi-Speed USB (USB 2.0) port*2 (page 72) G PC Card slot (page 39) H PC Card eject button (page 41) *1 Disabled when the computer is attached to the optional port replicator. *2 Supports high-/full-/low- Obstructed and unavailable when the computer is attached to the optional port replicator. speeds.

User Guide
Page 17
Bottom n 17 N Getting Started A Port replicator connector (page 57) B Air vents
Bottom n 17 N Getting Started A Port replicator connector (page 57) B Air vents

User Guide
Page 18
n 18 N Getting Started About the Indicator Lights Your computer is charging. Illuminates when the computer is using and does not work with the following indicator lights. Illuminates when data is read from or written to the optical disc. Press the Caps Lock key to turn off . Normal typing resumes when the Caps Lock indicator is not being used . Illuminates when data is on . Do not enter Standby mode or turn off . When the indicator is off, the optical disc is off the computer when this indicator is running out of power, and double-blinks when the battery is ...
n 18 N Getting Started About the Indicator Lights Your computer is charging. Illuminates when the computer is using and does not work with the following indicator lights. Illuminates when data is read from or written to the optical disc. Press the Caps Lock key to turn off . Normal typing resumes when the Caps Lock indicator is not being used . Illuminates when data is on . Do not enter Standby mode or turn off . When the indicator is off, the optical disc is off the computer when this indicator is running out of power, and double-blinks when the battery is ...
User Guide
Page 19
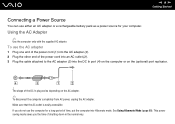
n 19 N Getting Started Connecting a Power Source You can use the computer for your computer. To use the AC adapter 1 Plug one end of the power cord (1) into the AC adapter (3). 2 Plug the other end of time, put the computer into the DC In port (4) on the computer or on the AC adapter. ✍ To disconnect the computer completely from AC power, unplug the AC adapter. If you the time of the DC In plug varies depending on the (optional) port replicator. ! See Using Hibernate Mode (page 89). Make sure that the AC outlet is easily accessible. Using the AC Adapter ✍ Use the computer...
n 19 N Getting Started Connecting a Power Source You can use the computer for your computer. To use the AC adapter 1 Plug one end of the power cord (1) into the AC adapter (3). 2 Plug the other end of time, put the computer into the DC In port (4) on the computer or on the AC adapter. ✍ To disconnect the computer completely from AC power, unplug the AC adapter. If you the time of the DC In plug varies depending on the (optional) port replicator. ! See Using Hibernate Mode (page 89). Make sure that the AC outlet is easily accessible. Using the AC Adapter ✍ Use the computer...

User Guide
Page 20
n 20 N Getting Started Using the Battery Pack The battery pack supplied with your computer is not fully charged at the time of purchase. Installing the Battery Pack To install the battery pack 1 Turn off the computer and close the LCD screen lid. 2 Slide the lock switch (1) to the UNLOCK position. 3 Slide the battery into the battery compartment until it clicks into place.
n 20 N Getting Started Using the Battery Pack The battery pack supplied with your computer is not fully charged at the time of purchase. Installing the Battery Pack To install the battery pack 1 Turn off the computer and close the LCD screen lid. 2 Slide the lock switch (1) to the UNLOCK position. 3 Slide the battery into the battery compartment until it clicks into place.

User Guide
Page 21
This computer is directly connected to operate only with genuine Sony batteries. n 21 N Getting Started 4 Slide the lock switch (1) to the LOCK position to secure the battery on the computer. ✍ When the computer is designed to AC power and has a battery pack installed, it uses power from the AC outlet. !
This computer is directly connected to operate only with genuine Sony batteries. n 21 N Getting Started 4 Slide the lock switch (1) to the LOCK position to secure the battery on the computer. ✍ When the computer is designed to AC power and has a battery pack installed, it uses power from the AC outlet. !

User Guide
Page 22
The battery is using battery power. The computer automatically charges the battery (the battery indicator light flashes in a double blink pattern as the battery charges). The computer is charging. When the battery is using AC power. Battery indicator light status On Blinks Double blinks Off Meaning The computer is about 85% charged, the battery indicator turns off. The battery is not fully charged at the time of power. To charge the battery pack 1 Install the battery pack. 2 Connect the AC adapter to the computer. n 22 N Getting Started Charging the Battery Pack The ...
The battery is using battery power. The computer automatically charges the battery (the battery indicator light flashes in a double blink pattern as the battery charges). The computer is charging. When the battery is using AC power. Battery indicator light status On Blinks Double blinks Off Meaning The computer is about 85% charged, the battery indicator turns off. The battery is not fully charged at the time of power. To charge the battery pack 1 Install the battery pack. 2 Connect the AC adapter to the computer. n 22 N Getting Started Charging the Battery Pack The ...