
User Guide
Page 4
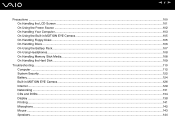
n4 N Precautions ...100 On Handling the LCD Screen ...101 On Using the Power Source ...102 On Handling Your Computer...103 On Using the Built-in MOTION EYE Camera...105 On Handling Floppy Disks ...105 On Handling Discs ...106 On Using the Battery Pack...107 On Using Headphones...108 On Handling Memory Stick Media...108 On Handling the Hard Disk ...109 Troubleshooting ...110 Computer ...112 System Security ...122 Battery...124 Built-in MOTION EYE Camera...126 Internet ...129 Networking ...131 CDs and DVDs...134 Display ...138 Printing ...141 Microphone ...142 Mouse ...143 Speakers ...144
n4 N Precautions ...100 On Handling the LCD Screen ...101 On Using the Power Source ...102 On Handling Your Computer...103 On Using the Built-in MOTION EYE Camera...105 On Handling Floppy Disks ...105 On Handling Discs ...106 On Using the Battery Pack...107 On Using Headphones...108 On Handling Memory Stick Media...108 On Handling the Hard Disk ...109 Troubleshooting ...110 Computer ...112 System Security ...122 Battery...124 Built-in MOTION EYE Camera...126 Internet ...129 Networking ...131 CDs and DVDs...134 Display ...138 Printing ...141 Microphone ...142 Mouse ...143 Speakers ...144
User Guide
Page 6
Sony has combined leading-edge technology in audio, video, computing, and communications to read on your purchase of this Sony VAIO® computer, and welcome to the on your VAIO computer. Contains an overview of -the-art personal computing. Contains safety guidelines and owner information. Documentation Your documentation includes printed information and user guides to provide state-of connections, setting up information, etc. ❑ Safety information - Printed Documentation ❑ Welcome mat - n6 N Before Use Before Use Congratulations on -screen User Guide.
Sony has combined leading-edge technology in audio, video, computing, and communications to read on your purchase of this Sony VAIO® computer, and welcome to the on your VAIO computer. Contains an overview of -the-art personal computing. Contains safety guidelines and owner information. Documentation Your documentation includes printed information and user guides to provide state-of connections, setting up information, etc. ❑ Safety information - Printed Documentation ❑ Welcome mat - n6 N Before Use Before Use Congratulations on -screen User Guide.
User Guide
Page 9
... muscle fatigue by adjusting the tilt of the display as well. ❑ Lighting - Use indirect lighting to find the best position. Make sure the display screen is at a comfortable viewing distance. Use the display's tilting feature to avoid bright spots on the display. You can also purchase accessories for your comfort...
... muscle fatigue by adjusting the tilt of the display as well. ❑ Lighting - Use indirect lighting to find the best position. Make sure the display screen is at a comfortable viewing distance. Use the display's tilting feature to avoid bright spots on the display. You can also purchase accessories for your comfort...

User Guide
Page 12
Front n 12 N Getting Started A Built-in MOTION EYE camera (page 31) B Built-in MOTION EYE camera indicator (page 18) C Internal microphone (monaural) D LCD screen (page 101) E Keyboard (page 27) F Touch pad (page 29) G WLAN (Wireless LAN) switch (page 47) H WLAN (Wireless LAN) indicator (page 18) I Power indicator (page 18) J Battery indicator (page 18) K Hard disk drive indicator (page 18) L Memory Stick media indicator (page 18) M Memory Stick media slot* (page 42) * Your computer supports Memory Stick Duo media and Memory Stick Pro high speed and high capacity capabilities.
Front n 12 N Getting Started A Built-in MOTION EYE camera (page 31) B Built-in MOTION EYE camera indicator (page 18) C Internal microphone (monaural) D LCD screen (page 101) E Keyboard (page 27) F Touch pad (page 29) G WLAN (Wireless LAN) switch (page 47) H WLAN (Wireless LAN) indicator (page 18) I Power indicator (page 18) J Battery indicator (page 18) K Hard disk drive indicator (page 18) L Memory Stick media indicator (page 18) M Memory Stick media slot* (page 42) * Your computer supports Memory Stick Duo media and Memory Stick Pro high speed and high capacity capabilities.

User Guide
Page 20
Installing the Battery Pack To install the battery pack 1 Turn off the computer and close the LCD screen lid. 2 Slide the lock switch (1) to the UNLOCK position. 3 Slide the battery into the battery compartment until it clicks into place. n 20 N Getting Started Using the Battery Pack The battery pack supplied with your computer is not fully charged at the time of purchase.
Installing the Battery Pack To install the battery pack 1 Turn off the computer and close the LCD screen lid. 2 Slide the lock switch (1) to the UNLOCK position. 3 Slide the battery into the battery compartment until it clicks into place. n 20 N Getting Started Using the Battery Pack The battery pack supplied with your computer is not fully charged at the time of purchase.
User Guide
Page 24
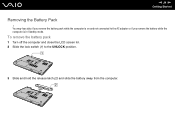
You may lose data if you remove the battery pack while the computer is on and not connected to the UNLOCK position. 3 Slide and hold the release latch (2) and slide the battery away from the computer. To remove the battery pack 1 Turn off the computer and close the LCD screen lid. 2 Slide the lock switch (1) to the AC adapter or if you remove the battery while the computer is in Standby mode. n 24 N Getting Started Removing the Battery Pack !
You may lose data if you remove the battery pack while the computer is on and not connected to the UNLOCK position. 3 Slide and hold the release latch (2) and slide the battery away from the computer. To remove the battery pack 1 Turn off the computer and close the LCD screen lid. 2 Slide the lock switch (1) to the AC adapter or if you remove the battery while the computer is in Standby mode. n 24 N Getting Started Removing the Battery Pack !
User Guide
Page 28
...Saving Modes (page 86). Make sure to quit such software before pressing the key combination. This key combination may change when the screen view is magnified or the standard view is disabled during video playback. For details on the power. When the LCD...is implemented by applying a lower resolution to the LCD screen with graphic images as it magnifies the screen view by changing the resolution. Fn + (F10): zoom Fn + (F12): Hibernate n 28 N Using Your VAIO Computer Changes the screen resolution to magnify/restore the screen view. ✍ The magnified view is not as clear...
...Saving Modes (page 86). Make sure to quit such software before pressing the key combination. This key combination may change when the screen view is magnified or the standard view is disabled during video playback. For details on the power. When the LCD...is implemented by applying a lower resolution to the LCD screen with graphic images as it magnifies the screen view by changing the resolution. Fn + (F10): zoom Fn + (F12): Hibernate n 28 N Using Your VAIO Computer Changes the screen resolution to magnify/restore the screen view. ✍ The magnified view is not as clear...
User Guide
Page 29
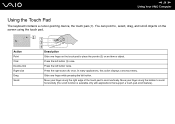
... Slide one finger while pressing the left button. Press the right button (4) once. Move your finger along the bottom to scroll vertically. n 29 N Using Your VAIO Computer Using the Touch Pad The keyboard contains a cursor-pointing device, the touch pad (1). In many applications, this action displays a shortcut menu. Press the left...
... Slide one finger while pressing the left button. Press the right button (4) once. Move your finger along the bottom to scroll vertically. n 29 N Using Your VAIO Computer Using the Touch Pad The keyboard contains a cursor-pointing device, the touch pad (1). In many applications, this action displays a shortcut menu. Press the left...
User Guide
Page 34
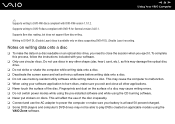
... disc may damage the optical disc drive. ❑ Do not strike or shake the computer while writing data onto a disc. ❑ Deactivate the screen saver and exit anti-virus software before writing data onto a disc. ❑ Do not use memory-resident utility software while writing data to a disc...at least 50 percent charged. ❑ Some DVD players and computer's DVD drives may cause the computer to malfunction. ❑ When using the VAIO Zone software. Notes on writing data onto a disc ❑ To make the data on a disc readable on applicable models using your software application...
... disc may damage the optical disc drive. ❑ Do not strike or shake the computer while writing data onto a disc. ❑ Deactivate the screen saver and exit anti-virus software before writing data onto a disc. ❑ Do not use memory-resident utility software while writing data to a disc...at least 50 percent charged. ❑ Some DVD players and computer's DVD drives may cause the computer to malfunction. ❑ When using the VAIO Zone software. Notes on writing data onto a disc ❑ To make the data on a disc readable on applicable models using your software application...

User Guide
Page 35
.... ❑ Do not switch power saving modes while the computer is activated, playing DVDs may cause the computer to malfunction. ❑ Deactivate the screen saver and exit anti-virus software before playing a DVD movie. ❑ Do not use memory-resident utility software to indicate in most regions of...details. ❑ Close all ," this means that you cannot play DVDs using the optical disc drive and the DVD playback software, such as VAIO Zone or WinDVD. When you should follow these recommendations. ❑ You can change the DVD region code while the WinDVD software is running,...
.... ❑ Do not switch power saving modes while the computer is activated, playing DVDs may cause the computer to malfunction. ❑ Deactivate the screen saver and exit anti-virus software before playing a DVD movie. ❑ Do not use memory-resident utility software to indicate in most regions of...details. ❑ Close all ," this means that you cannot play DVDs using the optical disc drive and the DVD playback software, such as VAIO Zone or WinDVD. When you should follow these recommendations. ❑ You can change the DVD region code while the WinDVD software is running,...
User Guide
Page 46
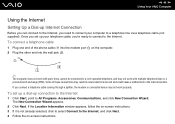
... 1 Click Start, point to All Programs, Accessories, Communications, and click New Connection Wizard. If the Location Information window appears, follow the on-screen instructions. 3 If it is not already selected, click to select Connect to a coin-operated telephone, and may not work with party lines,... the on the computer. 2 Plug the other end into the wall jack (2). ✍ The computer does not work properly. n 46 N Using Your VAIO Computer Using the Internet Setting Up a Dial-up your computer to a telephone line via a telephone cable (not supplied). The New Connection Wizard appears. 2...
... 1 Click Start, point to All Programs, Accessories, Communications, and click New Connection Wizard. If the Location Information window appears, follow the on-screen instructions. 3 If it is not already selected, click to select Connect to a coin-operated telephone, and may not work with party lines,... the on the computer. 2 Plug the other end into the wall jack (2). ✍ The computer does not work properly. n 46 N Using Your VAIO Computer Using the Internet Setting Up a Dial-up your computer to a telephone line via a telephone cable (not supplied). The New Connection Wizard appears. 2...

User Guide
Page 50
... access points are not used at the bottom of (decimal) 10 to 15. ✍ An ad-hoc network does not support WPA. n 50 N Using Your VAIO Computer 13 Enter exactly the same Network key again, for confirmation. 14 Select the check box This is ready to communicate with another computer. *1 See... computers, you configure. *3 Hexadecimal: A number representation using the digits 0-9, with their usual meaning, plus the letters A-F (or a-f) to represent hexadecimal digits with values of the screen. 15 Click OK.
... access points are not used at the bottom of (decimal) 10 to 15. ✍ An ad-hoc network does not support WPA. n 50 N Using Your VAIO Computer 13 Enter exactly the same Network key again, for confirmation. 14 Select the check box This is ready to communicate with another computer. *1 See... computers, you configure. *3 Hexadecimal: A number representation using the digits 0-9, with their usual meaning, plus the letters A-F (or a-f) to represent hexadecimal digits with values of the screen. 15 Click OK.
User Guide
Page 53
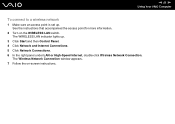
n 53 N Using Your VAIO Computer To connect to a wireless network 1 Make sure an access point is set up . 3 Click Start and then Control Panel. 4 Click Network and Internet Connections. 5 Click Network Connections. 6 In the right panel under LAN or High-Speed Internet, double-click Wireless Network Connection. See the instructions that accompanied the access point for more information. 2 Turn on -screen instructions. The Wireless Network Connection window appears. 7 Follow the on the WIRELESS LAN switch. The WIRELESS LAN indicator lights up .
n 53 N Using Your VAIO Computer To connect to a wireless network 1 Make sure an access point is set up . 3 Click Start and then Control Panel. 4 Click Network and Internet Connections. 5 Click Network Connections. 6 In the right panel under LAN or High-Speed Internet, double-click Wireless Network Connection. See the instructions that accompanied the access point for more information. 2 Turn on -screen instructions. The Wireless Network Connection window appears. 7 Follow the on the WIRELESS LAN switch. The WIRELESS LAN indicator lights up .
User Guide
Page 54
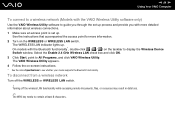
... To connect to a wireless network (Models with more information. 2 Turn on -screen instructions. * See the online Specifications to All Programs, and click VAIO Wireless Utility. See the instructions that accompanied the access point for more detailed information about wireless connections. 1 Make sure... taskbar to guide you through the set up process and provide you with the VAIO Wireless Utility software only) Use the VAIO Wireless Utility software to display the Wireless Device Switch window. Select the Enable 2.4 GHz Wireless LAN check box and click OK. 3 Click Start, point to see ...
... To connect to a wireless network (Models with more information. 2 Turn on -screen instructions. * See the online Specifications to All Programs, and click VAIO Wireless Utility. See the instructions that accompanied the access point for more detailed information about wireless connections. 1 Make sure... taskbar to guide you through the set up process and provide you with the VAIO Wireless Utility software only) Use the VAIO Wireless Utility software to display the Wireless Device Switch window. Select the Enable 2.4 GHz Wireless LAN check box and click OK. 3 Click Start, point to see ...

User Guide
Page 62
... N Using Peripheral Devices Connecting an External Display You can connect an external display to set up multiple monitors. ! Connected external displays are used as second screens. On Windows systems only, you can only use the VGA port on the port replicator. When the computer is attached to the optional port replicator...
... N Using Peripheral Devices Connecting an External Display You can connect an external display to set up multiple monitors. ! Connected external displays are used as second screens. On Windows systems only, you can only use the VGA port on the port replicator. When the computer is attached to the optional port replicator...

User Guide
Page 83
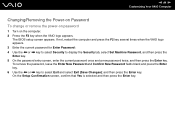
... need to be up to 32 alphanumeric characters (including spaces) long. ✍ The following is selected and then press the Enter key. The BIOS setup screen appears. The password can be sent in for depot service for password reset. Make sure not to display the Security tab, select Set Machine Password... the password twice and press the Enter key. If not, restart the computer and press the F2 key several times when the VAIO logo appears. 3 Use the < or , key to select Security to forget the password. Press the space bar to change the setting from Disabled to Enabled. 6 ...
... need to be up to 32 alphanumeric characters (including spaces) long. ✍ The following is selected and then press the Enter key. The BIOS setup screen appears. The password can be sent in for depot service for password reset. Make sure not to display the Security tab, select Set Machine Password... the password twice and press the Enter key. If not, restart the computer and press the F2 key several times when the VAIO logo appears. 3 Use the < or , key to select Security to forget the password. Press the space bar to change the setting from Disabled to Enabled. 6 ...
User Guide
Page 84
... the F2 key several times when the VAIO logo appears. 3 Enter the current password for Enter Password: 4 Use the < or , key to select Security to select Exit and select Exit (Save Changes); and then press the Enter key. On the Setup Confirmation screen, confirm that Yes is selected and then... press the Enter key. The BIOS setup screen appears. To remove the password, leave the Enter New Password and Confirm New Password fields blank and...
... the F2 key several times when the VAIO logo appears. 3 Enter the current password for Enter Password: 4 Use the < or , key to select Security to select Exit and select Exit (Save Changes); and then press the Enter key. On the Setup Confirmation screen, confirm that Yes is selected and then... press the Enter key. The BIOS setup screen appears. To remove the password, leave the Enter New Password and Confirm New Password fields blank and...

User Guide
Page 87
...data frequently. Standby mode uses more than four seconds, the computer will switch off the LCD screen and sets the hard disk and the CPU to Normal mode when you will enter Standby ...down when the computer enters Standby mode, you open the LCD screen lid. If the computer is in this , you can use VAIO Central to configure the computer to return to a low power ...consumption mode. Going back to Normal mode Press any unsaved data. n 87 N Customizing Your VAIO Computer Using Standby Mode Standby mode turns off automatically. You can change the Standby mode settings. ...
...data frequently. Standby mode uses more than four seconds, the computer will switch off the LCD screen and sets the hard disk and the CPU to Normal mode when you will enter Standby ...down when the computer enters Standby mode, you open the LCD screen lid. If the computer is in this , you can use VAIO Central to configure the computer to return to a low power ...consumption mode. Going back to Normal mode Press any unsaved data. n 87 N Customizing Your VAIO Computer Using Standby Mode Standby mode turns off automatically. You can change the Standby mode settings. ...

User Guide
Page 89
The Hibernating screen appears and the computer enters Hibernate mode. Alternatively, 1 Click Start and then Turn Off Computer. 2 Click Hibernate. If you press the power button for more ... to Normal mode Turn on the hard disk and power is off in this mode. The power indicator light is turned off. n 89 N Customizing Your VAIO Computer Using Hibernate Mode In Hibernate mode, the state of the system is saved on the computer by pressing the power button. Even when the...
The Hibernating screen appears and the computer enters Hibernate mode. Alternatively, 1 Click Start and then Turn Off Computer. 2 Click Hibernate. If you press the power button for more ... to Normal mode Turn on the hard disk and power is off in this mode. The power indicator light is turned off. n 89 N Customizing Your VAIO Computer Using Hibernate Mode In Hibernate mode, the state of the system is saved on the computer by pressing the power button. Even when the...

User Guide
Page 90
... for a long period of shutting down in Hibernate mode, you do not use VAIO Central to configure the computer to return to Normal mode from Standby mode. This ... Hibernate mode uses less power than from Hibernate mode than Standby mode. See Setting Up Your Computer with VAIO Central (page 85). ! It takes more time than Standby mode to be lost if you the time... of time, put the computer into Hibernate mode. n 90 N Customizing Your VAIO Computer ✍ If you cannot insert a disc. When the computer is in the normal way. Hibernate mode requires...
... for a long period of shutting down in Hibernate mode, you do not use VAIO Central to configure the computer to return to Normal mode from Standby mode. This ... Hibernate mode uses less power than from Hibernate mode than Standby mode. See Setting Up Your Computer with VAIO Central (page 85). ! It takes more time than Standby mode to be lost if you the time... of time, put the computer into Hibernate mode. n 90 N Customizing Your VAIO Computer ✍ If you cannot insert a disc. When the computer is in the normal way. Hibernate mode requires...

