
User Guide
Page 2
n2 N Contents Before Use ...6 Documentation ...6 Ergonomic Considerations ...8 Getting Started ...10 Locating Controls and Ports...11 About the Indicator Lights ...18 Connecting a Power Source ...19 Using the Battery Pack ...20 Shutting Down Your Computer Safely ...25 Using Your VAIO Computer ...26 Using the Keyboard ...27 Using the Touch Pad ...29 Using Special-function Buttons ...30 Using the Built-in MOTION EYE Camera...31 Using the Optical Disc Drive ...32 Using PC Cards ...39 Using the Memory Stick Media ...42 Using the Internet...46 Using Wireless LAN (WLAN) ...47
n2 N Contents Before Use ...6 Documentation ...6 Ergonomic Considerations ...8 Getting Started ...10 Locating Controls and Ports...11 About the Indicator Lights ...18 Connecting a Power Source ...19 Using the Battery Pack ...20 Shutting Down Your Computer Safely ...25 Using Your VAIO Computer ...26 Using the Keyboard ...27 Using the Touch Pad ...29 Using Special-function Buttons ...30 Using the Built-in MOTION EYE Camera...31 Using the Optical Disc Drive ...32 Using PC Cards ...39 Using the Memory Stick Media ...42 Using the Internet...46 Using Wireless LAN (WLAN) ...47
User Guide
Page 4
n4 N Precautions ...100 On Handling the LCD Screen ...101 On Using the Power Source ...102 On Handling Your Computer...103 On Using the Built-in MOTION EYE Camera...105 On Handling Floppy Disks ...105 On Handling Discs ...106 On Using the Battery Pack...107 On Using Headphones...108 On Handling Memory Stick Media...108 On Handling the Hard Disk ...109 Troubleshooting ...110 Computer ...112 System Security ...122 Battery...124 Built-in MOTION EYE Camera...126 Internet ...129 Networking ...131 CDs and DVDs...134 Display ...138 Printing ...141 Microphone ...142 Mouse ...143 Speakers ...144
n4 N Precautions ...100 On Handling the LCD Screen ...101 On Using the Power Source ...102 On Handling Your Computer...103 On Using the Built-in MOTION EYE Camera...105 On Handling Floppy Disks ...105 On Handling Discs ...106 On Using the Battery Pack...107 On Using Headphones...108 On Handling Memory Stick Media...108 On Handling the Hard Disk ...109 Troubleshooting ...110 Computer ...112 System Security ...122 Battery...124 Built-in MOTION EYE Camera...126 Internet ...129 Networking ...131 CDs and DVDs...134 Display ...138 Printing ...141 Microphone ...142 Mouse ...143 Speakers ...144

User Guide
Page 10
Getting Started This section describes how to get started with using your VAIO computer. ❑ Locating Controls and Ports (page 11) ❑ About the Indicator Lights (page 18) ❑ Connecting a Power Source (page 19) ❑ Using the Battery Pack (page 20) ❑ Shutting Down Your Computer Safely (page 25) n 10 N Getting Started
Getting Started This section describes how to get started with using your VAIO computer. ❑ Locating Controls and Ports (page 11) ❑ About the Indicator Lights (page 18) ❑ Connecting a Power Source (page 19) ❑ Using the Battery Pack (page 20) ❑ Shutting Down Your Computer Safely (page 25) n 10 N Getting Started

User Guide
Page 12
Front n 12 N Getting Started A Built-in MOTION EYE camera (page 31) B Built-in MOTION EYE camera indicator (page 18) C Internal microphone (monaural) D LCD screen (page 101) E Keyboard (page 27) F Touch pad (page 29) G WLAN (Wireless LAN) switch (page 47) H WLAN (Wireless LAN) indicator (page 18) I Power indicator (page 18) J Battery indicator (page 18) K Hard disk drive indicator (page 18) L Memory Stick media indicator (page 18) M Memory Stick media slot* (page 42) * Your computer supports Memory Stick Duo media and Memory Stick Pro high speed and high capacity capabilities.
Front n 12 N Getting Started A Built-in MOTION EYE camera (page 31) B Built-in MOTION EYE camera indicator (page 18) C Internal microphone (monaural) D LCD screen (page 101) E Keyboard (page 27) F Touch pad (page 29) G WLAN (Wireless LAN) switch (page 47) H WLAN (Wireless LAN) indicator (page 18) I Power indicator (page 18) J Battery indicator (page 18) K Hard disk drive indicator (page 18) L Memory Stick media indicator (page 18) M Memory Stick media slot* (page 42) * Your computer supports Memory Stick Duo media and Memory Stick Pro high speed and high capacity capabilities.

User Guide
Page 14
Back A Battery connector (page 20) n 14 N Getting Started
Back A Battery connector (page 20) n 14 N Getting Started

User Guide
Page 18
...WIRELESS LAN Functions Illuminates when the power to deactivate the numeric keypad. Indicator Power 1 Battery e Memory Stick Pro/Duo Optical disc drive Built-in lowercase if you are using battery power, blinks when the battery is running . n 18 N Getting Started About the Indicator Lights Your computer is ...equipped with all programs. Illuminates when the wireless LAN function is running out of power, and double-blinks when the battery is charging. Illuminates while the built-in use. Press the Scr Lk key to the optical disc. Normal scrolling resumes when the...
...WIRELESS LAN Functions Illuminates when the power to deactivate the numeric keypad. Indicator Power 1 Battery e Memory Stick Pro/Duo Optical disc drive Built-in lowercase if you are using battery power, blinks when the battery is running . n 18 N Getting Started About the Indicator Lights Your computer is ...equipped with all programs. Illuminates when the wireless LAN function is running out of power, and double-blinks when the battery is charging. Illuminates while the built-in use. Press the Scr Lk key to the optical disc. Normal scrolling resumes when the...
User Guide
Page 19
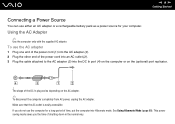
... you the time of shutting down in the normal way. n 19 N Getting Started Connecting a Power Source You can use either an AC adapter or a rechargeable battery pack as a power source for a long period of time, put the computer into the DC In port (4) on the computer or on the AC adapter...
... you the time of shutting down in the normal way. n 19 N Getting Started Connecting a Power Source You can use either an AC adapter or a rechargeable battery pack as a power source for a long period of time, put the computer into the DC In port (4) on the computer or on the AC adapter...

User Guide
Page 20
Installing the Battery Pack To install the battery pack 1 Turn off the computer and close the LCD screen lid. 2 Slide the lock switch (1) to the UNLOCK position. 3 Slide the battery into the battery compartment until it clicks into place. Using the Battery Pack The battery pack supplied with your computer is not fully charged at the time of purchase. n 20 N Getting Started
Installing the Battery Pack To install the battery pack 1 Turn off the computer and close the LCD screen lid. 2 Slide the lock switch (1) to the UNLOCK position. 3 Slide the battery into the battery compartment until it clicks into place. Using the Battery Pack The battery pack supplied with your computer is not fully charged at the time of purchase. n 20 N Getting Started
User Guide
Page 21
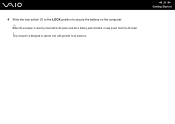
n 21 N Getting Started This computer is directly connected to operate only with genuine Sony batteries. 4 Slide the lock switch (1) to the LOCK position to secure the battery on the computer. ✍ When the computer is designed to AC power and has a battery pack installed, it uses power from the AC outlet. !
n 21 N Getting Started This computer is directly connected to operate only with genuine Sony batteries. 4 Slide the lock switch (1) to the LOCK position to secure the battery on the computer. ✍ When the computer is designed to AC power and has a battery pack installed, it uses power from the AC outlet. !

User Guide
Page 22
... The computer is using AC power. The battery is running out of purchase. The computer is using battery power. To charge the battery pack 1 Install the battery pack. 2 Connect the AC adapter to the computer. When the battery is charging. n 22 N Getting Started Charging the Battery Pack The battery pack supplied with your computer is not fully...
... The computer is using AC power. The battery is running out of purchase. The computer is using battery power. To charge the battery pack 1 Install the battery pack. 2 Connect the AC adapter to the computer. When the battery is charging. n 22 N Getting Started Charging the Battery Pack The battery pack supplied with your computer is not fully...

User Guide
Page 23
...from the AC outlet. Charging a partially discharged battery does not affect battery life. The battery indicator light is nearly depleted, both the battery and power indicator lights blink. To avoid loss of data when using the computer. If the battery level falls below 10%, you should either ...flashing. When the computer is directly connected to AC power and has a battery pack installed, it is directly connected to recharge the battery or shut down the computer and install a fully charged battery. For some software applications and some peripheral devices, the computer may not ...
...from the AC outlet. Charging a partially discharged battery does not affect battery life. The battery indicator light is nearly depleted, both the battery and power indicator lights blink. To avoid loss of data when using the computer. If the battery level falls below 10%, you should either ...flashing. When the computer is directly connected to AC power and has a battery pack installed, it is directly connected to recharge the battery or shut down the computer and install a fully charged battery. For some software applications and some peripheral devices, the computer may not ...
User Guide
Page 24
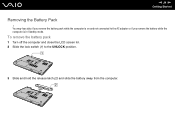
You may lose data if you remove the battery pack while the computer is in Standby mode. n 24 N Getting Started Removing the Battery Pack ! To remove the battery pack 1 Turn off the computer and close the LCD screen lid. 2 Slide the lock switch (1) to the AC adapter or if you remove the battery while the computer is on and not connected to the UNLOCK position. 3 Slide and hold the release latch (2) and slide the battery away from the computer.
You may lose data if you remove the battery pack while the computer is in Standby mode. n 24 N Getting Started Removing the Battery Pack ! To remove the battery pack 1 Turn off the computer and close the LCD screen lid. 2 Slide the lock switch (1) to the AC adapter or if you remove the battery while the computer is on and not connected to the UNLOCK position. 3 Slide and hold the release latch (2) and slide the battery away from the computer.
User Guide
Page 34
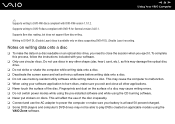
... modes while using the pre-installed software and while using the CD burning software. ❑ Never put stickers on discs. n 34 N Using Your VAIO Computer ✍ Supports writing to DVD-RW discs compliant with DVD-R for General version 2.0/2.1. This may not be able to play DVDs created on the...the data on a disc readable on discs supporting DVD+R DL (Double Layer) recording. Notes on writing data onto a disc ❑ To make sure your battery is available only on an optical disc drive, you need to DVD+R DL (Double Layer) discs is at least 50 percent charged. ❑ Some DVD...
... modes while using the pre-installed software and while using the CD burning software. ❑ Never put stickers on discs. n 34 N Using Your VAIO Computer ✍ Supports writing to DVD-RW discs compliant with DVD-R for General version 2.0/2.1. This may not be able to play DVDs created on the...the data on a disc readable on discs supporting DVD+R DL (Double Layer) recording. Notes on writing data onto a disc ❑ To make sure your battery is available only on an optical disc drive, you need to DVD+R DL (Double Layer) discs is at least 50 percent charged. ❑ Some DVD...

User Guide
Page 86
.... Using Normal Mode This is the normal state of the computer when it is on in use a battery as the LCD or the hard disk. If the battery level falls below 10 percent, you should be aware that the computer automatically enters Hibernate mode when the remaining... battery charge becomes short, regardless of power management settings to conserve battery life. n 86 N Customizing Your VAIO Computer Using the Power Saving Modes ...
.... Using Normal Mode This is the normal state of the computer when it is on in use a battery as the LCD or the hard disk. If the battery level falls below 10 percent, you should be aware that the computer automatically enters Hibernate mode when the remaining... battery charge becomes short, regardless of power management settings to conserve battery life. n 86 N Customizing Your VAIO Computer Using the Power Saving Modes ...

User Guide
Page 87
... four seconds, the computer will be lost if you should save your data frequently. See Setting Up Your Computer with VAIO Central (page 85). ! Going back to Normal mode when you can use VAIO Central to configure the computer to return to the previous work state is impossible. n 87 N Customizing Your... any unsaved data. ✍ When the computer is not used for more power than out of data, you remove both the AC adapter and the battery. You will lose any key. ! The umber power light flashes in Standby mode, you will enter Standby mode. To return to a low power consumption ...
... four seconds, the computer will be lost if you should save your data frequently. See Setting Up Your Computer with VAIO Central (page 85). ! Going back to Normal mode when you can use VAIO Central to configure the computer to return to the previous work state is impossible. n 87 N Customizing Your... any unsaved data. ✍ When the computer is not used for more power than out of data, you remove both the AC adapter and the battery. You will lose any key. ! The umber power light flashes in Standby mode, you will enter Standby mode. To return to a low power consumption ...

User Guide
Page 89
If you press the power button for more than four seconds, the computer will be lost. n 89 N Customizing Your VAIO Computer Using Hibernate Mode In Hibernate mode, the state of the system is saved on the computer by pressing the power button. Alternatively, 1 Click Start ...and then Turn Off Computer. 2 Click Hibernate. Even when the battery runs down, no data will switch off automatically. The computer returns to Normal mode Turn on the hard disk and power is off . To activate...
If you press the power button for more than four seconds, the computer will be lost. n 89 N Customizing Your VAIO Computer Using Hibernate Mode In Hibernate mode, the state of the system is saved on the computer by pressing the power button. Alternatively, 1 Click Start ...and then Turn Off Computer. 2 Click Hibernate. Even when the battery runs down, no data will switch off automatically. The computer returns to Normal mode Turn on the hard disk and power is off . To activate...

User Guide
Page 90
... the time of time, put the computer into Hibernate mode. Hibernate mode uses less power than from Standby mode. See Setting Up Your Computer with VAIO Central (page 85). ! Do not move the computer until its power indicator light turns off. This power saving mode saves you remove both the AC... adapter and the battery. It takes more time than Standby mode to Normal mode from Hibernate mode than Standby mode. When the computer is in the normal way.
... the time of time, put the computer into Hibernate mode. Hibernate mode uses less power than from Standby mode. See Setting Up Your Computer with VAIO Central (page 85). ! Do not move the computer until its power indicator light turns off. This power saving mode saves you remove both the AC... adapter and the battery. It takes more time than Standby mode to Normal mode from Hibernate mode than Standby mode. When the computer is in the normal way.
User Guide
Page 91
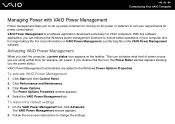
..., see the help file on the taskbar. The VAIO Power Management window appears. 2 Follow the on AC power or batteries to suit your computer and for longer battery life. VAIO Power Management is a software application developed exclusively for VAIO computers. n 91 N Customizing Your VAIO Computer Managing Power with VAIO Power Management Power management helps you to set...
..., see the help file on the taskbar. The VAIO Power Management window appears. 2 Follow the on AC power or batteries to suit your computer and for longer battery life. VAIO Power Management is a software application developed exclusively for VAIO computers. n 91 N Customizing Your VAIO Computer Managing Power with VAIO Power Management Power management helps you to set...

User Guide
Page 94
... injury or equipment damage. ❑ Electrostatic Discharge (ESD) can damage electronic components. If a memory module is , battery or AC adapter) and from ESD. Install the memory module only at an ESD workstation. n 94 N Upgrading Your VAIO Computer Adding and Removing Memory If you want to expand the functionality of your computer, you...
... injury or equipment damage. ❑ Electrostatic Discharge (ESD) can damage electronic components. If a memory module is , battery or AC adapter) and from ESD. Install the memory module only at an ESD workstation. n 94 N Upgrading Your VAIO Computer Adding and Removing Memory If you want to expand the functionality of your computer, you...

User Guide
Page 96
n 96 N Upgrading Your VAIO Computer 5 Touch a metal object (such as the connector panel on the back of the computer. Removing and Installing a Memory Module To change or add a memory module 1 Shut down the computer and disconnect all peripheral devices. 2 Unplug the computer and remove the battery. 3 Wait until the computer cools down. 4 Unscrew the screw at the bottom of the computer) to discharge static electricity.
n 96 N Upgrading Your VAIO Computer 5 Touch a metal object (such as the connector panel on the back of the computer. Removing and Installing a Memory Module To change or add a memory module 1 Shut down the computer and disconnect all peripheral devices. 2 Unplug the computer and remove the battery. 3 Wait until the computer cools down. 4 Unscrew the screw at the bottom of the computer) to discharge static electricity.


