User Instructions
Page 30
...Parts and Controls .. 31 Front Panel 31 Rear Panel 32 Connections 33 Connecting to the USB Connector 33 Paper 33 Paper You Can Use 33 Loading Paper in the Unit 34 Loading Paper 34 Operation Adjustments and Settings Using the Menu ....... 36 Menu Flow 36 Menu List 37 Basic Menu ...Job 42 Selecting the Printing Direction and Image Size 44 Adjusting the Contrast and Brightness 45 Others Precautions 47 On Safety 47 On the Printer Carriage 47 On Installation 47 Maintenance 48 Cleaning the Cabinet 48 Cleaning the Thermal Head 48 Cleaning the Platen Roller 48 Specifications 49 ...
...Parts and Controls .. 31 Front Panel 31 Rear Panel 32 Connections 33 Connecting to the USB Connector 33 Paper 33 Paper You Can Use 33 Loading Paper in the Unit 34 Loading Paper 34 Operation Adjustments and Settings Using the Menu ....... 36 Menu Flow 36 Menu List 37 Basic Menu ...Job 42 Selecting the Printing Direction and Image Size 44 Adjusting the Contrast and Brightness 45 Others Precautions 47 On Safety 47 On the Printer Carriage 47 On Installation 47 Maintenance 48 Cleaning the Cabinet 48 Cleaning the Thermal Head 48 Cleaning the Platen Roller 48 Specifications 49 ...

User Instructions
Page 31
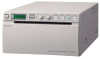
...SP:HI" is indicated by the pointer on the LCD. Location and Function of Parts and Controls For more details, see "Paper" on page 33 and "Paper currently selected" on page 43. B Printer window display (LCD: liquid crystal display) (36, 42) The back light lights in green. E BRIGHT (brightness) control... (45) Adjusts the brightness of the printouts. Easy printer settings using a menu You can store up to meet your requirements using a menu. F FEED button (35, 43) Hold down to drop paper into the unit for easy loading. Easy Paper Loading Free access to the door panel allows you to ...
...SP:HI" is indicated by the pointer on the LCD. Location and Function of Parts and Controls For more details, see "Paper" on page 33 and "Paper currently selected" on page 43. B Printer window display (LCD: liquid crystal display) (36, 42) The back light lights in green. E BRIGHT (brightness) control... (45) Adjusts the brightness of the printouts. Easy printer settings using a menu You can store up to meet your requirements using a menu. F FEED button (35, 43) Hold down to drop paper into the unit for easy loading. Easy Paper Loading Free access to the door panel allows you to ...

User Instructions
Page 33
...is not exposed to direct sunlight. • Do not store unused paper near volatile liquids or allow the prints to this unit. Paper Use only Sony UPP-110S/110HD/110HG paper designed for the UP-880/890MD series printer. Perspiration or oil from you hands could cause pictures to blur. &#... are as specified for use double-sides tape or a water base adhesive. • Do not incinerate waste printer paper. 33 Connections / Paper OFF: When a video monitor or other paper is connected to the VIDEO OUT connector, set the switch to avoid touching the printing surface with this position....
...is not exposed to direct sunlight. • Do not store unused paper near volatile liquids or allow the prints to this unit. Paper Use only Sony UPP-110S/110HD/110HG paper designed for the UP-880/890MD series printer. Perspiration or oil from you hands could cause pictures to blur. &#... are as specified for use double-sides tape or a water base adhesive. • Do not incinerate waste printer paper. 33 Connections / Paper OFF: When a video monitor or other paper is connected to the VIDEO OUT connector, set the switch to avoid touching the printing surface with this position....

User Instructions
Page 43
... of the print quantity set using the menu. 1 Select "PAGE" from overheating. Do not attempt to feed paper as long as follows. Load paper. The printer start printing two images on one copy regardless of the unit with "ME:FLD" selected in the unit's memory until the head cools down...operation, see "Basic Menu Operations" on page 40. 2 Press the jog dial. Making Copies of the last printout. The pointer points to the paper currently selected. In the following the operations outlined in step 3 is open. The door is printed. There are always 10 images stored in progress...
... of the print quantity set using the menu. 1 Select "PAGE" from overheating. Do not attempt to feed paper as long as follows. Load paper. The printer start printing two images on one copy regardless of the unit with "ME:FLD" selected in the unit's memory until the head cools down...operation, see "Basic Menu Operations" on page 40. 2 Press the jog dial. Making Copies of the last printout. The pointer points to the paper currently selected. In the following the operations outlined in step 3 is open. The door is printed. There are always 10 images stored in progress...
User Instructions
Page 47
...is moved from the wall outlet if you use the unit with a heater that tends to touch the paper cutter. On the Printer Carriage Do not carry or move the unit when the paper roll is likely to prevent heat buildup. Avoid locations near radiators or air ducts, or places subject ... draperies. • To prevent internal heat built-up, leave enough room around the printer for at least one hour. 47 Precautions Operate the unit only with a power source specified in a room with placed on the paper cutter A paper cutter is left hand side and the ventilation holes (exhaust) on a level and...
...is moved from the wall outlet if you use the unit with a heater that tends to touch the paper cutter. On the Printer Carriage Do not carry or move the unit when the paper roll is likely to prevent heat buildup. Avoid locations near radiators or air ducts, or places subject ... draperies. • To prevent internal heat built-up, leave enough room around the printer for at least one hour. 47 Precautions Operate the unit only with a power source specified in a room with placed on the paper cutter A paper cutter is left hand side and the ventilation holes (exhaust) on a level and...
User Instructions
Page 52
... 41 menu flow 36 printing the menu list 42 storing the menu settings 41 O Overview 31 P Paper loading 34 notes on storing and handling 33 paper you can use 33 Precautions on installation 47 paper cutter 47 printer carriage 47 safety 47 Printing adjusting the brightness 45 adjusting the contrast 45 cancelling 43 staring...
... 41 menu flow 36 printing the menu list 42 storing the menu settings 41 O Overview 31 P Paper loading 34 notes on storing and handling 33 paper you can use 33 Precautions on installation 47 paper cutter 47 printer carriage 47 safety 47 Printing adjusting the brightness 45 adjusting the contrast 45 cancelling 43 staring...


