Operating Instructions
Page 4
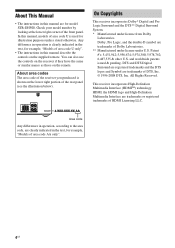
...• The instructions in this manual are clearly indicated in the text, for model STR-DH500. This receiver incorporates High-Definition Multimedia Interface (HDMITM) technology. Any difference in operation is shown on the remote. CENTER SURROUND R L FRONT L R SPEAKERS Area code Any differences in operation, ... The instructions in this manual describe the controls on the supplied remote. Check your model number by looking at the lower right corner of area code AA only". On Copyrights This receiver incorporates Dolby* Digital and Pro Logic Surround and the DTS** Digital...
...• The instructions in this manual are clearly indicated in the text, for model STR-DH500. This receiver incorporates High-Definition Multimedia Interface (HDMITM) technology. Any difference in operation is shown on the remote. CENTER SURROUND R L FRONT L R SPEAKERS Area code Any differences in operation, ... The instructions in this manual describe the controls on the supplied remote. Check your model number by looking at the lower right corner of area code AA only". On Copyrights This receiver incorporates Dolby* Digital and Pro Logic Surround and the DTS** Digital...
Operating Instructions
Page 5
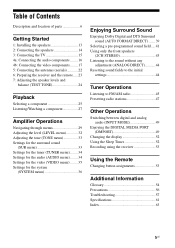
...4a: Connecting the audio components ........ 16 4b: Connecting the video components ........ 17 5: Connecting the antennas (aerials 22 6: Preparing the receiver and the remote..... 23 7: Adjusting the speaker levels and balance (TEST TONE 24 Playback Selecting a component 25 Listening/Watching a component 27 Amplifier Operations ...MEDIA PORT (DMPORT 49 Changing the display 52 Using the Sleep Timer 52 Recording using the receiver 53 Using the Remote Changing button assignments 53 Additional Information Glossary 54 Precautions 56 Troubleshooting 57 Specifications 61 Index 63 5US
...4a: Connecting the audio components ........ 16 4b: Connecting the video components ........ 17 5: Connecting the antennas (aerials 22 6: Preparing the receiver and the remote..... 23 7: Adjusting the speaker levels and balance (TEST TONE 24 Playback Selecting a component 25 Listening/Watching a component 27 Amplifier Operations ...MEDIA PORT (DMPORT 49 Changing the display 52 Using the Sleep Timer 52 Recording using the receiver 53 Using the Remote Changing button assignments 53 Additional Information Glossary 54 Precautions 56 Troubleshooting 57 Specifications 61 Index 63 5US
Operating Instructions
Page 6
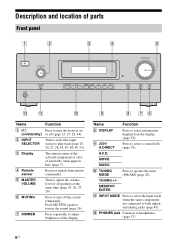
...here (page 7). MOVIE MUSIC DISPLAY DIMMER MUTING qs qa q; 9 8 76 Name A ?/1 (on the display (page 52). A.F.D. Receives signals from remote commander. Turn to restore the sound (page 26). Press MUTING again to adjust the volume level of the display. MEMORY/ ENTER K ... Press to select the input mode when the same components are connected to select information displayed on /standby) B INPUT SELECTOR C Display D Remote sensor E MASTER VOLUME F MUTING G DIMMER Function Press to headphones (page 57). 6US Name Function H DISPLAY Press to both digital and...
...here (page 7). MOVIE MUSIC DISPLAY DIMMER MUTING qs qa q; 9 8 76 Name A ?/1 (on the display (page 52). A.F.D. Receives signals from remote commander. Turn to restore the sound (page 26). Press MUTING again to adjust the volume level of the display. MEMORY/ ENTER K ... Press to select the input mode when the same components are connected to select information displayed on /standby) B INPUT SELECTOR C Display D Remote sensor E MASTER VOLUME F MUTING G DIMMER Function Press to headphones (page 57). 6US Name Function H DISPLAY Press to both digital and...
Operating Instructions
Page 10
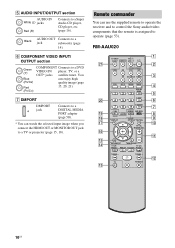
... a DIGITAL MEDIA PORT adapter (page 50). * You can enjoy high quality image (page 15, 20, 21). Remote commander You can use the supplied remote to operate the receiver and to control the Sony audio/video components that the remote is assigned to a jack subwoofer (page 14). REPLAY ADVANCE PRESET + .< > < TUNING - TV CH + PRESET - F COMPONENT VIDEO...
... a DIGITAL MEDIA PORT adapter (page 50). * You can enjoy high quality image (page 15, 20, 21). Remote commander You can use the supplied remote to operate the receiver and to control the Sony audio/video components that the remote is assigned to a jack subwoofer (page 14). REPLAY ADVANCE PRESET + .< > < TUNING - TV CH + PRESET - F COMPONENT VIDEO...
Operating Instructions
Page 11
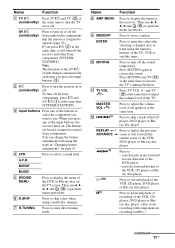
... to perform menu operations. The buttons are factory assigned to select a sound field. D 2CH Press to control Sony components. A.F.D. G D.TUNING Press to restore the sound. Press to turn the receiver on or off the sound temporarily. Press MUTING again to enter direct tuning mode. and TV (M) at (on .../standby) Press to turn off the Sony audio/video components that the remote is assigned to operate (page 53). AV ?/1 ...
... to perform menu operations. The buttons are factory assigned to select a sound field. D 2CH Press to control Sony components. A.F.D. G D.TUNING Press to restore the sound. Press to turn the receiver on or off the sound temporarily. Press MUTING again to enter direct tuning mode. and TV (M) at (on .../standby) Press to turn off the Sony audio/video components that the remote is assigned to operate (page 53). AV ?/1 ...
Operating Instructions
Page 22
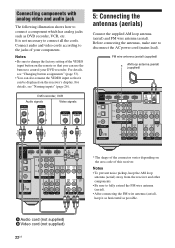
...8226; Be sure to change the factory setting of the VIDEO input button on the remote so that it as horizontal as DVD recorder, VCR, etc. For details, see... • After connecting the FM wire antenna (aerial), keep the AM loop antenna (aerial) away from the receiver and other components. • Be sure to control your components. Notes • To prevent noise pickup, keep...OUT R SA-CD/CD TV SAT VIDEO SUBWOOFER * The shape of the connector varies depending on the receiver's display. It is not necessary to connect a component which has analog jacks such as possible. Before ...
...8226; Be sure to change the factory setting of the VIDEO input button on the remote so that it as horizontal as DVD recorder, VCR, etc. For details, see... • After connecting the FM wire antenna (aerial), keep the AM loop antenna (aerial) away from the receiver and other components. • Be sure to control your components. Notes • To prevent noise pickup, keep...OUT R SA-CD/CD TV SAT VIDEO SUBWOOFER * The shape of the connector varies depending on the receiver's display. It is not necessary to connect a component which has analog jacks such as possible. Before ...
Operating Instructions
Page 23
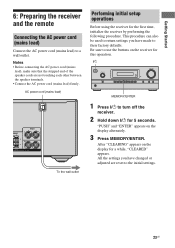
Getting Started 6: Preparing the receiver and the remote Connecting the AC power cord (mains lead) Connect the AC power cord (mains lead) to their factory defaults. After "CLEARING" appears on the display for the first time, initialize the receiver by performing the following procedure. All the ... Press MEMORY/ENTER. AC power cord (mains lead) ROUND L FRONT L R AKERS To the wall outlet Performing initial setup operations Before using the receiver for a while, "CLEARED" appears. Notes • Before connecting the AC power cord (mains lead), make sure that the stripped end of the...
Getting Started 6: Preparing the receiver and the remote Connecting the AC power cord (mains lead) Connect the AC power cord (mains lead) to their factory defaults. After "CLEARING" appears on the display for the first time, initialize the receiver by performing the following procedure. All the ... Press MEMORY/ENTER. AC power cord (mains lead) ROUND L FRONT L R AKERS To the wall outlet Performing initial setup operations Before using the receiver for a while, "CLEARED" appears. Notes • Before connecting the AC power cord (mains lead), make sure that the stripped end of the...
Operating Instructions
Page 24
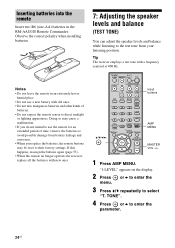
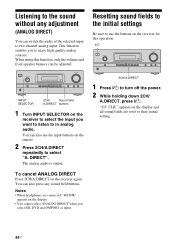
... 3 Press V/v repeatedly to enter the parameter. 24US If this happens, reassign the buttons again (page 53). • When the remote no longer operates the receiver, replace all the batteries with new ones. 7: Adjusting the speaker levels and balance (TEST TONE) You can adjust the speaker levels ...may cause a malfunction. • If you replace the batteries, the remote buttons may be reset to their factory settings. Notes • Do not leave the remote in the RM-AAU020 Remote Commander. Inserting batteries into the remote Insert two R6 (size-AA) batteries in an extremely hot or humid...
... 3 Press V/v repeatedly to enter the parameter. 24US If this happens, reassign the buttons again (page 53). • When the remote no longer operates the receiver, replace all the batteries with new ones. 7: Adjusting the speaker levels and balance (TEST TONE) You can adjust the speaker levels ...may cause a malfunction. • If you replace the batteries, the remote buttons may be reset to their factory settings. Notes • Do not leave the remote in the RM-AAU020 Remote Commander. Inserting batteries into the remote Insert two R6 (size-AA) batteries in an extremely hot or humid...
Operating Instructions
Page 44
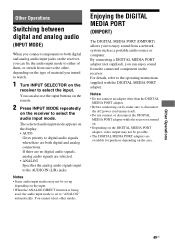
...high quality analog sources. MOVIE MUSIC DISPLAY DIMMER MUTING INPUT SELECTOR 2CH/ Sound field A.DIRECT buttons 1 Turn INPUT SELECTOR on the receiver for this operation. ?/1 ?/1 INPUT SELECTOR MASTER VOLUME PHONES INPUT MODE TUNING MODE TUNING MEMORY/ 2CH/ ENTER A.DIRECT A.F.D. To ...cancel ANALOG DIRECT Press 2CH/A.DIRECT on the remote. 2 Press 2CH/A.DIRECT repeatedly to select "A. Resetting sound fields to the initial settings Be sure to turn off the power. 2 While...
...high quality analog sources. MOVIE MUSIC DISPLAY DIMMER MUTING INPUT SELECTOR 2CH/ Sound field A.DIRECT buttons 1 Turn INPUT SELECTOR on the receiver for this operation. ?/1 ?/1 INPUT SELECTOR MASTER VOLUME PHONES INPUT MODE TUNING MODE TUNING MEMORY/ 2CH/ ENTER A.DIRECT A.F.D. To ...cancel ANALOG DIRECT Press 2CH/A.DIRECT on the remote. 2 Press 2CH/A.DIRECT repeatedly to select "A. Resetting sound fields to the initial settings Be sure to turn off the power. 2 While...
Operating Instructions
Page 49
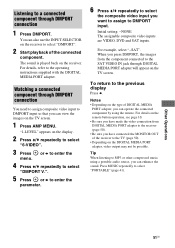
... cords, make sure to disconnect the AC power cord (mains lead). • Do not connect or disconnect the DIGITAL MEDIA PORT adapter while the receiver is turned on. • Depending on the DIGITAL MEDIA PORT adapter, video output may not be possible. • The DIGITAL MEDIA PORT adapters...MEDIA PORT adapter. By connecting a DIGITAL MEDIA PORT adapter (not supplied), you can also use the input buttons on the remote. 2 Press INPUT MODE repeatedly on the receiver to select the audio input mode. If there are no digital audio signals, analog audio signals are both digital and analog audio...
... cords, make sure to disconnect the AC power cord (mains lead). • Do not connect or disconnect the DIGITAL MEDIA PORT adapter while the receiver is turned on. • Depending on the DIGITAL MEDIA PORT adapter, video output may not be possible. • The DIGITAL MEDIA PORT adapters...MEDIA PORT adapter. By connecting a DIGITAL MEDIA PORT adapter (not supplied), you can also use the input buttons on the remote. 2 Press INPUT MODE repeatedly on the receiver to select the audio input mode. If there are no digital audio signals, analog audio signals are both digital and analog audio...
Operating Instructions
Page 51
... select "-SAT". When you press DMPORT, the images from DIGITAL MEDIA PORT adapter to the TV (page 50). • Depending on the remote button operation, see page 10. • Be sure you have made the video connection from the component connected to MP3 or other compressed music... using the remote. To return to select "PORTABLE" (page 41). Other Operations 51US The sound is played back on the receiver to select "DMPORT". 2 Start playback of the receiver to the receiver (page 50). • Be sure you have connected ...
... select "-SAT". When you press DMPORT, the images from DIGITAL MEDIA PORT adapter to the TV (page 50). • Depending on the remote button operation, see page 10. • Be sure you have made the video connection from the component connected to MP3 or other compressed music... using the remote. To return to select "PORTABLE" (page 41). Other Operations 51US The sound is played back on the receiver to select "DMPORT". 2 Start playback of the receiver to the receiver (page 50). • Be sure you have connected ...
Operating Instructions
Page 53
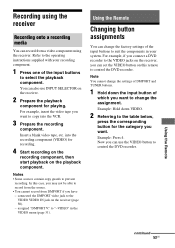
...DVD recorder to the VIDEO jacks on the receiver, you can set the VIDEO button on the receiver (page 50). - Now you want . Refer to the operating instructions supplied with your system. into the VCR. 3 Prepare the recording component. In this remote to control the DVD recorder. Note You ...jack on this case, you may not be able to record from the source. • You cannot record from a video component using the receiver. Using the Remote continued 53US to "-VIDEO" in your recording component. 1 Press one of the input buttons to select the playback component. Example: Press 4. ...
...DVD recorder to the VIDEO jacks on the receiver, you can set the VIDEO button on the receiver (page 50). - Now you want . Refer to the operating instructions supplied with your system. into the VCR. 3 Prepare the recording component. In this remote to control the DVD recorder. Note You ...jack on this case, you may not be able to record from the source. • You cannot record from a video component using the receiver. Using the Remote continued 53US to "-VIDEO" in your recording component. 1 Press one of the input buttons to select the playback component. Example: Press 4. ...
Operating Instructions
Page 54
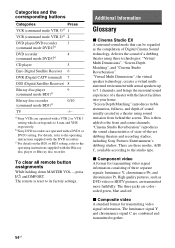
...DVD player/DVD recorder 3 (command mode DVD1)b) DVD recorder 4 (command mode DVD3)b) CD player 5 Euro Digital Satellite Receiver 6 DVR (Digital CATV terminal) 7 DSS (Digital Satellite Receiver) 8 Blu-ray disc player 9 (command mode BD1)c) Blu-ray disc recorder 0/10 (command mode BD3)c) TV -/-- ... and center channels. The luminance signal Y and chrominance signal C are transmitted more faithfully. a)Sony VCRs are operated with a DVD1 or DVD3 setting. b)Sony DVD recorders are operated with the DVD recorders. The remote is then added to 8 mm and VHS respectively.
...DVD player/DVD recorder 3 (command mode DVD1)b) DVD recorder 4 (command mode DVD3)b) CD player 5 Euro Digital Satellite Receiver 6 DVR (Digital CATV terminal) 7 DSS (Digital Satellite Receiver) 8 Blu-ray disc player 9 (command mode BD1)c) Blu-ray disc recorder 0/10 (command mode BD3)c) TV -/-- ... and center channels. The luminance signal Y and chrominance signal C are transmitted more faithfully. a)Sony VCRs are operated with a DVD1 or DVD3 setting. b)Sony DVD recorders are operated with the DVD recorders. The remote is then added to 8 mm and VHS respectively.
Operating Instructions
Page 60
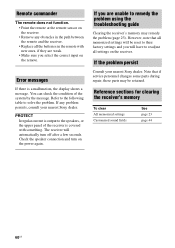
... changes some parts during repair, these parts may remedy the problem (page 23). Remote commander The remote does not function. • Point the remote at the remote sensor on the receiver. • Remove any problem persists, consult your nearest Sony dealer. The receiver will have to the speakers, or the upper panel of the system by the...
... changes some parts during repair, these parts may remedy the problem (page 23). Remote commander The remote does not function. • Point the remote at the remote sensor on the receiver. • Remove any problem persists, consult your nearest Sony dealer. The receiver will have to the speakers, or the upper panel of the system by the...
Operating Instructions
Page 62
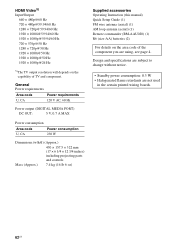
... and controls Mass (Approx.) 7.4 kg (16 lb 6 oz) Supplied accessories Operating Instruction (this manual) Quick Setup Guide (1) FM wire antenna (aerial) (1) AM loop antenna (aerial) (1) Remote commander (RM-AAU020) (1) R6 (size-AA) batteries (2) For details on the capability of the component you are not used in the certain printed wiring boards...
... and controls Mass (Approx.) 7.4 kg (16 lb 6 oz) Supplied accessories Operating Instruction (this manual) Quick Setup Guide (1) FM wire antenna (aerial) (1) AM loop antenna (aerial) (1) Remote commander (RM-AAU020) (1) R6 (size-AA) batteries (2) For details on the capability of the component you are not used in the certain printed wiring boards...
Operating Instructions
Page 63
... SUR 33 SYSTEM 36 TONE 33 TUNER 34 VIDEO 35 Muting 26 N Naming inputs 26 preset stations 48 P PROTECT 60 R Recording onto a recording media 53 Remote commander 10 S Satellite tuner connecting 21 Selecting component 25 sound field 41 Set-top box connecting 21 Sleep Timer 52 Sound fields resetting 44 selecting...
... SUR 33 SYSTEM 36 TONE 33 TUNER 34 VIDEO 35 Muting 26 N Naming inputs 26 preset stations 48 P PROTECT 60 R Recording onto a recording media 53 Remote commander 10 S Satellite tuner connecting 21 Selecting component 25 sound field 41 Set-top box connecting 21 Sleep Timer 52 Sound fields resetting 44 selecting...


