Operating Instructions
Page 1
4-129-450-11(1) Multi Channel AV Receiver Operating Instructions STR-DH500 ©2009 Sony Corporation
4-129-450-11(1) Multi Channel AV Receiver Operating Instructions STR-DH500 ©2009 Sony Corporation
Operating Instructions
Page 3
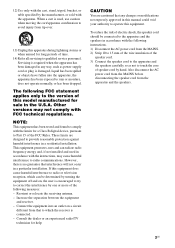
... with the following measures: - Connect the equipment into the apparatus, the apparatus has been exposed to radio or television reception, which the receiver is damaged, liquid has been spilled or objects have fallen into an outlet on , the user is required when the apparatus has been ... the apparatus and the speakers. 3US Consult the dealer or an experienced radio/TV technician for sale in the U.S.A. Reorient or relocate the receiving antenna. - To reduce the risk of electric shock, the speaker cord should be determined by one or more of this equipment. Servicing...
... with the following measures: - Connect the equipment into the apparatus, the apparatus has been exposed to radio or television reception, which the receiver is damaged, liquid has been spilled or objects have fallen into an outlet on , the user is required when the apparatus has been ... the apparatus and the speakers. 3US Consult the dealer or an experienced radio/TV technician for sale in the U.S.A. Reorient or relocate the receiving antenna. - To reduce the risk of electric shock, the speaker cord should be determined by one or more of this equipment. Servicing...
Operating Instructions
Page 4
...otherwise. Patent #'s: 5,451,942; 5,956,674; 5,974,380; 5,978,762; 6,487,535 & other U.S. This receiver incorporates High-Definition Multimedia Interface (HDMITM) technology. Check your model number by looking at the lower right corner of DTS, ...-D symbol are trademarks of Dolby Laboratories. ** Manufactured under license under license from Dolby Laboratories. On Copyrights This receiver incorporates Dolby* Digital and Pro Logic Surround and the DTS** Digital Surround System. * Manufactured under U.S. About This...in operation is clearly indicated in the text, for model STR-DH500.
...otherwise. Patent #'s: 5,451,942; 5,956,674; 5,974,380; 5,978,762; 6,487,535 & other U.S. This receiver incorporates High-Definition Multimedia Interface (HDMITM) technology. Check your model number by looking at the lower right corner of DTS, ...-D symbol are trademarks of Dolby Laboratories. ** Manufactured under license under license from Dolby Laboratories. On Copyrights This receiver incorporates Dolby* Digital and Pro Logic Surround and the DTS** Digital Surround System. * Manufactured under U.S. About This...in operation is clearly indicated in the text, for model STR-DH500.
Operating Instructions
Page 5
...TV 15 4a: Connecting the audio components ........ 16 4b: Connecting the video components ........ 17 5: Connecting the antennas (aerials 22 6: Preparing the receiver and the remote..... 23 7: Adjusting the speaker levels and balance (TEST TONE 24 Playback Selecting a component 25 Listening/Watching a component 27 Amplifier... DIGITAL MEDIA PORT (DMPORT 49 Changing the display 52 Using the Sleep Timer 52 Recording using the receiver 53 Using the Remote Changing button assignments 53 Additional Information Glossary 54 Precautions 56 Troubleshooting 57 Specifications 61 Index 63 5US
...TV 15 4a: Connecting the audio components ........ 16 4b: Connecting the video components ........ 17 5: Connecting the antennas (aerials 22 6: Preparing the receiver and the remote..... 23 7: Adjusting the speaker levels and balance (TEST TONE 24 Playback Selecting a component 25 Listening/Watching a component 27 Amplifier... DIGITAL MEDIA PORT (DMPORT 49 Changing the display 52 Using the Sleep Timer 52 Recording using the receiver 53 Using the Remote Changing button assignments 53 Additional Information Glossary 54 Precautions 56 Troubleshooting 57 Specifications 61 Index 63 5US
Operating Instructions
Page 6
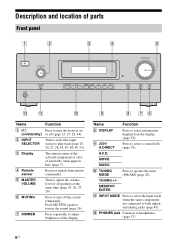
... select the input source to both digital and analog jacks (page 49). Turn to adjust the volume level of the display. A.F.D. Receives signals from remote commander. Press repeatedly to turn the receiver on /standby) B INPUT SELECTOR C Display D Remote sensor E MASTER VOLUME F MUTING G DIMMER Function Press to headphones (page 57). 6US I 2CH/ A.DIRECT...
... select the input source to both digital and analog jacks (page 49). Turn to adjust the volume level of the display. A.F.D. Receives signals from remote commander. Press repeatedly to turn the receiver on /standby) B INPUT SELECTOR C Display D Remote sensor E MASTER VOLUME F MUTING G DIMMER Function Press to headphones (page 57). 6US I 2CH/ A.DIRECT...

Operating Instructions
Page 7
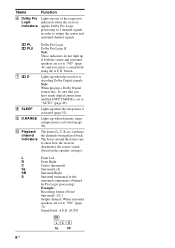
... Memory (page 47), etc., is selected. For details on the display if no digital signal is input through the COAXIAL jack. Lights up when the receiver is decoding DTS signals. However, "NO INPUT" appears on the display 12 3 4 SW LFE LCR SL S SR OPT HDMI DTS COAX 5 56 MEMORY PLI I D.RANGE... MODE is selected. "OPT" also lights up when BD input is set to tune in radio stations (page 45), etc. Lights up when using the receiver to "AUTO" and the source signal is actually being input through the OPTICAL jack. Lights up when the disc being played back contains an LFE...
... Memory (page 47), etc., is selected. For details on the display if no digital signal is input through the COAXIAL jack. Lights up when the receiver is decoding DTS signals. However, "NO INPUT" appears on the display 12 3 4 SW LFE LCR SL S SR OPT HDMI DTS COAX 5 56 MEMORY PLI I D.RANGE... MODE is selected. "OPT" also lights up when BD input is set to tune in radio stations (page 45), etc. Lights up when using the receiver to "AUTO" and the source signal is actually being input through the OPTICAL jack. Lights up when the disc being played back contains an LFE...
Operating Instructions
Page 8
...SW LCR SL SR 8US button. I D.RANGE Lights up when dynamic range compression is decoding Dolby Digital signals. G D Lights up when the receiver is activated (page 30). H SLEEP Lights up when the sleep timer is set to "AUTO" (page 49). PL Dolby Pro Logic PLII ...played back. Name Function F Dolby Pro Logic indicators Lights up one of the respective indicators when the receiver applies Dolby Pro Logic processing to 2 channel signals in order to show how the receiver downmixes the source sound (based on the speaker settings). L Front Left R Front Right C Center...
...SW LCR SL SR 8US button. I D.RANGE Lights up when dynamic range compression is decoding Dolby Digital signals. G D Lights up when the receiver is activated (page 30). H SLEEP Lights up when the sleep timer is set to "AUTO" (page 49). PL Dolby Pro Logic PLII ...played back. Name Function F Dolby Pro Logic indicators Lights up one of the respective indicators when the receiver applies Dolby Pro Logic processing to 2 channel signals in order to show how the receiver downmixes the source sound (based on the speaker settings). L Front Left R Front Right C Center...
Operating Instructions
Page 10
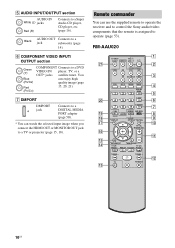
... + m H M TV FM MODE X x 1 2 3 4 5 6 7 8 9 q; G DMPORT DMPORT jack Connects to a DIGITAL MEDIA PORT adapter (page 50). * You can use the supplied remote to operate the receiver and to control the Sony audio/video components that the remote is assigned to operate (page 53). MOVIE MUSIC DVD/BD MENU 123 D.SKIP 456 D.TUNING 789 >10...
... + m H M TV FM MODE X x 1 2 3 4 5 6 7 8 9 q; G DMPORT DMPORT jack Connects to a DIGITAL MEDIA PORT adapter (page 50). * You can use the supplied remote to operate the receiver and to control the Sony audio/video components that the remote is assigned to operate (page 53). MOVIE MUSIC DVD/BD MENU 123 D.SKIP 456 D.TUNING 789 >10...
Operating Instructions
Page 11
..., use V, v, B, b and (P) to turn off . Press to - Press to adjust the volume level of all Sony components, press ?/1 and AV ?/1 (A) at the same time, it will turn the TV on or off the receiver and other Sony components (SYSTEM STANDBY). Note The function of the AV ?/1 switch changes automatically each time you press...
..., use V, v, B, b and (P) to turn off . Press to - Press to adjust the volume level of all Sony components, press ?/1 and AV ?/1 (A) at the same time, it will turn the TV on or off the receiver and other Sony components (SYSTEM STANDBY). Note The function of the AV ?/1 switch changes automatically each time you press...
Operating Instructions
Page 12
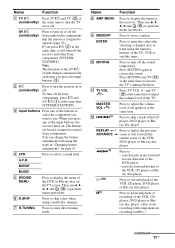
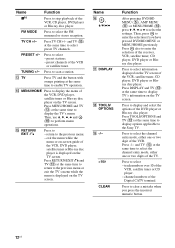
... mode, either one or two digits of the TV. Press -/-- and TV (M) at the same time to display TV's information on -screen guide of the receiver, VCR, satellite tuner, CD player, DVD player or Bluray disc player. Press to clear a mistake when you have pressed DVD/BD MENU or MENU/HOME... previously. Press TV CH +/- M TV Press TV and the button with orange printing at the same time to display options applicable to the Sony TV. exit the menu while the menu or on the TV screen. Press also to enter the selection of the VCR, DVD player, satellite tuner...
... mode, either one or two digits of the TV. Press -/-- and TV (M) at the same time to display TV's information on -screen guide of the receiver, VCR, satellite tuner, CD player, DVD player or Bluray disc player. Press to clear a mistake when you have pressed DVD/BD MENU or MENU/HOME... previously. Press TV CH +/- M TV Press TV and the button with orange printing at the same time to display options applicable to the Sony TV. exit the menu while the menu or on the TV screen. Press also to enter the selection of the VCR, DVD player, satellite tuner...
Operating Instructions
Page 13
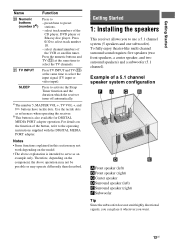
... the model. • The above explanation is also available for DIGITAL MEDIA PORT adapter operation. Getting Started 1: Installing the speakers This receiver allows you want. 13US select track numbers of the button, refer to the operating instructions supplied with the DIGITAL MEDIA PORT adapter. Press... 0/10 to activate the Sleep Timer function and the duration which the receiver turns off automatically. Therefore, depending on the component, the above operation may not be possible or may not work depending on...
... the model. • The above explanation is also available for DIGITAL MEDIA PORT adapter operation. Getting Started 1: Installing the speakers This receiver allows you want. 13US select track numbers of the button, refer to the operating instructions supplied with the DIGITAL MEDIA PORT adapter. Press... 0/10 to activate the Sleep Timer function and the duration which the receiver turns off automatically. Therefore, depending on the component, the above operation may not be possible or may not work depending on...
Operating Instructions
Page 15
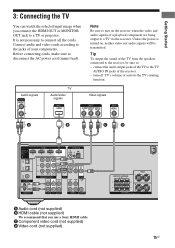
...3: Connecting the TV You can watch the selected input image when you use a Sony HDMI cable. It is turned on the receiver when the video and audio signals of the TV from the speakers connected to the receiver, be transmitted. Connect audio and video cords according to connect all the cords.... HDMI OUT or MONITOR OUT jack to disconnect the AC power cord (mains lead). Unless the power is not necessary to the jacks of the receiver. - C Component video cord (not supplied) D Video cord (not supplied) CENTER SURROUND R L FRONT L R SPEAKERS 15US connect the audio output jacks of the TV...
...3: Connecting the TV You can watch the selected input image when you use a Sony HDMI cable. It is turned on the receiver when the video and audio signals of the TV from the speakers connected to the receiver, be transmitted. Connect audio and video cords according to connect all the cords.... HDMI OUT or MONITOR OUT jack to disconnect the AC power cord (mains lead). Unless the power is not necessary to the jacks of the receiver. - C Component video cord (not supplied) D Video cord (not supplied) CENTER SURROUND R L FRONT L R SPEAKERS 15US connect the audio output jacks of the TV...
Operating Instructions
Page 17
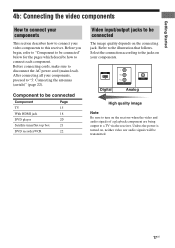
... Video input/output jacks to be connected The image quality depends on the receiver when the video and audio signals of a playback component are being output to a TV via the receiver. After connecting all your video components to this receiver. Refer to disconnect the AC power cord (mains lead). Unless the power is...
... Video input/output jacks to be connected The image quality depends on the receiver when the video and audio signals of a playback component are being output to a TV via the receiver. After connecting all your video components to this receiver. Refer to disconnect the AC power cord (mains lead). Unless the power is...
Operating Instructions
Page 19
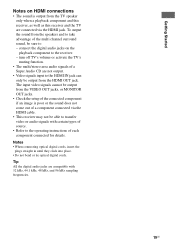
...• Video signals input to the HDMI IN jack can only be output from the TV speaker only when a playback component and this receiver, as well as this receiver and the TV are compatible with certain types of source. • Refer to the operating instructions of the connected component if an image... is output from the HDMI OUT jack. Tip All the digital audio jacks are connected via the HDMI cable. • This receiver may not ...
...• Video signals input to the HDMI IN jack can only be output from the TV speaker only when a playback component and this receiver, as well as this receiver and the TV are compatible with certain types of source. • Refer to the operating instructions of the connected component if an image... is output from the HDMI OUT jack. Tip All the digital audio jacks are connected via the HDMI cable. • This receiver may not ...
Operating Instructions
Page 20
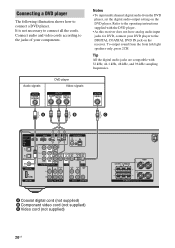
... audio from the front left/right speakers only, press 2CH. Tip All the digital audio jacks are compatible with the DVD player. • As this receiver does not have analog audio input jacks for DVD, connect your components. Refer to the DIGITAL COAXIAL DVD IN jack on the DVD player. Audio...
... audio from the front left/right speakers only, press 2CH. Tip All the digital audio jacks are compatible with the DVD player. • As this receiver does not have analog audio input jacks for DVD, connect your components. Refer to the DIGITAL COAXIAL DVD IN jack on the DVD player. Audio...
Operating Instructions
Page 22
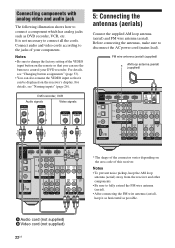
... R SA-CD/CD TV SAT VIDEO SUBWOOFER * The shape of the connector varies depending on the area code of the VIDEO input button on the receiver's display. Notes • Be sure to the jacks of your DVD recorder. A Audio cord (not supplied) B Video cord (not supplied) 22US... Connect audio and video cords according to change the factory setting of this receiver. Notes • To prevent noise pickup, keep the AM loop antenna (aerial) away from the receiver and other components. • Be sure to fully extend the FM wire antenna (aerial). •...
... R SA-CD/CD TV SAT VIDEO SUBWOOFER * The shape of the connector varies depending on the area code of the VIDEO input button on the receiver's display. Notes • Be sure to the jacks of your DVD recorder. A Audio cord (not supplied) B Video cord (not supplied) 22US... Connect audio and video cords according to change the factory setting of this receiver. Notes • To prevent noise pickup, keep the AM loop antenna (aerial) away from the receiver and other components. • Be sure to fully extend the FM wire antenna (aerial). •...
Operating Instructions
Page 23
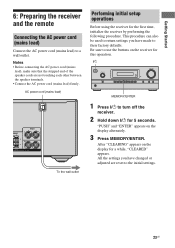
...return settings you have made to the initial settings. 23US After "CLEARING" appears on the display for the first time, initialize the receiver by performing the following procedure. MOVIE MUSIC DISPLAY DIMMER MUTING MEMORY/ENTER 1 Press ?/1 to use the buttons on the display alternately. ... (mains lead), make sure that the stripped end of the speaker cords are reset to their factory defaults. Be sure to turn off the receiver. 2 Hold down ?/1 for this operation. ?/1 ?/1 INPUT SELECTOR MASTER VOLUME PHONES INPUT MODE TUNING MODE TUNING MEMORY/ 2CH/ ENTER A.DIRECT ...
...return settings you have made to the initial settings. 23US After "CLEARING" appears on the display for the first time, initialize the receiver by performing the following procedure. MOVIE MUSIC DISPLAY DIMMER MUTING MEMORY/ENTER 1 Press ?/1 to use the buttons on the display alternately. ... (mains lead), make sure that the stripped end of the speaker cords are reset to their factory defaults. Be sure to turn off the receiver. 2 Hold down ?/1 for this operation. ?/1 ?/1 INPUT SELECTOR MASTER VOLUME PHONES INPUT MODE TUNING MODE TUNING MEMORY/ 2CH/ ENTER A.DIRECT ...
Operating Instructions
Page 24
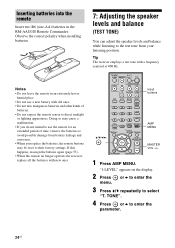
... Commander. TV INPUT TV ?/1 SLEEP DMPORT AV ?/1 ?/1 SYSTEM STANDBY VIDEO BD DVD SAT TV SA-CD/CD TUNER V/v/B/b, 2CH A.F.D. Tip The receiver employs a test tone with new ones. 7: Adjusting the speaker levels and balance (TEST TONE) You can adjust the speaker levels and balance while ..." appears on the display. 2 Press menu. If this happens, reassign the buttons again (page 53). • When the remote no longer operates the receiver, replace all the batteries with a frequency centered at 800 Hz. or b to enter the 3 Press V/v repeatedly to enter the parameter. 24US MOVIE MUSIC...
... Commander. TV INPUT TV ?/1 SLEEP DMPORT AV ?/1 ?/1 SYSTEM STANDBY VIDEO BD DVD SAT TV SA-CD/CD TUNER V/v/B/b, 2CH A.F.D. Tip The receiver employs a test tone with new ones. 7: Adjusting the speaker levels and balance (TEST TONE) You can adjust the speaker levels and balance while ..." appears on the display. 2 Press menu. If this happens, reassign the buttons again (page 53). • When the remote no longer operates the receiver, replace all the batteries with a frequency centered at 800 Hz. or b to enter the 3 Press V/v repeatedly to enter the parameter. 24US MOVIE MUSIC...
Operating Instructions
Page 25
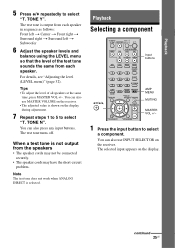
...MUTING MASTER VOL +/- 1 Press the input button to select "T. The test tone is selected. You can also use MASTER VOLUME on the receiver. The test tone turns off. Playback Selecting a component TV INPUT TV ?/1 SLEEP DMPORT AV ?/1 ?/1 SYSTEM STANDBY VIDEO BD DVD SAT ...2CH A.F.D. The selected input appears on the display during adjustment. 7 Repeat steps 1 to 5 to select "T. You can also use INPUT SELECTOR on the receiver. • The adjusted value is not output from each speaker in sequence as follows: Front left t Center t Front right t Surround right t Surround ...
...MUTING MASTER VOL +/- 1 Press the input button to select "T. The test tone is selected. You can also use MASTER VOLUME on the receiver. The test tone turns off. Playback Selecting a component TV INPUT TV ?/1 SLEEP DMPORT AV ?/1 ?/1 SYSTEM STANDBY VIDEO BD DVD SAT ...2CH A.F.D. The selected input appears on the display during adjustment. 7 Repeat steps 1 to 5 to select "T. You can also use INPUT SELECTOR on the receiver. • The adjusted value is not output from each speaker in sequence as follows: Front left t Center t Front right t Surround right t Surround ...
Operating Instructions
Page 26
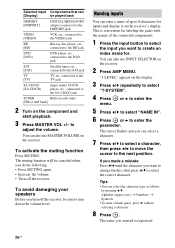
...) t Numbers t Symbols • To enter a blank space, press b without selecting a character. 8 Press . You can also use INPUT SELECTOR on the receiver. 2 Press AMP MENU. The muting function will be canceled when you want to change flashes, then press V/v to enter the parameter. To avoid damaging your...input button to select the input you do the following. • Press MUTING again. • Increase the volume. • Turn off the receiver, be sure to create an index name for. Selected input Components that can [Display] be played back DMPORT [DMPORT] DIGITAL MEDIA PORT adapter...
...) t Numbers t Symbols • To enter a blank space, press b without selecting a character. 8 Press . You can also use INPUT SELECTOR on the receiver. 2 Press AMP MENU. The muting function will be canceled when you want to change flashes, then press V/v to enter the parameter. To avoid damaging your...input button to select the input you do the following. • Press MUTING again. • Increase the volume. • Turn off the receiver, be sure to create an index name for. Selected input Components that can [Display] be played back DMPORT [DMPORT] DIGITAL MEDIA PORT adapter...


