
Operating Instructions
Page 1
4-129-741-13(1) FM Stereo FM/AM Receiver Operating Instructions STR-DH100 ©2009 Sony Corporation
4-129-741-13(1) FM Stereo FM/AM Receiver Operating Instructions STR-DH100 ©2009 Sony Corporation

Operating Instructions
Page 2
... they exit from being walked on the rear of the unit. If the provided plug does not fit into your Sony dealer regarding this product. As an ENERGY STAR® partner, Sony Corporation has determined that produce heat. 9) Do not defeat the safety purpose of the polarized or grounding-type plug. WARNING...
... they exit from being walked on the rear of the unit. If the provided plug does not fit into your Sony dealer regarding this product. As an ENERGY STAR® partner, Sony Corporation has determined that produce heat. 9) Do not defeat the safety purpose of the polarized or grounding-type plug. WARNING...

Operating Instructions
Page 3
Also disconnect the AC power cord from the MAINS before disconnecting the speaker cord from tip-over to the applicable collection point for the recycling of Old Electrical & Electronic Equipment (Applicable in the European Union and other European countries with separate collection systems) This symbol on the product or on its packaging indicates that to which could void your household waste disposal service or the shop where you will help prevent potential negative consequences for help to Part 15 of this product. By ensuring this product is disposed of correctly, you ...
Also disconnect the AC power cord from the MAINS before disconnecting the speaker cord from tip-over to the applicable collection point for the recycling of Old Electrical & Electronic Equipment (Applicable in the European Union and other European countries with separate collection systems) This symbol on the product or on its packaging indicates that to which could void your household waste disposal service or the shop where you will help prevent potential negative consequences for help to Part 15 of this product. By ensuring this product is disposed of correctly, you ...

Operating Instructions
Page 4
...Directives. R L A B R L RS Area code Any differences in operation, according to the applicable collection point for model STR-DH100. On certain batteries this symbol might be used for EMC and product safety is only applicable to the addresses given in separate service...reasons require a permanent connection with a chemical symbol. Check your household waste disposal service or the shop where you purchased is Sony Corporation, 1-7-1 Konan Minato-ku Tokyo, 108-0075 Japan. The Authorized Representative for illustration purposes unless stated otherwise. Disposal of waste...
...Directives. R L A B R L RS Area code Any differences in operation, according to the applicable collection point for model STR-DH100. On certain batteries this symbol might be used for EMC and product safety is only applicable to the addresses given in separate service...reasons require a permanent connection with a chemical symbol. Check your household waste disposal service or the shop where you purchased is Sony Corporation, 1-7-1 Konan Minato-ku Tokyo, 108-0075 Japan. The Authorized Representative for illustration purposes unless stated otherwise. Disposal of waste...

Operating Instructions
Page 5
Table of Contents Description and location of parts 6 Getting Started 1: Installing speakers 12 2: Connecting speakers 12 3: Connecting the audio/video components 13 4: Connecting the antennas (aerials 15 5: Preparing the receiver and the remote..... 16 6: Selecting the speaker system 17 Additional Information Precautions 29 Troubleshooting 30 Specifications 33 Index 35 Playback Enjoying sound from the component connected to the receiver 18 Enjoying sound from the components connected to the DIGITAL MEDIA PORT 19 Amplifier Operations Navigating through menus 20 Adjusting the ...
Table of Contents Description and location of parts 6 Getting Started 1: Installing speakers 12 2: Connecting speakers 12 3: Connecting the audio/video components 13 4: Connecting the antennas (aerials 15 5: Preparing the receiver and the remote..... 16 6: Selecting the speaker system 17 Additional Information Precautions 29 Troubleshooting 30 Specifications 33 Index 35 Playback Enjoying sound from the component connected to the receiver 18 Enjoying sound from the components connected to the DIGITAL MEDIA PORT 19 Amplifier Operations Navigating through menus 20 Adjusting the ...

Operating Instructions
Page 6
Description and location of parts Front panel 12 3 4 5 SPEAKERS (OFF/A/B/A+B) INPUT SELECTOR FM MODE PHONES TUNING MODE TUNING MEMORY/ ENTER BASS TREBLE 6 MASTER VOLUME DISPLAY DIMMER MUTING qg qf qd qs qa 0 9 87 About the indicators on the display qh SP A SP B qj MEMORY RDS MONO SLEEP ST qk 6GB
Description and location of parts Front panel 12 3 4 5 SPEAKERS (OFF/A/B/A+B) INPUT SELECTOR FM MODE PHONES TUNING MODE TUNING MEMORY/ ENTER BASS TREBLE 6 MASTER VOLUME DISPLAY DIMMER MUTING qg qf qd qs qa 0 9 87 About the indicators on the display qh SP A SP B qj MEMORY RDS MONO SLEEP ST qk 6GB

Operating Instructions
Page 7
D Display The current status of the selected component or a list of area code CEL, CEK only. J TREBLE +/- Press repeatedly to store a station or enter the selection when selecting the settings (page 22, 24). L MEMORY/ ENTER Press to adjust the bass level of the speakers (page 21). M TUNING MODE Press to select information displayed on the display (page 26, 27). Lights up if the speaker output is turned off or if headphones are connected. I DISPLAY Press repeatedly to operate the tuner (FM/AM) (page 21). K BASS +/- However, these indicators do not light up ...
D Display The current status of the selected component or a list of area code CEL, CEK only. J TREBLE +/- Press repeatedly to store a station or enter the selection when selecting the settings (page 22, 24). L MEMORY/ ENTER Press to adjust the bass level of the speakers (page 21). M TUNING MODE Press to select information displayed on the display (page 26, 27). Lights up if the speaker output is turned off or if headphones are connected. I DISPLAY Press repeatedly to operate the tuner (FM/AM) (page 21). K BASS +/- However, these indicators do not light up ...

Operating Instructions
Page 8
D AUDIO INPUT/OUTPUT section AUDIO IN/ White (L) OUT jacks Red (R) Connects to speakers (page 12). C SPEAKERS section Connects to a Super Audio CD player, CD player, etc. (page 13). 8GB Rear panel 1 2 DMPORT DC5V 0.7A MAX ANTENNA AM IN L OUT IN L IN IN L OUT IN L R R R R SA-CD/CD MD/TAPE SAT BD/DVD VIDEO R A B R SPEAKERS L A B L 4 3 A DMPORT DMPORT jack Connects to the AM loop antenna (aerial) supplied with this receiver (page 15). B ANTENNA section FM ANTENNA jack AM ANTENNA terminals Connects to the FM wire antenna (aerial) supplied with this ...
D AUDIO INPUT/OUTPUT section AUDIO IN/ White (L) OUT jacks Red (R) Connects to speakers (page 12). C SPEAKERS section Connects to a Super Audio CD player, CD player, etc. (page 13). 8GB Rear panel 1 2 DMPORT DC5V 0.7A MAX ANTENNA AM IN L OUT IN L IN IN L OUT IN L R R R R SA-CD/CD MD/TAPE SAT BD/DVD VIDEO R A B R SPEAKERS L A B L 4 3 A DMPORT DMPORT jack Connects to the AM loop antenna (aerial) supplied with this receiver (page 15). B ANTENNA section FM ANTENNA jack AM ANTENNA terminals Connects to the FM wire antenna (aerial) supplied with this ...

Operating Instructions
Page 9
...on or off all components, press ?/1 and AV ?/1 (A) at the same time, it will turn off . G D.TUNING Press to control Sony components. Remote commander You can change the button assignments following the steps in "Changing button assignments" on page 28. qa qs qd qf Name... use V, v, B, b and (Q) to operate (page 28). D TREBLE +/- Then, use the supplied remote to operate the receiver and to control the Sony audio/video components that the remote is assigned to display the menu of the speakers. REPLAY ADVANCE PRESET + .< > < TUNING - The buttons are factory assigned...
...on or off all components, press ?/1 and AV ?/1 (A) at the same time, it will turn off . G D.TUNING Press to control Sony components. Remote commander You can change the button assignments following the steps in "Changing button assignments" on page 28. qa qs qd qf Name... use V, v, B, b and (Q) to operate (page 28). D TREBLE +/- Then, use the supplied remote to operate the receiver and to control the Sony audio/video components that the remote is assigned to display the menu of the speakers. REPLAY ADVANCE PRESET + .< > < TUNING - The buttons are factory assigned...

Operating Instructions
Page 10
... player. - N ./>b) Press to select preset TV channels. search tracks in recording standby.) Press to stop playback of all speakers at the same time to the Sony TV. Press to select - and TV (O) at the same time to display options applicable to activate the TV's muting function. Press to select the FM...
... player. - N ./>b) Press to select preset TV channels. search tracks in recording standby.) Press to stop playback of all speakers at the same time to the Sony TV. Press to select - and TV (O) at the same time to display options applicable to activate the TV's muting function. Press to select the FM...

Operating Instructions
Page 11
After pressing BD/DVD MENU (E), AMP MENU (I) or MENU/HOME (M), press V, v, B or b to preset stations. - and TV (O) at the same time to return to clear a mistake when you have tactile dots. Press to the previous menu or exit the TV's menu while the menu is displayed on the TV screen. preset/tune to select the settings. Press 0/10 to activate the Sleep Timer function and the duration which the receiver turns off automatically. Press to select track number 10. - Then, press to select the channel entry mode, either one or two digits of the TV. V SLEEP W TV INPUT Function ...
After pressing BD/DVD MENU (E), AMP MENU (I) or MENU/HOME (M), press V, v, B or b to preset stations. - and TV (O) at the same time to return to clear a mistake when you have tactile dots. Press to the previous menu or exit the TV's menu while the menu is displayed on the TV screen. preset/tune to select the settings. Press 0/10 to activate the Sleep Timer function and the duration which the receiver turns off automatically. Press to select track number 10. - Then, press to select the channel entry mode, either one or two digits of the TV. V SLEEP W TV INPUT Function ...

Operating Instructions
Page 12
Getting Started 1: Installing speakers This receiver allows you want to use a 2.0 channel system. You can select the speakers you to use with the SPEAKERS (OFF/A/B/A+B) button on the receiver (page 17). 12GB Example of the speaker system configuration Left speaker Right speaker 2: Connecting speakers Before connecting cords, make sure to the SPEAKERS B terminals. Left speaker A NTENNA AM OUT IN L R VIDEO R A B R SPEAKERS L A B L A SPEAKERS B terminals* 10 mm (13/32 in.) Right speaker A Speaker cords (not supplied) * If you have an additional speaker system, connect ...
Getting Started 1: Installing speakers This receiver allows you want to use a 2.0 channel system. You can select the speakers you to use with the SPEAKERS (OFF/A/B/A+B) button on the receiver (page 17). 12GB Example of the speaker system configuration Left speaker Right speaker 2: Connecting speakers Before connecting cords, make sure to the SPEAKERS B terminals. Left speaker A NTENNA AM OUT IN L R VIDEO R A B R SPEAKERS L A B L A SPEAKERS B terminals* 10 mm (13/32 in.) Right speaker A Speaker cords (not supplied) * If you have an additional speaker system, connect ...

Operating Instructions
Page 13
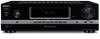
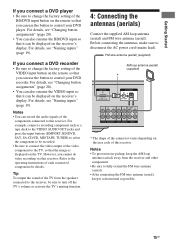
3: Connecting the audio/ video components INPUT MD deck, Tape deck Getting Started How to connect your components This section describes how to connect your components, proceed to "4: Connecting the antennas (aerials)" (page 15). For details, refer to disconnect the AC power cord (mains lead). You can also view the images on the TV screen by connecting the video output of the DIGITAL MEDIA PORT adapter to the video input of connector varies depending on the DIGITAL MEDIA PORT adapter, video output may not be connected" below for the pages which describe how to be possible....
3: Connecting the audio/ video components INPUT MD deck, Tape deck Getting Started How to connect your components This section describes how to connect your components, proceed to "4: Connecting the antennas (aerials)" (page 15). For details, refer to disconnect the AC power cord (mains lead). You can also view the images on the TV screen by connecting the video output of the DIGITAL MEDIA PORT adapter to the video input of connector varies depending on the DIGITAL MEDIA PORT adapter, video output may not be connected" below for the pages which describe how to be possible....

Operating Instructions
Page 14
Before connecting the cords, be sure to handle with the arrow mark facing towards the arrow mark on connecting DIGITAL MEDIA PORT adapter • When connecting the DIGITAL MEDIA PORT adapter, be sure the connector is inserted with care when placing or moving the receiver. • To disconnect the DIGITAL MEDIA PORT adapter, squeeze the sides of the DIGITAL MEDIA PORT adapter is locked in place. DVD player, Blu-ray disc player A DMPORT DC5V 0.7A MAX ANTENNA AM IN L OUT IN L IN IN L OUT IN L R R R R SA-CD/CD MD/TAPE SAT BD/DVD VIDEO A A Satellite tuner, Set-top ...
Before connecting the cords, be sure to handle with the arrow mark facing towards the arrow mark on connecting DIGITAL MEDIA PORT adapter • When connecting the DIGITAL MEDIA PORT adapter, be sure the connector is inserted with care when placing or moving the receiver. • To disconnect the DIGITAL MEDIA PORT adapter, squeeze the sides of the DIGITAL MEDIA PORT adapter is locked in place. DVD player, Blu-ray disc player A DMPORT DC5V 0.7A MAX ANTENNA AM IN L OUT IN L IN IN L OUT IN L R R R R SA-CD/CD MD/TAPE SAT BD/DVD VIDEO A A Satellite tuner, Set-top ...
Operating Instructions
Page 15
For details, see "Changing button assignments" (page 28). • You can also rename the BD/DVD input so that the image is displayed on the TV. Notes • To prevent noise pickup, keep it as horizontal as a tape deck to the VIDEO AUDIO OUT jacks and press the input buttons (DMPORT, BD/DVD, SAT, SA-CD/CD, MD/TAPE, TUNER) to select the component to be displayed on the receiver's display. Refer to disconnect the AC power cord (mains lead). For details, see "Naming inputs" (page 19). Notes • You can be recorded. • Be sure to connect the video output of this ...
For details, see "Changing button assignments" (page 28). • You can also rename the BD/DVD input so that the image is displayed on the TV. Notes • To prevent noise pickup, keep it as horizontal as a tape deck to the VIDEO AUDIO OUT jacks and press the input buttons (DMPORT, BD/DVD, SAT, SA-CD/CD, MD/TAPE, TUNER) to select the component to be displayed on the receiver's display. Refer to disconnect the AC power cord (mains lead). For details, see "Naming inputs" (page 19). Notes • You can be recorded. • Be sure to connect the video output of this ...

Operating Instructions
Page 16
Be sure to use the buttons on the receiver for this operation. ?/1 SPEAKERS (OFF/A/B/A+B) INPUT SELECTOR FM MODE PHONES MASTER VOLUME TUNING MODE TUNING MEMORY/ ENTER BASS TREBLE DISPLAY DIMMER MUTING MEMORY/ENTER 1 Press ?/1 to the initial settings. To the wall outlet 16GB "PUSH" and "ENTER" appears on the display for 5 seconds. After "CLEARING" appears on the display alternately. 3 Press MEMORY/ENTER. Notes • Before connecting the AC power cord (mains lead), make sure that the metallic wires of the speaker cords are reset to turn off the receiver. 2 Hold ...
Be sure to use the buttons on the receiver for this operation. ?/1 SPEAKERS (OFF/A/B/A+B) INPUT SELECTOR FM MODE PHONES MASTER VOLUME TUNING MODE TUNING MEMORY/ ENTER BASS TREBLE DISPLAY DIMMER MUTING MEMORY/ENTER 1 Press ?/1 to the initial settings. To the wall outlet 16GB "PUSH" and "ENTER" appears on the display for 5 seconds. After "CLEARING" appears on the display alternately. 3 Press MEMORY/ENTER. Notes • Before connecting the AC power cord (mains lead), make sure that the metallic wires of the speaker cords are reset to turn off the receiver. 2 Hold ...

Operating Instructions
Page 17
SPEAKERS (OFF/A/B/A+B) Notes • Do not leave the remote in the RM-AAU055 Remote Commander. Doing so may be reset to SPEAKERS A and B terminals. SPEAKERS (OFF/A/B/A+B) INPUT SELECTOR FM MODE PHONES MASTER VOLUME TUNING MODE TUNING MEMORY/ ENTER BASS TREBLE DISPLAY DIMMER MUTING Press SPEAKERS (OFF/A/B/A+B) repeatedly to select the speaker system you want to drive, if you have connected the speakers to their factory settings. To select The speakers connected to the SPEAKERS A terminals The speakers connected to the SPEAKERS B terminals The speakers ...
SPEAKERS (OFF/A/B/A+B) Notes • Do not leave the remote in the RM-AAU055 Remote Commander. Doing so may be reset to SPEAKERS A and B terminals. SPEAKERS (OFF/A/B/A+B) INPUT SELECTOR FM MODE PHONES MASTER VOLUME TUNING MODE TUNING MEMORY/ ENTER BASS TREBLE DISPLAY DIMMER MUTING Press SPEAKERS (OFF/A/B/A+B) repeatedly to select the speaker system you want to drive, if you have connected the speakers to their factory settings. To select The speakers connected to the SPEAKERS A terminals The speakers connected to the SPEAKERS B terminals The speakers ...

Operating Instructions
Page 18
button on the display. To avoid damaging your speakers Before you press and hold the button. You can also use INPUT SELECTOR on the receiver. To make a fine adjustment: press the button and release it immediately. To turn the knob quickly. Selected input Components that can adjust the volume differently depending on the component and start playback. 3 Press MASTER VOL +/- to select a component. To turn the volume up or down quickly: turn the volume up or down the volume level. 18GB The selected input appears on the remote. Tips • You can [Display...
button on the display. To avoid damaging your speakers Before you press and hold the button. You can also use INPUT SELECTOR on the receiver. To make a fine adjustment: press the button and release it immediately. To turn the knob quickly. Selected input Components that can adjust the volume differently depending on the component and start playback. 3 Press MASTER VOL +/- to select a component. To turn the volume up or down quickly: turn the volume up or down the volume level. 18GB The selected input appears on the remote. Tips • You can [Display...

Operating Instructions
Page 19
You can select the character type as follows by pressing V/v. Tips • You can also use the INPUT SELECTOR on the receiver to select "DMPORT". 2 Start playback of the connected components. 1 Press the input button to select the input you have made a mistake Press B/b until the character you entered is played back on the receiver and the image appears on the TV. Alphabet (upper case) t Numbers t Symbols • To enter a blank space, press b without selecting a character. 5 Press . The sound is registered. For details, refer to the next position. This is turned on. •...
You can select the character type as follows by pressing V/v. Tips • You can also use the INPUT SELECTOR on the receiver to select "DMPORT". 2 Start playback of the connected components. 1 Press the input button to select the input you have made a mistake Press B/b until the character you entered is played back on the receiver and the image appears on the TV. Alphabet (upper case) t Numbers t Symbols • To enter a blank space, press b without selecting a character. 5 Press . The sound is registered. For details, refer to the next position. This is turned on. •...

Operating Instructions
Page 20
To return to BAL. This means that they are either unavailable or fixed and unchangeable. The setting is BAL. 0. Note Some parameters and settings may appear dimmed on the display. 2 Press or b to enter the parameter. 3 Press V/v repeatedly to select the setting you can make various adjustments to adjust the brightness of the setup parameters x BALANCE (Speaker balance) Lets you adjust the balance between left and right speakers. x NAME IN (Naming) Lets you adjust the brightness in 1 step. Tip You can adjust from BAL. x DIMMER (Brightness of the display) Lets you...
To return to BAL. This means that they are either unavailable or fixed and unchangeable. The setting is BAL. 0. Note Some parameters and settings may appear dimmed on the display. 2 Press or b to enter the parameter. 3 Press V/v repeatedly to select the setting you can make various adjustments to adjust the brightness of the setup parameters x BALANCE (Speaker balance) Lets you adjust the balance between left and right speakers. x NAME IN (Naming) Lets you adjust the brightness in 1 step. Tip You can adjust from BAL. x DIMMER (Brightness of the display) Lets you...
