
Operating Instructions
Page 3
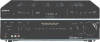
...describe the controls on the lower portion of area code AA only". This receiver incorporates Dolby* Digital and Pro Logic Surround and the DTS** Digital Surround System. * Manufactured under license from Dolby Laboratories. Check your remote, see the illustration below). 2-XXX-XXX-XX AA Area code DIGITAL ... R SURR SUB R FRONT SURROUND BACK WOOFER OUT MULTI CH IN 2ND ZONE Any differences in the text, for model STR-DE898. About area codes The area code of the receiver you purchased is for example, "Models of the rear panel (see pages 53-55. About This Manual • The ...
...describe the controls on the lower portion of area code AA only". This receiver incorporates Dolby* Digital and Pro Logic Surround and the DTS** Digital Surround System. * Manufactured under license from Dolby Laboratories. Check your remote, see the illustration below). 2-XXX-XXX-XX AA Area code DIGITAL ... R SURR SUB R FRONT SURROUND BACK WOOFER OUT MULTI CH IN 2ND ZONE Any differences in the text, for model STR-DE898. About area codes The area code of the receiver you purchased is for example, "Models of the rear panel (see pages 53-55. About This Manual • The ...
Operating Instructions
Page 4
... 42 Listening to the sound in another zone 43 Operations Using the Remote RM-AAL001 Before you use your remote 45 Remote button description 45 Selecting the command mode of the remote 49 Programming the remote 50 Learning the commands of your components 5 1a: Connecting components with...power cord ........ 17 5: Setting up the speakers 18 6: Adjusting the speaker levels and balance 22 - MULTI CH IN Listening to FM/AM radio 24 Presetting radio stations 25 Changing the display 26 About the indications in sequence automatically (Macro Play 55 Additional Information Precautions ...
... 42 Listening to the sound in another zone 43 Operations Using the Remote RM-AAL001 Before you use your remote 45 Remote button description 45 Selecting the command mode of the remote 49 Programming the remote 50 Learning the commands of your components 5 1a: Connecting components with...power cord ........ 17 5: Setting up the speakers 18 6: Adjusting the speaker levels and balance 22 - MULTI CH IN Listening to FM/AM radio 24 Presetting radio stations 25 Changing the display 26 About the indications in sequence automatically (Macro Play 55 Additional Information Precautions ...

Operating Instructions
Page 22
...(right) t Surround back (right)* t Surround back (left)* t Surround (left) t Sub woofer * You will only hear the test tone from each speaker. For details on the receiver. 2 Press TEST TONE. Tips • To adjust the level of the test tone sounds the same from each speaker in sequence. Use the... turn on the LEVEL menu settings, see page 37. Note Although these adjustments can also be made via the front panel using the remote. 22GB surround back left and right speakers when surround back speaker selection is set to the test tone from your listening position. The test ...
...(right) t Surround back (right)* t Surround back (left)* t Surround (left) t Sub woofer * You will only hear the test tone from each speaker. For details on the receiver. 2 Press TEST TONE. Tips • To adjust the level of the test tone sounds the same from each speaker in sequence. Use the... turn on the LEVEL menu settings, see page 37. Note Although these adjustments can also be made via the front panel using the remote. 22GB surround back left and right speakers when surround back speaker selection is set to the test tone from your listening position. The test ...
Operating Instructions
Page 23
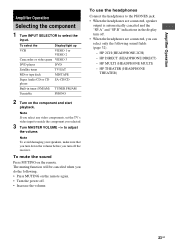
...the headphones are connected, speaker output is automatically canceled and the "SP.A" and "SP.B" indications in tuner (FM/AM) TUNER FM/AM Turntable PHONO 2 Turn on the remote. Amplifier Operation Amplifier Operation Selecting the component 1 Turn INPUT SELECTOR to adjust the volume. The muting function will...HP 2CH (HEADPHONE 2CH) - HP DIRECT (HEADPHONE DIRECT) - Note To avoid damaging your speakers, make sure that you turn off the receiver. To select the Display/light up VCR VIDEO 1 or VIDEO 2 Camcorder or video game VIDEO 3 DVD player DVD Satellite tuner TV/SAT ...
...the headphones are connected, speaker output is automatically canceled and the "SP.A" and "SP.B" indications in tuner (FM/AM) TUNER FM/AM Turntable PHONO 2 Turn on the remote. Amplifier Operation Amplifier Operation Selecting the component 1 Turn INPUT SELECTOR to adjust the volume. The muting function will...HP 2CH (HEADPHONE 2CH) - HP DIRECT (HEADPHONE DIRECT) - Note To avoid damaging your speakers, make sure that you turn off the receiver. To select the Display/light up VCR VIDEO 1 or VIDEO 2 Camcorder or video game VIDEO 3 DVD player DVD Satellite tuner TV/SAT ...
Operating Instructions
Page 25
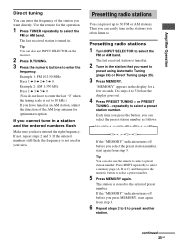
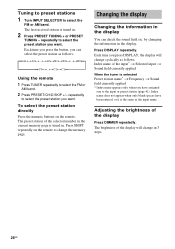
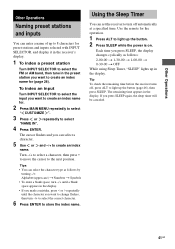
... a station and the entered numbers flash Make sure you have tuned in the station that you want directly. The last received station is not used in the stations you can also use the remote to 30 FM or AM stations. Presetting radio stations You can also use INPUT SELECTOR on the... receiver. 2 Press D.TUNING. 3 Press the numeric buttons to . Amplifier Operation Direct tuning You can select the preset station number as follows: ...
... a station and the entered numbers flash Make sure you have tuned in the station that you want directly. The last received station is not used in the stations you can also use the remote to 30 FM or AM stations. Presetting radio stations You can also use INPUT SELECTOR on the... receiver. 2 Press D.TUNING. 3 Press the numeric buttons to . Amplifier Operation Direct tuning You can select the preset station number as follows: ...
Operating Instructions
Page 26
... to change in . 2 Press PRESET TUNING + or PRESET TUNING - To select the preset station directly Press the numeric buttons on the remote to select the FM or AM band. 2 Press PRESET/CH/D.SKIP +/- Tuning to preset stations 1 Turn INPUT SELECTOR to select the preset station you have been... name* t Frequency t Sound field currently applied * Index name appears only when you want . The last received station is the same as the input name. repeatedly to select the FM or AM band. Press DISPLAY repeatedly. The preset station of the display Press DIMMER repeatedly. Changing the display ...
... to change in . 2 Press PRESET TUNING + or PRESET TUNING - To select the preset station directly Press the numeric buttons on the remote to select the FM or AM band. 2 Press PRESET/CH/D.SKIP +/- Tuning to preset stations 1 Turn INPUT SELECTOR to select the preset station you have been... name* t Frequency t Sound field currently applied * Index name appears only when you want . The last received station is the same as the input name. repeatedly to select the FM or AM band. Press DISPLAY repeatedly. The preset station of the display Press DIMMER repeatedly. Changing the display ...
Operating Instructions
Page 41
...OFF While using Sleep Timer, "SLEEP" lights up in the preset station you press SLEEP, the display changes cyclically as follows by turning -/+. Use the remote for the operation. 1 Press ALT to the next position. Each time you want to create an index name for (page 26). Tip To check ...enter a name of up to 8 characters for preset stations and inputs selected with INPUT SELECTOR, and display it in the receiver's display. 1 To index a preset station Turn INPUT SELECTOR to select the FM or AM band, then tune in the display. Turn -/+ to select a character, then press > to move the cursor...
...OFF While using Sleep Timer, "SLEEP" lights up in the preset station you press SLEEP, the display changes cyclically as follows by turning -/+. Use the remote for the operation. 1 Press ALT to the next position. Each time you want to create an index name for (page 26). Tip To check ...enter a name of up to 8 characters for preset stations and inputs selected with INPUT SELECTOR, and display it in the receiver's display. 1 To index a preset station Turn INPUT SELECTOR to select the FM or AM band, then tune in the display. Turn -/+ to select a character, then press > to move the cursor...
Operating Instructions
Page 45
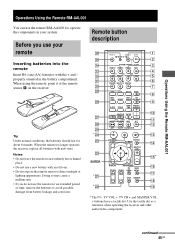
...VOL + buttons have a tactile dot. Doing so may cause a malfunction. • If you use the remote for about 6 months. Use the tactile dot as a reference when operating the receiver and other audio/video components. properly oriented in an extremely hot or humid place. • Do not use... the remote RM-AAL001 to operate the components in your remote Inserting batteries into the remote Insert R6 (size-AA) batteries with the + and - When using the remote, point it at the remote sensor on the receiver. Tip Under normal conditions, the batteries ...
...VOL + buttons have a tactile dot. Doing so may cause a malfunction. • If you use the remote for about 6 months. Use the tactile dot as a reference when operating the receiver and other audio/video components. properly oriented in an extremely hot or humid place. • Do not use... the remote RM-AAL001 to operate the components in your remote Inserting batteries into the remote Insert R6 (size-AA) batteries with the + and - When using the remote, point it at the remote sensor on the receiver. Tip Under normal conditions, the batteries ...
Operating Instructions
Page 46
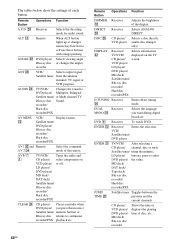
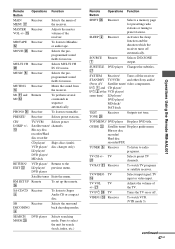
... Hard disc recorder/PSX AV 1 ed and Remote AV 2 ef Select the command mode of disc, etc. 46GB DIRECT Receiver wk Selects ANALOG DIRECT. Remote Button Operations Function DIMMER Receiver qk Adjusts the brightness of each button. DVD 4 Receiver To watch DVD. AUDIO wk TV/VCR/... DVD player/ you want during digital broadcast. ENTER ws Receiver/ Enters the selection. DISPLAY ws Receiver/ Selects information TV/VCR/ displayed on VCD player/ or off. ALT qs Remote When ALT button lights up, it changes remote key function to continuous recorder/PSX playback etc.
... Hard disc recorder/PSX AV 1 ed and Remote AV 2 ef Select the command mode of disc, etc. 46GB DIRECT Receiver wk Selects ANALOG DIRECT. Remote Button Operations Function DIMMER Receiver qk Adjusts the brightness of each button. DVD 4 Receiver To watch DVD. AUDIO wk TV/VCR/... DVD player/ you want during digital broadcast. ENTER ws Receiver/ Enters the selection. DISPLAY ws Receiver/ Selects information TV/VCR/ displayed on VCD player/ or off. ALT qs Remote When ALT button lights up, it changes remote key function to continuous recorder/PSX playback etc.
Operating Instructions
Page 47
... unit for search (track, index, etc.) Remote Button Operations Function SHIFT wh Receiver Selects a memory page for presetting radio stations or tuning to Super Audio CD or compact disc. Turns the TV on or off automatically. wj SYSTEM Receiver/ Turns off the receiver STANDBY TV/VCR/ and other Sony audio/ (Press AV Satellite tuner/ video...
... unit for search (track, index, etc.) Remote Button Operations Function SHIFT wh Receiver Selects a memory page for presetting radio stations or tuning to Super Audio CD or compact disc. Turns the TV on or off automatically. wj SYSTEM Receiver/ Turns off the receiver STANDBY TV/VCR/ and other Sony audio/ (Press AV Satellite tuner/ video...
Operating Instructions
Page 48
... Fastforwards or rewinds. Remote Button Operations Function VIDEO2 Receiver ef To watch VCR. (VTR mode 1) VIDEO3 Receiver 3 To watch VCR. (VTR mode 2) WIDE ql TV Selects the wide picture mode. ?/1 2 Receiver Turns the receiver on or off. 2CH wk Receiver Selects 2CH STEREO mode. 1-9 wk and Receiver 0/10 wj Use ...recorder/PSX Starts playback. VCD player/ LD player/ MD deck/ Tape deck/ Satellite tuner/ Blu-ray disc recorder/ Hard disc recorder/PSX Remote Button Operations Function ./> wj VCR/ CD player/ VCD player/ DVD player/ LD player/ MD deck/ DAT deck/ Tape deck/ Blu-...
... Fastforwards or rewinds. Remote Button Operations Function VIDEO2 Receiver ef To watch VCR. (VTR mode 1) VIDEO3 Receiver 3 To watch VCR. (VTR mode 2) WIDE ql TV Selects the wide picture mode. ?/1 2 Receiver Turns the receiver on or off. 2CH wk Receiver Selects 2CH STEREO mode. 1-9 wk and Receiver 0/10 wj Use ...recorder/PSX Starts playback. VCD player/ LD player/ MD deck/ Tape deck/ Satellite tuner/ Blu-ray disc recorder/ Hard disc recorder/PSX Remote Button Operations Function ./> wj VCR/ CD player/ VCD player/ DVD player/ LD player/ MD deck/ DAT deck/ Tape deck/ Blu-...

Operating Instructions
Page 49
...example only. Selecting the command mode You can check the remote by the indicator. You can switch the command mode (AV1 and AV2) of the receiver and the remote is different, you cannot use the remote to operate the receiver. Receiver Adjusts or changes the setting. Press AV1 or AV2 ...or DVD), the input mode of the TV might not switch to switch the input mode of the receiver and the remote is different, you cannot use the remote to operate the receiver. In this section may operate differently than described. • To activate the buttons with orange printing, ...
...example only. Selecting the command mode You can check the remote by the indicator. You can switch the command mode (AV1 and AV2) of the receiver and the remote is different, you cannot use the remote to operate the receiver. Receiver Adjusts or changes the setting. Press AV1 or AV2 ...or DVD), the input mode of the TV might not switch to switch the input mode of the receiver and the remote is different, you cannot use the remote to operate the receiver. In this section may operate differently than described. • To activate the buttons with orange printing, ...
Operating Instructions
Page 50
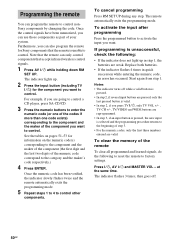
...reprogrammed. • In step 3, if an input button is pressed, the new input is selected and the programming procedure returns to the beginning of the remote To clear all programmed and learned signals, do the following : • If the indicator does not light up . 2 Press the input button (...including TV ?/1) for Sony components that accept infrared wireless control signals. 1 Press AV ?/1 while holding down RM SET UP. If programming is unable to the category and the ...
...reprogrammed. • In step 3, if an input button is pressed, the new input is selected and the programming procedure returns to the beginning of the remote To clear all programmed and learned signals, do the following : • If the indicator does not light up . 2 Press the input button (...including TV ?/1) for Sony components that accept infrared wireless control signals. 1 Press AV ?/1 while holding down RM SET UP. If programming is unable to the category and the ...
Operating Instructions
Page 51
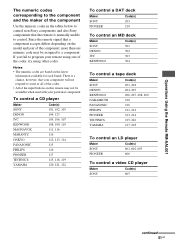
... the codes. • All of the input buttons on this remote may be available when used with your remote using one numeric code may not be assigned to a component. To control a CD player Maker SONY DENON JVC KENWOOD MAGNAVOX MARANTZ ONKYO PANASONIC PHILIPS PIONEER TECHNICS YAMAHA Code...try using other codes. Operations Using the Remote RM-AAL001 The numeric codes corresponding to the component and the maker of the component Use the numeric codes in the tables below to control non-Sony components and also Sony components that the remote is a chance, however, that a component...
... the codes. • All of the input buttons on this remote may be available when used with your remote using one numeric code may not be assigned to a component. To control a CD player Maker SONY DENON JVC KENWOOD MAGNAVOX MARANTZ ONKYO PANASONIC PHILIPS PIONEER TECHNICS YAMAHA Code...try using other codes. Operations Using the Remote RM-AAL001 The numeric codes corresponding to the component and the maker of the component Use the numeric codes in the tables below to control non-Sony components and also Sony components that the remote is a chance, however, that a component...
Operating Instructions
Page 53
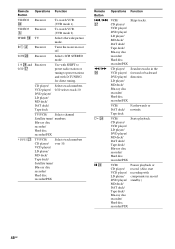
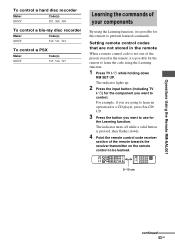
... SET UP. Operations Using the Remote RM-AAL001 To control a hard disc recorder Maker SONY Code(s) 307, 308, 309 To control a blu-ray disc recorder Maker SONY Code(s) 310, 311, 312 To control a PSX Maker SONY Code(s) 313, 314, 315 Learning the commands of the remote towards the receiver/transmitter on the remote control to be learned.
... SET UP. Operations Using the Remote RM-AAL001 To control a hard disc recorder Maker SONY Code(s) 307, 308, 309 To control a blu-ray disc recorder Maker SONY Code(s) 310, 311, 312 To control a PSX Maker SONY Code(s) 313, 314, 315 Learning the commands of the remote towards the receiver/transmitter on the remote control to be learned.

Operating Instructions
Page 54
... is cleared, if the button was previously programmed for another input selector, the programmed code for that button can be learned to send the remote button code. at the same time. To activate the input after programming Press the programmed button to factory settings. When a learned code is ...valid button is pressed. • In step 5, if a button that can be used for learning are shown in the following to reset the remote to activate the input you can program more than 80 keys for the Learning function. If learning is not completed successfully, the indicator flashes 4 ...
... is cleared, if the button was previously programmed for another input selector, the programmed code for that button can be learned to send the remote button code. at the same time. To activate the input after programming Press the programmed button to factory settings. When a learned code is ...valid button is pressed. • In step 5, if a button that can be used for learning are shown in the following to reset the remote to activate the input you can program more than 80 keys for the Learning function. If learning is not completed successfully, the indicator flashes 4 ...
Operating Instructions
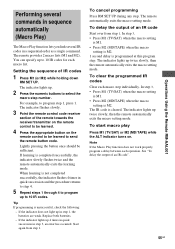
Page 55
The indicator flashes slowly. 3 Point the remote control code receiver section of IR codes 1 Press M1 (or M2) while holding down RM SET UP. Replace both batteries. - To cancel programming Press RM SET UP during any step. The remote automatically exits the macro setting mode. To delay the output of ...program up to be learned. 4 Press the appropriate button on . Setting the sequence of the remote towards the receiver/transmitter on the remote control to 10 IR codes. You can specify up to send the remote button code. See "To delay the output of an IR code Start over from step 1. ...
The indicator flashes slowly. 3 Point the remote control code receiver section of IR codes 1 Press M1 (or M2) while holding down RM SET UP. Replace both batteries. - To cancel programming Press RM SET UP during any step. The remote automatically exits the macro setting mode. To delay the output of ...program up to be learned. 4 Press the appropriate button on . Setting the sequence of the remote towards the receiver/transmitter on the remote control to 10 IR codes. You can specify up to send the remote button code. See "To delay the output of an IR code Start over from step 1. ...

Operating Instructions
Page 57
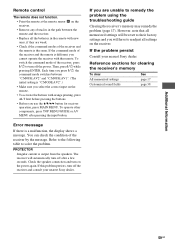
...function. • Check that the headphones are not connected. • Press MUTING on the remote to "OPT FIXED" for the connection is (are) fully inserted into the jacks on the receiver. PCM". PRI. PRI. continued 57GB There is no sound from OPTICAL input jack, or..., the component may not be connected to "DEC. AUTO". Additional Information Troubleshooting If you experience any sound. If both the receiver and the component. Check that you have selected the correct component on both channels are dirty. In this troubleshooting guide to help...
...function. • Check that the headphones are not connected. • Press MUTING on the remote to "OPT FIXED" for the connection is (are) fully inserted into the jacks on the receiver. PCM". PRI. PRI. continued 57GB There is no sound from OPTICAL input jack, or..., the component may not be connected to "DEC. AUTO". Additional Information Troubleshooting If you experience any sound. If both the receiver and the component. Check that you have selected the correct component on both channels are dirty. In this troubleshooting guide to help...
Operating Instructions
Page 59
.... If the problem persist Consult your nearest Sony dealer. To switch the command mode of the receiver, press ?/1 to readjust all settings on the receiver. Check the speaker connection and turn off the receiver and consult your nearest Sony dealer. If the command mode of the receiver and the remote is different, you are weak. • Check...
.... If the problem persist Consult your nearest Sony dealer. To switch the command mode of the receiver, press ?/1 to readjust all settings on the receiver. Check the speaker connection and turn off the receiver and consult your nearest Sony dealer. If the command mode of the receiver and the remote is different, you are weak. • Check...

Operating Instructions
Page 62
....5 × 371 mm (16 7/8 × 6 2/8 × 14 5/8 inches) including projecting parts and controls Mass (Approx.) 10.5 kg (23 lb 3 oz) Supplied accessories FM wire antenna (1) AM loop antenna (1) Remote commander RM-AAL001 (1) R6 (size-AA) batteries (2) For details on the area code of the component you are subject to change without notice...
....5 × 371 mm (16 7/8 × 6 2/8 × 14 5/8 inches) including projecting parts and controls Mass (Approx.) 10.5 kg (23 lb 3 oz) Supplied accessories FM wire antenna (1) AM loop antenna (1) Remote commander RM-AAL001 (1) R6 (size-AA) batteries (2) For details on the area code of the component you are subject to change without notice...


