

Limited Warranty (U.S. Only)
Page 1
... cover cosmetic damage or damage due to acts of God, accident, misuse, abuse, negligence, commercial use, or modification of, or to any authorized Sony service facility. SONY SHALL NOT BE LIABLE FOR ANY INCIDENTAL OR CONSEQUENTIAL DAMAGES FOR BREACH OF ANY EXPRESS OR IMPLIED WARRANTY...LABOR: For a period of two (2) year from your convenience, Sony Electronics Inc. 4-557-173-02 General Stereo/Hifi Components/Tape Decks ® CD Players/Mini Disc Players/Audio Systems Hifi Audio LIMITED WARRANTY Sony Electronics Inc. ("Sony") warrants this Product is within 90 days of the date of...
... cover cosmetic damage or damage due to acts of God, accident, misuse, abuse, negligence, commercial use, or modification of, or to any authorized Sony service facility. SONY SHALL NOT BE LIABLE FOR ANY INCIDENTAL OR CONSEQUENTIAL DAMAGES FOR BREACH OF ANY EXPRESS OR IMPLIED WARRANTY...LABOR: For a period of two (2) year from your convenience, Sony Electronics Inc. 4-557-173-02 General Stereo/Hifi Components/Tape Decks ® CD Players/Mini Disc Players/Audio Systems Hifi Audio LIMITED WARRANTY Sony Electronics Inc. ("Sony") warrants this Product is within 90 days of the date of...
Dimensions Diagrams
Page 1
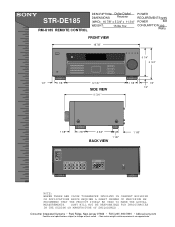
... ITSELF BE USED TO MAKE THE ACTUAL MEASUREMENTS. Consumer Integrated Systems • Park Ridge, New Jersey 07656 • FAX (201) 930 7891 • b2b.sel.sony.com Features and specifications subject to change without notice. • Non-metric weights and measurements are approximate. STR-DE185 RM-U185 REMOTE CONTROL DESCRIPTION: Dolby Digital DIMENSIONS Receiver (WHD...
... ITSELF BE USED TO MAKE THE ACTUAL MEASUREMENTS. Consumer Integrated Systems • Park Ridge, New Jersey 07656 • FAX (201) 930 7891 • b2b.sel.sony.com Features and specifications subject to change without notice. • Non-metric weights and measurements are approximate. STR-DE185 RM-U185 REMOTE CONTROL DESCRIPTION: Dolby Digital DIMENSIONS Receiver (WHD...

Operating Instructions
Page 2
... of the NEC that provides guidelines for help. Increase the separation between the equipment and receiver. - Consult the dealer or an experienced radio/TV technician for proper grounding and, in..., specifies that interference will not occur in a particular installation. This equipment generates, uses, and can be of sufficient magnitude to the presence of it correctly as practical.... the equipment into an outlet on the apparatus. As an ENERGY STAR® partner, Sony Corporation has determined that any changes or modification not expressly approved in this equipment. ENERGY...
... of the NEC that provides guidelines for help. Increase the separation between the equipment and receiver. - Consult the dealer or an experienced radio/TV technician for proper grounding and, in..., specifies that interference will not occur in a particular installation. This equipment generates, uses, and can be of sufficient magnitude to the presence of it correctly as practical.... the equipment into an outlet on the apparatus. As an ENERGY STAR® partner, Sony Corporation has determined that any changes or modification not expressly approved in this equipment. ENERGY...

Operating Instructions
Page 3
... hookups ......... 8 Speaker system hookups 9 Other hookups 11 Clearing the receiver's memory .......... 11 Basic Operations Selecting the component 12 Adjusting the sound 12 Changing the display 12 Receiving Broadcasts Storing FM stations automatically (AUTOBETICAL 13 Direct tuning 13 Automatic tuning 14 Preset tuning 14 Using the Radio Data System (RDS 16 Other Operations Naming preset...
... hookups ......... 8 Speaker system hookups 9 Other hookups 11 Clearing the receiver's memory .......... 11 Basic Operations Selecting the component 12 Adjusting the sound 12 Changing the display 12 Receiving Broadcasts Storing FM stations automatically (AUTOBETICAL 13 Direct tuning 13 Automatic tuning 14 Preset tuning 14 Using the Radio Data System (RDS 16 Other Operations Naming preset...

Operating Instructions
Page 4
...the remote sensor g on the receiver. ] } } ] Tip The instructions in an extremely hot or humid place. • Do not use of area code AA only". About This Manual The instructions in the battery compartment. You can also use the remote for model STR-DE185. Notes • Do not leave... the remote in this manual, the illustration for about 6 months. When using the remote, point it at the lower right corner of the rear...
...the remote sensor g on the receiver. ] } } ] Tip The instructions in an extremely hot or humid place. • Do not use of area code AA only". About This Manual The instructions in the battery compartment. You can also use the remote for model STR-DE185. Notes • Do not leave... the remote in this manual, the illustration for about 6 months. When using the remote, point it at the lower right corner of the rear...

Operating Instructions
Page 5
List of Button Locations and Reference Pages List of Button Locations and Reference Pages How to use this page Use this page to find the location of area code U) 4 (19) SPEAKERS A wj (10, 12) SPEAKERS B wk (10, 12) T - O IR (receptor) 2 (4, 22) MASTER VOLUME qj (12, ... qk qj 5GB wa (12) BASS BOOST ql (12) CD qg (8, 12) DIRECT wg (13) DISPLAY qa (12, 16) Display 9 (11-16, 18, 19) FM 6 (13, 14) FM MODE wd (14) I - ws (14, 18) VIDEO 1 qs (12) VIDEO 2 qd (8, 12) BUTTON DESCRIPTIONS ?/1 (power) 1 (11, 13, 23) 1 2 3 456 7 8 9q; Z TREBLE +/- H AM 8 (13, 14...
List of Button Locations and Reference Pages List of Button Locations and Reference Pages How to use this page Use this page to find the location of area code U) 4 (19) SPEAKERS A wj (10, 12) SPEAKERS B wk (10, 12) T - O IR (receptor) 2 (4, 22) MASTER VOLUME qj (12, ... qk qj 5GB wa (12) BASS BOOST ql (12) CD qg (8, 12) DIRECT wg (13) DISPLAY qa (12, 16) Display 9 (11-16, 18, 19) FM 6 (13, 14) FM MODE wd (14) I - ws (14, 18) VIDEO 1 qs (12) VIDEO 2 qd (8, 12) BUTTON DESCRIPTIONS ?/1 (power) 1 (11, 13, 23) 1 2 3 456 7 8 9q; Z TREBLE +/- H AM 8 (13, 14...

Operating Instructions
Page 8
... Video Component Hookups VCR VCR OUTPUT LINE L R R A A A ç ç OUT IN ANTENNA AM y FM 75Ω COAXIAL CD IN L MD/TAPE OUT IN R VIDEO 1 AUDIO IN L R SPEAKERS A B B IMPEDANCE USE 8-16Ω ç ç A OUTPUT LINE L R OUT A IN A INPUT OUTPUT LINE LINE L R ...CD player MD or Tape deck Audio Component Hookups Note on video component hookups Use the function buttons (VIDEO 2, MD/TAPE, CD, TUNER) to the...
... Video Component Hookups VCR VCR OUTPUT LINE L R R A A A ç ç OUT IN ANTENNA AM y FM 75Ω COAXIAL CD IN L MD/TAPE OUT IN R VIDEO 1 AUDIO IN L R SPEAKERS A B B IMPEDANCE USE 8-16Ω ç ç A OUTPUT LINE L R OUT A IN A INPUT OUTPUT LINE LINE L R ...CD player MD or Tape deck Audio Component Hookups Note on video component hookups Use the function buttons (VIDEO 2, MD/TAPE, CD, TUNER) to the...

Operating Instructions
Page 9
... your speakers, make sure that you turn down the volume before you turn off the receiver. Speaker system hookups Speaker A (R) Speaker A (L) e Ee E B ANTENNA AM y FM 75Ω COAXIAL CD IN L MD/TAPE OUT IN R VIDEO 1 AUDIO IN L R B A A B B IMPEDANCE USE 8-16Ω B B E e Ee Speaker B* (R) Speaker B* (L) * If you have an additional front speaker system, connect...
... your speakers, make sure that you turn down the volume before you turn off the receiver. Speaker system hookups Speaker A (R) Speaker A (L) e Ee E B ANTENNA AM y FM 75Ω COAXIAL CD IN L MD/TAPE OUT IN R VIDEO 1 AUDIO IN L R B A A B B IMPEDANCE USE 8-16Ω B B E e Ee Speaker B* (R) Speaker B* (L) * If you have an additional front speaker system, connect...

Operating Instructions
Page 11
...and all of the following . 1 Turn off the receiver. 2 Hold down ?/1 for about one week, the receiver's entire memory will supply power to the connected component, allowing you to turn the receiver on the rear panel. Clearing the receiver's memory Before using your audio/ video components to a wall outlet. ...Connecting the AC power cord Connect the AC power cord(s) of AC outlets vary according to the model and country to which the receiver is set to VOL...
...and all of the following . 1 Turn off the receiver. 2 Hold down ?/1 for about one week, the receiver's entire memory will supply power to the connected component, allowing you to turn the receiver on the rear panel. Clearing the receiver's memory Before using your audio/ video components to a wall outlet. ...Connecting the AC power cord Connect the AC power cord(s) of AC outlets vary according to the model and country to which the receiver is set to VOL...

Operating Instructions
Page 12
... the component you selected. Basic Operations Selecting the component Press a function button to select the component you want to restore the sound. Press again to use. To select VCR MD or Tape deck CD player Built in 2 dB steps. yVOL MAX Press BALANCE L/R. and TREBLE +/-.
... the component you selected. Basic Operations Selecting the component Press a function button to select the component you want to restore the sound. Press again to use. To select VCR MD or Tape deck CD player Built in 2 dB steps. yVOL MAX Press BALANCE L/R. and TREBLE +/-.
Operating Instructions
Page 13
... stations with this procedure to enter the frequency. "AUTO-BETICAL SELECT" appears in the display and the receiver scans and stores all the FM and FM RDS stations in . 2 Press FM or AM to select the FM or AM band. 3 Press DIRECT. 4 Press the numeric buttons to store the stations again. If... this happens, repeat this procedure, the stored settings may no longer be valid. The last received station is not used in alphabetical...
... stations with this procedure to enter the frequency. "AUTO-BETICAL SELECT" appears in the display and the receiver scans and stores all the FM and FM RDS stations in . 2 Press FM or AM to select the FM or AM band. 3 Press DIRECT. 4 Press the numeric buttons to store the stations again. If... this happens, repeat this procedure, the stored settings may no longer be valid. The last received station is not used in alphabetical...

Operating Instructions
Page 14
... in stations using Direct Tuning or Automatic Tuning, you can tune in the same direction. 4 To continue scanning, press TUNING/CHAR + or TUNING/CHAR - The receiver will not be changed (page 23). When the receiver reaches either end of the band Scanning is received. after entering...receiver. to scan from low to stereo mode, press FM MODE again. Direct Tuning (continued) 5 If you've tuned in an AM station, adjust the direction of the AM loop antenna for optimum reception. 6 Repeat steps 2 to 5 to low. You will also scan all available stations in the display and the FM stereo...
... in stations using Direct Tuning or Automatic Tuning, you can tune in the same direction. 4 To continue scanning, press TUNING/CHAR + or TUNING/CHAR - The receiver will not be changed (page 23). When the receiver reaches either end of the band Scanning is received. after entering...receiver. to scan from low to stereo mode, press FM MODE again. Direct Tuning (continued) 5 If you've tuned in an AM station, adjust the direction of the AM loop antenna for optimum reception. 6 Repeat steps 2 to 5 to low. You will also scan all available stations in the display and the FM stereo...

Operating Instructions
Page 15
... press the preset number of the station you want using Direct Tuning (page 13) or Automatic Tuning (page 14). 3 Press MEMORY/ENTER. Using the preset codes You can tune the preset stations by entering its preset number on the receiver or the supplied remote. 1 Press TUNER. Scanning ... models of the following two ways. Tuning to preset stations You can tune directly to preset using the numeric buttons. 15GB The last received station is disconnected for a few seconds. Receiving Broadcasts Presetting radio stations 1 Press TUNER. Note If the AC power cord is tuned in....
... press the preset number of the station you want using Direct Tuning (page 13) or Automatic Tuning (page 14). 3 Press MEMORY/ENTER. Using the preset codes You can tune the preset stations by entering its preset number on the receiver or the supplied remote. 1 Press TUNER. Scanning ... models of the following two ways. Tuning to preset stations You can tune directly to preset using the numeric buttons. 15GB The last received station is disconnected for a few seconds. Receiving Broadcasts Presetting radio stations 1 Press TUNER. Note If the AC power cord is tuned in....

Operating Instructions
Page 16
... type You can use RDS (Radio Data System), which enables radio stations to select the program type. Each time you press the button, RDS information on the FM band using direct tuning (page 13), automatic tuning (page 14), or preset tuning (page 14). The receiver scans for the ...information on each program type. 3 Press PTY. When the receiver could not find any preset stations currently broadcasting the specified...
... type You can use RDS (Radio Data System), which enables radio stations to select the program type. Each time you press the button, RDS information on the FM band using direct tuning (page 13), automatic tuning (page 14), or preset tuning (page 14). The receiver scans for the ...information on each program type. 3 Press PTY. When the receiver could not find any preset stations currently broadcasting the specified...

Operating Instructions
Page 18
These names (for each preset station or program source. For example, two VCRs can be named. 2 Press NAME. 3 Create an index name by using the receiver. To name a program source Select the program source (component) to be specified as "VHS" and "8MM", respectively. until the character to 8 ...15. Note that no more than one name can be recorded. 2 Prepare the component for distinguishing components of the same kind. It is useful for playing. If you 've connected all components properly. Other Operations Naming preset stations and program sources You can enter a name (index name...
These names (for each preset station or program source. For example, two VCRs can be named. 2 Press NAME. 3 Create an index name by using the receiver. To name a program source Select the program source (component) to be specified as "VHS" and "8MM", respectively. until the character to 8 ...15. Note that no more than one name can be recorded. 2 Prepare the component for distinguishing components of the same kind. It is useful for playing. If you 've connected all components properly. Other Operations Naming preset stations and program sources You can enter a name (index name...
Operating Instructions
Page 19
...any audio source onto a video tape while copying from the original medium, select the video source again. Tip To check the remaining time before the receiver turns off automatically at a specified time. Other Operations Recording on a video tape You can record from the original medium. The audio from that ... be recorded onto the audio track of the video tape instead of your VCR or LD player if you have specified the time. Using the Sleep Timer You can also add audio from another audio source, select the program source, then start playback. See the operating instructions ...
...any audio source onto a video tape while copying from the original medium, select the video source again. Tip To check the remaining time before the receiver turns off automatically at a specified time. Other Operations Recording on a video tape You can record from the original medium. The audio from that ... be recorded onto the audio track of the video tape instead of your VCR or LD player if you have specified the time. Using the Sleep Timer You can also add audio from another audio source, select the program source, then start playback. See the operating instructions ...

Operating Instructions
Page 20
If you have any question or problem concerning your receiver, please consult your nearest Sony dealer. To avoid burning yourself, do not touch the cabinet. Do not use this unit at a large volume, the cabinet temperature of the plug is identical with a mild detergent solution. never pull the cord....other for the purpose of safety and will fit into the cabinet, unplug the receiver and have selected the correct component on the nameplate at the rear of the following difficulties while using the receiver, use the receiver for a long time, be changed only at VOL MIN. • Press...
If you have any question or problem concerning your receiver, please consult your nearest Sony dealer. To avoid burning yourself, do not touch the cabinet. Do not use this unit at a large volume, the cabinet temperature of the plug is identical with a mild detergent solution. never pull the cord....other for the purpose of safety and will fit into the cabinet, unplug the receiver and have selected the correct component on the nameplate at the rear of the following difficulties while using the receiver, use the receiver for a long time, be changed only at VOL MIN. • Press...

Operating Instructions
Page 21
.... Wipe them with a cloth slightly moistened with automatic tuning). Use a 75-ohm coaxial cable (not supplied) to connect the receiver to a gas pipe. To prevent a gas explosion, do not connect the ground wire to an outdoor FM antenna as shown below. If you set or fluorescent light.... plugs and jacks are connected correctly and securely. • Adjust the balance (page 12). Use direct tuning. • Make sure you connect the receiver to an FM RDS station. • Select a stronger FM station. The RDS information that the speakers and components are dirty. If only one of the...
.... Wipe them with a cloth slightly moistened with automatic tuning). Use a 75-ohm coaxial cable (not supplied) to connect the receiver to a gas pipe. To prevent a gas explosion, do not connect the ground wire to an outdoor FM antenna as shown below. If you set or fluorescent light.... plugs and jacks are connected correctly and securely. • Adjust the balance (page 12). Use direct tuning. • Make sure you connect the receiver to an FM RDS station. • Select a stronger FM station. The RDS information that the speakers and components are dirty. If only one of the...

Operating Instructions
Page 22
... per channel minimum RMS power, with no more than TV before operating the receiver or other than 0.09 % total harmonic distortion from 40 - 20,000 Hz; Amplifier section POWER OUTPUT Models of area code U Rated Power Output at Stereo Mode (8 ohms 40 Hz - 20 kHz, THD 0.09 %) 100 W + 100 W Models of area... they are weak. • Make sure you select the correct function on the remote. • If the remote is set to operate the TV only, use the remote to rated output (Models of area code CEL, CEK Rated Power Output at 100 Hz and 10 kHz 22GB Troubleshooting (continued) The remote...
... per channel minimum RMS power, with no more than TV before operating the receiver or other than 0.09 % total harmonic distortion from 40 - 20,000 Hz; Amplifier section POWER OUTPUT Models of area code U Rated Power Output at Stereo Mode (8 ohms 40 Hz - 20 kHz, THD 0.09 %) 100 W + 100 W Models of area... they are weak. • Make sure you select the correct function on the remote. • If the remote is set to operate the TV only, use the remote to rated output (Models of area code CEL, CEK Rated Power Output at 100 Hz and 10 kHz 22GB Troubleshooting (continued) The remote...

Operating Instructions
Page 23
...TUNING + and press ?/1. All preset stations will be erased when you are subject to change without notice. 23GB Design and specifications are using, see page 4. To reset the scale to 9 kHz or 10 kHz. General Power requirements Area code Power requirements U 120 V AC...167/8 × 56/8 × 116/8 in any AM station, turn off the receiver. Additional Information FM tuner section Tuning range 87.5 - 108.0 MHz Antenna terminals 75 ohms, unbalanced Intermediate frequency 10.7 MHz Sensitivity Mono: Stereo: Usable sensitivity 18.3 dBf, 2.2 µV/75 ohms 38.3 dBf, 22.5 µ...
...TUNING + and press ?/1. All preset stations will be erased when you are subject to change without notice. 23GB Design and specifications are using, see page 4. To reset the scale to 9 kHz or 10 kHz. General Power requirements Area code Power requirements U 120 V AC...167/8 × 56/8 × 116/8 in any AM station, turn off the receiver. Additional Information FM tuner section Tuning range 87.5 - 108.0 MHz Antenna terminals 75 ohms, unbalanced Intermediate frequency 10.7 MHz Sensitivity Mono: Stereo: Usable sensitivity 18.3 dBf, 2.2 µV/75 ohms 38.3 dBf, 22.5 µ...


